Harley Davidson 2010 Softail Models. Service manual - page 10
CLUTCH CONTROL
REMOVAL
1. Loosen clutch adjuster so clutch cable is fully slack. See 1.11
CLUTCH.
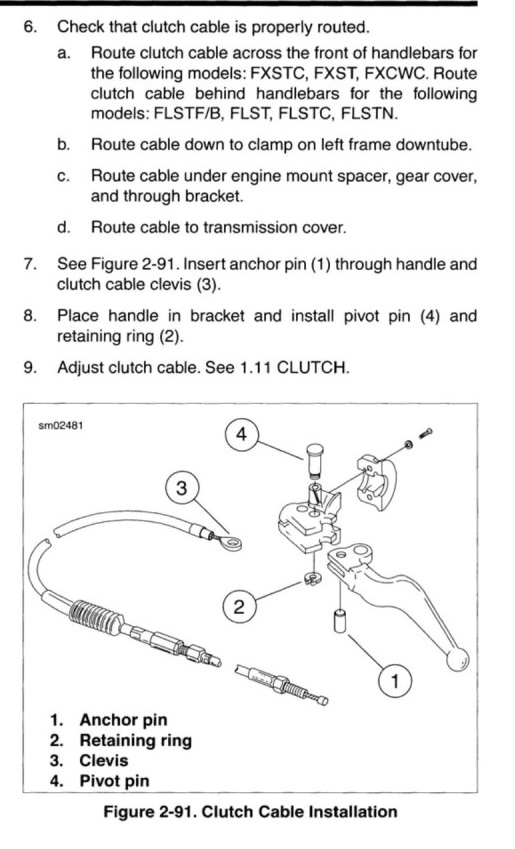
2. See Figure 2-91. Remove the retaining ring (2) and pivot pin (4).
Remove the clutch cable anchor pin (1) from the hand lever.
Awarning
Wear safety glasses or goggles when removing or
installing retaining rings. Retaining rings can slip from the
pliers and could be propelled with enough force to cause
serious eye injury. (00312a)
3. Drain transmission lubricant and remove fill plug dipstick. Remove
transmission side cover. See 6.5 CLUTCH RELEASE COVER.
4. See Figure 2-92. Note position of retaining ring (1) opening.
Retaining ring opening must be positioned in approximately the same
location during assembly. Remove retaining ring.
5. Pull inner ramp (2) and ramp coupling (3) out of side cover. Hold
inner and outer ramps together to keep balls from falling free.
6. Rotate the inner ramp to a position which will allow the coupling to
be disconnected from the inner ramp lever arm. Disconnect coupling from
inner ramp. Disconnect cable end (4) from coupling.
7. Back out threaded cable fitting (5) from side cover.
INSTALLATION
1. See Figure 2-92. Install new о-ring on end of clutch cable threads.
Apply a drop of Loctite Threadlocker 243 (blue) to clutch cable fitting
and screw fitting into clutch release cover. Do not tighten at this
time.
2. Connect cable end to ramp coupling (3). Rotate ramps for best access
and install coupling on inner ramp (2). Place ramp assembly in position
in side cover.
AwARNING
Wear safety glasses or goggles when removing or installing retaining
rings. Retaining rings can slip from the pliers and could be propelled
with enough force to cause serious eye injury. (00312a)
3. Install retaining ring (1). Position retaining ring opening to the
right of the outer ramp tang (the stop that prevents rotation).
4. Place new gasket on side cover and install, fully tightening the
clutch cable fitting. See 6.5 CLUTCH RELEASE COVER.
5. Place a few drops of oil inside cable housing.
NOTE
Anchor pin does not require lubrication.