Geely Emgrand X7. Manual part - 112


  Главная      Geely     Geely Emgrand X7 - Manual


поиск по сайту            


содержание   ..    111  112  113  ..


Geely Emgrand X7. Manual part - 112
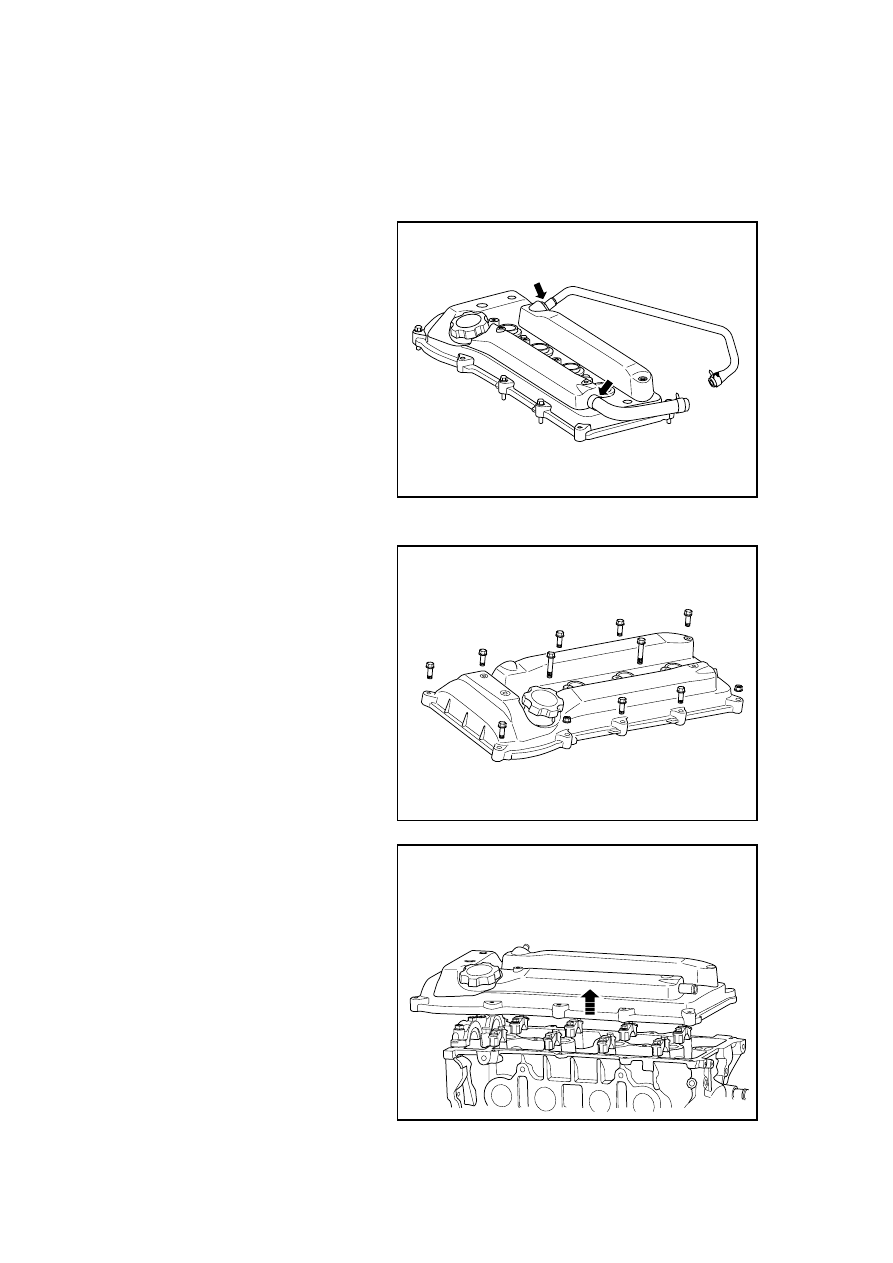


2.6.8.2 Replacement of Cylinder Hood Cover 

Warning: refer to "warning of battery disconnection" in "warnings and precautions". 

Dismantlement Procedure 

1.  Disconnect the battery negative 

electrode cable. Refer to 2.12.6.1 
Battery Disconnection. 

2.  Refer to 2.6.8.1 "Replacement of 

Plastic Shield of Engine" to 
dismantle the engine shied. 

3.  Dismantle ignition coil and 

ignition guide wire, refer to“2 . 
10.7.3ignition coil 
replacement ” . 

4.  Dismantle forced venting pipe of 

crankshaft 

5. Dismantle  the  crankcase 

ventilation tube . 

GC02-0010c

6.  Dismantle cylinder hood cover 

bolts and nuts. 

GC02-0011c

7.  Remove the cylinder hood cover.

GC02-0012c

447

8. Dismantle the cylinder hood cover 

seal gasket from the cylinder 
hood cover. 

GC02-0011c

Installation Procedure: 

1.  Install the cylinder hood cover 

gasket. 

2.  Apply sealant evenly in the 

cylinder hood gasket. 

3.  Install the cylinder hood cover. 

4.  Tighten the cylinder hood cover 

bolts. 

Note: When tightening, tighten a 
single bolt several times, in 
accordance with the specified torque.

Short Bolts: 

Torque: 10-12 N.m (Metric)   

Long Bolts, Nuts, Special Bolts: 

Torque: 10-12 N.m (Metric) 

GC02-0013c

5.  Install the forced ventilation 

rubber hose of the crankcase. 

6.  Install the crankcase ventilation 

vacuum tube. 

7.  Install the ignition coil and 

ignition wire. 

8.  Install the plastic shield of 

engine. 

9.  Connect battery negative cable. 

GC02-0010c

448

2.6.8.3 Replacement of Drive Belt 

Dismantlement Procedure 

Warning: Refer to "Warning on 
Battery Disconnection" in "Warning 
and Precautions". 

1.  Disconnect the battery negative 

electrode cable. Refer to 2.12.6.1 
Battery Disconnection. 

Rotate the drive belt tensioner 
anti-clockwise with a wrench to 
remove the drive belt. 

Note: In the removal process, prevent 
the wrench slipping causing injury to 
the operator.
 

GC02-0015c

Installation Procedure: 

1.  Wrap the drive belt as shown. 

2.  Rotate the drive belt tensioner 

clockwise with a wrench to 
install the drive belt. 

3.  Release drive belt tensioner to 

normal position. 

Important precaution : Before 
releasing the tensioner device, 
confirm the drive belt aligned with 
drive pulley groove, otherwise the 
drive belt may be damaged. 

4.  Connect battery negative cable. 

GC02-0014c


449

2.6.8.4 Replacement of Drive Belt Tensioner 

Dismantlement Procedure 

1.  Disconnect the battery negative 

electrode cable. Refer to 2.12.6.1 
Battery Disconnection. 

2.  Refer to 2.6.8.1 "Replacement of 

Plastic Shield of Engine" to 
dismantle the engine shied. 

3.  Refer to 2.6.8.3 "Replacement of 

Drive Belt" to dismantle the drive 
belt. 

4.  Dismantle the fixing bolts at the 

end of drive belt tensioner 
hydraulic unit. 

FE02-3019b

5.  Dismantle the fixing bolts of 

drive belt tensioner pulley 
bracket. 

FE02-3020b

Installation Procedure: 

1. Install drive belt tensioner 

support fixing bolt. 

Torque :60N. m(Metric) 44 . 
28lb-ft(English system) 

2.  Install hydraulic unit end of drive 

belt tensioner Fixing Bolts 

Torque: 32 Nm (Metric) 23.62 lb-ft 
(English system) 

3.  Install the drive belt. 

4.  Install the engine hood. 

5.  Connect battery negative cable. 

FE02-3020b

450


содержание   ..    111  112  113  ..