Freightliner Cascadia. Manual - part 11
 

  Index      Freightliner     Freightliner Cascadia - service manual


Search            


Content   ..  9  10  11  12   ..


Freightliner Cascadia. Manual - part 11


cation, such as Detroit Synth 75W-90. Using lubri-
cant that does not comply with this specification
will result in damage to the transmission. The oil
part number can be found in module 348 in
PartsPro.

6.

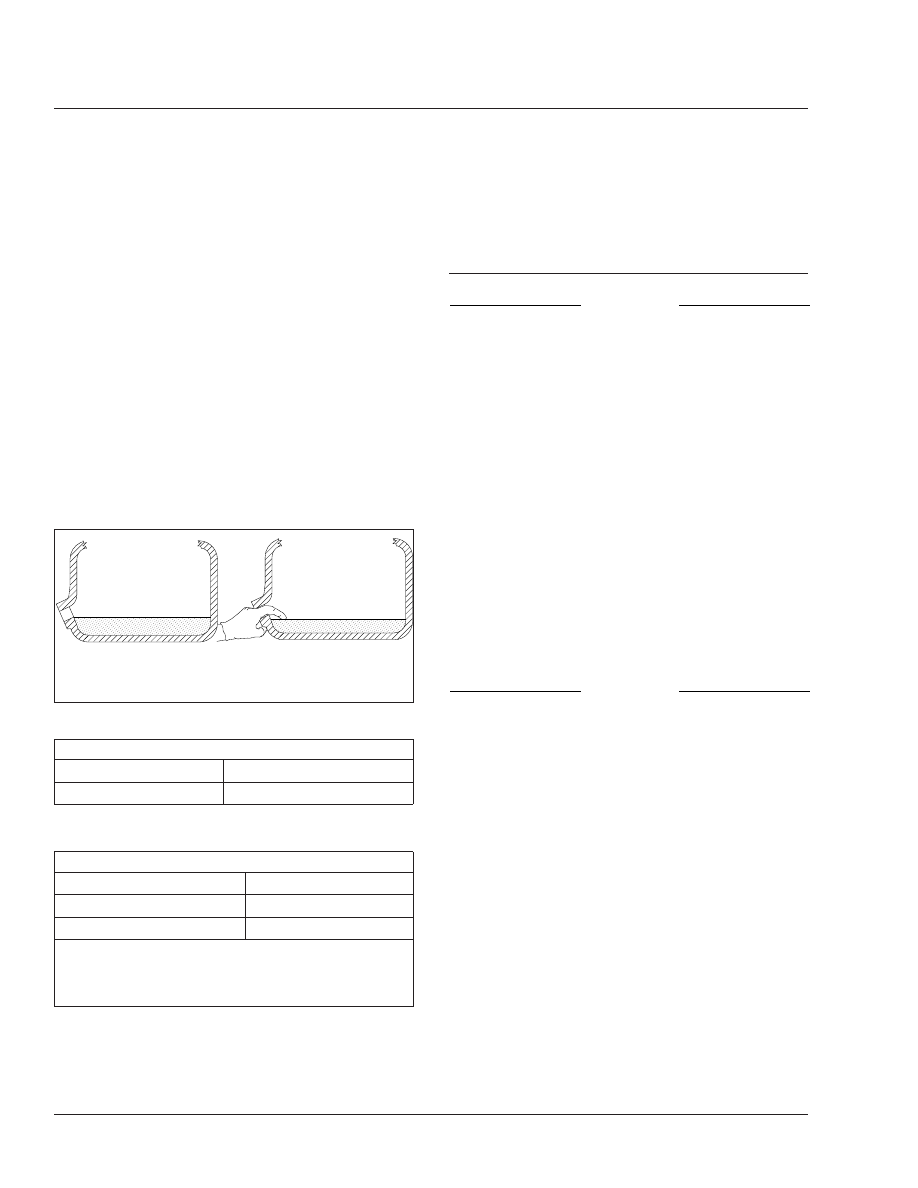
Add fluid until it is level with the lower edge of
the fill opening; see

Fig. 3

See

Table 1

for ap-

proved transmission lubricants, and

Table 2

for

transmission lubricant capacities.

NOTE: In all cases, the correct fluid level is es-
tablished by checking at the fill opening.

7.

Operate the engine for five minutes after filling
the transmission, then check the fluid level again.

8.

Install a new seal on the fill plug, then install the
plug and tighten it 45 lbf·ft (60 N·m).

9.

Operate the vehicle to check for correct
operation.

Detroit Transmission Lubricant

Specification

Example

MB 235.11

Detroit Synth 75W-90

Table 1, Detroit Transmission Lubricant

Detroit Transmission Lubricant Capacities

Transmission Size

Refill Capacity

*

: qt (L)

Small

10.7 (10.1)

Large

15.4 (14.6)

NOTE: Transmission size is represented by the sixth digit
of the model name. An "A" indicates a large transmission,
and "B" indicates a small transmission. For example, a
DT12-DA-1550 is a large transmission.

*

Quantities listed are approximate. Fill transmission until lubricant is level

with bottom of fill hole with vehicle in normal operating position.

Table 2, Detroit Transmission Lubricant Capacities

26–02 Detroit

Automated

Transmission Fluid
Level Inspection

NOTICE

Operating a transmission with the fluid level
higher or lower than recommended can result in
transmission damage. Do not overfill the transmis-
sion. Overfilling will force fluid out of the case
through the main shaft openings.

Do not mix types or brands of fluid, because of
possible incompatibility. Do not use fluid addi-
tives, friction modifiers, or extreme-pressure gear
fluids.

With the transmission at operating temperature, and
the vehicle on a level surface, check the fluid level in
the transmission.

1.

Clean the area around the fill plug, then remove
it from the side of the gear case.

2.

Using your finger or a bent pipe cleaner, see if
the fluid is level with the fill opening. See

Fig. 3

.

3.

If the fluid level is low, check the transmission for
leaks, and correct as needed.

NOTICE

Detroit transmissions use synthetic lubricant that
meets the requirements of the MB 235.11 specifi-
cation, such as Detroit Synth 75W-90. Using lubri-
cant that does not comply with this specification
will result in damage to the transmission. The oil
part number can be found in module 348 in
PartsPro.

4.

If needed, add the recommended fluid until it is
level with the lower edge of the fill opening. See

Table 1

for approved transmission lubricants.

5.

Clean the fill plug and install a new seal on it.
Install the plug in the side of the gear case, then
tighten it 45 lbf·ft (60 N·m).

f260006c

11/30/2010

A

B

A. Full

B. Low

Fig. 3, Checking Transmission Fluid Level

Transmission

26

26/2

26–03 Detroit

Automated

Transmission Air Filter
Replacement

NOTE: The information in this MOP only applies
if the vehicle is equipped with a transmission air
filter.

1.

Park the vehicle on a level surface, shut down
the engine, and set the parking brake. Chock the
tires.

2.

Drain the main air system and the isolated trans-
mission reserve air tank. See

Fig. 4

.

3.

Remove the air filter canister, located between
the main air system and the transmission reserve
air tank. See

Fig. 5

.

4.

Remove and discard the air filter.

5.

Install a new air filter.

6.

Install the air filter canister.

7.

Start the engine and charge the air system.

26–04 Eaton Fuller

Transmission Fluid
Change and Magnetic
Plug Cleaning

NOTE: Information in this MOP applies to Eaton
Fuller manual and automated transmissions.
Fluid change intervals are extended to 500,000
miles (800 000 km) on any vehicles filled with
synthetic transmission fluid.

NOTICE

Operating a transmission with the fluid level
higher or lower than recommended can result in
transmission damage. Do not overfill the transmis-

09/04/2012

f261445

1

2

3

4

1.

Transmission

2.

Air Supply to Transmission

3.

Transmission Reserve Air Tank

4.

Air Supply to Reserve Air Tank

Fig. 4, Isolated Transmission Reserve Air Tank (typical

installation)

01/08/2013

f261450

1

2

3

4

5

1.

RH Frame Rail

2.

Air Filter Canister

3.

Air Inlet Hose

4.

Air Outlet Hose

5.

5-Piece Crossmember

Fig. 5, Detroit Transmission Air Filter (typical

installation)

Transmission

26

26/3

sion. Overfilling will force fluid out of the case
through the main shaft openings.

Do not mix types or brands of fluid, because of
possible incompatibility. Do not use fluid addi-
tives, friction modifiers, extreme-pressure gear
fluids, or multiviscosity lubricants.

IMPORTANT: Drain the transmission when the
fluid is warm. If not already warm, run the en-
gine until the transmission fluid reaches operat-
ing temperature. Shift the transmission to neu-
tral (N) and shut down the engine.

1.

Apply the parking brakes, and chock the rear
tires. Place a large drain pan under the transmis-
sion.

2.

Clean the area around the fill plug, and remove it
from the side of the gear case. Remove each
drain plug from the bottom of the case.

3.

Clean the fill and drain plugs. For magnetic
plugs, use a piece of key stock or any other con-
venient steel slug to short the two magnetic
poles and divert the magnetic field.

4.

Install each drain plug and tighten them 50 lbf·ft
(68 N·m).

NOTE: For an Eaton Fuller transmission, the
optional transmission fluid filter is a remote-
mount, spin-on type, and is located between the
transmission and the fluid cooler. The filter
bracket is attached to the frame rail or some
other nearby location. The filter is mounted in a
vertical position, and should be filled with fluid
before installation to assure the proper fluid
level. For optimum transmission performance,
change the filter each time that the fluid is
changed.

5.

For an Eaton Fuller transmission equipped with a
transmission fluid filter(s), replace the fluid fil-
ter(s) as follows:

5.1

Place a drain pan under the transmission
fluid filter.

CAUTION

To prevent skin burns from hot transmission fluid,
wear protective gloves when removing the filter.

5.2

Place a strap or chain wrench around the
filter canister, and rotate it in a counter-

clockwise motion to separate the filter
from the mounting. Carefully spin the filter
off the mount and remove it from the ve-
hicle.

5.3

Apply a light coat of transmission fluid to
the O-ring gasket on the new filter. Fill the
filter with specified transmission fluid, and
spin the filter onto the mount.

NOTE: The filter fills slowly, so be patient to
ensure the proper fluid level has been set.

5.4

Once the filter makes contact with the
mount, use a strap wrench to rotate the
canister an additional 180 to 270 degrees
to firmly tighten the filter. Wipe the filter
clean of any fluid after it is tightened.

6.

Add fluid until it is level with the lower edge of
the fill opening. See

Fig. 3

If the transmission

has two fill openings, add fluid to the level of
both openings. See

Table 3

for approved trans-

mission lubricants, and

Table 4

for transmission

lubricant capacities.

For more information and a complete listing of
approved lubricants, refer to the Eaton website,

www.roadranger.com

.

Eaton Approved Manual and Automated

Transmission Lubricants

Lubricant Type

*

Temperature

SAE

Viscosity

Synthetic transmission
lubricant meeting Eaton PS-
386 lubricant specification

All

*

Do not mix types or brands of lubricant.

Table 3, Eaton Approved Manual and Automated

Transmission Lubricants

Eaton Fuller Transmission Lubricant Capacities

Transmission Model

Refill Capacity: qt (L)

7-Speed T Series

All Models

18.0 (17.0)

All 9-Speed Series

All Models

13.5 (12.8)

All 10-Speed Manual (except deep reduction)

FR and FRO Series

11.75 (11.0)

RT and RTX Series

13.0 (12.3)

Transmission

26

26/4

Eaton Fuller Transmission Lubricant Capacities

Transmission Model

Refill Capacity: qt (L)

RTLO Series

14.0 (13.2)

10-Speed Deep Reduction

RTO–14908LL

14.0 (13.2)

RTO–16908LL

10-Speed Advantage

FA Series

8.0 (7.5)

10-Speed Automated

Lightning Top 2 (all)

13.5 (12.8)

10-Speed Autoshift AS2 (all)

13.0 (12.3)

13-Speed RTLO Series

All Models

14.0 (13.2)

15-Speed RTO Series

All Models

14.0 (13.2)

All 18-Speed Series

RTLO Series

14.0 (13.2)

18-Speed Autoshift AS2 (all)

UltraShift PLUS

LAS

13.0 (12.0)

MHP and MXP

14.0 (13.0)

Table 4, Eaton Fuller Transmission Lubricant

Capacities

NOTE: In all cases, the correct fluid level is es-
tablished by checking at the fill opening.

7.

Operate the engine for five minutes after filling
the transmission, then check the fluid level again.

8.

Clean the fill plug, then install it in the transmis-
sion. Tighten the plug as follows:

• For an Eaton Fuller transmission with a

plug with 3/4-inch pipe threads, tighten the
plug 25 to 35 lbf·ft (34 to 48 N·m).

• For an Eaton Fuller transmission with a

plug with 1-1/4-inch pipe threads, tighten
the plug 60 to 75 lbf·ft (81 to 102 N·m).

9.

Operate the vehicle to check for correct opera-
tion.

26–05 Eaton Fuller

Transmission Fluid
Level Inspection

NOTICE

Operating a transmission with the fluid level
higher or lower than recommended can result in
transmission damage. Do not overfill the transmis-
sion. Overfilling will force fluid out of the case
through the main shaft openings.

Do not mix types or brands of fluid, because of
possible incompatibility. Do not use fluid addi-
tives, friction modifiers, extreme-pressure gear
fluids, or multiviscosity lubricants.

With the transmission at operating temperature, and
the vehicle on a level surface, check the fluid level in
the transmission.

Some transmissions are equipped with a sight glass
for checking the fluid level. For transmissions not so
equipped, check the fluid level at the fill plug.

Checking at the Fill Plug

1.

Clean the area around the fill plug, and remove it
from the side of the gear case.

2.

Using your finger or a bent pipe cleaner, see if
the fluid is level with the fill opening. See

Fig. 3

.

3.

If the fluid level is low, check the transmission for
leaks, and correct as needed.

4.

If needed, add the recommended fluid, until it is
level with the lower edge of the fill opening. See

Table 3

for approved transmission lubricants.

5.

Clean the fill plug, then install it. Tighten the plug
as follows:

• For an Eaton Fuller transmission with a

plug with 3/4-inch pipe threads, tighten the
plug 25 to 35 lbf·ft (34 to 48 N·m).

• For an Eaton Fuller transmission with a

plug with 1-1/4-inch pipe threads, tighten
the plug 60 to 75 lbf·ft (81 to 102 N·m).

Checking With the Sight Glass

If the transmission is equipped with a sight glass,
check the fluid level as follows:

Transmission

26

26/5


Content   ..  9  10  11  12   ..