Freightliner Business Class. Manual - part 17
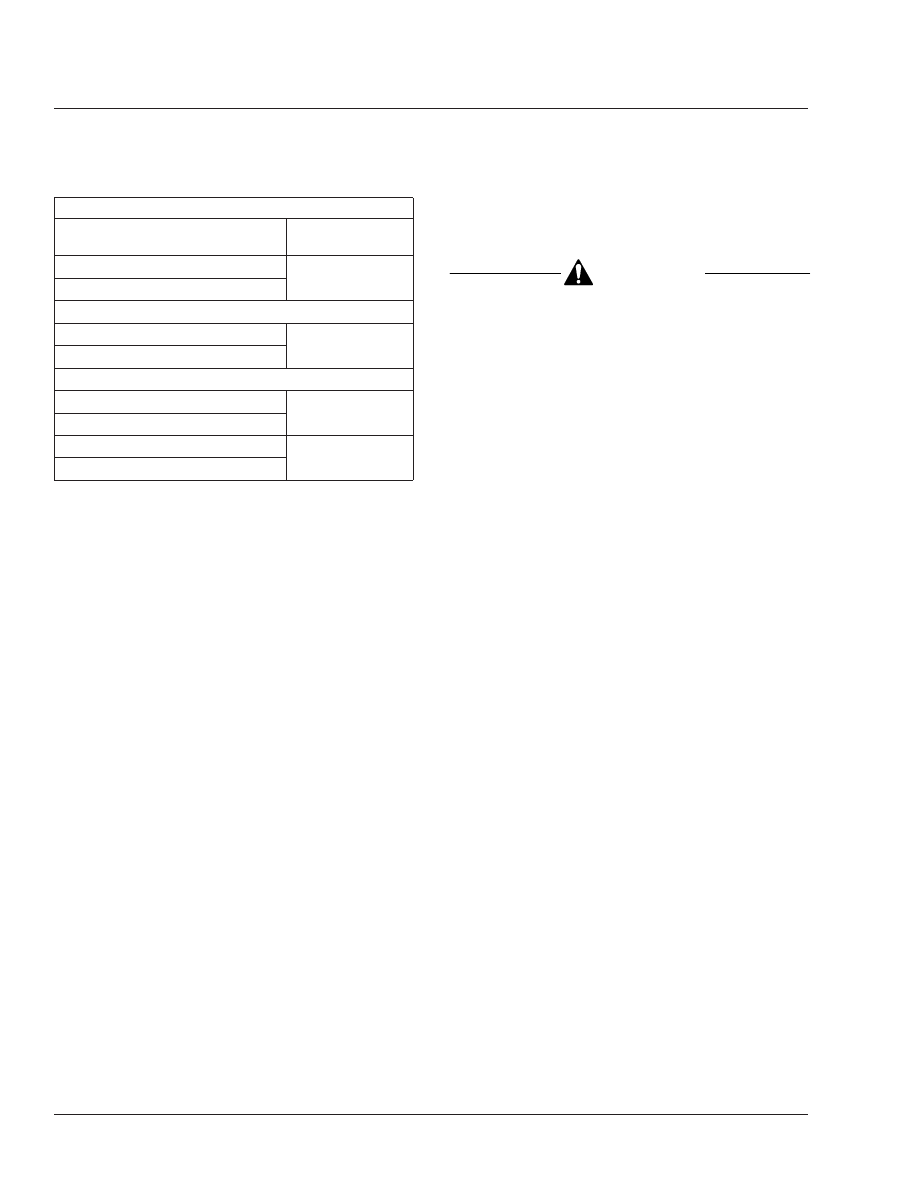
Allison Transmission Lubricant Capacities
Transmission Model
Refill Capacity
*
in Quarts (liters)
MT–643
15.0 (14.2)
MT–653
MD Series
MD–3060
19.0 (18.0)
MD–3560
HD Series (FL112 only)
†
HD–4060
36 (34)
HD–4560
HD–4060P
39 (37)
HD–4560P
*
Quantities listed are approximate. Add the recommended amount of fluid
as listed under refill capacity, then perform a "hot check" and add fluid as
needed. Do not overfill.
†
NOTE: Quantities listed are for a standard size (not shallow) oil pan.
Table 5, Allison Transmission Lubricant Capacities
2.
Operate the vehicle until the transmission
reaches normal operating temperature: 160 to
200°F (71 to 93°C).
3.
Clean the area around the drain plug and the
transmission fluid pan. Place a drain pan under
the transmission and remove the drain plug. Ex-
amine the fluid as it drains. If only the filter is
being changed, do not drain the fluid.
4.
Remove the 12 mounting bolts (six each) from
the two filter covers.
NOTE: A lot of fluid will drain when the filter
covers are removed.
5.
Remove the filter covers, O-rings, and two
square-cut seals from the transmission. See
6.
Remove the filters from the bottom of the control
module.
7.
Lubricate the new O-rings with transmission fluid,
and install them on the cover assemblies.
8.
Install a new square-cut seal on each cover as-
sembly, and install the fluid filter elements on the
cover assemblies.
9.
Install the filter and cover assemblies into the
filter compartment.
10. Align each cover assembly with the holes in the
channel plate sump, and push the cover assem-
blies in by hand to seat the seals.
CAUTION
Do not use the bolts to draw the filter covers to
the sump. This can damage the covers, seals, or
sump.
11. Install six bolts in each cover, and torque the
bolts 38 to 44 lbf·ft (51 to 61 N·m).
12. Replace the drain plug O-ring, and install the
drain plug. Tighten the drain plug 18 to 24 lbf·ft
(25 to 32 N·m).
13. Refill the transmission with fresh Dexron
®
trans-
mission fluid (see
) and check the fluid
level. See
for lubricant capacities.
14. Check and adjust the fluid level using the proce-
dures under "Checking the Fluid Level."
MT Series
1.
Park the vehicle on a level surface. Apply the
parking brakes and chock the rear tires.
2.
Start the engine and check that the transmission
fluid temperature is 160° to 200°F (71° to 93°C)
before draining the fluid. Shift the gear selector
to neutral and shut down the engine.
3.
Place a suitable container under the transmis-
sion, then remove the drain plug and gasket from
the transmission oil pan. Allow the fluid to drain.
See
4.
Remove the nut that secures the oil filler tube to
the transmission pan.
5.
Remove the 21 capscrews that secure the trans-
mission oil pan to the transmission housing, then
remove the transmission oil pan and gasket from
the transmission. Discard the gasket.
6.
Clean the oil pan of any debris and residual fluid
in an approved cleaning tank.
7.
Remove the washer-head capscrew that secures
the filter to the transmission, then remove the
filter and the filter intake pipe from the transmis-
sion.
8.
Separate the filter intake pipe from the filter, dis-
card the O-ring, then clean the tube.
Transmission
26
26/8