Ford Edge (2024 year). Manual in english - page 7
 

  Index      Manuals     Ford Edge (2024 year). Manual in english


Search            copyright infringement  


Content      ..     5      6      7      8     ..


Ford Edge (2024 year). Manual in english - page 7


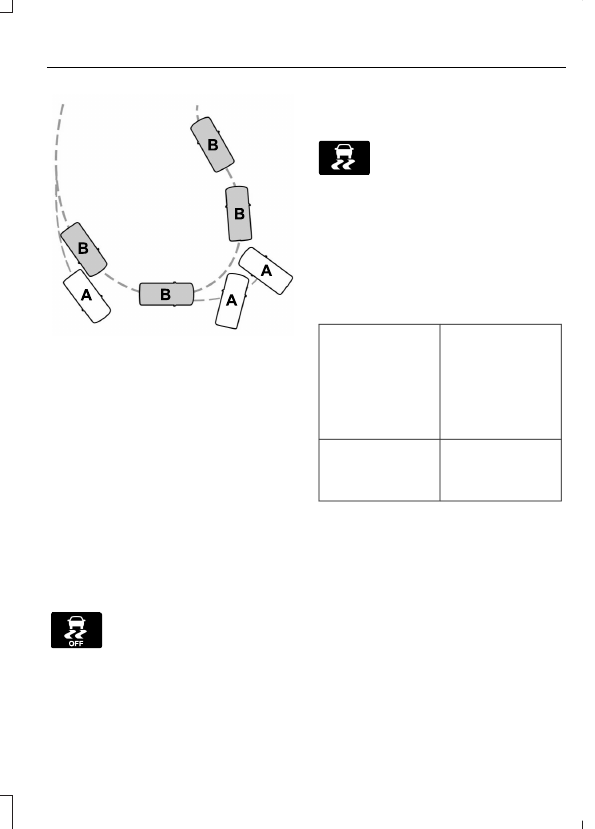
E72903

Vehicle without stability control
skidding off its intended route.

A

Vehicle with stability control
maintaining control on a slippery
surface.

B

SWITCHING STABILITY
CONTROL ON AND OFF

The system turns on each time you switch
the ignition on.

You can switch the electronic stability
control system off by pressing and holding
the ESC off button for over 15 seconds, or
you can press the button again to switch
the system on.

E130458

Shifting the transmission into
reverse (R) disables the system.

You can switch the traction control system
off or on independently. See 

Switching

Traction Control On and Off

 (page 191).

STABILITY CONTROL
INDICATOR

E138639

If it does not illuminate when you
switch the power on, or remains
on, this indicates a malfunction.

Have your vehicle checked by an
authorized dealer as soon as possible.

STABILITY CONTROL –
TROUBLESHOOTING

STABILITY CONTROL –
INFORMATION MESSAGES

Displayed when the

system has

detected a condi-

tion that requires

service. Contact

your authorized

dealer as soon as

possible.

Service Advan-

ceTrac

The traction control

has been disabled

or enabled by the

driver

AdvanceTrac Off

On

193

Stability Control

ELECTRIC POWER STEERING

HOW DOES ELECTRIC POWER
STEERING WORK

The electric power steering system assists
the brake system to help operate
advanced stability control and accident
avoidance systems.

If your vehicle loses electrical power or
detects a concern when you are driving,
the system switches to reduced steering
assist or manual steering. Additionally,
whenever disconnecting the battery or
installing a new one, you must drive your
vehicle a short distance before the system
relearns the strategy and reactivates all
systems.

ELECTRIC POWER STEERING
PRECAUTIONS

WARNING: 

The electric power

steering system has diagnostic checks
that continuously monitor the system. If
a fault is detected, a message displays
in the information display. Stop your
vehicle as soon as it is safe to do so.
Switch the vehicle off. After at least 10
seconds, switch the vehicle on and
watch the information display for a
steering system warning message. If a
steering system warning message
returns, have the system checked as
soon as possible.

WARNING: 

If the system detects

an error, you may not feel a difference in
the steering, however a serious condition
may exist. Have your vehicle checked as
soon as possible. Failure to do so may
result in loss of steering control.

Adapt your speed and driving behavior
according to reduced steering assist.

Extreme continuous steering may increase
the effort to steer. This occurs to prevent
internal overheating and damage to the
steering system. If this occurs, you will not
lose the ability to steer your vehicle
manually nor will it cause damage to the
system. Normal steering and driving allows
the system to cool down and steering
assist returns to normal.

Note:

There is no fluid reservoir to check or

fill.

STEERING –
TROUBLESHOOTING

STEERING – WARNING
INDICATORS

E223375

The electric power steering
system indicator illuminates if
the system detects a fault during

the continuous diagnostic checks.

Note:

If a red warning message displays,

stop your vehicle as soon as it is safe to do
so.

194

Steering

STEERING – INFORMATION MESSAGES

Action

Message

The power steering system has detected a

condition that requires service.  Have your

vehicle checked as soon as possible.

Steering Fault Service Now

The power steering system is not working.
Stop your vehicle in a safe place.  Have your

vehicle checked as soon as possible.

Steering Loss Stop Safely

The power steering system has detected a

condition that requires service.  Have your

vehicle checked as soon as possible.

Steering Assist Fault Service Required

The steering system has detected a condi-
tion that requires service.  Have your vehicle

checked as soon as possible.

Steering Lock Malfunction Service Now

195

Steering

STEERING – FREQUENTLY ASKED
QUESTIONS

Why does it seem that the steering
is wandering or pulling?

Check your vehicle for an improperly
inflated or uneven tire, loose or worn
suspension or steering components, or
improper vehicle alignment.

The system is functioning properly
and the components have been
checked, why is the steering
system continuing to pull or
wander?

A high crown in the road or crosswinds
could make the steering system feel
like it is wandering or pulling.

196

Steering

PARKING AID PRECAUTIONS

WARNING: 

To help avoid personal

injury, always use caution when in
reverse (R) and when using the sensing
system.

WARNING: 

The system may not

detect objects with surfaces that absorb
reflection. Always drive with due care
and attention. Failure to take care may
result in a crash.

WARNING: 

Traffic control systems,

fluorescent lamps, inclement weather,
air brakes, external motors and fans may
affect the correct operation of the
sensing system. This may cause reduced
performance or false alerts.

WARNING: 

The system may not

detect small or moving objects,
particularly those close to the ground.

WARNING: 

The parking aid system

can only assist you to detect objects
when your vehicle is moving at parking
speeds. To help avoid personal injury you
must take care when using the parking
aid system.

WARNING: 

The system may not

function if the sensor is blocked.

WARNING: 

In cold and severe

weather conditions the system may not
function. Rain, snow and spray can all
limit sensor performance.

WARNING: 

If damage occurs in the

immediate area surrounding the sensor,
have your vehicle checked as soon as
possible.

Note:

If your vehicle sustains damage

leaving the sensors misaligned, this will
cause inaccurate measurements or false
alerts.

When you connect a trailer to your vehicle,
the rear parking aid detects the trailer and
provides an alert. Disable the parking aid
when you connect a trailer to prevent the
alert.

Note:

The system might detect a connected

trailer, if so, it turns parking aid off.

Note:

Certain add-on devices installed

around the bumper or fascia may create
false alerts. For example, large trailer
hitches, bike or surfboard racks, license plate
brackets, bumper covers or any other device
could block the normal detection zone of
the parking aid system. Aftermarket spare
tires or spare tire covers mounted to the rear
tailgate could cause false alerts from the
park aid system. Remove the add-on device
to prevent false alerts.

Note:

 Keep the sensors free of debris.

Accumulation of dirt, snow or ice over the
sensors can affect the accuracy of the
system.

Do not clean the sensors with sharp
objects.

Note:

 When using a programmed MyKey,

you cannot switch the parking aids off.  See

MyKey™

 (page 65).

SWITCHING PARKING AID ON
AND OFF

Using the Parking Aid Button

 (If

Equipped)

E139213

Press the parking aid button to
switch the system on and off.

197

Parking Aids

REAR PARKING AID

WHAT IS THE REAR PARKING AID

Reverse Sensing System

Rear parking sensors detect objects behind
your vehicle when in reverse (R).

REAR PARKING AID LIMITATIONS

There is a decreased coverage area at the
outer corners.

When using a programmed MyKey, you
cannot switch the rear parking aid off.

The rear parking aid sensors are active
when your vehicle is in reverse (R) and the
vehicle speed is less than 5 mph (8 km/h).

The sensor coverage area is up to 71 in
(180 cm) from the rear bumper.

The rear parking aid detects large objects
when you shift into reverse (R) and any of
the following occur:

Your vehicle is moving backward at a
low speed.

Your vehicle is stationary but an object
is approaching the rear of your vehicle
at a low speed.

Your vehicle is moving backward at a
low speed and an object is moving
towards your vehicle, for example
another vehicle at a low speed.

The system shall provide no audible
warning for the object behind the vehicle
when in neutral (N) gear.

LOCATING THE REAR PARKING
AID SENSORS

E130178

The rear parking aid sensors are in the rear
bumper.

REAR PARKING AID AUDIBLE

WARNINGS

A warning tone sounds when your vehicle
approaches an object.  As your vehicle
moves closer to an object, the rate of the
tone increases.  The warning tone
continuously sounds when an object is 12 in
(30 cm) or less from the rear bumper.

If your vehicle remains stationary for a few
seconds, the audible warning turns off. If
your vehicle moves backward the tone
sounds again.

Note:

When the parking aid system sounds

a tone, the audio system could reduce the
set volume.

198

Parking Aids

FRONT PARKING AID

 (IF EQUIPPED)

WHAT IS THE FRONT PARKING
AID

Front parking sensors detect objects in
front of your vehicle.

FRONT PARKING AID
LIMITATIONS

The front parking aid sensors are active
when your vehicle is in any position other
than park (P) and the vehicle speed is less
than 5 mph (8 km/h).

The sensor coverage area is up to 28 in
(70 cm) from the front bumper.

If your vehicle is in reverse (R), the front
parking aid detects objects and provides
an audible warning when your vehicle is
moving at a low speed, or when an object
is moving toward your vehicle, for example,
another vehicle at a low speed. If your
vehicle remains stationary for a few
seconds, the audible warning turns off.
Visual indication is always active in reverse
(R).

If your vehicle is in any forward gear, the
front parking aid provides audible warnings
and a visual indication when your vehicle
is moving at a speed of 5 mph (8 km/h) or
below and the system detects an object
within the detection zone. If your vehicle
remains stationary for a few seconds, the
visual indication and audible warning turns
off.

If your vehicle is in neutral (N), the front
and rear sensors provide a visual indication
only when your vehicle is moving below a
speed of 5 mph (8 km/h) and the system
detects obstacles inside the detection
areas. Once your vehicle stops, the visual
indication and audible warning stops after
a few seconds.

LOCATING THE FRONT PARKING
AID SENSORS

E187330

The front parking aid sensors are in the
front bumper.

FRONT PARKING AID AUDIBLE
WARNINGS

A warning tone sounds when there is an
object within 28 in (70 cm) from the front
bumper. As your vehicle moves closer to
an object, the rate of the tone increases.

The warning tone continuously sounds
when an object is 12 in (30 cm) or less from
the front bumper.

Note:

If the detected object is 12 in (30 cm)

or less from your vehicle, visual indication
remains on.

SIDE PARKING AID

 (IF EQUIPPED)

WHAT IS THE SIDE PARKING AID

The front and rear outermost parking aid
sensors map objects that are near to the
sides of your vehicle.

SIDE PARKING AID LIMITATIONS

The sensor coverage is up to 24 in (60 cm)
from the sides of your vehicle.

199

Parking Aids

The side parking aid may not function if:

Your vehicle remains stationary for over
two minutes.

The anti-lock brake system activates.

The traction control system activates.

Your vehicle is in park (P).

The steering wheel angle information
is not available. To reset the steering
wheel angle information, drive straight
for at least 492 ft (150 m) above
19 mph (30 km/h).

Note:

If you switch traction control off, the

side sensing system also turns off.

To reinitialize the system, drive the length
of your vehicle.

The side parking aid does not detect an
object that is moving toward the side of
your vehicle, for example another vehicle
moving at a low speed, if it does not pass
a front or rear parking aid sensor.

If the transmission is in reverse (R), the side
sensing system provides audible warnings.
When your vehicle is moving slowly, the
system detects obstacles within 24 in
(60 cm) and are inside the driving path of
your vehicle. If your vehicle remains
stationary for a few seconds, the audible
warning turns off. Visual indication is
always present in reverse (R).

If your vehicle is in neutral (N), the side
sensing system provides visual indication
only when your vehicle is moving slowly
and there is a front or rear parking aid
obstacle detected, and the side obstacle
is within 24 in (60 cm) from the side of
your vehicle. If your vehicle remains
stationary for a few seconds, the visual
indication turns off.

If the transmission is in drive (D) or any
other forward gear, the side sensing system
provides audible and visual warnings.
When your vehicle is moving slowly, the
system detects obstacles within 24 in
(60 cm) and are inside the driving path of
your vehicle. If your vehicle remains
stationary for a few seconds, the visual
indication and audible warning turns off.

LOCATING THE SIDE PARKING AID
SENSORS

E187810

The side parking sensors are located in the
sides of the front and rear bumpers.

SIDE PARKING AID AUDIBLE
WARNINGS

When the side parking aid detects an
object within the coverage area and the
driving path of your vehicle, an audible
warning sounds. As your vehicle moves
closer to the object, the rate of the tone
increases.

200

Parking Aids

PARKING AID INDICATORS

E190459

The system provides object distance
indication through the information and
entertainment display.

As the distance to the object
decreases, the indicator waves and the
lines move toward the vehicle icon.

If there is no object detected, the
distance indicator lines are grey.

Visual indication remains on when your
vehicle is in reverse (R). In any other gear,
when you stop your vehicle, visual
indication turns off after four seconds.

If the parking aids are not available, the
side distance indicator lines do not display.

PARKING AIDS –
TROUBLESHOOTING

PARKING AIDS – INFORMATION
MESSAGES

If a fault is present in the parking aids, a
warning message appears in the
instrument cluster or the touchscreen.

Action

Message

The system detects a condition that

requires service.  Have your vehicle checked

as soon as possible.

Park Aid Fault

Inclement weather, ice, mud, or water is

blocking the sensor, causing the system to

become unavailable. You can typically

clean the sensor to resolve.

Sensor Blocked

A correct trailer connection is sensed during

a given ignition cycle.

Trailer Connected

201

Parking Aids

WHAT IS THE REAR VIEW
CAMERA

The rear view camera provides a video
image of the area behind your vehicle when
the transmission is in reverse (R).

REAR VIEW CAMERA
PRECAUTIONS

WARNING: 

The rear view camera

system is a reverse aid supplement
device that still requires the driver to use
it in conjunction with the interior and
exterior mirrors for maximum coverage.

WARNING: 

Objects that are close

to either corner of the bumper or under
the bumper, might not be seen on the
screen due to the limited coverage of the
camera system.

WARNING: 

Objects above the

camera may not be visible. Check the
area behind your vehicle when necessary.

WARNING: 

Reverse your vehicle

slowly. Failure to follow this instruction
could result in the loss of control of your
vehicle, personal injury or death.

WARNING: 

Use caution when the

rear cargo door is ajar. If the rear cargo
door is ajar, the camera will be out of
position and the video image could be
incorrect. All guide lines disappear when
the rear cargo door is ajar. Failure to
follow this instruction could result in
personal injury.

WARNING: 

Do not switch the

camera features on or off when your
vehicle is moving.

Note:

 When towing, the camera only sees

what you are towing.  This might not provide
adequate coverage and you might not see
some objects.  In some vehicles, the guide
lines may disappear when you connect the
trailer tow connector.

LOCATING THE REAR VIEW
CAMERA

The rear view camera is located on the
cargo door. It provides a video image of the
area behind your vehicle.

REAR VIEW CAMERA GUIDE
LINES

Note:

Active guide lines and fixed guide

lines are only available when the
transmission is in reverse (R).

Note:

The centerline is only available if the

active or fixed guide lines are on.

202

Rear View Camera

E306774

A. Active guide lines.
B. Centerline.
C. Fixed guide line: Green zone.
D. Fixed guide line: Yellow zone.
E. Fixed guide line: Red zone.
F. Rear bumper.

Active guide lines only show with fixed
guide lines. To use active guide lines, turn
the steering wheel to point the guide lines
toward an intended path. If the steering
wheel position changes while reversing,
your vehicle might deviate from the
intended path.

The fixed and active guide lines fade in and
out depending on the steering wheel
position. The active guide lines do not
display when the steering wheel position
is straight.

Use caution while reversing. Objects in the
red zone are closest to your vehicle and
objects in the green zone are farther away.
Objects get closer to your vehicle as they
move from the green zone to the yellow or
red zones. Use the side view mirrors and
rear view mirror to get better coverage on
both sides and rear of your vehicle.

REAR VIEW CAMERA OBJECT
DISTANCE INDICATORS

The system provides an image of your
vehicle and the sensor zones. The zones
highlight green, yellow, and red when the
parking aid sensors detect an object in the
coverage area.

REAR VIEW CAMERA
SETTINGS

ZOOMING THE REAR VIEW
CAMERA IN AND OUT

WARNING: 

When manual zoom is

on, the full area behind your vehicle may
not show. Be aware of your surroundings
when using the manual zoom feature.

Selectable settings for this feature are
zoom in (+) and zoom out (-). Press the
symbol on the camera screen to change
the view. The default setting is zoom off.

This allows you to get a closer view of an
object behind your vehicle.  The zoomed
image keeps the bumper in the image to
provide a reference.  The zoom is only
active while the transmission is in reverse
(R).

Note:

Manual zoom is only available when

the transmission is in reverse (R).

Note:

Only the centerline shows when you

enable manual zoom.

203

Rear View Camera

SWITCHING REAR VIEW CAMERA
DELAY ON AND OFF

1.

Press 

Settings

 on the touchscreen.

2. Press 

Vehicle Settings

.

3. Switch 

Rear View Camera Delay

 on or

off.

When shifting the transmission out of
reverse (R) and into any gear other than
park (P), the camera image remains in the
display until:

Your vehicle speed reaches
approximately 5 mph (8 km/h).

You shift your vehicle into park (P).

204

Rear View Camera

WHAT IS THE 180 DEGREE
CAMERA

The 180 degree camera system consists
of front and rear cameras.

HOW DOES THE 180 DEGREE
CAMERA WORK

The 180 degree camera system allows you
to see what is directly in front or behind
your vehicle, provides a cross traffic view
in front of your vehicle and provides
visibility when parking your vehicle.

180 DEGREE CAMERA
PRECAUTIONS

WARNING: 

The rear view camera

system is a reverse aid supplement
device that still requires the driver to use
it in conjunction with the interior and
exterior mirrors for maximum coverage.

WARNING: 

Objects that are close

to either corner of the bumper or under
the bumper, might not be seen on the
screen due to the limited coverage of the
camera system.

WARNING: 

Use caution when

turning camera features on or off when
the transmission is not in park (P). Make
sure your vehicle is not moving.

180 DEGREE CAMERA
LIMITATIONS

Note:

The area displayed on the screen may

vary according to your vehicle's orientation
or road condition.

Note:

The front view camera will switch off

if your vehicle speed exceeds 6 mph
(10 km/h). You will have to switch the
system back on by using the camera system
button once below the speed threshold.

Note:

The camera system may not operate

correctly if mud, water or debris obstructs
the camera's view. You can clean the lens
with a soft, lint-free cloth and non-abrasive
cleaner or by using your front or rear washer.
See 

Wipers

 (page 91).

LOCATING THE 180 DEGREE
CAMERAS

The front view camera is in the grille. The
rear view camera is on the liftgate.

180 DEGREE CAMERA
INDICATORS

The 180 degree camera provides an image
of your vehicle and the sensor zones. The
zones will highlight green, yellow, and red
when the parking aid sensors detect an
object in the coverage area.

180 DEGREE CAMERA
SETTINGS

SWITCHING THE 180 DEGREE
CAMERA ON AND OFF

E188847

The camera button is located on
the audio unit and allows you to
toggle through different camera

views.

Note:

The camera system may not operate

correctly if mud, water or debris obstructs
the camera's view. You can clean the lens
with a soft, lint-free cloth and non-abrasive
cleaner or by using your front or rear washer.
See 

Wipers

 (page 91).

205

180 Degree Camera

 (If Equipped)

SWITCHING THE 180 DEGREE
CAMERA VIEW

E188847

Press the camera button on the
audio unit to toggle between the
different camera views.

Normal Front View:

Provides an image of what is directly in
front of your vehicle when your vehicle is
in neutral (N) or drive (D).

Expanded Front View:

Provides an expanded 180 degree image
of what is directly in front of your vehicle
when your vehicle is in neutral (N) or drive
(D).

206

180 Degree Camera

 (If Equipped)

WHAT IS ACTIVE PARK
ASSIST

Assists you with parking in and out of
parking spaces.

HOW DOES ACTIVE PARK
ASSIST WORK

Active park assist uses sensors to detect
parking spaces. The system controls
steering as required to maneuver into or
out of a parking space.

ACTIVE PARK ASSIST
PRECAUTIONS

WARNING: 

You must remain in

your vehicle when the system turns on.
At all times you are responsible for
controlling your vehicle, supervising the
system, and intervening if required.
Failure to follow this instruction could
result in the loss of control of your
vehicle, personal injury or death.

WARNING: 

The sensors may not

detect objects in heavy rain or other
conditions that cause interference.

WARNING: 

You are responsible for

controlling your vehicle at all times. The
system is designed to be an aid and does
not relieve you of your responsibility to
drive with due care and attention. Failure
to follow this instruction could result in
the loss of control of your vehicle,
personal injury or death.

WARNING: 

Active park assist does

not apply the brakes under any
circumstances.

WARNING: 

Do not use the system

with accessories that extend beyond the
front or rear of your vehicle, for example
a trailer hitch or bike rack. The system is
not able to make corrections for the
additional length of the accessories.

SWITCHING ACTIVE PARK
ASSIST ON AND OFF

E146186

Press the active park assist
button to bring up full screen
notifications.

Press the soft keys on the touchscreen to
switch between parallel park in,
perpendicular park in or parallel park out
parking modes.

Cancelling Active Park Assist

To cancel parking assistance at any time:

Press the active park assist button
during operation.

Grab the steering wheel during
operation.

Drive above 22 mph (35 km/h) for a
short period of time when searching for
a parking space.

Drive above 6 mph (9 km/h) during
operation.

Switch traction control off.

ENTERING A PARALLEL
PARKING SPACE

1.

Press the active park assist button.

2. Select parallel park.

Note:

The system detects other vehicles

and curbs to find a parking space.

207

Active Park Assist

 (If Equipped)

3. Use the turn signal lever to search for

a parking space on the driver or
passenger side of your vehicle.

Note:

The system defaults to searching for

a parking spot on the passenger side of your
vehicle if you do not use the turn signal lever.

4. Drive your vehicle approximately 3 ft

(1 m) away from and parallel to the
other parked vehicles when searching
for a parking space.

Note:

A tone sounds and a message

appears on the touchscreen when active
park assist finds a parking space.

5. Press and hold the brake pedal.

6. Release the steering wheel and shift

into reverse (R).

7.

Use the accelerator and brake to
control your vehicle's speed when
parking. You are responsible for
stopping your vehicle.

8. Active park assist is a multi-step

process and requires you to shift the
transmission multiple times. Follow the
onscreen instructions until parking is
complete.

Note:

You can slow down your vehicle at

any time by pressing the brake pedal.

Note:

When parallel parking between

objects, the system will park closer to the
object in front of your vehicle to allow easier
access to the cargo area.

ENTERING A PERPENDICULAR
PARKING SPACE

1.

Press the active park assist button.

2. Select perpendicular parking.

Note:

Active park assist does not recognize

parking space lines and centers your vehicle
between objects.

Note:

Active park assist backs your vehicle

into parking spaces.

3. Use the turn signal lever to search for

a parking space on the driver or
passenger side of your vehicle.

Note:

The system defaults to searching for

a parking spot on the passenger side of your
vehicle if you do not use the turn signal lever.

4. Drive your vehicle approximately 3 ft

(1 m) away from and perpendicular to
the other parked vehicles when
searching for a parking space.

Note:

A tone sounds and a message

appears in the information and
entertainment display when active park
assist finds a parking space.

5. Press and hold the brake pedal.

6. Release the steering wheel and shift

into reverse (R).

7.

Use the accelerator and brake to
control your vehicle's speed when
parking. You are responsible for
stopping your vehicle.

8. Active park assist is a multi-step

process and requires you to shift the
transmission multiple times. Follow the
onscreen instructions until parking is
complete.

Note:

Active park assist aligns the front-end

of your vehicle with the lane side of the
object next to it.

Note:

When only one object is detected,

the system allows enough distance to open
the door on either side.

Note:

You can slow down your vehicle at

any time by pressing the brake pedal.

EXITING A PARKING SPACE

Active park assist only assists leaving
parallel parking spaces.

1.

Press the active park assist button.

2. Select parallel park exit.

208

Active Park Assist

 (If Equipped)

3. Use the turn signal to choose the

direction to exit the parking space.

4. Press and hold the brake pedal.

5. Release the parking brake.

6. Release the steering wheel and shift

into the instructed gear.

7.

Use the accelerator and brake to
control your vehicle's speed when
exiting the parking space. You are
responsible for stopping your vehicle.

8. Active park assist is multi-step process

and requires you to shift the
transmission multiple times. Follow the
onscreen instructions until operation
is complete.

Note:

After active park assist drives your

vehicle to a position where you can exit the
parking space in a forward movement, a
message appears instructing you to take full
control of your vehicle.

9. Take control of your vehicle.

Note:

You can slow down your vehicle at

any time by pressing the brake pedal.

ACTIVE PARK ASSIST –
TROUBLESHOOTING

ACTIVE PARK ASSIST –
INFORMATION MESSAGES

Details

Message

The system

requires service.

Have your vehicle

checked as soon as

possible.

Active Park Fault

ACTIVE PARK ASSIST –
FREQUENTLY ASKED QUESTIONS

Why does active park assist not
operate correctly?

The system is unable to detect a
vehicle, curb or object to park next to
or in between. The system needs
boundary objects to operate correctly.

Why does active park assist not
search for a parking space?

You have switched traction control off.

The transmission is in reverse (R). Your
vehicle must be moving forward to be
able to detect a parking space.

Why does active park assist not
offer a parking space?

The sensors could be blocked. For
example, snow, ice or large
accumulations of dirt. Blocked sensors
can affect how the system functions.

The sensors in the front or rear bumper
could be damaged.

There is not enough room in the parking
space for your vehicle to safely park.

209

Active Park Assist

 (If Equipped)

There is not enough space for the
parking maneuver on the opposite side
of the parking space.

The parking space is more than 1.6 yd
(1.5 m) or less than 0.5 yd (0.5 m)
away from your vehicle.

Your vehicle's speed is greater than
21.7 mph (35 km/h) for parallel parking
or greater than 11.8 mph (19 km/h) for
perpendicular parking.

You recently disconnected or replaced
the battery. After you reconnect the
battery you must drive your vehicle on
a straight road for a short period of
time.

Why does active park assist not
correctly position the vehicle into
a parking space?

An irregular curb along the parking
space prevents the system from
correctly aligning your vehicle.

Vehicles or objects bordering the space
could not be correctly parked.

Your vehicle stopped too far past the
parking space.

The tires are not correctly installed or
maintained. For example, using a spare
tire, not inflated correctly, improper
size, or of different sizes.

A repair or alteration changed the
detection capabilities.

A parked vehicle has a high
attachment. For example, a salt
sprayer, snowplow or moving truck bed.

The parking space length or position of
parked objects changes after your
vehicle passes the space.

The temperature around your vehicle
quickly changes. For example, driving
from a heated garage into a cold
outside temperature, or after leaving a
car wash.

210

Active Park Assist

 (If Equipped)

WHAT IS CRUISE CONTROL

Cruise control lets you maintain a set
speed without keeping your foot on the
accelerator pedal.

Requirements

Use cruise control when the vehicle speed
is greater than 20 mph (30 km/h).

SWITCHING CRUISE CONTROL
ON AND OFF

WARNING: 

Do not use cruise

control on winding roads, in heavy traffic
or when the road surface is slippery. This
could result in loss of vehicle control,
serious injury or death.

The cruise controls are on the steering
wheel.  See 

Steering Wheel

 (page 25).

Switching Cruise Control On

E265296

Press the button.

Switching Cruise Control Off

E265297

Press the button when the
system is in standby mode.

The system also turns off when you switch
the ignition off.

Note:

The set speed erases when you

switch the system off.

SETTING THE CRUISE
CONTROL SPEED

WARNING: 

When you are going

downhill, your vehicle speed could
increase above the set speed. The
system does not apply the brakes.

Drive to the speed you prefer.

E246884

E246885

Press either button to set the
current speed.

Take your foot off the accelerator pedal.

Note:

The indicator changes color in the

information display.

Changing the Set Speed

E246884

Press and release the button to
increase the set speed in small
increments.

Press and hold the button to accelerate.
Release the button when you reach your
preferred speed.

E246885

Press and release the button to
decrease the set speed in small
increments.

Press and hold the button to decelerate.
Release the button when you reach your
preferred speed.

Note:

 If you accelerate by pressing the

accelerator pedal, the set speed does not
change. When you release the accelerator
pedal, your vehicle returns to the speed that
you previously set.

211

Cruise Control

CANCELING THE SET SPEED

E265298

Press the button, or tap the
brake pedal to cancel the set
speed.

Note:

The system remembers the set

speed.

Note:

The system cancels if the vehicle

speed drops below 10 mph (16 km/h) under
the set speed when driving uphill.

RESUMING THE SET SPEED

Press the button.

CRUISE CONTROL
INDICATORS

E71340

Illuminates when you switch the
system on.

212

Cruise Control

HOW DOES ADAPTIVE CRUISE
CONTROL WITH STOP AND GO
WORK

Adaptive cruise control with stop and go
uses radar and camera sensors to maintain
a set gap between your vehicle and the
vehicle in front of you while following it to
a complete stop. Stop and go can also be
set to follow a vehicle directly in front of
you and adjust the set speed, while you are
at a complete stop.

ADAPTIVE CRUISE CONTROL
PRECAUTIONS

WARNING: 

You are responsible for

controlling your vehicle at all times. The
system is designed to be an aid and does
not relieve you of your responsibility to
drive with due care and attention. Failure
to follow this instruction could result in
the loss of control of your vehicle,
personal injury or death.

WARNING: 

Do not use adaptive

cruise control on winding roads, in heavy
traffic or when the road surface is
slippery. This could result in loss of
vehicle control, serious injury or death.

WARNING: 

Pay close attention to

changing road conditions such as
entering or leaving a highway, on roads
with intersections or roundabouts, roads
without visible lanes of travel, roads that
are unpaved, or steep slopes. Failure to
follow this instruction could result in the
loss of control of your vehicle, personal
injury or death.

WARNING: 

The system is not a

crash warning or avoidance system.

WARNING: 

Do not use the system

when towing a trailer that has
aftermarket electronic trailer brake
controls. Failure to follow this instruction
could result in the loss of control of your
vehicle, personal injury or death.

WARNING: 

Do not use tire sizes

other than those recommended because
this can affect the normal operation of
the system. Failure to do so may result
in a loss of vehicle control, which could
result in serious injury.

WARNING: 

Do not use the system

with a snow plow blade installed.

WARNING: 

In situations with poor

visibility, such as fog, heavy rain or other
inclement weather, you may need to
override or completely switch off the
system.

When Following a Vehicle

WARNING: 

When following a

vehicle that is braking, your vehicle does
not always decelerate quickly enough to
avoid a crash without driver intervention.
Apply the brakes when necessary. Failure
to follow this instruction could result in
personal injury or death.

Hilly Condition Usage

Select a lower gear when the system is
active in situations such as prolonged
downhill driving on steep slopes, for
example in mountainous areas.

213

Adaptive Cruise Control

 (If Equipped)

ADAPTIVE CRUISE CONTROL
LIMITATIONS

Sensor Limitations

WARNING: 

On rare occasions,

detection issues can occur due to the
road infrastructures, for example bridges,
tunnels and safety barriers. In these
cases, the system may brake late or
unexpectedly. At all times, you are
responsible for controlling your vehicle,
supervising the system and intervening,
if required.

WARNING: 

If the system

malfunctions, have your vehicle checked
as soon as possible.

WARNING: 

Large contrasts in

outside lighting can limit sensor
performance.

WARNING: 

The system only warns

of vehicles detected by the radar sensor.
In some cases there may be no warning
or a delayed warning. Apply the brakes
when necessary. Failure to follow this
instruction could result in personal injury
or death.

WARNING: 

The system may not

detect stationary or slow moving
vehicles below 6 mph (10 km/h).

WARNING: 

The system does not

detect pedestrians or objects in the road.

WARNING: 

The system does not

detect oncoming vehicles in the same
lane.

WARNING: 

The system may not

operate properly if the sensor is blocked.
Keep the windshield free from
obstruction.

WARNING: 

The system may

incorrectly track lane markings as other
structures or objects. This can result in
a false or missed warning.

E307893

The camera is mounted on the windshield
behind the interior mirror.

E307892

The radar sensor is in the lower grille.

Note:

You cannot see the sensor. It is

behind a fascia panel.

Note:

Keep the front of your vehicle free of

dirt, metal badges or objects. Vehicle front
protectors, aftermarket lights, additional
paint or plastic coatings could also degrade
sensor performance.

214

Adaptive Cruise Control

 (If Equipped)

A message displays if something obstructs
the camera or the sensor. When something
blocks the sensor, the system cannot
detect a vehicle ahead and does not
function.  See 

Adaptive Cruise Control

– Information Messages

 (page 222).

The radar sensor has a limited field of view.
It may not detect vehicles at all or detect
a vehicle later than expected in some
situations. The lead vehicle image does
not illuminate if the system does not
detect a vehicle in front of you.

Detection issues can occur:

E71621

When driving on a different line
than the vehicle in front.

A

With vehicles that edge into your
lane. The system can only detect
these vehicles once they move
fully into your lane.

B

There may be issues with the
detection of vehicles in front
when driving into and coming out
of a bend or curve in the road.

C

In these cases, the system may brake late
or unexpectedly.

If something hits the front end of your
vehicle or damage occurs, the
radar-sensing zone may change. This could
cause missed or false vehicle detection.

215

Adaptive Cruise Control

 (If Equipped)

Optimal system performance requires a
clear view of the road by the
windshield-mounted camera.

Optimal performance may not occur if:

The camera is blocked.

There is poor visibility or lighting
conditions.

There are bad weather conditions.

SWITCHING ADAPTIVE
CRUISE CONTROL ON AND OFF

The cruise controls are on the steering
wheel.  See 

Steering Wheel

 (page 25).

Switching Adaptive Cruise Control
On

E294678

Press the button to set the
system in standby mode.

The indicator, current gap setting and set
speed appear in the information display.

Switching Adaptive Cruise Control
Off

E294678

Press the button when the
system is in standby mode, or
switch the ignition off.

Note:

You erase the set speed when you

switch the system off.

ADAPTIVE CRUISE CONTROL
AUTOMATIC CANCELLATION

The system may cancel if:

The tires lose traction.

You apply the parking brake.

The system may cancel and set the parking
brake if:

You unbuckle the seatbelt and open
the driver door after adaptive cruise
control stops your vehicle.

Adaptive cruise control holds your
vehicle at a stop continuously for more
than three minutes.

The system may deactivate or prevent
activating when requested if:

The vehicle has a blocked sensor.

The brake temperature is too high.

There is a failure in the system or a
related system.

SETTING THE ADAPTIVE
CRUISE CONTROL SPEED

Drive to the speed you prefer.

E265299

E246885

Press either button to set the
current speed.

Take your foot off the accelerator pedal.

The indicator, current gap setting and set
speed appear in the information display.

E355761

A vehicle image illuminates if there is a
vehicle detected in front of you.

216

Adaptive Cruise Control

 (If Equipped)

Note:

When adaptive cruise control is

active, the speedometer may vary slightly
from the set speed displayed in the
information display.

Setting the Adaptive Cruise Speed
from a Complete Stop

E265299

E246885

Press and release either button
while keeping the brake pedal
fully pressed.

The set speed adjusts to 20 mph
(30 km/h).

The indicator, current gap setting and set
speed appear in the information display.

Note:

The system will activate from a

complete stop only when it detects a lead
vehicle in close proximity.

Manually Changing the Set Speed

E265299

Press and release to increase the
set speed in small increments.

Press and hold to increase the set speed
in large increments. Release the button
when the set speed equals the desired
speed.

E246885

Press and release to decrease
the set speed in small
increments.

Press and hold to decrease the set speed
in large increments. Release the button
when the set speed equals the desired
speed.

E246885

You can also press the
accelerator or brake pedal until
you reach the speed you prefer.

Press the button to select the current
speed as the set speed.

The system may apply the brakes to slow
the vehicle to the new set speed.  The set
speed continuously displays in the
information display when the system is
active.

SETTING THE ADAPTIVE
CRUISE CONTROL GAP

Press the button to cycle
through the four gap settings.

E355761

The selected gap appears in the
instrument cluster display as shown by the
bars in the image.

Note:

The gap setting is time dependent

and therefore, the distance adjusts with your
vehicle speed.

Note:

It is your responsibility to select a gap

appropriate to the driving conditions.

217

Adaptive Cruise Control

 (If Equipped)

Adaptive Cruise Control Gap Settings

Dynamic

Behavior

Gap Distance

Graphic

Display,

Bars Indic-

ated

Between

Vehicles

Sport.

Closest.

1

Normal.

Close.

2

Normal.

Medium.

3

Comfort.

Far.

4

Each time you switch the system on, it
selects the last chosen gap setting.

Following a Vehicle

When a vehicle ahead of you enters the
same lane or a slower vehicle is ahead in
the same lane, the vehicle speed adjusts
to maintain the gap setting.

Note:

When you are following a vehicle and

you switch on a turn signal lamp, adaptive
cruise control may provide a small,
temporary acceleration to help you pass.

Your vehicle maintains a consistent gap
from the vehicle ahead until:

The vehicle in front of you accelerates
to a speed above the set speed.

The vehicle in front of you moves out
of the lane you are in.

You set a new gap distance.

The system applies the brakes to slow
down your vehicle to maintain a safe gap
distance from the vehicle in front of you.
The system only applies limited braking.
You can override the system by applying
the brakes.

Note:

The brakes may emit noise when

applied by the system.

If the system determines that its maximum
braking level is not sufficient, an audible
warning sounds, a message appears in the
instrument cluster display and an indicator
flashes when the system continues to
brake. Take immediate action.

CANCELING THE SET SPEED

E265298

Press the button or tap the brake
pedal.

The set speed does not erase.

RESUMING THE SET SPEED

Press the button.

Your vehicle speed returns to the
previously set speed and gap setting. The
set speed displays continuously in the
information display when the system is
active.

Note:

Only use resume if you are aware of

the set speed and intend to return to it.

Resuming the Set Speed from a
Complete Stop

If your vehicle follows a vehicle to a
complete stop and remains stationary for
less than three seconds, your vehicle
accelerates from a stationary position to
follow the vehicle ahead.

If your vehicle follows a vehicle
to a complete stop and remains
stationary for more than three

seconds, press and release the button or
press the accelerator pedal to follow the
vehicle ahead.

218

Adaptive Cruise Control

 (If Equipped)

OVERRIDING THE SET SPEED

WARNING: 

If you override the

system by pressing the accelerator
pedal, it does not automatically apply
the brakes to maintain a gap from any
vehicle ahead.

When you press the accelerator pedal, you
override the set speed and gap distance.

Use the accelerator pedal to intentionally
exceed the set speed limit.

When you override the system, the green
indicator illuminates and the vehicle icon
does not appear in the instrument cluster
display.

The system resumes operation when you
release the accelerator pedal. The vehicle
speed decreases to the set speed, or a
lower speed if following a slower vehicle.

ADAPTIVE CRUISE CONTROL
INDICATORS

E144529

Illuminates when you switch
adaptive cruise control on. The
color of the indicator changes to

indicate the system status.

White indicates the system is on but
inactive.

Green indicates that you set the speed and
the system is active.

SWITCHING FROM ADAPTIVE
CRUISE CONTROL TO CRUISE
CONTROL

WARNING: 

Normal cruise control

will not brake when your vehicle is
approaching slower vehicles. Always be
aware of which mode you have selected
and apply the brakes when necessary.

1.

Press 

Features

 on the touchscreen.

2. Press 

Driver Assistance

.

3. Press 

Cruise Control

.

4. Press 

Normal Cruise Control

.

E332905

The cruise control indicator
replaces the adaptive cruise
control indicator if you select

normal cruise control.  The gap setting
does not display, and the system does not
respond to lead vehicles. Automatic
braking remains active to maintain set
speed.  The system remembers the last
setting when you start your vehicle.

LANE CENTERING

HOW DOES LANE CENTERING
WORK

Adaptive cruise control with lane centering
uses the vehicle's front radar sensor and
front windshield camera sensor, together
with the steering sensor to operate.

Using these sensors, the system applies
continuous steering assistance towards
driving in the middle of the lane you choose
on highway roads.

Note:

The gap setting for adaptive cruise

control with lane centering, operates in the
same way as normal adaptive cruise control.

219

Adaptive Cruise Control

 (If Equipped)

LANE CENTERING PRECAUTIONS

WARNING: 

Do not use the system

when towing a trailer. Failure to follow
this instruction could result in the loss of
control of your vehicle, personal injury or
death.

WARNING: 

Do not use the system

if any changes or modifications to the
steering wheel have been made. Any
changes or modifications to the steering
wheel could affect the functionality or
performance of the system. Failure to
follow this instruction could result in the
loss of control of your vehicle, personal
injury or death.

Adaptive cruise control precautions apply
to lane centering unless stated otherwise
or contradicted by a lane centering
precaution.  See 

Adaptive Cruise Control

Precautions

 (page 213).

LANE CENTERING
REQUIREMENTS

You must keep your hands on the steering
wheel at all times.

Lane centering only activates when all of
the following occur:

Adaptive cruise control with lane
centering is enabled in your information
and entertainment screen.  See

Switching Lane Centering On and
Off

 (page 221).

You have adaptive cruise control with
stop and go enabled and set.

The steering sensor detects your hands
on the steering wheel.

The system detects both lane markings
when driving on a straight road.

Your vehicle is initially centered in the
lane between two visible line markings.

Note:

If the system does not detect valid

lane line markings, the system will remain
in standby until valid line markings are
availables.

LANE CENTERING LIMITATIONS

Adaptive cruise control limitations apply
to lane centering unless stated otherwise
or contradicted by a lane centering
limitation.  See 

Adaptive Cruise Control

Limitations

 (page 214).

Lane centering may not correctly operate
in any of the following conditions:

The lane width is too narrow or wide.

The curve in the road is too tight.

The system does not detect the
minimum required lane markings or
when lanes merge or split.

When the required steering effort to
maintain lane center exceeds the lane
centering system limit.

When driving in areas that are under
construction or when road work is in
progress.

If the front windshield camera and/or
the front radar are blocked.

When using a spare tire.

Inclement weather conditions
including, but not limited to, high wind,
heavy rain, and fog.

Driving into direct sunlight.

When modification to the steering
system has been made, including
alterations to the steering wheel.

When towing a trailer.

See 

Lane Centering Precautions

 (page

220).

Note:

The system steering assistance is

limited and may not have sufficient effort
for all driving situations and/or conditions,
such as driving through tight curves or
driving through curves at high speeds.

220

Adaptive Cruise Control

 (If Equipped)

Note:

In exceptional conditions, the system

may deviate from the lane center.

SWITCHING LANE CENTERING ON
AND OFF

You must keep your hands on the steering
wheel at all times.

The controls are on the steering wheel.

E262175

Press the button.

The indicator appears in the instrument
cluster. When the lane centering system is
on, the color of the indicator changes to
indicate the system status.

You can override the system at any time
by steering your vehicle.

Note:

The lane centering requirements

must be met before you can enable the
feature.  See 

Lane Centering

Requirements

 (page 220).

LANE CENTERING ALERTS

You must keep your hands on the steering
wheel at all times.

When the system is active and detects no
steering activity for a period of time, the
system alerts you to put your hands on the
steering wheel. If you do not react
appropriately to the warnings the adaptive
cruise control with lane centering system
cancels and slows your vehicle down to
idle speeds while maintaining steering
control. See 

Lane Centering Automatic

Cancellation

 (page 221).

The system also alerts you if your vehicle
crosses lane line markings without
detected steering activity.

Note:

The system could detect a light grip

or light touch on the steering wheel as
hands-off driving.

LANE CENTERING AUTOMATIC
CANCELLATION

When an external condition cancels the
system, for example, no lane markings
available, a tone sounds and a message
appears in the information display.

If your vehicle starts to slow
down, you must provide steering
input to the wheel and press and

release the button to regain full system
performance.

Automatic cancellation can also occur if:

The lane becomes too wide or too
narrow.

The system cannot detect valid lane
markings.

Lane markings cross over one another.

Note:

The system disables until the next

key cycle if your vehicle slows down due to
driver inactivity twice within a key cycle.

LANE CENTERING MANUAL
CANCELLATION

When you perform the following actions,
adaptive cruise control with lane centering
will cancel:

The brake pedal is pressed.

Adaptive cruise control button on the
steering wheel is switched off.

The lane centering system is momentarily
suppressed when either of the following
actions are performed:

Turn signal indicator is latched or
tapped.

You steer the vehicle out of lane.

221

Adaptive Cruise Control

 (If Equipped)

LANE CENTERING INDICATORS

E262175

Illuminates when you switch
lane centering on. The color of
the indicator changes to indicate

the system status.

Gray indicates the system is on but
inactive.

Green indicates the system is active and
applying steering torque assistance input
to keep your vehicle in the center of the
lane.

Amber with an audible tone and then gray
indicates a system automatic cancellation.

LANE CENTERING –
TROUBLESHOOTING

LANE CENTERING –
INFORMATION MESSAGES

Note:

Depending on your vehicle options

and instrument cluster type, some
messages can appear different or not at all.

Details

Message

You must return your hands to the steering wheel and provide

steering input to cancel the message.

Keep Hands on Steering

Wheel

Lane centering is currently not available, due to conditions

that prevent the system from becoming active. To reset the

system, when the vehicle is stationary, return the gear selector

to park (P) and turn the vehicle off. Then, restart the vehicle

with your foot on the brake pedal.

Lane Centering Assist

Not Available

Adaptive cruise control with lane centering is about to cancel.

You must immediately take full control of the vehicle.

Resume Control

Adaptive cruise control with lane centering is in standby mode.

When safe to do so, you can resume adaptive cruise control

with lane centering by applying pressure on the accelerator
pedal. Alternatively, you can also re-enable adaptive cruise

control with lane centering by pressing the resume button on

the steering wheel.

Press Accelerator Pedal

to Resume

ADAPTIVE CRUISE CONTROL
– TROUBLESHOOTING

ADAPTIVE CRUISE CONTROL –
INFORMATION MESSAGES

Note:

Depending on your vehicle options

and instrument cluster type, not all
messages display or are available.

Note:

The system could abbreviate or

shorten certain messages depending upon
which cluster type you have.

222

Adaptive Cruise Control

 (If Equipped)

Action

Message

A malfunction is preventing the adaptive cruise from engaging.

Adaptive Cruise

Malfunction

Front Sensor Not Aligned

Contact an authorized dealer to have the radar checked for

proper coverage and operation.

Conditions exist preventing the system from being available.

Adaptive Cruise Not

Available

You have a blocked radar because of poor radar visibility due
to inclement weather or ice, mud, or water in front of the radar.

You can typically clean the sensor to resolve this.

Adaptive Cruise Not

Available Sensor

Blocked See Manual

Due to the nature of radar technology, it is possible to get a

blockage warning with no actual block. This happens, for

example, when driving in sparse rural or desert environments.
A false blocked condition either self clears, or clears after you

restart your vehicle.

You have selected normal cruise control. The system does

not brake or react to traffic.

Normal Cruise Active

Adaptive Braking Off

Displays when the adaptive cruise control is going to cancel

and you must take control.

Adaptive Cruise - Driver

Resume Control

Displays when the vehicle speed is too slow to activate the

adaptive cruise control and there is no lead vehicle in range.

Adaptive Cruise Speed

Too Low to Activate

223

Adaptive Cruise Control

 (If Equipped)

WHAT IS THE LANE KEEPING
SYSTEM

The lane keeping system alerts you by
providing temporary steering assistance
or steering wheel vibration when it detects
an unintended lane departure.

HOW DOES THE LANE
KEEPING SYSTEM WORK

The lane keeping system uses a forward
looking camera mounted on the windshield
to monitor vehicle movement within the
lane of travel.

When the camera detects a drift out of the
lane of travel, the lane keeping system
alerts the driver by vibrating the steering
wheel, or aids the driver by providing a
small steering input to move the vehicle
back into the lane of travel.

The driver can select one of three modes:

Alert

Aid

Alert + Aid

LANE KEEPING SYSTEM
PRECAUTIONS

WARNING: 

You are responsible for

controlling your vehicle at all times. The
system is designed to be an aid and does
not relieve you of your responsibility to
drive with due care and attention. Failure
to follow this instruction could result in
the loss of control of your vehicle,
personal injury or death.

WARNING: 

The system will not

operate if the sensor cannot track the
road lane markings.

WARNING: 

The sensor may

incorrectly track lane markings as other
structures or objects. This can result in
a false or missed warning.

WARNING: 

In cold and severe

weather conditions the system may not
function. Rain, snow and spray can all
limit sensor performance.

WARNING: 

The system may not

operate properly if the sensor is blocked.
Keep the windshield free from
obstruction.

WARNING: 

If damage occurs in the

immediate area surrounding the sensor,
have your vehicle checked as soon as
possible.

WARNING: 

The system may not

correctly operate if your vehicle is fitted
with a suspension kit not approved by
us.

WARNING: 

Large contrasts in

outside lighting can limit sensor
performance.

LANE KEEPING SYSTEM
LIMITATIONS

The lane keeping system only operates
when the vehicle speed is greater than
40 mph (64 km/h).

The system works when the camera can
detect at least one lane marking or the
edge of the road.

The lane keeping system may not correctly
operate in any of the following conditions:

The lane keeping system does not
detect at least one lane marking.

You switch the turn signal on.

224

Lane Keeping System


Content      ..     5      6      7      8     ..