Ford Bronco (2022 year). Manual in english - page 8
 

  Index      Manuals     Ford Bronco (2022 year). Manual in english


Search            copyright infringement  


Content      ..     6      7      8      9     ..


Ford Bronco (2022 year). Manual in english - page 8


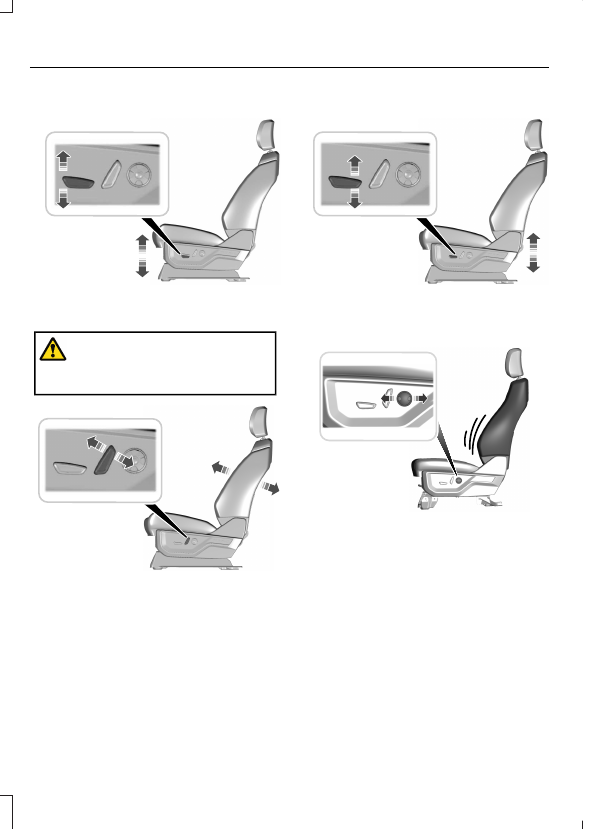
ADJUSTING THE SEAT CUSHION

E308336

ADJUSTING THE SEAT BACKREST

WARNING: 

Do not place cargo or

any objects behind the seatback before
returning it to the original position.

E308338

ADJUSTING THE SEAT HEIGHT

E308337

ADJUSTING THE LUMBAR
SUPPORT

E327927

132

Front Seats

HEATED SEATS

 (IF EQUIPPED)

HEATED SEAT PRECAUTIONS

WARNING: 

Use caution when using

the heated seat if you are unable to feel
pain to your skin because of advanced
age, chronic illness, diabetes, spinal cord
injury, medication, alcohol use,
exhaustion or other physical conditions.
The heated seat could cause burns even
at low temperatures, especially if used
for long periods of time. Failure to follow
this instruction could result in personal
injury.

WARNING: 

Do not poke sharp

objects into the seat cushion or seat
backrest. This could damage the heated
seat element and cause it to overheat.
Failure to follow this instruction could
result in personal injury.

WARNING: 

Do not place anything

on the seat that blocks the heat, for
example a seat cover or a cushion. This
could cause the seat to overheat. Failure
to follow this instruction could result in
personal injury.

Do not:

Place heavy objects on the seat.

Operate the heated seat if water or any
other liquid spills on the seat. Allow the
seat to dry.

SWITCHING THE HEATED SEATS
ON AND OFF

The vehicle must be running to use this
feature.

E146322

Press the heated seat symbol to cycle
through the various heat settings and off.
The more indicators that display, the
warmer the temperature of the seat.

Note:

The heated seats may remain on

after you remote start your vehicle, based
on your remote start settings. The heated
seats may also turn on when you start your
vehicle if they were on when you switched
your vehicle off.

133

Front Seats

MANUAL SEATS

HEAD RESTRAINT COMPONENTS

Rear Seat Outermost Head Restraints
(4-Door)

E330418

Rear Seat Center Head Restraint
(4-Door)

E342165

The head restraints consist of:

An energy absorbing head
restraint.

A

Two steel stems.

B

Guide sleeve adjust and release
button.

C

Guide sleeve unlock and remove
button (If equipped).

D

Fold button (If equipped).

E

Rear Seat Outermost Head Restraints
(2-Door)

A

B

C

E333887

The head restraints consist of:

An energy absorbing head
restraint.

A

Two steel stems.

B

Fold strap.

C

ADJUSTING THE HEAD
RESTRAINT

4-Door

Pull the head restraint up to raise it.

To lower the head restraint:

1.

Press and hold the adjust and release
button.

2. Push the head restraint down.

Press the fold button to fold the head
restraint.

134

Rear Seats

2-Door

Pull the strap to fold the head restraint
rearward.

REMOVING THE HEAD RESTRAINT

1.

Pull up the head restraint until it
reaches its highest position.

2. Press and hold the adjust and release

button and the unlock and remove
button.

3. Pull up the head restraint.

Note:

The head restraints are not

removable on 2-door vehicles.

INSTALLING THE HEAD
RESTRAINT

Align the steel stems into the guide sleeves
and push the head restraint down until it
locks.

ADJUSTING THE SEAT BACKREST

WARNING: 

Do not place cargo or

any objects behind the seat backrest
before returning it to the original position.
Pull on the seat backrest to make sure
that it has fully latched after returning
the seat backrest to its original position.
An unlatched seat may become
dangerous if you stop suddenly or have
a crash.

Note:

The rear seats are not adjustable on

2-door vehicles.

4-Door

E327939

Pull the lever up to fold the seat backrest
fully forward.

Note:

Make sure that the area under the

seat is free of objects before folding the
backrest.

To return the seat backrest to the upright
position, rotate it up until it locks.

Note:

To store the removable doors, the

seat backrest must be in the upright
position.

To recline the seat backrest to the optimal
seating position, pull the lever up and push
the backrest rearward.

FOLDING THE SEATS

WARNING: 

Do not drive your

vehicle with a seat that is unlatched or
in the folded position. Failure to follow
this instruction could result in personal
injury or death in the event of a sudden
stop or crash.

WARNING: 

Do not adjust a seat or

release a seat floor latch when the
vehicle is moving. Failure to follow this
instruction could result in personal injury
or death in a sudden stop or crash.

135

Rear Seats

2-Door

E342383

1.

Pull the strap at the front of the seat
cushion. Then, flip the seat cushion up
to the vertical position.

E342771

2. Pull the strap on the top of the seat

backrest to fold it forward.

UNFOLDING THE SEATS

WARNING: 

Make sure that cargo

and other objects are not trapped under
the seat cushion and that you return the
seat cushion to the full-down position.
Failure to do so may prevent the seat
from operating properly, which could
increase the risk of serious injury in a
crash.

For 2-door vehicles, rotate the seat
backrest upright until it locks in the seating
position. Then, move the seat cushion back
to the seating position.

136

Rear Seats

WHAT IS THE REAR
OCCUPANT ALERT SYSTEM

The rear occupant alert system monitors
vehicle conditions and notifies you to check
for rear seat occupants when you switch
the ignition off.

HOW DOES THE REAR
OCCUPANT ALERT SYSTEM
WORK

The system monitors when rear doors have
been opened and closed to indicate the
potential presence of an occupant in the
rear seat.

A message displays in the information and
entertainment display screen and an
audible warning sounds when you switch
the ignition off after any of the following
conditions have been met:

A rear door is opened or closed while
the ignition is on.

You switch the ignition on within 15
minutes of a rear door opening and
closing.

You switch the ignition on within 15
minutes of the alert having displayed
or sounded.

REAR OCCUPANT ALERT
SYSTEM PRECAUTIONS

WARNING: 

On hot days, the

temperature inside the vehicle can rise
very quickly. Exposure of people or
animals to these high temperatures for
even a short time can cause death or
serious heat related injuries, including
brain damage. Small children are
particularly at risk.

WARNING: 

Do not leave children

or pets unattended in your vehicle.
Failure to follow this instruction could
result in personal injury or death.

REAR OCCUPANT ALERT
SYSTEM LIMITATIONS

The system does not function if any door
is removed.

The system does not detect the presence
of objects or passengers in the rear seat.
It monitors when rear doors are opened
and closed.

Note:

It is possible to receive an alert when

there is no rear seat occupant, but alert
conditions are met.

Note:

It is possible to receive no alert when

there is an occupant in the rear seat, if alert
conditions are not met. For example, if a rear
seat occupant does not enter the vehicle
through a rear door.

Note:

The audible warning does not sound

when the front door is opened before you
switch the ignition off.

SWITCHING REAR OCCUPANT
ALERT SYSTEM ON AND OFF

1.

Press 

Settings

 on the touchscreen.

2. Press 

Vehicle

.

3. Switch 

Rear Occupant Alert

 on or off.

Note:

The default setting is on.

Note:

Performing a master reset causes the

system to switch on again.

137

Rear Occupant Alert System

 (If Equipped)

Semiannual Reminder

 (If Equipped)

When you switch the system off, a
message appears every six months as a
reminder that the system is off. You can
switch the system back on or leave it off.

REAR OCCUPANT ALERT
SYSTEM INDICATORS

E350472

Message

Check rear seats for occupants.

Displays when you switch your vehicle off
after the alert conditions are met.

The message displays for a short period of
time.  Press 

Close

 to acknowledge and

remove the message.

Note:

Depending on your SYNC version, the

graphic may look different from what you
see here.

REAR OCCUPANT ALERT
SYSTEM AUDIBLE WARNINGS

Sounds when you switch your vehicle off
after the alert conditions are met.

The warning sounds for a short period of
time.

138

Rear Occupant Alert System

 (If Equipped)

WHAT IS THE GARAGE DOOR
OPENER

HomeLink Wireless Control
System

E188211

The universal garage door opener replaces
the common hand-held garage door
opener with a three-button transmitter
integrated into the driver’s sun visor.

HOW DOES THE GARAGE
DOOR OPENER WORK

The system includes two primary features,
a garage door opener and a platform for
remote activation of devices within the
home. You can program garage doors as
well as entry gate operators, security
systems, entry door locks and home or
office lighting.

Additional system information can be
found online at www.homelink.com or by
calling the toll-free help line at
1-800-355-3515.

Note:

You can program a maximum of

three devices. To change or replace any of
the three devices after it has been initially
programmed, you must first erase the
current settings.  See 

Clearing the Garage

Door Opener

 (page 141).

GARAGE DOOR OPENER
PRECAUTIONS

WARNING: 

Do not use the system

with any garage door opener that does
not have the safety stop and reverse
feature as required by U.S. Federal
Safety Standards (this includes any
garage door opener manufactured
before April 1, 1982). A garage door
opener which cannot detect an object,
signaling the door to stop and reverse,
does not meet current federal safety
standards. Using a garage door opener
without these features increases the risk
of serious injury or death.

Note:

Make sure that the garage door and

security device are free from obstruction
when you are programming. Do not program
the system with your vehicle in the garage.

Note:

Make sure you keep the original

remote control transmitter for use in other
vehicles as well as for future system
programming.

Note:

We recommend that upon the sale

or lease termination of your vehicle, you
erase the programmed function buttons for
security reasons.  See 

Clearing the Garage

Door Opener

 (page 141).

GARAGE DOOR OPENER
LIMITATIONS

Canadian radio-frequency laws require
transmitter signals to time-out (or quit)
after several seconds – which may not be
long enough for HomeLink to pick up the
signal.

U.S. gate operators time-out in the same
manner.

139

Garage Door Opener

 (If Equipped)

Note:

If programming a garage door opener

or gate operator, it is advised to unplug the
device during the “cycling” process to
prevent possible overheating.

PROGRAMMING THE GARAGE
DOOR OPENER TO YOUR
HAND-HELD TRANSMITTER

This process is to program your in-vehicle
HomeLink function button with your
hand-held transmitter.

Note:

The programming steps below

assume you will be programming HomeLink
that was not previously programmed. If your
HomeLink was previously programmed, you
may need to erase your HomeLink buttons.
See 

Clearing the Garage Door Opener

(page 141).

E188212

1.

With your vehicle parked outside of the
garage, switch your ignition to the on
position, but do not start your vehicle.

2. Press and release one of the three

HomeLink function buttons that you
would like to program.

3. Hold your hand-held garage door

transmitter 1–3 in (2–8 cm) away from
the HomeLink button you want to
program.

4. Press and hold the hand-held

transmitter button you want to
program while watching the indicator
light on HomeLink. Continue to hold
the hand-held button until the
HomeLink indicator light flashes rapidly
or is continuously on.

Note:

You may need to use a different

method if you live in Canada or have
difficulties programming your gate operator
or garage door opener.  See 

Programming

the Garage Door Opener to Your Gate
Opener Motor

 (page 141).

5. Press and hold the HomeLink button

you programmed for two seconds, then
release. You may need to do this twice
to activate the door.

Note:

If the indicator light stays on, the

programming is complete.

Note:

If the HomeLink indicator flashes

rapidly, repeat step 5.

Note:

If your device still does not operate,

you must program your garage door.  See

Programming the Garage Door Opener to
Your Garage Door Opener Motor

 (page

140).

6. To program additional buttons, repeat

Steps 1 – 4.

PROGRAMMING THE GARAGE
DOOR OPENER TO YOUR
GARAGE DOOR OPENER
MOTOR

E142659

140

Garage Door Opener

 (If Equipped)

1.

Press the learn button on the garage
door opener motor, you have 30
seconds to complete the next two
steps.

2. Return to your vehicle.

E188212

3. Press and hold one of the three

HomeLink function buttons you want
to program for two seconds, then
release. Repeat this step. Depending
on your brand of garage door opener,
you may need to repeat this sequence
a third time.

PROGRAMMING THE GARAGE
DOOR OPENER TO YOUR GATE
OPENER MOTOR

Gate Operator / Canadian
Programming

Canadian radio-frequency laws require
transmitter signals to “time-out” (or quit)
after several seconds of transmission –
which may not be long enough for
HomeLink to pick up the signal during
programming. Similar to this Canadian law,
some U.S. gate operators “time-out” in the
same manner.

Note:

If programming a garage door opener

or gate operator, it is advised to unplug the
device during the “cycling” process to
prevent possible overheating.

1.

Press and release, every two seconds,
your hand-held transmitter until the
HomeLink indicator light changes to a
rapidly blinking or continuously on light.

2. Release the hand-held transmitter

button.

3. Press and hold the HomeLink function

button you want to program for two
seconds, then release. You may need
to do this twice to activate the door.

Note:

If the indicator light stays on, the

programming is complete.

Note:

If the HomeLink indicator flashes

rapidly, repeat Step 3.

Note:

If your device still does not operate,

you must program your garage door.  See

Programming the Garage Door Opener to
Your Garage Door Opener Motor

 (page

140).

4. To program additional buttons, repeat

Steps 1 – 4.

CLEARING THE GARAGE DOOR
OPENER

E188213

1.

Press and hold the outer two function
buttons simultaneously for
approximately 10 seconds until the
indicator light above the buttons
flashes rapidly.

141

Garage Door Opener

 (If Equipped)

2. When the indicator light flashes,

release the buttons.

Note:

You cannot erase individual buttons.

REPROGRAMMING THE
GARAGE DOOR OPENER

To program a device to a previously trained
button, follow these steps:

1.

Press and hold the desired button. Do
NOT release the button.

2. The indicator light begins to flash after

20 seconds. Without releasing the
button, follow programming steps.

GARAGE DOOR OPENER
RADIO FREQUENCIES

FCC and RSS-210 Industry Canada
Compliance

WARNING: 

Changes or

modifications not expressively approved
by the party responsible for compliance
could void the user's authority to operate
the equipment. The term "IC:" before the
radio certification number only signifies
that Industry Canada technical
specifications were met.

This device complies with Part 15 of the
FCC Rules and with RSS-210 of Industry
Canada. Operation is subject to the
following two conditions: (1) this device
may not cause harmful interference, and
(2) this device must accept any
interference received, including
interference that could cause undesired
operation.

This equipment complies with FCC
radiation exposure limits set forth for an
uncontrolled environment. End Users must
follow the specific operating instructions
for satisfying RF exposure compliance. This
transmitter must be at least 8 in (20 cm)
from the user and must not be co-located
or operating in conjunction with any other
antenna or transmitter.

142

Garage Door Opener

 (If Equipped)

LOCATING THE USB PORTS

Data Transfer USB Ports

The USB ports could be in the following
locations:

On the lower instrument panel below
the climate control.

Inside the center console.

Note:

 These USB ports can also charge

devices.

Note:

 Not all USB ports in your vehicle have

data transfer capabilities.

Note:

 We recommend using only USB-IF

certified cables and adapters. Non-certified
cables and adapters may not work.

Charge Only USB Ports

The USB ports could be in the following
locations:

On the lower instrument panel.

On the upper instrument panel.

Inside the media bin.

Inside the center console.

On the rear of the center console.

In the cargo area.

In the frunk.

PLAYING MEDIA USING THE
USB PORT

WARNING: 

Driving while distracted

can result in loss of vehicle control, crash
and injury. We strongly recommend that
you use extreme caution when using any
device that may take your focus off the
road. Your primary responsibility is the
safe operation of your vehicle. We
recommend against the use of any
hand-held device while driving and
encourage the use of voice-operated
systems when possible. Make sure you
are aware of all applicable local laws
that may affect the use of electronic
devices while driving.

Connect your device to the USB port.

E100027

Press the audio button on the
feature bar.

Select 

Sources

.

Select the USB option.

Press the button to play a track.
Press the button again to pause
the track.

Press the button to skip to the
next track.

Press and hold the button to fast

forward through the track.

Press the button once to return
to the beginning of a track.
Repeatedly press the button to

return to previous tracks.

Press and hold the button to fast rewind.

143

USB Ports

CHARGING A DEVICE

Connect your device to the USB port.

Data Transfer USB Ports

You can charge your device through the
data transfer USB port when SYNC is on.

Charge Only USB Ports

You can charge your device through the
charge only USB port when the vehicle is
in accessory mode or when the vehicle is
running.

144

USB Ports

WHAT IS THE POWER OUTLET

The power outlet is a socket that connects
an electrical device to your vehicle's power
supply.

POWER OUTLET
PRECAUTIONS

WARNING: 

Do not keep electrical

devices plugged in the power point
whenever the device is not in use. Do not
use any extension cord with the 110 volt
AC power point, since it will defeat the
safety protection design. Doing so may
cause the power point to overload due
to powering multiple devices that can
reach beyond the 400 watt load limit
and could result in fire or serious injury.

Note:

The vehicle provides up to 400 watts

when in park and up to 300 watts when in
drive mode. This wattage is divided between
multiple outlets when in use at the same
time.

LOCATING THE POWER
OUTLETS

The power outlet is on the rear of the
center console.

Rear of the Center Console

E337926

POWER OUTLET INDICATORS

The power outlet indicator illuminates to
let you know the status of the system.

Description

Indicator Status

When the indicator

light is on, the

outlet is providing

power.

On

When the indicator

light is off, there is

no power to the

outlet.

Off

When the indicator
light is flashing, the

outlet is in a fault

mode.

Flashing

Fault mode

The power outlet temporarily turns off
power if the device exceeds the watt limit.

1.

Unplug your device.

145

Power Outlet - Vehicles With: 120V Power Outlet

2. Switch your vehicle off to let the

system cool and reset the fault mode.

3. Switch your vehicle back on, but do not

plug your device back in.

4. With your vehicle on, make sure the

indicator light remains on.

5. Make sure your device does not exceed

the power limits and then plug in your
device.

Note:

If a fault occurs again, your device

may exceed the capacity available from the
power outlet.

146

Power Outlet - Vehicles With: 120V Power Outlet

WHAT IS THE POWER OUTLET

The power outlet can power devices using
a 12 V outlet adapter.

POWER OUTLET
PRECAUTIONS

WARNING: 

Do not plug optional

electrical accessories into the cigar
lighter socket. Incorrect use of the cigar
lighter can cause damage not covered
by the vehicle warranty, and can result
in fire or serious injury.

When you switch the vehicle on, you can
use the socket to power 12 V appliances
with a maximum current rating of 20 A. Do
not use the power point over the vehicle
capacity of 12 V DC 240 W or a fuse could
blow. Do not plug in any device that
supplies power to the vehicle through the
power points. This could result in damage
to vehicle systems. Do not hang any
accessory from the accessory plug. Always
keep the power point caps closed when
not in use. Do not insert objects other than
an accessory plug into the power point.

To prevent the battery from running out of
charge:

Do not use the power point longer than
necessary when the vehicle is off.

Do not leave devices plugged in
overnight or when you park your vehicle
for extended periods.

LOCATING THE POWER
OUTLETS

Power outlets may be in the following
locations:

On the lower instrument panel.

Inside the center console.

On the front of the center console.

On the rear of the center console.

In the cargo area.

On the passenger side floor panel.

3rd row on the quarter trim panels.

147

Power Outlet - Vehicles With: 12V Power Outlet


Content      ..     6      7      8      9     ..