Ford Super Duty (2017 year). Manual - part 51
 

  Index      Ford     Ford Super Duty - service repair manual 2017 year


Search            


Content   ..  49  50  51  52   ..


Ford Super Duty (2017 year). Manual - part 51


In order to prevent the engine from running
at too low an RPM, which may cause it to
stall, SelectShift will still automatically
make some downshifts if it has determined
that you have not downshifted in time.
Although SelectShift will make some
downshifts for you, it will still allow you to
downshift at any time as long as the
SelectShift determines that damage will
not be caused to the engine from
over-revving.

SelectShift will not automatically upshift,
even if the engine is approaching the RPM
limit. It must be shifted manually by
pressing the + button.

Note: Engine damage may occur if you
maintain excessive engine revving without
shifting.

The SelectShift Automatic transmission
feature has two modes: PRS and M mode.

PRS (Progressive Range Selection)

Progressive Range Selection gives you the
ability to lockout gears from the automatic
shifting range. This may provide you with
an improved driving experience (for
example, in slippery conditions or when
experiencing a steep grade).

With the gearshift lever in drive (D), press
the – button to active PRS. The available
and selected gears are indicated on the
instrument cluster.

All available gears will display with the
current gear indicated. Press the – button
again to lock out gears beginning with the
highest gear. Example: press the – button
twice to lock out 6th and 5th gears. Only
the available gears will display and the
transmission will automatically shift
between the available gears. Press the +
button to unlock gears to allow the
transmission to shift to higher gears. The
transmission will shift automatically within
the gear range you select.

Manual (M)

Moving the gearshift lever to the manual
(M) position will allow you to manually
select the gear you desire. Only the current
gear will display. Use the buttons on the
gearshift lever to manually select gears.
Press the + button to upshift or the –
button to downshift. Return the
transmission to a different gearshift
position to deactivate manual control.

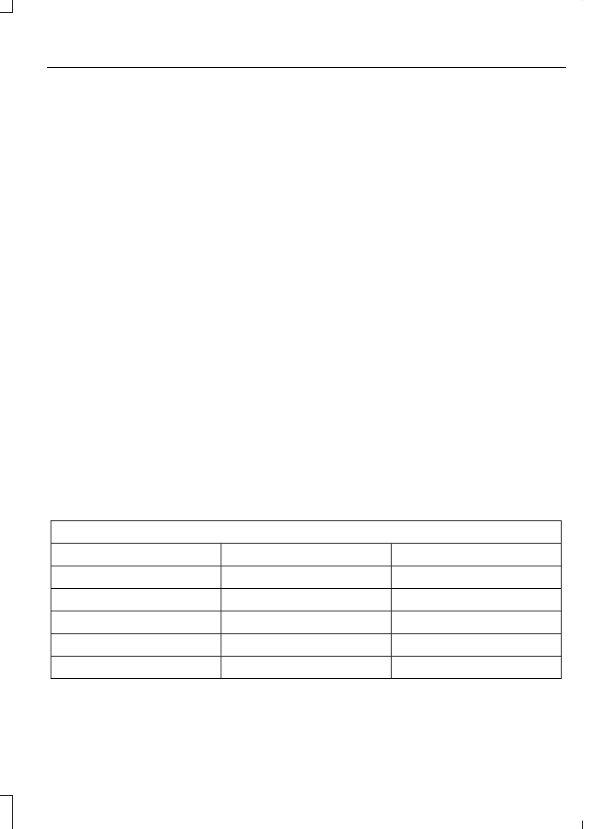
Recommended shift speeds

Upshift according to the following chart:

Upshifts when accelerating (recommended for best fuel economy)

Diesel engines

Gasoline engines

Shift from:

12 mph (19 km/h)

15 mph (24 km/h)

1 – 2

19 mph (31 km/h)

25 mph (40 km/h)

2 – 3

26 mph (42 km/h)

40 mph (64 km/h)

3 – 4

34 mph (55 km/h)

45 mph (72 km/h)

4 – 5

46 mph (74 km/h)

50 mph (80 km/h)

5 – 6

207

Automatic Transmission Adaptive
Learning

This feature's design is to increase
durability and provide consistent shift feel
over the life of your vehicle. A new vehicle
or transmission may have firm shifts, soft
shifts or both. This operation is normal and
does not affect function or durability of the
transmission. Over time, the adaptive
learning process fully updates transmission
operation. Additionally, whenever you
disconnect the battery or install a new
battery, the system must relearn the
strategy.

Brake-Shift Interlock

WARNINGS

Do not drive your vehicle until you
verify that the brake lamps are
working.

When doing this procedure, you need
to take the transmission out of park
(P) which means your vehicle can

roll freely. To avoid unwanted vehicle
movement, always fully apply the parking
brake prior to doing this procedure. Use
wheels chocks if appropriate.

If the parking brake is fully released,
but the brake warning lamp remains
illuminated, the brakes may not be

working properly. Have your vehicle
checked as soon as possible.

Your vehicle is equipped with a brake-shift
interlock feature that prevents the
gearshift lever from moving from park (P)
when the ignition is on and the brake pedal
is not pressed.

If you cannot move the gearshift lever out
of park (P) position with the ignition is on
and the brake pedal pressed, a malfunction
may have occurred. It is possible that a
fuse has blown or your vehicle’s brake
lamps are not operating properly.  See
Fuse Specification Chart (page 310).

If the fuse is not blown and the brake
lamps are working properly, the following
procedure allows you to move the gearshift
lever from park (P):

1.

Apply the parking brake. Switch the
ignition key to 1 (off), then remove the
key.

2. Move the steering column to the full

down and full rearward position
(toward the driver’s seat).

3. Remove the gearshift lever boot.
4. Place fingers into hole where you

removed the gearshift lever boot and
pull top half of shroud up and forward
to separate it from the lower half of the
shroud. There is a hinge at the forward
edge of the top shroud. Roll the top
half of the shroud upward on the hinge
point to clear the hazard flasher button,
then pull straight rearward toward the
driver’s seat to remove.

5. Remove the top half of the shroud.

6. Remove the three fasteners under the

column that secure the lower shroud
half to the column.

E163185

7.

Pull the lock lever into the full unlocked
position and remove the lower shroud
cover by pulling the lever handle
through the slot in the cover.

8. Apply the brake. Gently lift the override

disk and move the gearshift lever into
neutral (N).

208

E163186

9. Start your vehicle.

Perform Steps 4 through 8 in reverse order,
making sure to engage the hinge pivots
between the upper and lower halves of the
shroud. Keep slight pressure in the forward
direction as you rotate the halves together.

If Your Vehicle Gets Stuck In Mud
or Snow

Note: Do not rock your vehicle if the engine
is not at normal operating temperature or
damage to the transmission may occur.

Note: Do not rock your vehicle for more
than a minute or damage to the
transmission and tires may occur, or the
engine may overheat.

If your vehicle is stuck in mud or snow, you
may rock it out by shifting between forward
and reverse gears, stopping between shifts
in a steady pattern. Press lightly on the
accelerator in each gear.

POWER TAKE-OFF

WARNING

Use of auxiliary equipment that
exceeds the maximum Power
Take-Off (PTO) load specified in the

Ford Truck Body Builders Layout Book can
adversely affect the performance of the
powertrain system. Refer to the Body
Builders Layout Book for instructions about
the appropriate installation of additional
equipment.

Auxiliary equipment called power take-off,
or PTO, is often added to the engine or
transmission to operate utility equipment.
Examples include a wheel-lift for tow
trucks, cranes, tools for construction or tire
service, and pumping fluids. PTO
applications draw auxiliary horsepower
from the powertrain, often while the
vehicle is stationary. In this condition, there
is limited cooling air flow through the
radiator and around the vehicle that
normally occurs when a vehicle is moving.
The aftermarket PTO system installer,
having the most knowledge of the final
application, is responsible for determining
whether additional chassis heat protection
or powertrain cooling is required, and
alerting the user to the safe and proper
operation.

Ford Super Duty Vehicles are approved for
use as a stationary (including split shaft
capability) or mobile power source, within
limits and operating guidelines detailed in
the Ford Truck Body Builders Layout Book,
found at www.fleet.ford.com/truckbbas,
and through the Ford Truck Body Builders
Advisory Service.

209

USING FOUR-WHEEL DRIVE

Note: For important information regarding
the safe operation of this type of vehicle,
see General Information in the Wheels and
Tires chapter.

Note: Do not use 4H or 4L mode on dry,
hard surfaced roads. Doing so can produce
excessive noise, increase tire wear and may
damage drive components. 4X4 mode is
only intended for consistently slippery or
loose surfaces. Use of 4L mode on these
surfaces may produce some noise (such as
occasional clunks), but will not damage
drive components.

Note: If 4X4 low is selected while the
vehicle is moving above 3 mph (5 km/h),
the 4WD system will not perform a shift.
This is normal and should be no reason for
concern. Refer to Shifting to or from 4L (4X4
Low) for proper operation.

Note: You can switch on and switch off the
electronic locking differential by pulling the
4WD control (4WD vehicles) or turning the
electronic locking differential control (2WD
vehicles).  See Electronic Locking
Differential
 (page 219).

Manual Shift On Stop (MSOS)
4WD system

 (If Equipped)

Note: The vehicle should not be driven in
4X4 High or 4X4 Low modes with the hub
locks set to FREE as this condition may
damage driveline system components.

LOCK

E

E

R

F

E163187

The 4WD system is engaged or disengaged
by rotating the control for both front wheel
hub locks from the FREE or LOCK position,
then manually engaging or disengaging the
transfer case with the floor-mounted
shifter. For increased fuel economy in 2WD,
rotate both hub locks to the FREE position.

Electronic Shift-On-the-Fly
(ESOF) 4WD system

 (If Equipped)

Note: If 4X4 Low is selected while the
vehicle is moving above 3 mph (5 km/h),
the 4WD system will not perform a shift.
This is normal and should be no reason for
concern. Refer to Shifting to or from 4L (4X4
Low) for proper system operation.

Note: Auto-manual hub locks can be
manually overridden by rotating the hub lock
control from AUTO to LOCK.

LOCK

O

T

U

A

E163188

210

 (If Equipped)


Content   ..  49  50  51  52   ..