Ford Transit Connect (2018 year). Manual - part 65
 

  Index      Ford     Ford Transit Connect - service manual 2018 year in english


Search            


Content   ..  63  64  65  66   ..


Ford Transit Connect (2018 year). Manual - part 65


A

B

D

C

I

J

K

L

M

E

H

F

G

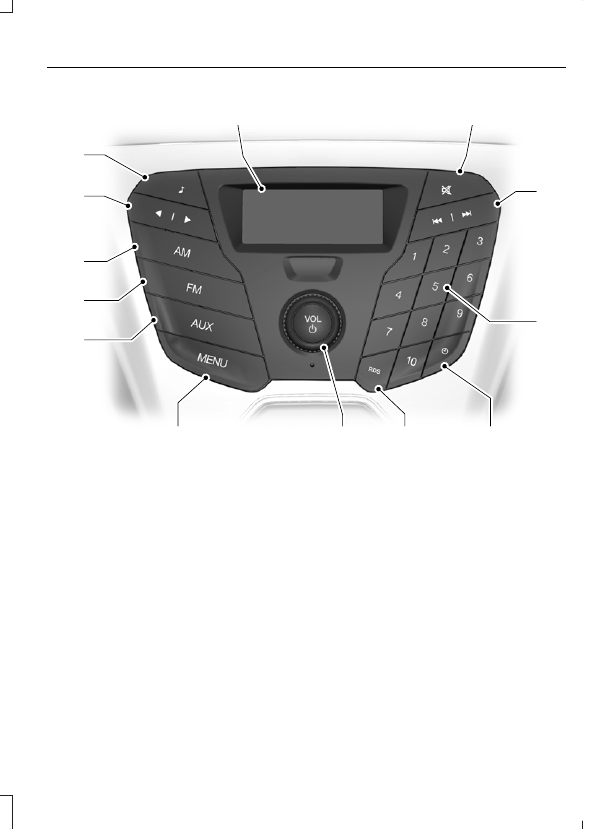
E165952

Display: Shows the status of the current mode selected.

A

Mute: Press the button to mute the sound.

B

Seek up: Press the button to go to the next station up the radio frequency band.
Seek down: Press the button to go to the next station down the radio frequency
band.

C

Numeric keypad: Press the button to recall a previously stored station. To
store a favorite station press and hold until the sound returns.

D

Clock: Press the button to select clock setup.

E

RDS: Press the button to toggle between displaying the radio station frequency
or radio station name.

F

On, Off and VOL: Press the button to switch the audio system on or off. Turn
the dial to adjust the volume.

G

MENU: Press the button to access different audio system features.

H

AUX: Press the button to access the AUX features, it will also cancel the menu
or list browsing.

I

FM: Press the button to select the FM frequency band.

J

AM: Press the button to select the AM frequency band.

K

Cursor up or down: Press the cursor up or down arrow buttons to adjust the
settings within the menus or to move to the next radio station while listening
to the radio on the FM or AM frequency band.

L

Sound: Press the button to adjust the sound settings for bass, treble, balance
or fade.

M

Sound Button

This will allow you to adjust the sound
settings for bass, treble, balance or fade.

1.

Press the sound button until the
required setting is displayed.

2. Use the cursor up or down arrow

buttons to select the required level.

Note: Fade settings are only adjustable if
there are speakers in the rear of your vehicle.

Frequency Band Buttons

Press the FM or AM button to select
frequency band.

You can use the buttons to return to radio
reception when you have been listening to
an AUX source.

Station Tuning Buttons

Seek Tuning

Select a frequency band and briefly press
one of the seek buttons. The unit will stop
at the first station it finds in the direction
you have chosen.

Manual Tuning

Use the cursor up or down arrow buttons
to tune up or down the frequency band in
small increments, or press and hold to
increment quickly until you find a station
you want to listen to.

Station Preset Buttons

This feature allows you to store your
favorite stations. They can be recalled by
selecting the appropriate frequency band
and pressing one of the preset buttons.

1.

Select a frequency band.

2. Tune to the station required.

3. Press and hold one of the preset

buttons. The audio unit will also mute
momentarily as confirmation.

You can repeat this on each frequency
band and for each preset button.

Clock Button

This will allow you to adjust the clock
settings.

1.

Press the clock button until Set Hour
is displayed.

2. Use the cursor up or down arrow

buttons to set the correct hour.

3. Press the clock button again until Set

Minutes is displayed.

4. Use the cursor up or down arrow

buttons to set the correct minutes.

Setting 24 Hour or 12 Hour Display

1.

Press the MENU button until 24 Hour
is displayed.

2. Use the cursor up or down arrow

buttons to toggle between 24 hour or
12 hour display.

Menu Button

This will allow you to adjust all of the audio
system settings. Press the button
repeatedly until the required setting is
displayed. Use the cursor up or down arrow
buttons to adjust the following settings:

Clock hour

Clock minutes

24 hour, 12 hour

Bass

Treble

Balance

Fade

RDS

AUX Button

Connect your media device to the audio
unit.  See Media Hub (page 276).

Select your media device as the audio
source by pressing the AUX button. After
connecting your media device, the first
track will start to play automatically.

AUDIO UNIT - VEHICLES WITH:
AM/FM/CD/SYNC

WARNING

Driving while distracted can result in
loss of vehicle control, crash and
injury. We strongly recommend that

you use extreme caution when using any
device that may take your focus off the
road. Your primary responsibility is the safe
operation of your vehicle. We recommend
against the use of any hand-held device
while driving and encourage the use of
voice-operated systems when possible.
Make sure you are aware of all applicable
local laws that may affect the use of
electronic devices while driving.

Note: You can operate your audio system
for up to one hour after you switch the
ignition off. Press the on and off control to
operate the system with the ignition turned
off. The system automatically turns off after
one hour.

A

B

C

D

F

G

E

K

L

M

N

O

I

I

J

E166684

H

H

Eject: Press this button to eject a CD.

A

Cursor arrows: Press these buttons to scroll through on screen audio system
choices.

B

OK: Press this button to confirm menu selections.

C

Information: Press this button to access any available radio or CD information.

D

TUNE - and TUNE +: Press these buttons to manually search the frequency
band.

E

Number block: In radio mode, store your favorite radio stations. To store a
radio station, tune to the station, then press and hold a preset button until sound
returns. In CD mode, select a track. In phone mode, enter a phone number.

F

Clock: Push to access clock settings. You can also set the clock by pressing
the MENU button and scrolling to Clock Settings.

G

Function buttons: Select different functions of the audio system depending
on which mode you are in (such as Radio mode or CD mode).

H


Content   ..  63  64  65  66   ..