Ford Low Cab Forward (Ford year). Manual - part 10
 

  Index      Ford     Ford Low Cab Forward - service manual Ford year in english


Search            


Content   ..  8  9  10  11   ..


Ford Low Cab Forward (Ford year). Manual - part 10


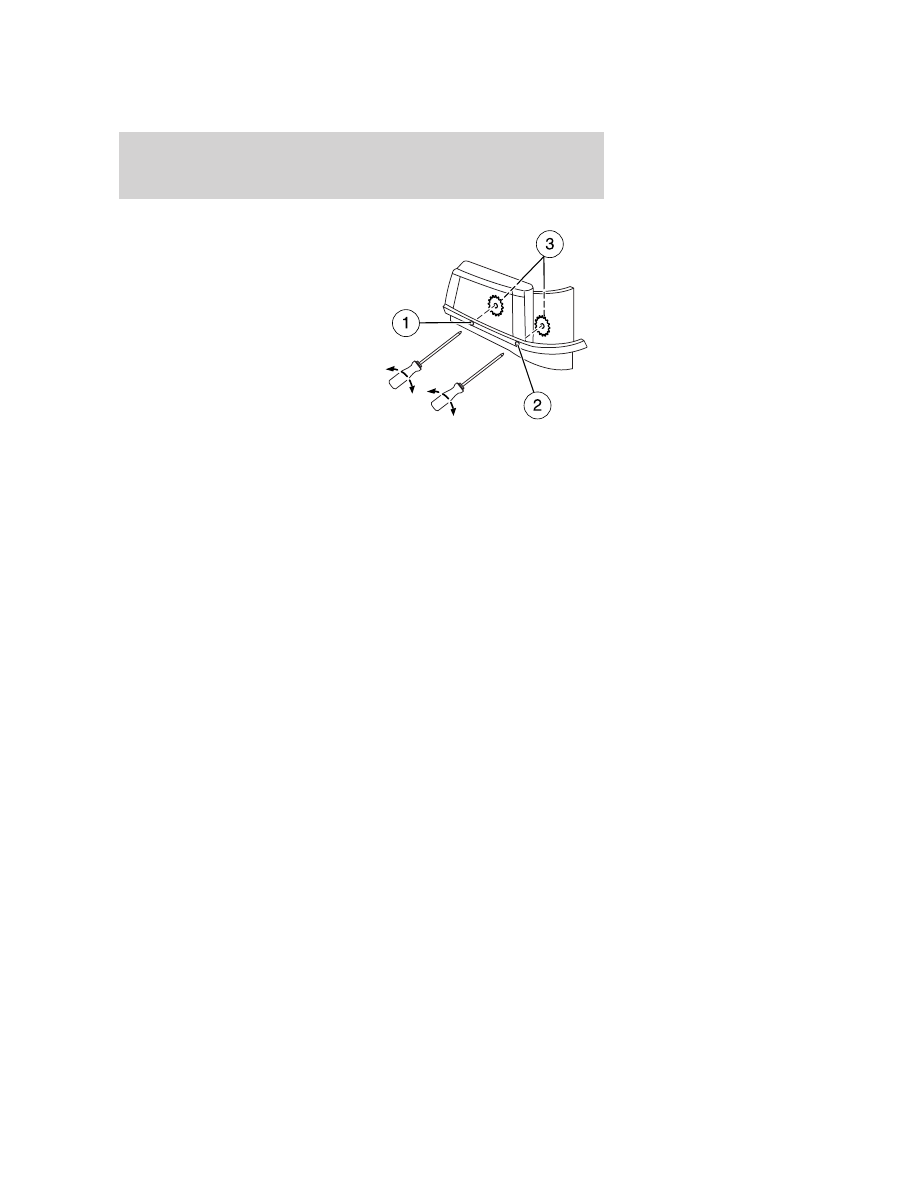
1. Use a #2 Phillips screwdriver with
at least a six inch (150 mm) long
shaft.

2. Insert the screwdriver in the
inboard aiming hole (#1 in the
illustration) until it engages the gear
at the back of the headlamp (#3 in
the illustration). Always start with
the inboard aiming screw.

3. Turn the screwdriver in the
counterclockwise direction to move
the headlamp aim upward or in the
clockwise direction to move the
headlamp aim downward, while
counting the number of turns made. 
Continue turning this screw
until the vertical aim is properly adjusted, but make sure you finish in
the clockwise screwdriver direction. If you are adjusting in the
counterclockwise screwdriver movement, overshoot the adjustment by
one full turn and then turn it clockwise one full turn, so you finish the
adjustment in the clockwise direction and still line up with the vertical
aiming line.

4. Insert the screwdriver in the outboard aiming hole (#2 in the
illustration) until it engages the gear at the back of the headlamp (#3 in
the illustration).

5. Turn the screwdriver the same number of turns in the same direction
as was done in the inboard aiming hole, but make sure you finish in the
clockwise screwdriver direction. If you are adjusting in the
counterclockwise screwdriver direction overshoot the adjustment by one
full turn and then turn it back one full turn, so you finish the adjustment
in the clockwise direction and still line up with the vertical aiming line.
Do NOT turn this outboard screw in a different direction or a
different amount than was done with the inboard aiming screw.

Lights

42

TURN SIGNAL CONTROL
• Push down to activate the left

turn signal.

• Push up to activate the right turn

signal.

INTERIOR LAMPS

Dome lamp - Type A:

1. OFF: Light always off.

2. DOOR: Light turns on when
either door is open.

3. ON: Light always on.

Dome lamp - Type B:

Press where the arrows indicate to
turn on either side of the dome
lamp.

Lights

43

EXTERIOR BULBS

Bulb inspection

It is a good safety practice to check operation of headlamps, parking
lamps, turn signals, clearance and marker lamps, instrument panel and
control lamps each day.

Using the right bulbs

Function

Number of

bulbs

Trade number

Headlamps

2

9007LL

Front park/turn signal lamps

2

1157A

Front sidemarker

2

168

Front clearance and
identification lamps

5

194

Fog lamps

2

64151

Brake/Tail/Stop/Rear turn
signal/License lamps

2

1157

Back-up lamps

2

1156

Dome lamp

2

DE3175 (single

bulb lamp) or 212

(dual bulb lamp)

To replace all instrument panel lights - see your dealer

Bulb replacement

Dome lamp - Type A

To replace the dome lamp, pull the
lamp cover off by disengaging the
tabs and pulling the cover down;
pull the bulb down to remove it.
Replace the bulb and cover.

Lights

44

Dome lamp - Type B

To replace the dome lamp, pull the
lamp cover off by disengaging the
tabs on the long end of the lens and
pulling it down; pull the bulb(s) out.
Replace the bulb and lens.

Replacing headlamp and fog lamp bulbs

Handle a halogen headlamp bulb carefully and keep out of
children’s reach. Grasp the bulb only by its plastic base and do

not touch the glass. The oil from your hand could cause the bulb to
break the next time the headlamps are operated.

The headlamp and fog lamp bulbs can be replaced without removing the
headlight assemblies, just by tilting the cab (refer to Tilting the cab in
the Maintenance and Specifications chapter) and reaching in the back
of the headlamp assemblies to remove the bulbs. If you find replacing the
headlamp or fog lamp bulbs too difficult without removing the headlamp
assemblies, see the following procedure.

To remove the headlamp bulbs:

1. Make sure headlamp switch is in the OFF position.

Lights

45


Content   ..  8  9  10  11   ..