Ford Fusion (2018 year). Manual - part 5
 

  Index      Ford     Ford Fusion - service manual 2018 year in english


Search            


Content   ..  3  4  5  6   ..


Ford Fusion (2018 year). Manual - part 5


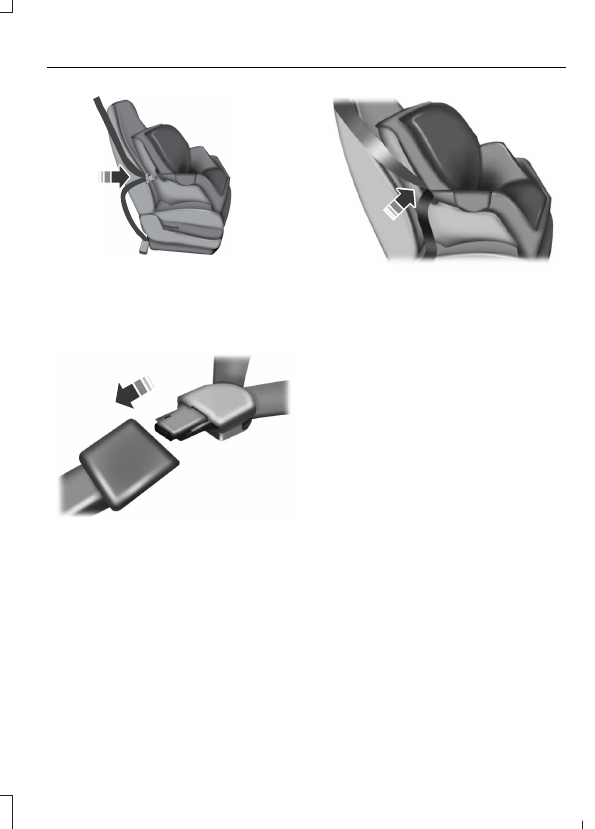
E142530

3. While holding the shoulder and lap belt

portions together, route the tongue
through the child restraint according
to the child restraint manufacturer's
instructions. Be sure the belt webbing
is not twisted.

E146523

4. Insert the belt tongue into the proper

buckle (the buckle closest to the
direction the tongue is coming from)
for that seating position until you hear
a snap and feel the latch engage. Make
sure the tongue is latched securely by
pulling on it.

E146524

5. To put the retractor in the automatic

locking mode, grasp the lap portion of
the inflatable seatbelt and pull upward
until you pull all of the belt out.

Note: The automatic locking mode is
available on the front passenger and rear
seats.

Note: Unlike the standard seatbelt, the
inflatable seatbelt's unique lap portion locks
the child restraint for installation. The ability
for the shoulder portion of the belt to move
freely is normal, even after the lap belt has
been put into the automatic locking mode.

Note: The lock-off device on some child
restraints may not accommodate the
shoulder portion of the inflatable seatbelt.
Follow all instructions provided by the
manufacturer of the child restraint regarding
the necessary and proper use of the lock-off
device. In some instances, these devices
have been provided only for use in vehicles
with seatbelt systems that would otherwise
require a locking clip.

6. Allow the belt to retract to remove

slack. The belt clicks as it retracts to
indicate it is in the automatic locking
mode.

7.

Try to pull the belt out of the retractor
to make sure the retractor is in the
automatic locking mode (you should
not be able to pull more belt out). If the
retractor is not locked, unbuckle the
belt and repeat Steps 5 and 6.

E146525

8. Remove remaining slack from the belt.

Force the seat down with extra weight,
for example, by pressing down or
kneeling on the child restraint while
pulling down on the lap belt in order to
force slack from the belt. This is
necessary to remove the remaining
slack that will exist once the extra
weight of the child is added to the child
restraint. It also helps to achieve the
proper snugness of the child restraint
to your vehicle. Sometimes, a slight
lean toward the buckle will additionally
help to remove remaining slack from
the belt.

9. Attach the tether strap (if the child

restraint is equipped).

E142534

10.

Before placing the child in the seat,
forcibly move the seat forward and
back to make sure the seat is securely
held in place. To check this, grab the
seat at the belt path and attempt to
move it side to side and forward and
back. There should be no more than
1 in (2.5 cm) of movement for proper
installation.

We recommend checking with a NHTSA
Certified Child Passenger Safety
Technician to make certain the child
restraint is properly installed. In Canada,
check with Transport Canada for referral
to a Child Car Seat Clinic.

Using Lower Anchors and Tethers
for CHildren (LATCH)

WARNINGS

Do not attach two child safety
restraints to the same anchor. In a
crash, one anchor may not be strong

enough to hold two child safety restraint
attachments and may break, causing
serious injury or death.

WARNINGS

Depending on where you secure a
child restraint, and depending on the
child restraint design, you may block

access to certain seatbelt buckle
assemblies and LATCH lower anchors,
rendering those features potentially
unusable. To avoid risk of injury, make sure
occupants only use seating positions
where they are able to be properly
restrained.

The LATCH system is composed of three
vehicle anchor points: two lower anchors
where the seatback and seat cushion meet
(called the seat bight) and one top tether
anchor behind that seating position.

LATCH compatible child safety seats have
two rigid or webbing mounted
attachments that connect to the two lower
anchors at the LATCH equipped seating
positions in your vehicle. This type of
attachment method eliminates the need
to use seatbelts to attach the child
restraint. However, you can still use the
seatbelt to attach the child restraint. For
forward-facing child restraints, the top
tether strap must also be attached to the
proper top tether anchor if a top tether
strap has been provided with your child
restraint.

E142535

Your vehicle has LATCH lower anchors for
child restraint installation at the seating
positions marked with the child restraint
symbol.

E144054

The LATCH anchors are at the rear section
of the rear seat between the cushion and
seatback below the symbols as shown.
Follow the child restraint manufacturer's
instructions to properly install a child
restraint with LATCH attachments. Follow
the instructions on attaching child safety
seats with tether straps.

Attach LATCH lower attachments of the
child restraint only to the anchors shown.

Use of Inboard Lower Anchors from the
Outboard Seating Positions (Center
Seating Use)

WARNING

The standardized spacing for LATCH
lower anchors is 11 in (280 mm)
center to center. Do not use LATCH

lower anchors for the center seating
position unless the child restraint
manufacturer's instructions permit and
specify using anchors spaced at least as
far apart as those in this vehicle.

The lower anchors at the center of the
second row rear seat are spaced 18 in
(46 cm) apart. You cannot install a child
restraint with rigid LATCH attachments at
the center seating position. You can only
use LATCH compatible child restraints
(with attachments on belt webbing) at
this seating position provided that the child
restraint manufacturer's instructions
permit use with the anchor spacing stated.
Do not attach a child restraint to any lower
anchor if an adjacent child restraint is
attached to that anchor.

Each time you use the safety seat, check
that the seat is properly attached to the
lower anchors and tether anchor, if
applicable. Tug the child restraint from side
to side and forward and back where it is
secured to your vehicle. The seat should
move less than 1 in (2.5 cm) when you do
this for a proper installation.

If the safety seat is not anchored properly,
the risk of a child being injured in a crash
greatly increases.

Combining Seatbelt and LATCH Lower
Anchors for Attaching Child Safety
Seats

When used in combination, either the
seatbelt or the LATCH lower anchors may
be attached first, provided a proper
installation is achieved. Attach the tether
strap afterward, if included with the child
restraint.

Using Tether Straps

Many forward-facing child safety
seats include a tether strap
which extends from the back of

the child safety seat and hooks to an
anchoring point called the top tether
anchor. Tether straps are available as an
accessory for many older safety seats.

Contact the manufacturer of your child
restraint for information about ordering a
tether strap, or to obtain a longer tether
strap if the tether strap on your safety seat
does not reach the appropriate top tether
anchor in your vehicle.

Once you install the child safety seat using
either the seatbelt, the lower anchors of
the LATCH system, or both, you can attach
the top tether strap.

The tether strap anchors in your vehicle
are in the following positions (shown from
top view):

E142537

Perform the following steps to install a
child safety seat with tether anchors:

Note: If you install a child restraint with rigid
LATCH attachments, do not tighten the
tether strap enough to lift the child restraint
off your vehicle seat cushion when the child
is seated in it. Keep the tether strap just snug
without lifting the front of the child restraint.
Keeping the child restraint just touching your
vehicle seat gives the best protection in a
severe crash.


Content   ..  3  4  5  6   ..