Ford F-150 (2018 year). Manual - part 100
 

  Index      Ford     Ford F-150 - service manual 2018 year in english


Search            


Content   ..  98  99  100  101   ..


Ford F-150 (2018 year). Manual - part 100


E233626

8. Remove the tools from the tool bag.

Note: Only F-150 Raptor trim vehicles
receive a wheel chock with the tool bag.

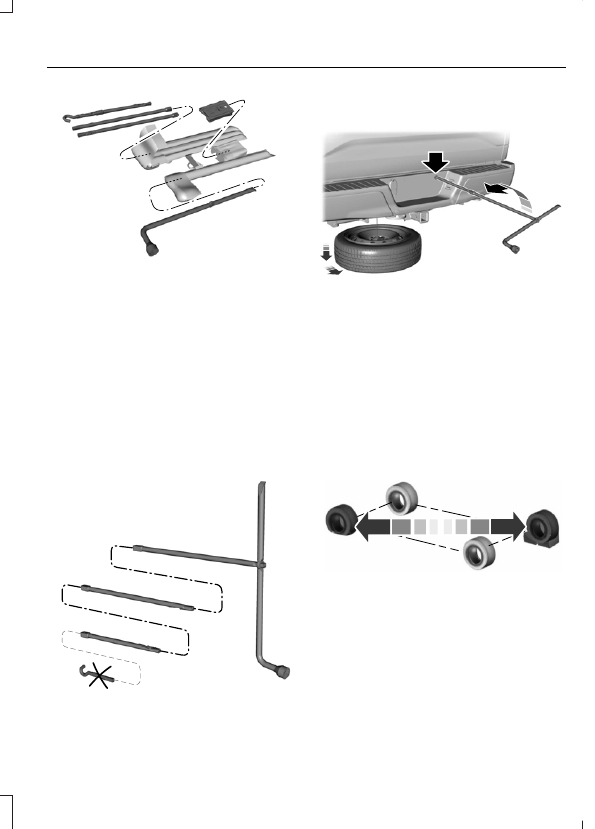
Removing the Spare Tire

Note: Remove the hook end from the
assembled jack handle before continuing.

The spare tire is located under the vehicle,
just forward of the rear bumper.

1.

Use your key to remove the lock
cylinder from the access hole of the
bumper to allow access to the guide
tube.

E188735

2. Assemble the jack handle as shown in

the illustration.

E184020

3. Fully insert the jack handle through the

bumper hole and into the guide tube
through the access hole in the rear
bumper.

4. Turn the handle counterclockwise until

the tire is lowered to the ground, the
tire can be slid rearward and the cable
is slightly slack.

5. Remove the retainer from the center

of the wheel.

E175447

6. Block both the front and rear of the

wheel diagonally opposite the flat tire.
For example, if the left front tire is flat,
block the right rear wheel.

7.

Obtain the spare tire and vehicle jack
from their storage locations.

8. Loosen each wheel lug nut on the

affected flat tire one-half turn
counterclockwise, but do not remove
them.

Jacking the Vehicle

Front Jacking Points

E183709

Note: Use the frame rail as the jacking
location point, not the control arm. The
frame rail is marked with an arrow.

Rear Jacking Points

E166718

Note: Jack at the specified locations to
avoid damage to the vehicle.

1.

Place the vehicle jack at the jacking
point next to the tire you are changing.
Turn the jack handle clockwise until
the wheel is completely off the ground.

2. Remove the lug nuts with the lug

wrench.

3. Replace the flat tire with the spare tire,

making sure the valve stem is facing
outward. Reinstall the lug nuts until the
wheel is snug against the hub. Do not
fully tighten the lug nuts until the wheel
has been lowered.

4. Lower the wheel by turning the jack

handle counterclockwise.

5. Remove the vehicle jack and fully

tighten the lug nuts in the order shown.
See Technical Specifications (page
407).

6. Stow the flat tire. See the Stowing the

Flat or Spare Tire.

7.

Stow the vehicle jack and lug wrench.
Make sure the jack is fastened securely
before you drive. See Stowing the
Vehicle Jack and Tool Bag.

8. Unblock the wheels.

E166719

1

3

5

4

6

2

Stowing the Flat or Spare Tire

Note: Failure to follow the spare tire
stowage instructions may result in failure of
the cable or loss of the spare tire.

1.

Lay the tire on the ground with the
valve stem facing up.

2. Slide the wheel partially under the

vehicle and install the retainer through
the wheel center. Pull on the cable to
align the components at the end of the
cable.

3. Turn the jack handle clockwise until

the tire is raised to its stowed position
underneath the vehicle. The effort to
turn the jack handle increases
significantly and the spare tire carrier
ratchets or slips when the tire is raised
to the maximum tightness. Tighten to

the best of your ability, to the point
where the ratchet or slip occurs, if
possible. The spare tire carrier will not
allow you to overtighten. If the spare
tire carrier ratchets or slips with little
effort, contact your authorized dealer.

4. Check that the tire lies flat against the

frame and is properly tightened. Try to
push or pull, then turn the tire to be
sure it will not move. Loosen and
retighten, if necessary. Failure to
properly stow the spare tire may result
in failure of the winch cable and loss
of the tire.

5. Repeat this tightness check procedure

when servicing the spare tire pressure
(every six months, as per your
scheduled maintenance information),
or at any time that the spare tire is
disturbed through service of other
components.

6. If removed, install the spare tire lock

into the bumper drive tube with the
spare tire lock key and jack handle.

Stowing the Vehicle Jack and Tool Bag

E184021

1.

Adjust the jack up or down by rotating
the lead screw located on the end of
the jack. The stowage markings should
line up with the bottom channel.

E233626

2. Place the tools inside of the tool bag.

E233625

3. Install the tool bag to the top of the

vehicle jack.

E233624

4. Install the D-ring straps that secure the

tool bag to the vehicle jack.

E233623

5. Install the fuel funnel.

6. Position the jack base so the key hole

slots align with the posts in the floor.

7.

With slight downward pressure, slide
the vehicle jack and tool bag inwards
toward the driver side of the vehicle
until it stops.

E233622

8. Secure the strap that holds the vehicle

jack and tool bag to the vehicle.


Content   ..  98  99  100  101   ..