Ford F-150 (2018 year). Manual - part 88
 

  Index      Ford     Ford F-150 - service manual 2018 year in english


Search            


Content   ..  86  87  88  89   ..


Ford F-150 (2018 year). Manual - part 88


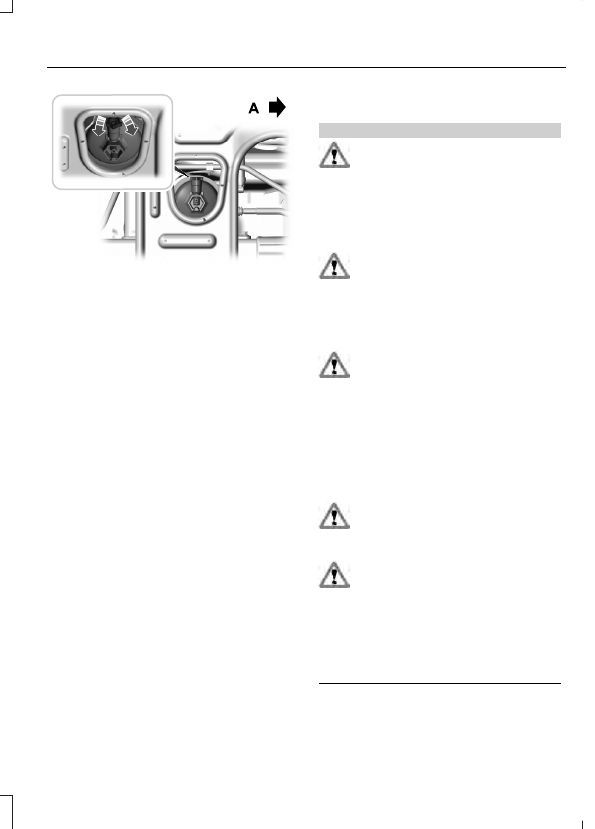
E254226

Front of Vehicle.

A

1.

Switch the ignition off.

2. Loosen the drain plug approximately

one and a half turns.

3. Allow the water to drain.

4. Tighten the drain plug until you feel a

strong resistance.

5. Start the engine.

6. Check for leaks.

Note: The water-in-fuel indicator lamp will
go out after approximately 2 seconds, with
the engine running.

FUEL FILTER

Your vehicle is equipped with a lifetime
fuel filter that is integrated with the fuel
tank. Regular maintenance or replacement
is not needed.

CHANGING THE 12V BATTERY

WARNINGS

Batteries normally produce explosive
gases which can cause personal
injury. Therefore, do not allow

flames, sparks or lighted substances to
come near the battery. When working near
the battery, always shield your face and
protect your eyes. Always provide correct
ventilation.

When lifting a plastic-cased battery,
excessive pressure on the end walls
could cause acid to flow through the

vent caps, resulting in personal injury and
damage to the vehicle or battery. Lift the
battery with a battery carrier or with your
hands on opposite corners.

Keep batteries out of reach of
children. Batteries contain sulfuric
acid. Avoid contact with skin, eyes or

clothing. Shield your eyes when working
near the battery to protect against possible
splashing of acid solution. In case of acid
contact with skin or eyes, flush
immediately with water for a minimum of
15 minutes and get prompt medical
attention. If acid is swallowed, call a
physician immediately.

Battery posts, terminals and related
accessories contain lead and lead
compounds. Wash hands after

handling.

This vehicle may have more than one
battery. Removing the battery cables
from only one battery does not

disconnect your vehicle electrical system.
Make sure you disconnect the battery
cables from all batteries when
disconnecting power. Failure to do so may
cause serious personal injury or property
damage.

Your vehicle is fitted with a Motorcraft
maintenance-free battery which normally
does not require additional water.

When a battery replacement is required,
you must use a recommended
replacement battery that matches the
electrical requirements of the vehicle.

Note: After cleaning or replacing the
battery, make sure you reinstall the battery
cover or shield.

Note: If you add electrical accessories or
components to the vehicle, it may adversely
affect the low voltage battery performance
and durability. This may also affect the
performance of other electrical systems in
the vehicle.

For longer, trouble-free operation, keep the
top of the battery clean and dry.

If you see any corrosion on the battery or
terminals, remove the cables from the
terminals and clean with a wire brush.  You
can neutralize the acid with a solution of
baking soda and water.

Because your vehicle’s engine is
electronically controlled by a computer,
some control conditions are maintained
by power from the battery. When the
battery is disconnected or a new battery
is installed, the engine must relearn its idle
and fuel trim strategy for optimum
driveability and performance. Flexible fuel
vehicles (FFV) must also relearn the
ethanol content of the fuel for optimum
driveability and performance.

To restore the settings, do the following:

1.

Apply the parking brake.

2. Shift into park (P) or neutral (N).

3. Switch off all accessories.

4. Press the brake pedal and start your

vehicle.

5. Run the engine until it reaches normal

operating temperature. While the
engine is warming up, complete the
following: Reset the clock. Reset the
power windows bounce-back feature.
See Windows and Mirrors (page 96).
Reset the radio station presets.  See
Audio System (page 443).

6. Allow the engine to idle for at least one

minute.

7.

Drive the vehicle at least 10 mi (16 km)
to completely relearn the idle trim and
fuel trim strategy.

Note: If you do not allow the engine to
relearn the idle and fuel trim strategy, the
idle quality of your vehicle may be adversely
affected until the engine computer
eventually relearns the idle trim and fuel
trim strategy.

Note: For flexible fuel vehicles, if you are
operating on E85, you may experience poor
starts or an inability to start the engine and
driveability problems until the fuel trim and
ethanol content have been relearned.

Make sure that you dispose of old batteries
in an environmentally friendly way.  Seek
advice from your local authority about
recycling old batteries.

If storing your vehicle for more than 30
days without recharging the battery, we
recommend that you disconnect the
battery cables to maintain battery charge
for quick starting.

Battery Management System

 (If

Equipped)

The battery management system monitors
battery conditions and takes actions to
extend battery life. If excessive battery
drain is detected, the system temporarily
disables some electrical systems to
protect the battery.

Systems included are:

Heated rear window.

Heated seats.

Climate control.

Heated steering wheel.

Audio unit.

Navigation system.

A message may appear in the information
displays to alert you that battery
protection actions are active. These
messages are only for notification that an
action is taking place, and not intended to
indicate an electrical problem or that the
battery requires replacement.

After battery replacement, or in some
cases after charging the battery with an
external charger, the battery management
system requires eight hours of vehicle sleep
time to relearn the battery state of charge.
During this time your vehicle must remain
fully locked with the ignition switched off.

Note: Prior to relearning the battery state
of charge, the battery management system
may temporarily disable some electrical
systems.

Electrical Accessory Installation

To make sure the battery management
system works correctly, do not connect an
electrical device ground connection
directly to the battery negative post. This
can cause inaccurate measurements of
the battery condition and potential
incorrect system operation.

Note: If you add electrical accessories or
components to the vehicle, it may adversely
affect battery performance and durability.
This may also affect the performance of
other electrical systems in the vehicle.

CHECKING THE WIPER
BLADES

E142463

Run the tip of your fingers over the edge of
the blade to check for roughness.

Clean the wiper blades with washer fluid
or water applied with a soft sponge or
cloth.

CHANGING THE WIPER
BLADES

Note: Do not hold the wiper blade when
lifting the wiper arm.

E165804

1.

Pull the wiper blade and arm away
from the glass.

E205141

2

3

4

2. Lift the wiper blade primary locking clip.

3. Press the wiper blade secondary

locking clip.

4. Remove the wiper blade.

Note: Make sure that the wiper arm does
not spring back against the glass when the
wiper blade is not attached.

5. Install in the reverse order.

Note: Make sure that the wiper blade locks
into place.

ADJUSTING THE HEADLAMPS

Vertical Aim Adjustment

The headlamps on your vehicle are
properly aimed at the assembly plant. If
your vehicle has been in an accident,
contact an authorized dealer to check and
realign your headlamps.

Headlamp Aiming Target

E142592

8 feet (2.4 meters).

A

Center height of lamp to ground.

B

25 feet (7.6 meters).

C

Horizontal reference line.

D

Vertical Aim Adjustment

1.

Park your vehicle directly in front of a
wall or screen on a level surface,
approximately 25 feet (7.6 meters)
away.

2. Measure the height from the center of

your headlamp (indicated by a 3.0
millimeter circle on the lens) to the
ground and mark an 8 foot (2.4 meter)
horizontal reference line on the vertical
wall or screen at this height (a piece of
masking tape works well).

Note: To see a clearer light pattern for
adjusting, you may want to block the light
from one headlamp while adjusting the
other.

3. Switch on the low beam headlamps to

illuminate the wall or screen and open
the hood. Cover one of the headlamps
so no light hits the wall.


Content   ..  86  87  88  89   ..