Fiat Panda (2022 year). Manual in english - page 15
 

  Index      Manuals     Fiat Panda (2022 year). Manual in english


Search            copyright infringement  


Content      ..     13      14      15     


Fiat Panda (2022 year). Manual in english - page 15


 MULTIMEDIA

236

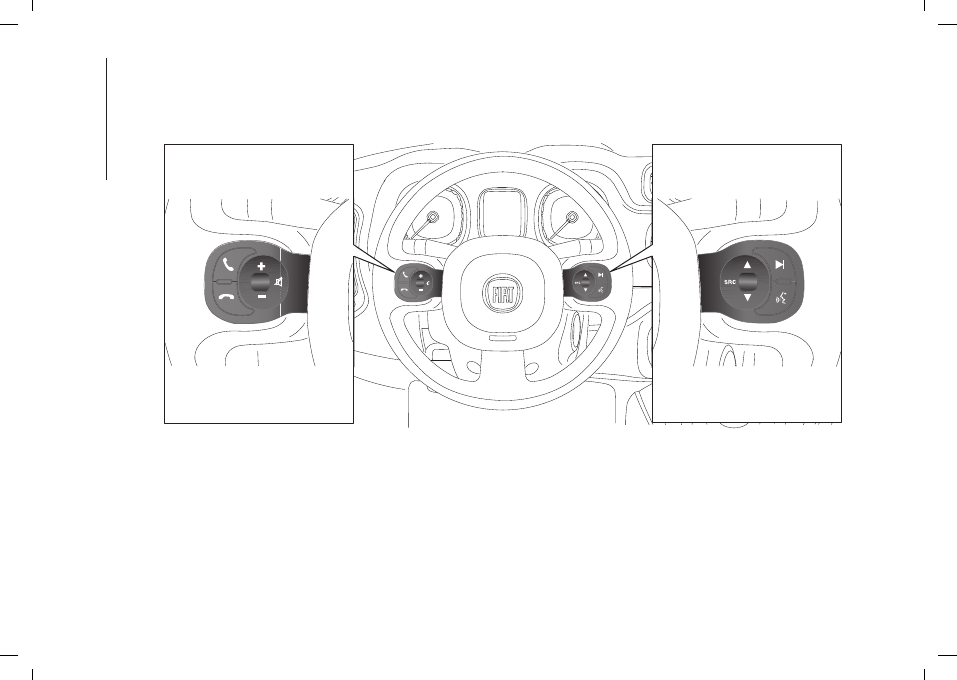
STEERING WHEEL CONTROLS

(where provided)
The controls for the main system functions are present on the steering wheel to make control easier. The activation of the

function selected is controlled, in some cases, by how long the button is pressed (brief or long press) as described in the table

below.

197

F1D1001

-------------------------------------------------------------------------------------------------------------------------------------------------------------

237

STEERING WHEEL CONTROLS SUMMARY TABLE

Button

Interaction

Acceptance of incoming call

Acceptance of the second incoming call and putting the active call on hold

ATTENTION: the voice commands only serve to interact with the voice assistance (Siri Eyes Free or Google Assistant).

For Apple devices, it is possible to interact with mobile devices connected via either Bluetooth or USB, while a USB

connection is required for Android devices.

Activation of voice recognition

Interruption of the voice message in order to give a new voice command

Interruption of voice recognition

Rejection of incoming call

Ending of call in progress

Radio preset scroll (only in Radio mode)

-------------------------------------------------------------------------------------------------------------------------------------------------------------

 MULTIMEDIA

238

TOUCHSCREEN

FUNCTION

The system uses the touchscreen

function; to interact with the different

functions, press the graphic buttons

displayed.

To confirm

a selection, press the "OK"

graphic button.

To go back to the previous screen

,

press the

(Delete) button or,

depending on the active screen,

/

Done.

RADIO MODE

The system is switched on/off by

pressing the

(ON/OFF) button/knob.

Turn the button/knob clockwise

to increase the radio volume or

anticlockwise to decrease it.
The system is equipped with the

following tuners: AM, FM and DAB (for

versions/markets, where provided).
After the desired radio station is

selected, the following information is

shown on the display:

At the top

: the list of radio stations

stored (preset) is displayed; the station

currently playing is highlighted.

At the centre

: the name of station

being listened too is displayed.

On the left side

: displays the “AM”,

“FM”, “DAB” (where provided) buttons

for selecting the desired frequency

band (the button corresponding to the

selected band is highlighted).
NOTE The DAB frequency can be used

in countries where digital transmission

technology is available. The device will

not be tuned to any frequency if the

DAB button is pressed in a country

where the service is not provided.

On the right side

: “Info” graphic

button display: additional information

on the source being played.

At the bottom

: display of the following

buttons:

"Browse": list of the radio stations

available;

/

: selecting previous/next

radio station;

"Tune" : manual radio station tuning;

"Audio": access to the "Audio

Settings" screen.

Audio menu

To access the "Audio" menu press the

Audio" button located at the bottom of

the display.
Pressing the “Audio” button

automatically accesses the “Settings”

menu from which it is possible to make

the desired adjustments.
The following adjustments can be

carried out using the "Audio" menu:

"Balance" (left/right and front/rear

sound balance adjustment)

"Equalizer" (where provided)

“Speed Adj Volume” (speed-

dependent automatic volume control)

“Loudness” (where provided)

"AutoPlay"

"Auto-On Radio"

MEDIA MODE

Press the "Select Source" graphic

button to select the desired audio

source from those available: USB and

Bluetooth®

.

WARNING Applications used

on portable devices may be not

compatible with the

Uconnect™

system.

After Media mode is selected, the

following information is shown on the

display.

At the top

: information on the track

being played and the following graphic

buttons:

"Repeat Song", "Repeat All" or

"Repeat Off": repeat the current song,

all songs or turn the function off;

“Shuffle": to play the tracks in

random order;

Track progress and duration.

In the middle

: information on the track

being played.

On the left

: display of the following

buttons:

-------------------------------------------------------------------------------------------------------------------------------------------------------------

239

Selected device or audio source;

"Select source": select the required

audio source.

On the right

: display of the following

buttons:

"Info": additional information about

the song playing;

"Tracks": list of available tracks.

At the bottom

: information on the

track being played and the following

graphic buttons:

“Bluetooth”: for a

Bluetooth®

audio

source, opens the list of devices;

"Browse" for a USB source, opens

browsing;

/

: previous/next track

selection;

: pause track being played;

"Audio": access to the "Audio

Settings" screen.

Track selection

The “Tracks” function allows you to

open a window with the list of tracks

being played.
With the TUNE SCROLL button/knob

you can browse the list of artists,

genres, etc...
The choices available depend on the

device connected.
For example, on a USB device you can

also scroll through the list of artists,

genres and albums available depending

on the information present on the

tracks.
NOTE This button might be disabled for

some

Apple®

devices

Press the "Tracks" graphic button to

activate this function on the source

being played.
Turn the TUNE SCROLL button/knob

to select the desired category and then

press the button/knob to confirm the

selection.
NOTE The indexing time of a USB

device can vary depending on the

media inserted (in some cases it can

take a few minutes).

BLUETOOTH® SOURCE

This mode is activated by pairing a

Bluetooth®

device containing music

tracks with the system.

PAIRING A BLUETOOTH®

AUDIO DEVICE

To pair a

Bluetooth®

audio device,

proceed as follows:

activate the

Bluetooth®

function on

the device;

press the "Media" graphic button on

the display;

press the "Select Source" button;

select the

Bluetooth®

Media

source;

press the "Add Device" graphic

button;

search for

Uconnect™

on the

Bluetooth®

audio device (during the

pairing stage a screen is displayed

showing the progress of the operation);

when requested by the audio device,

enter the PIN code shown on the

system display or confirm on the device

the PIN displayed;

if the pairing procedure is completed

successfully, a screen is displayed.

Answer “Yes" to the question to pair

the

Bluetooth®

audio device as

favourite (the device will have priority

over all other devices to be paired

subsequently). If "No" is selected, the

priority is determined according to the

order of connection. The last device

connected will have the highest priority;

an audio device can also be

paired by pressing the "Phone"

graphic button on the display and

by selecting "Settings" or selecting

"Phone/Bluetooth” from the "Settings"

menu.

WARNING If the

Bluetooth®

connection between mobile phone

and system is lost, consult the mobile

phone handbook.

NOTE The Radio may change the

track being played by modifying the

name-device in the

Bluetooth®

settings of the telephone (where

-------------------------------------------------------------------------------------------------------------------------------------------------------------

 MULTIMEDIA

240

provided), if the device is by means of

USB after the

Bluetooth®

connection.

After updating the phone software, for

proper operation, it is recommended

to remove the phone from the list of

devices linked to the radio, delete the

previous system pairing also from the

list of

Bluetooth®

devices on the

phone and make a new pairing.

USB SOURCE

The car has a USB port on the front

panel.
When a USB device is inserted with

the radio on, it starts to play the tracks

on the device if the "AutoPlay" is set to

"ON" in the "Audio" menu.

PHONE MODE

Phone mode activation

Press the “Phone” button on the

display to activate the Phone mode.
NOTE To consult the list of mobile

phones and supported functions, visit

the www.driveuconnect.eu website
Use the graphic buttons on the display

to:

dial the phone number (using the

graphic dial pad on the display);

display and call the contacts in the

phonebook of the mobile phone;

display and call contacts from the

registers of previous calls;

pair up to 10 phones/audio device

to make access and connection easier

and quicker;

transfer calls from the system to

the mobile phone and vice versa and

deactivate the microphone audio for

private conversations.
The mobile phone audio is transmitted

through the car’s sound system; the

system automatically mutes the radio

when the Phone function is used.

Pairing a mobile phone

WARNING Carry out this operation

only with car stationary and in safety

conditions; this function is deactivated

when the car is moving.

The pairing procedure for a mobile

phone is described below: always

consult the handbook for the mobile

phone in any case.
To pair the mobile phone, proceed as

follows:

activate the

Bluetooth®

function on

the mobile phone;

press the "Phone" graphic button on

the display;

if no phone is paired with the system

yet, the display shows a dedicated

screen;

access “Settings” and select “Add

device” to start the pairing procedure,

then search for the

Uconnect™

device

on the mobile phone;

when prompted by the mobile

phone, use its keypad to enter the PIN

code shown on the system display or

confirm on the mobile phone the PIN

displayed;

during the pairing stage a screen

appears on the display showing the

progress of the operation;

when the pairing procedure is

completed successfully, a screen

is displayed: answer "Yes" to the

question to pair the mobile phone as

favourite (the mobile phone will have

priority over all other mobile phones

to be paired subsequently). If no other

devices are paired, the system will

consider the first paired device as the

favourite.
NOTE The priority is determined

according to the order of connection

for mobile phones which are not set as

favourite. The last phone connected will

have the highest priority.
NOTE On some mobile phones,

to make the text message voice

reading function available, the text

message notification option on the

phone must be enabled; this option is

usually available on the phone, in the

Bluetooth®

connections menu for a

device registered as

Uconnect™

.

After enabling this function on the

-------------------------------------------------------------------------------------------------------------------------------------------------------------

241

mobile phone, it must be disconnected

and reconnected with the

Uconnect™

system in order to make it effective.
NOTE After updating the phone

software, for proper operation, it is

recommended to remove the phone

from the list of devices linked to the

radio, delete the previous system

pairing also from the list of

Bluetooth®

devices on the phone and make a new

pairing.

Making a phone call

The operations described below can

only be accessed if supported by the

mobile phone in use. For all functions

available, refer to the mobile phone

owner's handbook.
A call can be made by:

pressing the “Phonebook” button

(mobile phone phonebook);

pressing the “Recent” button;

pressing the "Dial" graphic button;

Favourites

You can add a number or a contact (if

already in Contacts) to the favourite list

during a call by pressing one of the 5

"Empty" graphic buttons on the upper

part of the display. The favourites can

also be managed by using the Phone

Book options.

Text Message Reader

The system can read the messages

received by the mobile phone. To use

this function, the mobile phone must

support the text message exchange

function through

Bluetooth®

.

If this operation is not supported by

the phone, the corresponding "Text

message" graphic button is deactivated

(greyed out).
When a text message is received, the

display will show a screen where the

options "Show", "Call" or "Ignore" can

be selected.
Press the "Text" graphic button to

access the list of text messages

received by the mobile phone (the list

displays a maximum of 60 messages

received).
NOTE On some mobile phones,

to make the text message voice

reading function available, the text

message notification option on the

phone must be enabled; this option is

usually available on the phone, in the

Bluetooth®

connections menu for a

device registered as

Uconnect™

.

After enabling this function on the

mobile phone, it must be disconnected

and reconnected with the

Uconnect™

system in order to make it effective.

WARNING Some mobile phones may

not take the text message delivery

confirmation settings into account

when interfacing with the

Uconnect™

system.If a text message is sent via the

Uconnect™

system, the user could

face an additional cost, without any

warning, due to the text message

delivery confirmation request sent by

the phone. For any problems related

to the above, contact your telephone

service provider.

"Do Not Disturb" function

If supported by the connected

phone, the driver can press the "Do

Not Disturb" graphic button to stop

receiving notifications of incoming calls

or text messages. The driver can reply

with a default message or a message

customised in the settings.

Text message reader

Predefined messages are stored in the

system memory and can be sent to

answer a received message or as a

new message.

Yes

No

Okay

I can't talk right now

Call me

I'll call you later

I’m on my way

Thanks

I'll be late

Stuck in traffic

Start without me

-------------------------------------------------------------------------------------------------------------------------------------------------------------

 MULTIMEDIA

242

Where are you?

Are you there yet?

I need directions

I'm lost

See you later

I will be 5 (or 10, 15, 20, 25, 30, 45,

60) minutes late (*)

See you in 5 (or 10, 15, 20, 25, 30,

45, 60) minutes (*)
(*) Only use the numbers listed,

otherwise the system will not take the

message.
NOTE For details on how to send a text

message using the voice commands,

refer to the dedicated paragraph.
When receiving a text message, the

systems also allows the same message

to be forwarded.

Browsing favourites

(for versions/markets, where provided)
You can view and manage your

favourite numbers on the radio using

the steering wheel controls. To use

this function, the mobile phone must

support exchanging information via

Bluetooth®

and the favorite numbers

must have been saved previously as

such in the

Uconnect™

system.

Apple CarPlay and

Android Auto

(where provided)
The Apple CarPlay and Android Auto

applications allow you to use your

smartphone in the car safely and

intuitively. To enable them, connect a

compatible smartphone to the USB

port of the car and the contents of the

phone will be automatically shown on

the

Uconnect™

system display.

To check the compatibility of your

smartphone, refer to the indications on

the websites:
https://www.android.com/intl/it_it/auto/

e http://www.apple.com/it/ios/carplay/.
If the smartphone is connected

correctly to the car via the USB port,

the Apple CarPlay or Android Auto icon

will be displayed in place of the

graphic button in the main menu.

Apple CarPlay App Setup

Apple CarPlay is compatible with the

iPhone 5 or more recent models, with

the iOS 7.1 operating system or later

versions.
Before using Apple CarPlay, enable Siri

from "Settings" > "General" > "Siri" on

the smartphone.
To use Apple CarPlay, the smartphone

must be connected to the car by

means of a USB cable.

NOTE Enabling Apple CarPlay or some

operations could require interaction on

the smartphone. If necessary, complete

the step on your device (smartphone).

Android Auto APP Setup

Before use, download the Android Auto

application to your smartphone from

Google Play Store.
Starting from Android 10, the Android

Auto app is integrated into your

phone. Downloading is therefore not

necessary.
The application is compatible with

Android 5.0 (Lollipop) and later

versions. To use Android Auto, the

smartphone must be connected to the

car by means of a USB cable.
On the first connection, you will have

to perform the setup procedure that

appears on the smartphone. This

procedure can only be carried out with

the car stationary and the handbrake

applied, checking that the time and

date of the

Uconnect™

system are

correct.
Once connected to the USB port, the

Android Auto application establishes a

parallel

Bluetooth®

connection.

Interaction

After the setup procedure, the

application will run automatically on

the

Uconnect™

system when your

-------------------------------------------------------------------------------------------------------------------------------------------------------------

243

smartphone is connected to the USB

port in the car.

Apple CarPlay: to integrate with

Apple CarPlay, press the button on
the steering wheel

and, using the

TUNE SCROLL / BROWSE ENTER

button/knob select and confirm or hold

the "Home" graphic button pressed

(long press on the graphic button) on

the display in Apple CarPlay.

Android Auto: to integrate with

Android Auto, press the button on
the steering wheel

(hold the

button pressed) and, using the

TUNE

SCROLL / BROWSE ENTER

button/knob select and confirm or

hold the "Microphone" graphic button

pressed (long press on the graphic

button) on the display in Android Auto.

Navigation

With the Apple CarPlay and Android

Auto applications, you can choose

to use the navigation system on your

smartphone.

Exiting from the Apple CarPlay and

Android Auto apps

You can still access the contents of the

Uconnect™

system with the CarPlay

app enabled by using the controls

available and viewable on its display.
To return to the

Uconnect™

system

contents with the Android Auto app

enabled, according to the version of

the app you are using, select the last

item on the Android Auto system bar

and select "Back to Uconnect or the

"Exit" icon on the main screen of

Android Auto.
To end the Apple CarPlay or Android

Auto session, physically disconnect the

smartphone from the USB port of the

car.

SETTINGS

Press the "Settings" graphic button

on the display to display the main

"Settings" menu with the relative

submenus (where provided).
NOTE The menu items displayed vary

according to the versions.
The menu includes the following items:

Display

Time and Date

Engine Off Options

Audio

Phone/Bluetooth

Radio Setup

Restore Default Settings

Clear Personal Data

VOICE COMMANDS

For the functions controlled with voice

commands, see the description of the

Uconnect™

7” LIVE system.

198

F1D1040

NOTE During the calls, we recommend

not directing the central vents or the air

vent towards the microphone as the

noise of the air on the microphone

could worsen voice command

performance.
NOTE Voice entry of addresses is

only supported in the country in which

you are located and provided that

the system language matches the

local language. For example, if the car

is located in Italy, it will be possible

to enter Italian addresses only if the

system language is set to "Italian".
IMPORTANT It is advisable to position

the smartphone horizontally as shown

in fig. 198 so that in the case of a

collision or accident it does not pose a

danger and at the same time does not

obstruct the view while driving.

-------------------------------------------------------------------------------------------------------------------------------------------------------------

 MULTIMEDIA

244

MOPAR® CONNECT

(where provided)

These services let you keep your car

under control at all times and receive

assistance in the event of accident,

theft or breakdown.

Availability of the services depends

on the country (list available on the

www.driveuconnect.eu website).

Request activation by following the

instructions received at the email

address given when your car was

handed over to you.

SERVICES

According on the equipment of the car

and of the country, different services

may be available for different durations.

For further information about your car,

go to the personal page on the official

Fiat website.

Some of the packages made available

to the customer are:

my:Assistant

: package for customer

assistance in the event of an accident,

breakdown or attempted theft.

The package is available from the

Uconnect™LIVE

app and can also

detect unauthorised car towing or

tampering.

my:RemoteControl

: package for

managing remote functions from the

Uconnect™LIVE

smartphone app,

such as car location on the map or

locking/unlocking the doors, unlocking

the boot and flashing the hazard

warning lights for 4 seconds.

my:Car

: package for using the

Uconnect™LIVE

app to remotely

monitor the car, such as the fuel level

and tyre pressures. The package also

includes the Vehicle Condition Report

to check the state of health of the car

via web and with a monthly email.

my:Journey

: package for using the

Uconnect™LIVE

app to display and

manage travel, with dates, maps,

personal notes and travel reports.

My Fleet Manager

: package for

managing car and light commercial

vehicle fleets efficiently and securely.

Download the

Uconnect™ LIVE

app for smartphones or access the

www.driveuconnect.eu portal to use

the connected services.

You can find all the details about the

services in the

Mopar® Connect

section of the www.driveuconnect.eu

portal.

The main functions of the

My:RemoteControl

and

My:Car

packages (where available) can be run

from the

Uconnect™ LIVE

App but

also from the www.driveuconnect.eu

web portal.

With

Mobility Services

, it is also

possible to take advantage of

proposals from FCA partners.

PRIVACY MODE

Privacy mode lets you disable the

“Find car”, “Notify Area” and “Notify

Speed” services, which allow registered

customers to locate their cars, for a

fixed time.

WARNING Car position tracing remains

active for assistance services, where

provided, in the event of accident

or car theft, but is not visible to the

customer.

PRIVACY MODE activation

procedure

Proceed as follows:

take note of the total odometer

reading;

make sure that the instrument panel

is off;

Send the following text message

to +393424112613: "PRIVACY

<VEHICLE_CHASSIS_NUM>

<TOTAL_MILEAGE_KM>" (e.g.:

PRIVACY ZFA3340000P123456

12532). You can find the vehicle

identification number in the registration

document;

before starting the engine, wait to

receive the text message confirming

that Privacy mode has been activated

and indicating when it expires.

When you have received the

confirmation, you can start your trip in

the knowledge that the car will not be

tracked until the indicated expiry time. If

-------------------------------------------------------------------------------------------------------------------------------------------------------------

245

it expires while you are still travelling,

Privacy mode will be extended until you

turn off the engine (instrument panel

off).

If you receive a text message indicating

that your request was not successful,

you must be aware that the car will

continue to be visible to the registered

customer.

If you have any doubts or problems

during activation, consult the FAQ on

the www.driveuconnect.eu portal,

contact the Fiat Dealership or contact

Customer Care.

OFFICIAL TYPE

APPROVALS

Radio devices

All radio equipment provided with

the car complies with Directive

2014/53/EU, UA.RED.TR, the

French SAR Decree Law of

15/11/2019 and the UKCA (UK

Conformity Assessed) Certification

of 01/01/2021 in force in the United

Kingdom. For further information

visit the www.mopar.eu/owner or

http://aftersales.fiat.com/elum/

websites

Radio frequency

devices

All radio frequency devices comply with

the regulations in force in the countries

in which they are sold.
For further information go

to www.mopar.eu/owner or

http://aftersales.fiat.com/elum.

-------------------------------------------------------------------------------------------------------------------------------------------------------------

 MULTIMEDIA

246

DASHBOARD (RIGHT-HAND DRIVE VERSION)

The presence and position of controls, instruments and gauges may vary depending on the versions.

199

F0W0476

1. Adjustable and directable air diffusers 2. Exterior light control stalk 3. Driver front airbag 4. Windscreen wiper/rear window

wiper/trip computer control lever 5. Adjustable and directable central air vents 6. Passenger front airbag 7. Glove compartment

(for versions/markets, where provided) 8. Radio (for versions/markets, where provided) 9. Control buttons 10. Gear lever 11.

Heating/ventilation/climate control system controls 12. Ignition device 13. Instrument panel 14. Electric front windows 15.

ECO/ASR OFF buttons (for versions/markets, where provided)

-------------------------------------------------------------------------------------------------------------------------------------------------------------

247

DASHBOARD AND INSTRUMENT PANEL

The instrument background colour and type may vary according to the versions. The warning lights on the instrument panel

may change according to the version/trim level (e.g. LPG, Cross etc.) of the vehicle.

.

TO T

kmi

C

200

F1D0811

A. Speedometer B. Multifunction display C. Rev counter

-------------------------------------------------------------------------------------------------------------------------------------------------------------

 MULTIMEDIA

248

REPLACING FUSES

Fuse location

Fuses on the dashboard

Lift the plastic cover fig. 201 to access

the fuses. The fuses are located in the

fuse box in fig. 202.

201

F0W0294

202

F0W0295

WHEN PARKED

Stop the engine and engage the
handbrake. Engage a gear (1st gear

if the car is parked facing uphill or

reverse if facing downhill) and leave the

wheels turned. You are advised to

block the wheels with a wedge or a

stone if the car is parked on a steep

slope. Always remove the ignition key

when leaving the car.

PARKING BRAKE

203

F0W0296

B

A

204

F1D1026

Pull lever A fig. 203 or fig. 204 upwards

to operate the handbrake, until the car

is braked.
To disengage the handbrake, slightly

raise lever A and hold button B

pressed, checking that the

warning

light switches off in the instrument

panel.

207) 208) 209)

207)

Never leave children unattended in

the car. Always remove the key from the

ignition when leaving the car and take it

with you.

208)

The car should be braked after a few

clicks of the lever, if it is not, contact a Fiat

Dealership to have it adjusted.

209)

In the case of parking manoeuvres

on roads on a gradient, the front wheels

must be steered towards the pavement

(when parking downhill), or in the opposite

direction if the vehicle is parked uphill.

Block the wheels with a wedge or a stone

if the car is parked on a steep slope.

-------------------------------------------------------------------------------------------------------------------------------------------------------------


Content      ..     13      14      15