Fiat Bravo (2015 year). Manual - part 5
The sensor has an adjustment range that varies
Never use the windscreen wipers to
progressively from wiper still (no stroke) when the
remove layers of snow or ice from the
windscreen is dry, to wiper at first continuous speed
windscreen. In such conditions, the
(slow continuous operation) with intense rain.
windscreen wipers may be subjected to excessive
stress and the motor protection, which prevents
operation for a few seconds, may intervene. If
operation is not restored, contact a Fiat
Dealership.
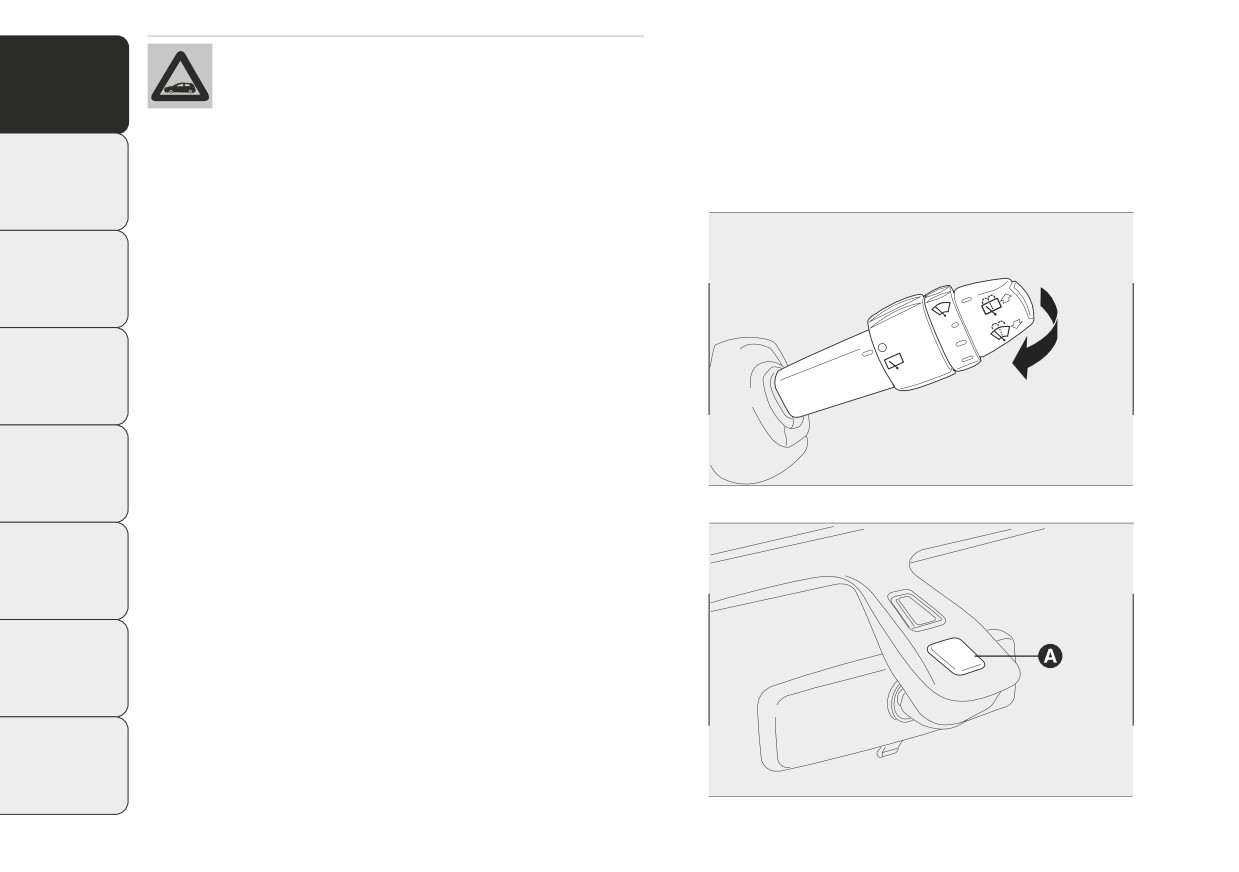
"Smart washing" functionfig. 38
Pull the stalk towards the steering wheel (unstable
position) to operate the windscreen washer.
Keep the stalk pulled, with just one movement, to
operate the washer jet and the windscreen wiper;
the latter automatically turns on if you keep the stalk
pulled for more than half a second.
The windscreen wiper stops operating a few strokes
after releasing the stalk; a further “cleaning stroke”,
fig. 38
F0Q0646
after a few seconds, completes the wiping operation.
RAIN SENSOR
(for versions/markets, where provided)
The rain sensor A fig. 39 is located behind the
interior rear view mirror in contact with the
windscreen and has the purpose of automatically
adjusting the frequency of the windscreen wiper
strokes depending on the intensity of the rain during
intermittent operation.
fig. 39
F0Q0014
56

Activation
Make sure the device is switched off if
Move the right stalk down by one click.
there is ice on the windscreen.
The activation of the sensor is signalled by a "stroke"
to show that the command has been acquired.
WARNING
IMPORTANT Keep the glass in the sensor area clean.
Make sure the device is switched off
By turning ring nut F fig. 37 is it possible to increase
whenever the windscreen is being
the sensitivity of the rain sensor to obtain a more
cleaned.
rapid variation between wiper still (no stroke) when
the windscreen is dry, to wiper at first continuous
speed (slow continuous operation).
REAR WINDOW WASHER/WIPER
The increasing of the rain sensor sensitivity is also
It can be operated only with the ignition key turned
signalled by a stroke of the wipers.
to MAR-ON. The function stops when the stalk is
If the windscreen washer is used with the rain sensor
released.
activated, the normal washing cycle is performed,
Turning the stalk ring nut A fig. 40 from position
after which the rain sensor resumes its normal
to position
will operate the rear window wiper
automatic operation.
as follows:
❒ in intermittent mode when the rear window wiper
Deactivation
is not operating;
Turn the ignition key to STOP.
❒ in synchronous mode (at half the speed of the
At the next start-up (key at MAR-ON), the sensor
windscreen wiper) when the windscreen wiper
will not be reactivated even if the stalk is at B fig. 37.
is operating;
To activate the sensor, move the stalk to position
❒ in continuous mode with reverse gear engaged and
A or C and then back to position B.
the control active.
Rain sensor activation will be indicated by at least
With the windscreen wiper on and reverse gear
one wiper “stroke” even if the windscreen is dry.
engaged the rear window wiper is activated in
continuous mode. Pushing the stalk towards the
dashboard (unstable position) will activate the rear
Do not activate the rain sensor when
window washer jet.
washing the car in an automatic car wash.
57

Keep the stalk pushed for more than half a second to
Do not use the rear window wiper to
activate the rear window wiper as well. Releasing
remove layers of snow or ice. In
the stalk will activate the smart washing function, as
such conditions, the wiper may be
described for the windscreen wiper.
subjected to excessive stress and the motor
protection, which prevents operation for a few
HEADLIGHT WASHERS
seconds, may intervene. If operation is not
(for versions/markets, where provided)
restored, contact a Fiat Dealership.
The headlight washers fig. 41 are retractable, i.e. they
are located inside the front bumper and work when
the windscreen washer is activated with the dipped
and/or main beam headlights on.
IMPORTANT Check the correct operation and
cleanliness of nozzles at regular intervals.
fig. 40
F0Q0653
fig. 41
F0Q0018
58

CRUISE CONTROL
The activation is indicated by the turning on of
warning light
on the instrument panel (together
(constant speed regulator)
(for versions/markets, where provided)
with the dedicated message on the display) (see
“Warning lights and messages” chapter).
This is an electronically controlled driving assistance
device which allows the car to be driven at a chosen
STORING THE VEHICLE SPEED
speed above 30 km/h on long stretches of dry,
straight roads with few variations (e.g. motorways),
Proceed as follows:
without having to depress the accelerator pedal.
❒ turn ring nut A fig. 42 to ON and press the
The use of this device on extra-urban roads with
accelerator pedal so that the car reaches the
traffic is not therefore recommended. Do not use
desired speed;
the device in town.
❒ turn the ring nut B to (+) for at least three
seconds, then release it. The vehicle speed is now
TURNING THE DEVICE ON
memorised and you can therefore release the
accelerator pedal.
Turn the ring nut A fig. 42 to the ON position.
If needed (when overtaking for instance), you can
The device must only be switched on in 4th gear or
accelerate simply by depressing the accelerator pedal;
higher. When travelling downhill with the device
when you release the pedal, the vehicle goes back
engaged, the vehicle speed may slightly exceed the
to the speed set previously.
preset one.
RESTORING STORED SPEED
If the device has been switched off, for example by
depressing the brake or clutch pedal, the memorised
speed can be restored as follows:
❒ accelerate progressively until a speed close to that
stored is reached;
❒ engage the gear selected at the time that the
speed was memorised (4th, 5th or 6th gear);
❒ press button C fig. 42.
fig. 42
F0Q0648
59

INCREASING THE STORED SPEED
TURNING THE DEVICE OFF
This can be done in two ways:
Turn the ring nut A fig. 42 to OFF or turn the
ignition key to STOP. The device is automatically
❒ by pressing the accelerator and memorising the
turned off in one of the following cases:
new speed reached;
❒ when the brake or clutch pedal is pressed;
or
❒ if the ASR or ESP system cuts in (for versions/
❒ by temporarily turning ring nut B fig. 42 to (+).
markets, where provided);
Each movement of the ring nut will correspond to a
❒ if the gear is shifted in versions with Dualogic
slight increase in speed (about 1 km/h), while keeping
gearbox (for versions/markets, where provided) in
the ring nut turned will correspond to a continuous
Manual mode;
speed increase.
❒ if the Dualogic gearbox lever (where provided) is
REDUCING THE STORED SPEED
inadvertently shifted to N or R.
This can be done in two ways:
WARNING
❒ by switching off the device and then memorising
the new speed;
Whilst driving with the device on, never
place the gear lever in neutral and do
or
not move the Dualogic gearbox lever into
❒ by keeping ring nut B fig. 42 turned to (-) until the
position N or R.
new speed is reached; it will then be memorised
automatically.
Each movement of the ring nut will correspond to a
WARNING
slight reduction in speed (about 1 km/h), while
keeping the ring nut turned will correspond to a
If the device is faulty, turn ring nut A
continuous reduction in speed.
fig. 42 to OFF, check the condition of the
protective fuse and contact a Fiat Dealership.
60

ROOF LIGHTS
IMPORTANT Before getting out of the car, make
sure that both switches are in the central position:
when the doors are closed the lights will switch
FRONT ROOF LIGHT WITH SPOT LIGHTS
off to avoid draining the battery. In any case, if the
Switch A fig. 43 switches the roof lights on/off.
switch is left in on position, the roof light switches
With the switch A in the central position, the lights
off automatically 15 minutes after the engine
C and D come on/go off when front doors are
switching off.
opened/closed.
Roof light timing
With switch A pressed to the left, lights C and D are
always off. With switch A pressed to the right, the
To make getting in and out the vehicle easier,
lights C and D are always on.
especially at nighttime or in poorly lit areas, two
timing logics are available.
Lights switch on/off progressively.
Switch B controls the spot light function; when the
Timing when getting into the car
roof light is off, it switches on individually:
The roof lights switch on according to the following
❒ light C if pressed on the left side;
modes:
❒ light D if pressed on the right side.
❒ for around 10 seconds when the front doors are
unlocked;
❒ for about 3 minutes when one of the side doors is
opened;
❒ for about 10 seconds when the doors are closed.
The timing is interrupted when the ignition key is
turned to MAR-ON.
fig. 43
F0Q0669
61

Timing when getting out of the car
The rear roof light also switches on in conjunction
with events that cause the front roof light to switch
After removing the key from the ignition switch, the
on.
roof lights switch on as follows:
❒ within 2 minutes of the engine being switched off
for a period of around 10 seconds;
❒ when one of the side doors is opened for a period
of around 3 minutes;
❒ when one of the doors is closed for a period of
about 10 seconds.
❒ if the fuel cut-off switch operates, they are on for
about 15 minutes, then they switch off
automatically.
Door locking switches the lights off immediately
(unless the fuel cut-off switch is operating).
REAR ROOF LIGHT
Versions without sun rooffig. 44
fig. 44
F0Q0670
In these versions, there are two rear roof lights.
Press the point indicated by the arrow to switch the
lights on/off (+ sign on the roof light lens cover).
The rear roof lights also come on in conjunction
with events that cause the front roof light to come
on.
Versions with sun rooffig. 45
In these versions, there is only one rear roof light.
Press the point indicated by the arrow to switch the
lights on/off (+ sign on the roof light lens cover).
fig. 45
F0Q0740
62

CONTROLS
FOG LIGHTS
(for versions/markets, where provided)
HAZARD WARNING LIGHTS
Press button B fig. 47 with the side lights on to turn
the fog lights on.
They are turned on by pressing switch A fig. 46,
regardless of the position of the ignition key. With
Press the button again to turn the lights off.
the device on, warning lights and light up in the
instrument panel.
REAR FOG LIGHT
Press button A again to switch the lights off.
Press button C with the dipped beam headlights or
front fog lights on to switch it on fig. 47.
IMPORTANT The use of hazard warning lights is
governed by the highway code of the country you are
Press the button again to switch it off.
in. Comply with legal requirements.
Emergency braking
During emergency braking, the hazard warning lights
come on automatically and warning lights and
on the panel also come on.
The function switches off automatically when
emergency braking ceases.
fig. 46
F0Q0637
fig. 47
F0Q0636
63

FUEL CUT-OFF SWITCH
Carefully check the car for fuel leaks, for instance in
(as an alternative to the fuel cut-off system, for
the engine compartment, under the car or near
versions/markets where provided)
the tank area.
It is located in the bottom, near the passenger side
If no fuel leaks are found and the car can be started
pillar fig. 48. It is triggered in the event of an impact,
again, press button A to reactivate the fuel system
causing:
and the lights.
❒ the fuel supply cut-off with the engine
After a collision, turn the ignition key to STOP to
consequently switching off;
prevent the battery from running down.
❒ the automatic unlocking of the doors;
WARNING
❒ the interior lights being switched on (for about 15
minutes).
If, after a collision, you smell fuel or
The intervention of the switch is indicated by the
notice leaks from the fuel supply system,
switching on of the
warning light on the
do not reset the switch to avoid fire risk.
instrument panel or the symbol on the display
(together with a message) (see “Warning lights and
messages” section).
fig. 48
F0Q0638
64

FUEL CUT-OFF SYSTEM
The following procedure should be carried out to
(as an alternative to the fuel cut-off switch, for
restore the correct operation of the vehicle:
versions/markets where provided)
❒ turn the ignition key to the MAR-ON position;
It is triggered in the event of a collision, causing:
❒ turn on the right direction indicator;
❒ the fuel supply cut-off with the engine
❒ turn off the right direction indicator;
consequently switching off;
❒ turn on the left direction indicator;
❒ the automatic unlocking of the doors;
❒ turn off the left direction indicator;
❒ the interior lights being switched on.
❒ turn on the right direction indicator;
The intervention of the system is indicated by a
❒ turn off the right direction indicator;
message shown on the display.
❒ turn on the left direction indicator;
Carefully check the car for fuel leaks, for instance in
the engine compartment, under the car or near
❒ turn off the left direction indicator;
the tank area.
❒ turn the ignition key to the OFF position;
After a collision, turn the ignition key to STOP to
❒ turn the ignition key to the MAR-ON position.
prevent the battery from running down.
WARNING
If, after an impact, you smell fuel or
notice leaks from the fuel supply system,
do not reactivate the system to avoid the risk of
fire.
65

INTERIOR FITTINGS
Storage compartment
Cover A fig. 49 can only be opened with the armrest
FRONT ARMREST WITH STORAGE
fully lowered and attached.
COMPARTMENTS
To access storage compartment B fig. 50, lift up
(for versions/markets, where provided)
cover A.
This is located between the front seats. A storage
compartment and cooled drinks compartment
are located inside the armrest (for versions/markets,
Do not spill your drinks: in any case, a
where provided) (see following paragraphs).
hole at the bottom of the compartment
allows, if necessary, for spilled liquids
The armrest can be adjusted lengthwise through the
to drain outside the car.
cover A fig. 49.
fig. 49
F0Q0631
fig. 50
F0Q0632
66

Cooled drinks compartment
REAR ARMREST
(for versions/markets, where provided)
Press button A fig. 51 and lift up armrest B: you can
then access the cooled drinks compartment fig. 52.
To use armrest A fig. 53, lower it as shown in the
diagram.
IMPORTANT The function of the compartment is to
maintain the temperature of the drinks that are put
in, which should be heated or cooled beforehand.
fig. 51
F0Q0634
fig. 52
F0Q0633
fig. 53
F0Q0010
67

There are two cup and/or can holders B in the
WARNING
armrest. To use these, pull tab C in the direction
shown by the arrow.
Never travel with the glove
compartment open: it could injure the
A storage compartment is available inside the
passenger in the event of a crash.
armrest; this can be accessed by raising the flap.
STORAGE COMPARTMENTS
Compartment under the seat
(for versions/markets, where provided)
Passenger side compartment
On some versions, under the passenger’s seat there
To open this compartment, operate handle A fig. 54,
is a storage compartment: do not use it for objects
as shown by the arrow.
heavier than 1.5 kg.
When the compartment is opened a courtesy light
To open the compartment, use handle A fig. 55.
comes on inside which remains on for about 15
minutes with the ignition key in the STOP position.
If, during this period, a door or the tailgate is
opened, the 15 minute timing is reset.
fig. 54
F0Q0635
fig. 55
F0Q0012
68
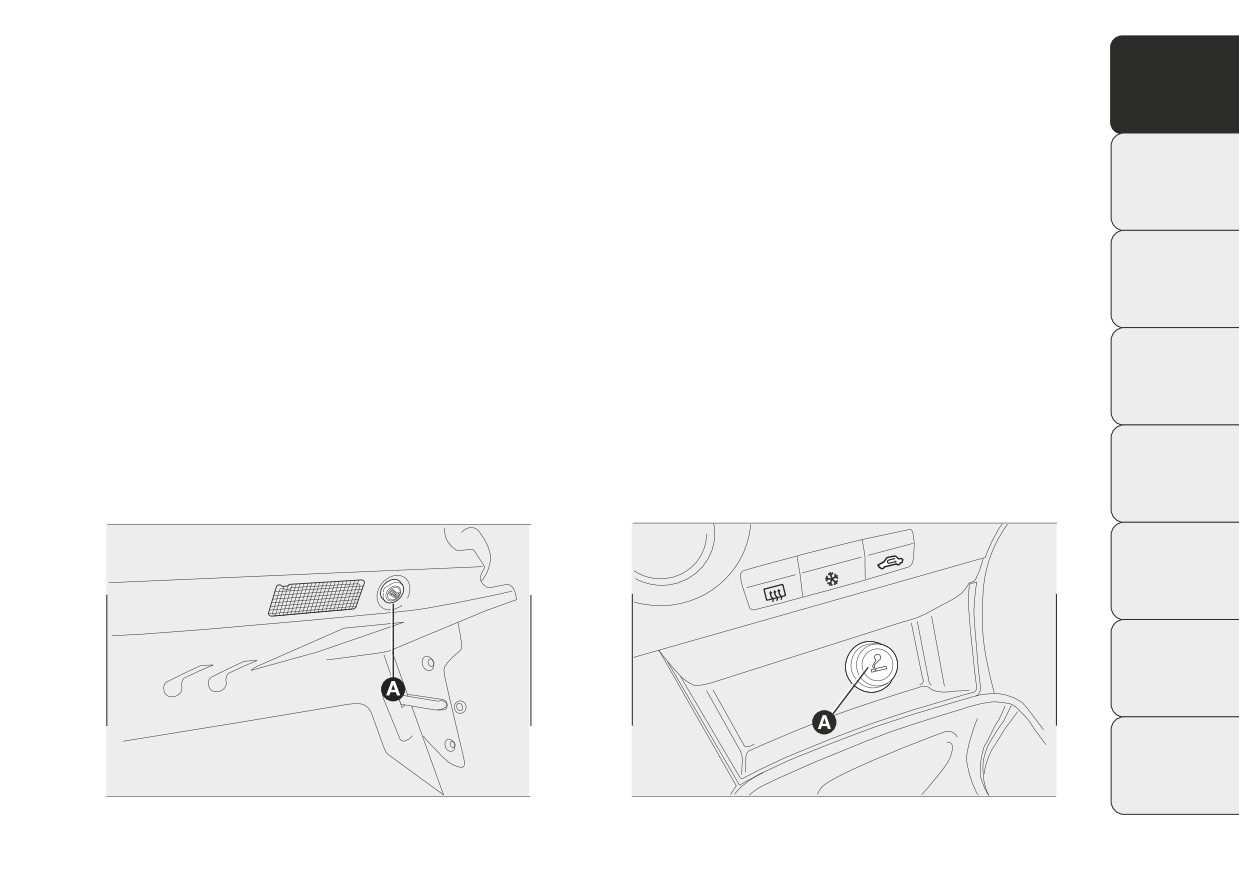
POWER SOCKET (12 V)
CIGAR LIGHTER
(for versions/markets, where provided)
It is located on the central tunnel and is only
operational when the ignition key is turned to
This is located on the central tunnel.
MAR-ON. If a smokers' kit is requested, the socket
Press button A fig. 57 to switch on the cigar lighter
is replaced by a cigar lighter (see next paragraph).
when the ignition key is turned to MAR-ON.
On some versions an additional power socket A
After a few seconds the button automatically returns
fig. 56 is provided in the luggage compartment.
to its initial position, and the cigar lighter is ready
for use.
IMPORTANT Always check that the cigar lighter is
switched off.
IMPORTANT The cigar lighter becomes very hot.
Handle it carefully and make sure that children don't
touch it: risk of fire and/or burning.
fig. 56
F0Q0016
fig. 57
F0Q0629
69