Tesla Model Y (2022 year). Manual in english - page 1
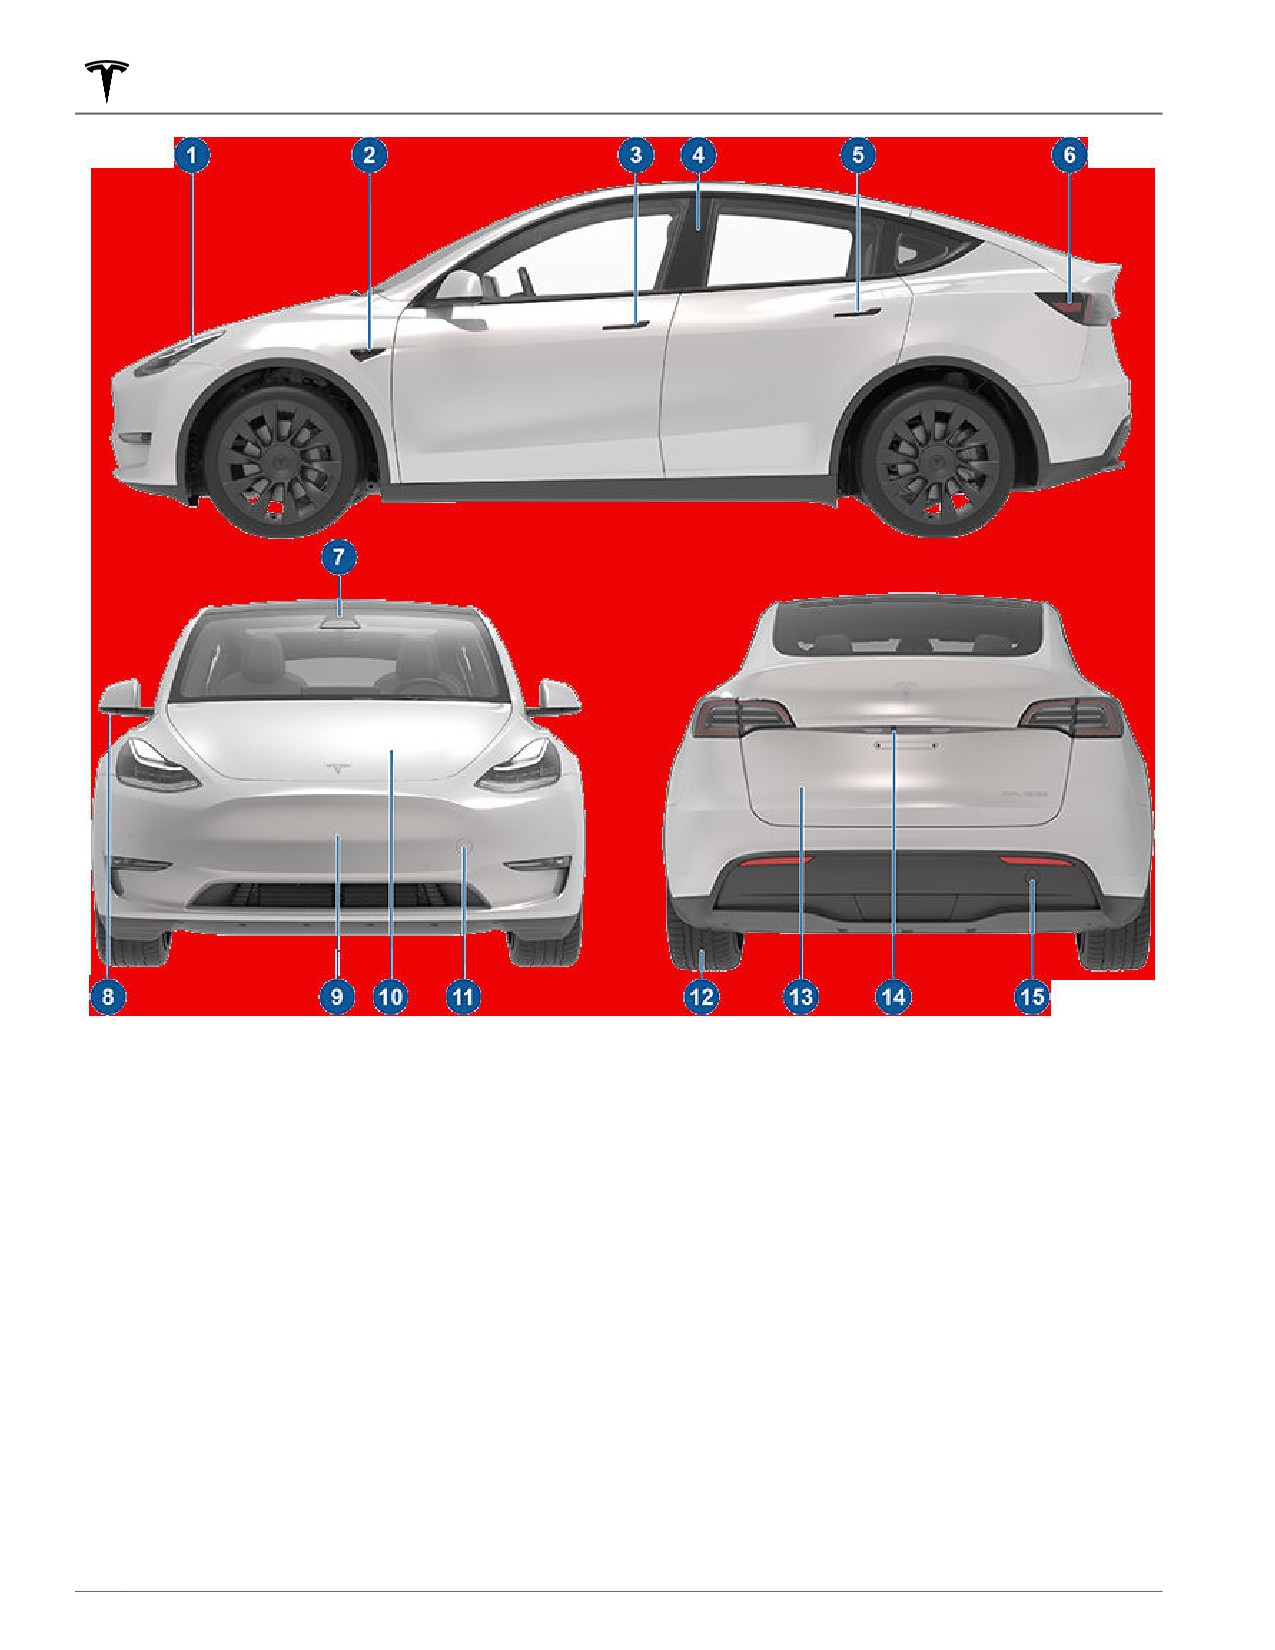
Exterior Overview
1. Exterior lights (Lights on page 55)
2. Autopilot camera (About Autopilot on page 85)
3. Front door handle (Using Exterior Door Handles on page 11)
4. Key card sensor (Keys on page 7), Autopilot camera (About Autopilot on page 85)
5. Rear door handle (Using Exterior Door Handles on page 11)
6. Charge port (Charging Instructions on page 169)
7. Autopilot cameras (About Autopilot on page 85)
8. Exterior mirrors (Mirrors on page 50)
9. Radar sensor, if equipped (hidden from view) (About Autopilot on page 85)
10. Hood/front trunk (Front Trunk on page 16)
11. Front tow eye cover (Instructions for Transporters on page 209)
12. Wheels and tires (Wheels and Tires on page 201)
13. Rear trunk (Rear Trunk on page 14)
14. Rear view camera (Rear Facing Camera(s) on page 73)
15. Rear tow eye cover (Instructions for Transporters on page 209)
2
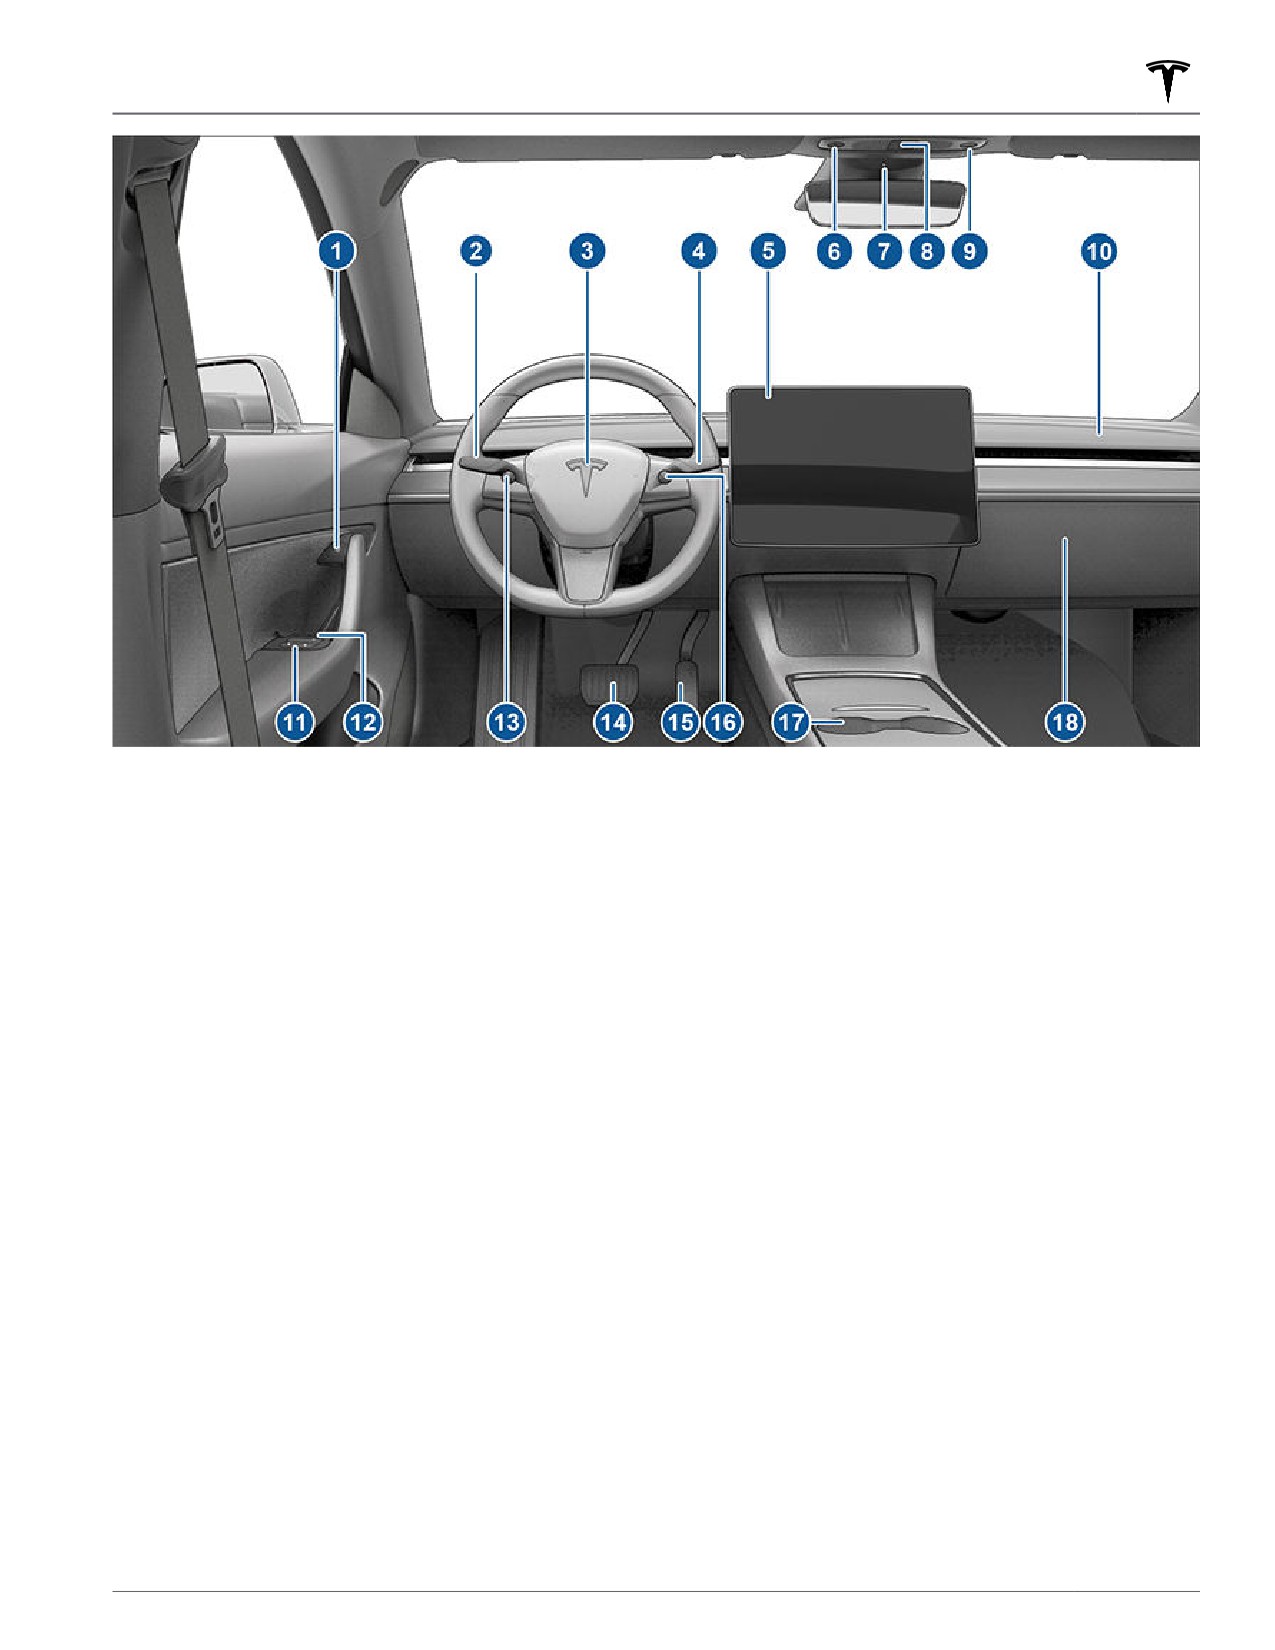
Interior Overview
1. Door open button (Opening Doors from the Interior on page 11)
2. Turn signal stalk (High Beam Headlights on page 56), Turn Signals on page 57, and Windshield Washers on
page 61)
3. Horn (Horn on page 48)
4. Drive stalk (How to Shift on page 53, Tra
c-Aware Cruise Control on page 88, Autosteer on page 93)
5. Touchscreen (Touchscreen Overview on page 4)
6. Driver dome light (Lights on page 55)
7. Cabin camera (Cabin Camera on page 123)
8. Hazard warning flashers (Hazard Warning Flashers on page 57)
9. Passenger dome light (Lights on page 55)
10. Climate control vent (see Climate Controls on page 130)
11. Power window switches (Windows on page 13)
12. Manual door release (Opening Doors from the Interior on page 11)
13. Left scroll button (Scroll Buttons on page 48)
14. Brake pedal (Braking and Stopping on page 62)
15. Accelerator pedal (Regenerative Braking on page 63)
16. Right scroll button (Scroll Buttons on page 48)
17. Center console (Interior Storage and Electronics on page 19)
18. Glovebox (Glovebox on page 19)
Overview
3
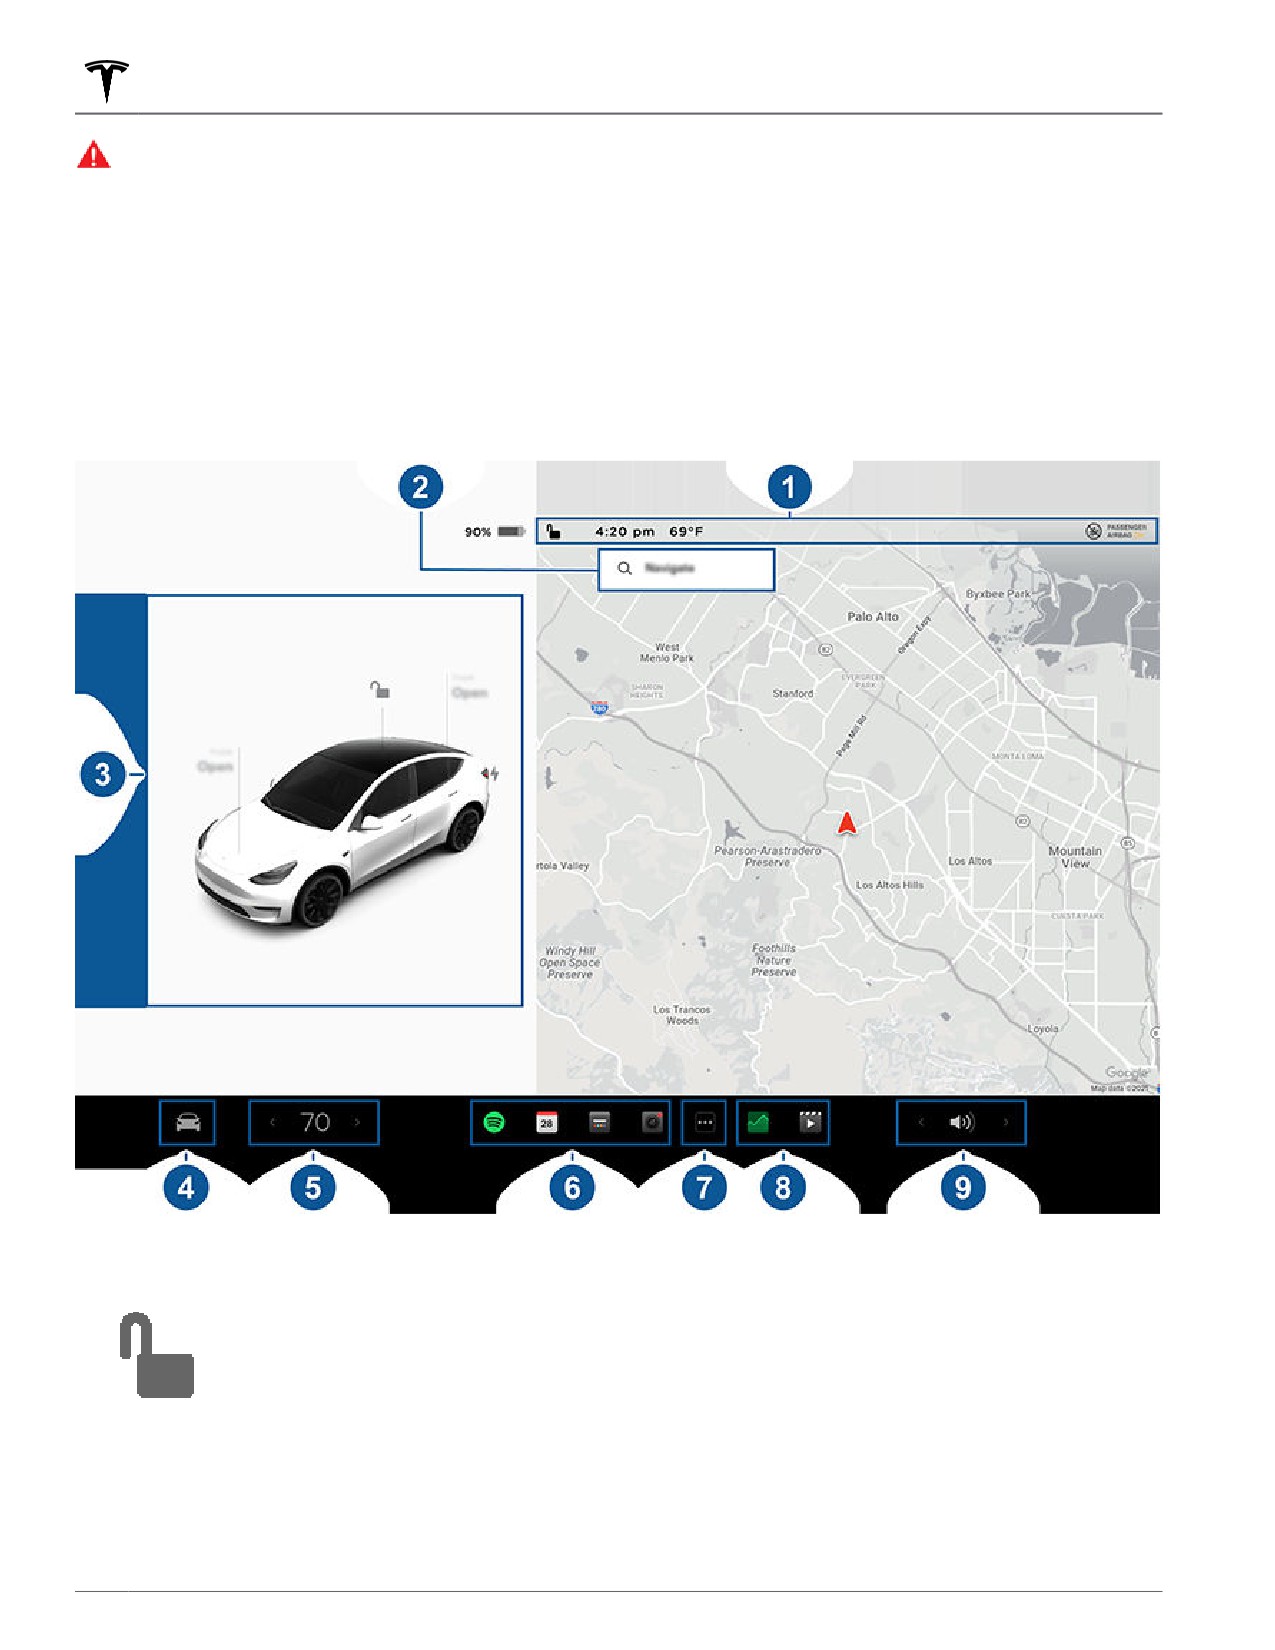
Touchscreen Overview
WARNING: Always pay attention to road and tra
c conditions when driving. To minimize driver distraction and
ensure the safety of vehicle occupants as well as other road users, avoid using the touchscreen to adjust
settings while the vehicle is in motion.
Use the touchscreen to control many features that, in traditional cars, are controlled using physical buttons (for
example, adjusting the cabin heating and air conditioning, headlights, etc.). You also use the touchscreen to control
media, navigate, use entertainment features, and customize Model Y to suit your preferences. For hands-free access
to common touchscreen controls, use voice commands (see Voice Commands on page 150).
If the touchscreen is unresponsive or demonstrates unusual behavior, you can restart it (see Restarting the
Touchscreen on page 6).
NOTE: Illustrations are provided to improve conceptual understanding only. Depending on vehicle options, software
version, market region and regional and language settings, the details displayed on the screen will differ.
1. Status bar: This area on the top of the touchscreen displays the time of day, the outside temperature, and the
following icons:
Touch to lock/unlock all doors and trunks.
4:20 pm
Your vehicle automatically updates the time.
4
Touchscreen Overview
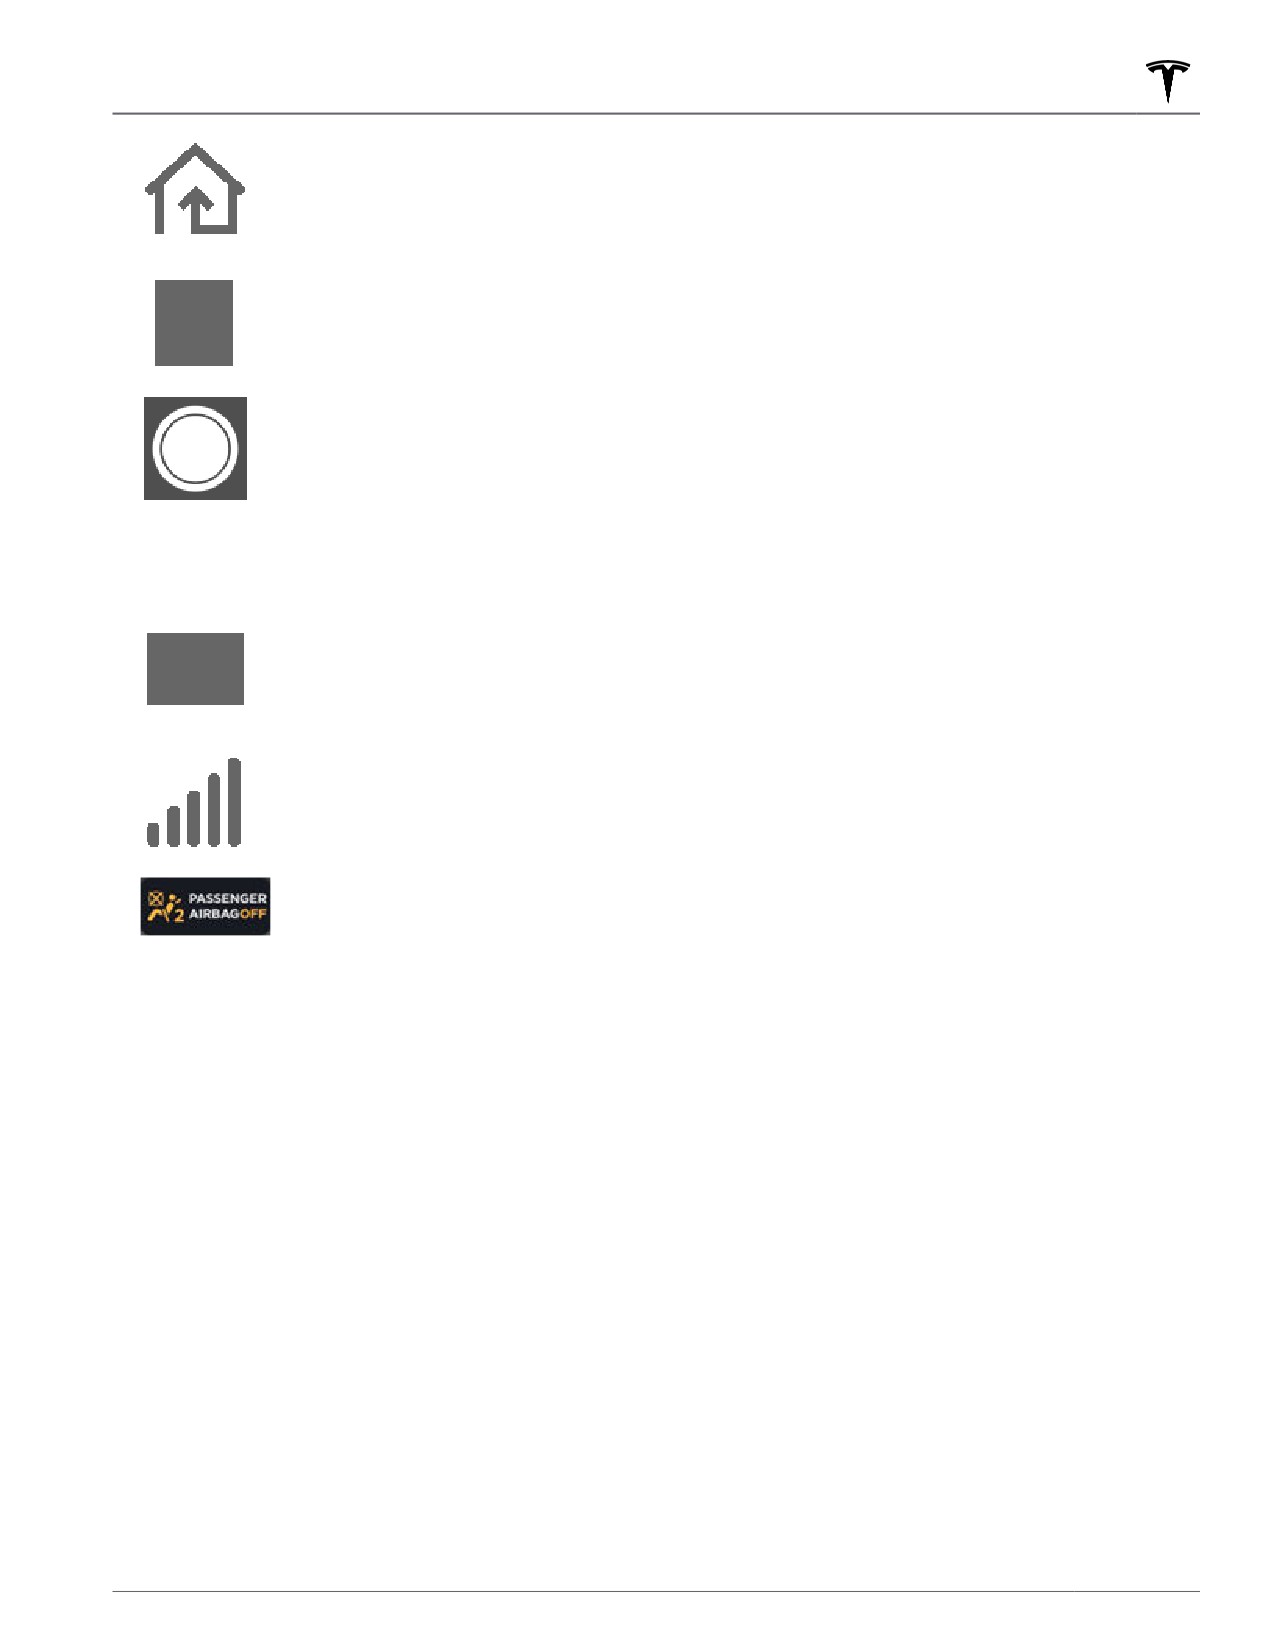
Displays on the touchscreen status bar only when Model Y detects a programmed HomeLink
within range, and the touchscreen is not already displaying the HomeLink screen or popup. See
HomeLink Universal Transceiver on page 157.
Displays on the touchscreen status bar only when Model Y is parked. Add, configure (including
Valet Mode and Use Easy Entry), or quickly switch driver profiles. Driver profiles can also be
accessed from the top of any Controls screen. See Driver Profiles on page 46.
Available when Model Y is parked, touch to manually enable or disable Sentry Mode for the
current drive cycle. To automatically turn Sentry Mode on (or off) every time you leave your
vehicle, enable the setting from Controls > Safety > Sentry Mode.
NOTE: If you turn Sentry Mode on or off from Controls > Safety > Sentry Mode, the shortcuts on
the vehicle's touchscreen and mobile app will only work for the current drive cycle.
NOTE: For some vehicles manufactured after approximately November 1, 2021, the center console
USB ports may only support charging devices. Use the USB port inside the glove box for all other
functions.
Displays when Model Y is connected to a Wi-Fi network.
Displays when Model Y cellular connectivity is very low or unavailable. Touch this icon for quick
access to Wi-Fi settings.
Status of the front passenger airbag (see Airbags on page 39).
2. Navigation: Change the orientation of the map, find or navigate to a destination, and change navigation settings
(see Maps and Navigation on page 135).
3. Car status: This area dynamically displays the current status of Model Y as you drive, park, open doors, turn lights
on, etc. Monitor this area when driving as it displays important information such as driving speed and warning
messages (see Car Status on page 58). When the car is in Park, you can open the trunks or charge port door.
When full self-driving is enabled (if equipped), the car status area displays visualizations of the road and your
vehicle's surroundings. You can expand/condense the visualization by dragging the car status area from side to
side. Expanding the visualization displays more details about the roadway and its surroundings, including road
markings, stop lights, and objects (such as trash cans and poles).
4. Controls: Control various features and adjust settings to customize your Model Y (see Controls on page 124).
5. Climate controls (driver): Use the left and right arrows to decrease/increase cabin temperature. Touch Split on
the popup to display separate controls for the driver and passenger. Touch the temperature icon to customize
climate control settings (see Climate Controls on page 130). The passenger climate controls display when
temperature controls have been Split to provide separate controls for the driver and passenger.
6. My Apps: For one-touch access to frequently used apps and controls, you can choose what displays here. See
Customizing My Apps on page 6.
7. App Launcher: Touch the app launcher to open the app tray. Then touch any app to open it. The app you choose
displays on top of the map. To close an app, drag it downward.
8. Recent App(s): Displays the most recently used app(s). The number of recent apps displayed here depends on
how many apps have been added to My Apps. If you add the maximum number of apps to My Apps, only the
most recent app displays.
Overview
5
Touchscreen Overview
9. Volume Control: Controls the volume of media player and phone calls (see Volume Controls on page 141). The
volume of navigation instructions is controlled separately (see Maps and Navigation on page 135).
Popup messages appear at the bottom of the touchscreen. For example, a seat belt reminder appears if a seat belt is
unfastened in an occupied seat, an alert appears to notify you of an incoming phone call, a text message appears
(when applicable), and voice commands appear when in use. If applicable, touch options from these popup
messages (for example, accept/decline a phone call, choose an option from the headlight menu, etc.). To dismiss a
popup message, swipe it downward.
Customizing My Apps
For one-touch access to commonly used apps and
controls, you can customize what displays in the My
Apps area on the touchscreen's bottom bar:
1. Enter customization mode by touching and holding
any app or control in the My Apps area. If this area is
empty, touch the App Launcher.
2. Simply drag any app or control from the app tray
onto the My Apps area in the bottom bar.
NOTE: Seat heaters selected from the app tray
appear next to the temperature, instead of in the My
Apps area.
3. After a few seconds, the Tesla logo appears. Wait
approximately 30 seconds for the touchscreen to
restart. If the touchscreen is still unresponsive or
NOTE: Controls (for example, wipers, defrosters and seat
demonstrating unusual behavior after a few minutes,
heaters) appear in the app tray only when you enter
try power cycling the vehicle (if possible). See Power
customization mode by touching and holding an app.
Cycling the Vehicle on page 52.
NOTE: When you've added the maximum number of
apps or controls to My Apps, adding an additional app
NOTE: Restarting the touchscreen using the scroll
removes the rightmost app.
buttons does not power Model Y off and on.
NOTE: Remove an app or control from the My Apps area
by touching and holding, then touching its associated
"X".
Restarting the Touchscreen
You can restart your touchscreen if it is unresponsive or
demonstrates unusual behavior.
WARNING: Only restart the touchscreen while the
vehicle is stopped and in Park. The car status
display, safety warnings, backup camera, etc. will
not be visible during the restart.
1. Shift into Park.
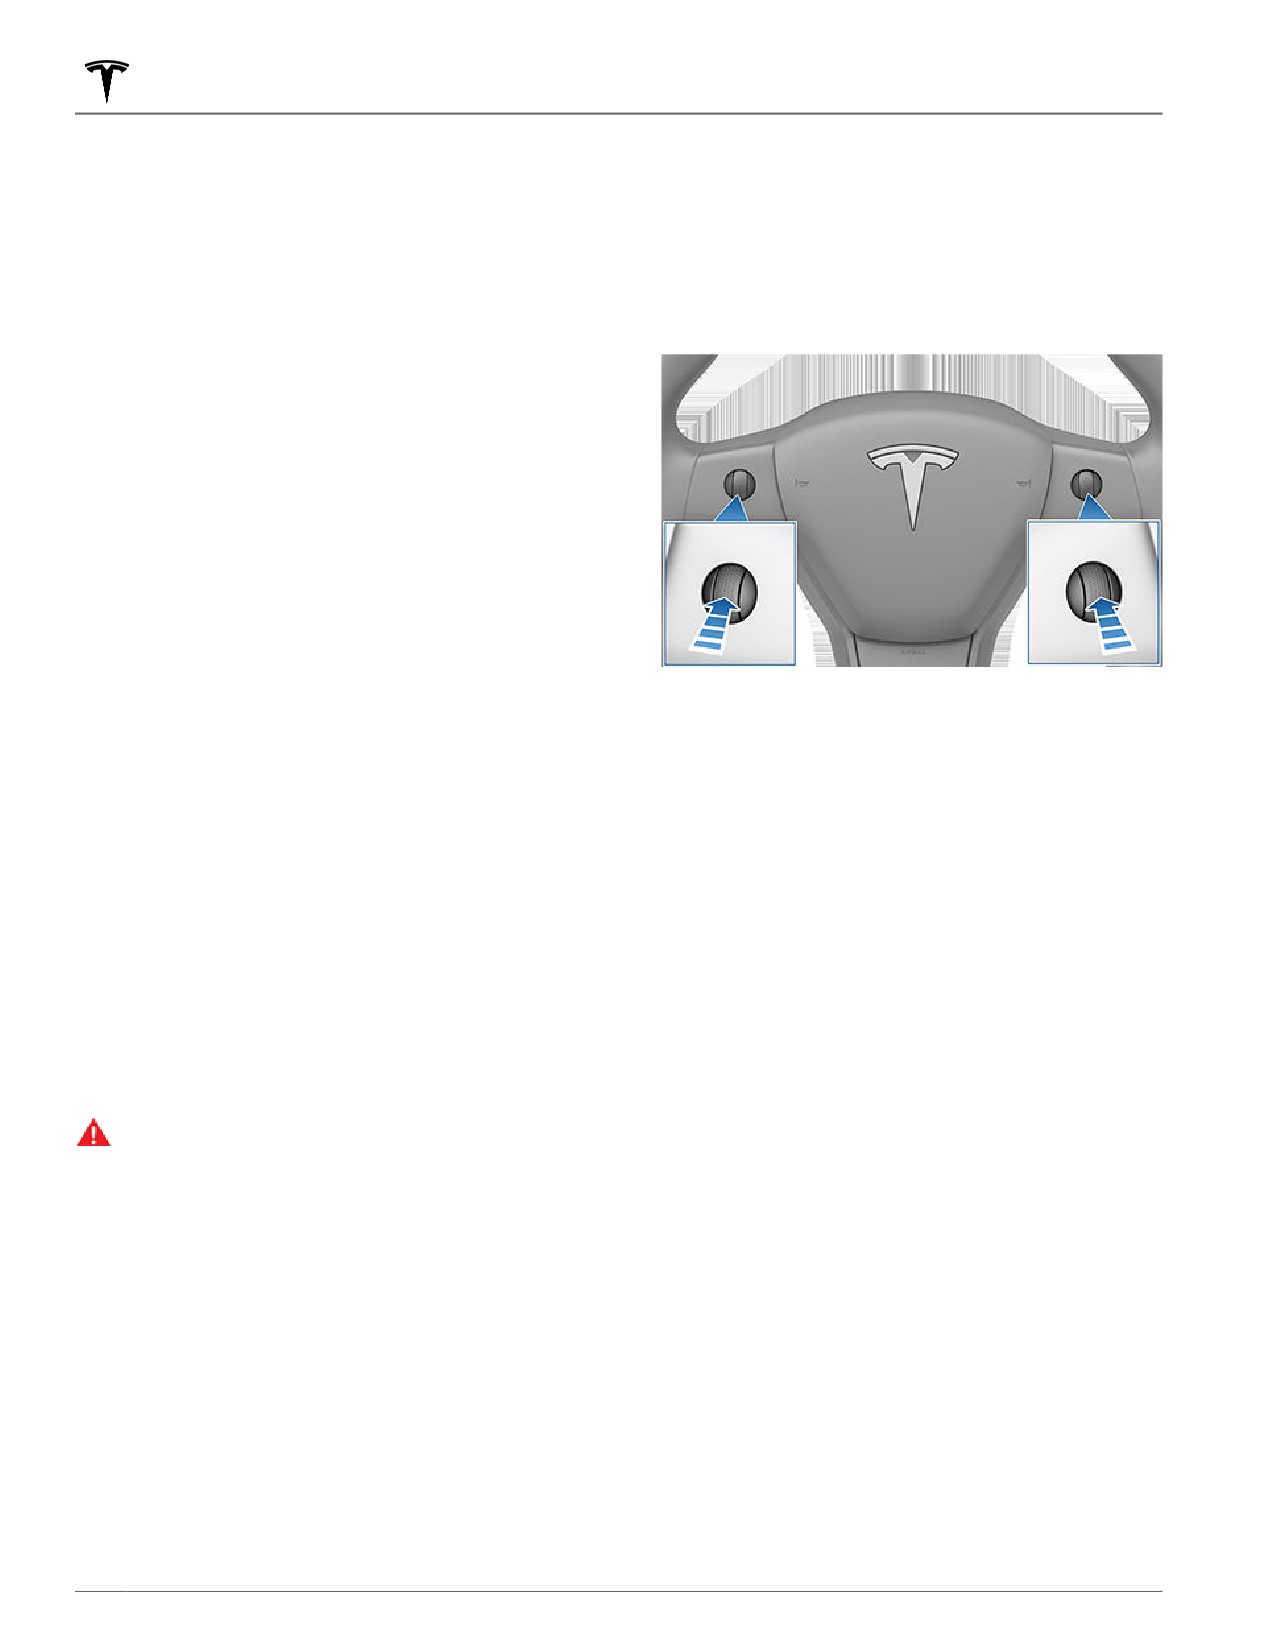
2. Hold down both scroll buttons on the steering wheel
until the touchscreen turns black.
6
Keys
Three Types of Keys
◦ Your phone's general Bluetooth settings are
enabled.
Model Y supports three types of keys:
◦ Bluetooth is enabled within your phone's settings
for the Tesla mobile app. For example, on your
• Phone key - You can set up your personal phone as a
phone, navigate to Settings, choose the Tesla
"phone key" that communicates with Model Y using
mobile app, and ensure the Bluetooth setting is
Bluetooth. A phone key supports automatic locking
turned on.
and unlocking.
◦ Access to your location is enabled. Open the Tesla
• Key card - Tesla provides a key card that
mobile app in your phone's settings and select
communicates with Model Y using short range radio-
Location > Always. For the best experience, keep
frequency identification (RFID) signals. The key card
the mobile app running in the background.
is used to "authenticate" phone keys to work with
◦ Allow Mobile Access is enabled on the vehicle
Model Y and to add or remove other key cards,
touchscreen (Controls > Safety > Allow Mobile
phone keys, or key fobs. Unlike the phone key and
Access).
key fob, the key card does not support automatic
locking and unlocking. In situations where your phone
NOTE: Model Y communicates with your phone using
key has a dead battery, or is lost or stolen, use your
Bluetooth. Keep in mind that your phone must have
key card to unlock, drive, and lock Model Y.
enough battery power to run Bluetooth and that
many phones disable Bluetooth when the battery is
• Key fob - The key fob (if equipped) allows you to
low.
press buttons to open the front and rear trunks, and
unlock, lock, and drive Model Y. The key fob also
4. While sitting inside the vehicle with a key card handy,
supports automatic locking and unlocking, if available
open the Tesla mobile app and touch Set Up Phone
in your region (see Passive Locking and Unlocking on
Key on the main screen, or navigate to Security > Set
page 9) and can be used as a backup to your
Up Phone Key. Follow the prompts on the mobile app
phone key.
and vehicle touchscreen to set up your phone key.
Model Y supports a total of 19 keys, which can include
To view a list of keys that can currently access Model Y,
phone keys, key cards, and up to four key fobs.
or to remove a phone key, touch Controls > Locks (see
Managing Keys on page 10).
CAUTION: Remember to bring a key with you
when you drive. Although you can drive Model Y
Model Y can connect to three phone keys
away from its key, you will be unable to power it
simultaneously. Therefore, if more than three phone keys
back on after it powers off.
are detected and you want to authenticate or pair a
different phone, move the other connected phone key(s)
Phone Key
out of range or turn off its Bluetooth setting.
Once a phone has been authenticated, it no longer
Using your phone as a key is a convenient way to access
your Model Y. As you approach, your phone's Bluetooth
requires an internet connection to be used as a phone
signal is detected and doors unlock when you press a
key for Model Y. However, to use the phone hands-free,
door handle. Likewise, when you exit and walk away with
access your phone's contacts, play media from it, etc.,
the phone key, doors automatically lock (provided the
you must also pair it and connect it as a Bluetooth
device (see Pairing a Bluetooth Phone on page 147).
Walk-Away Door Lock feature is turned on; see Walk-
Away Door Lock on page 12).
Key Card
Before you can use a phone to access Model Y, follow
these steps to authenticate it:
Tesla provides you with two Model Y key cards, designed
to fit in your wallet.
1. Download the Tesla mobile app to your phone.
2. Log into the Tesla mobile app using your Tesla
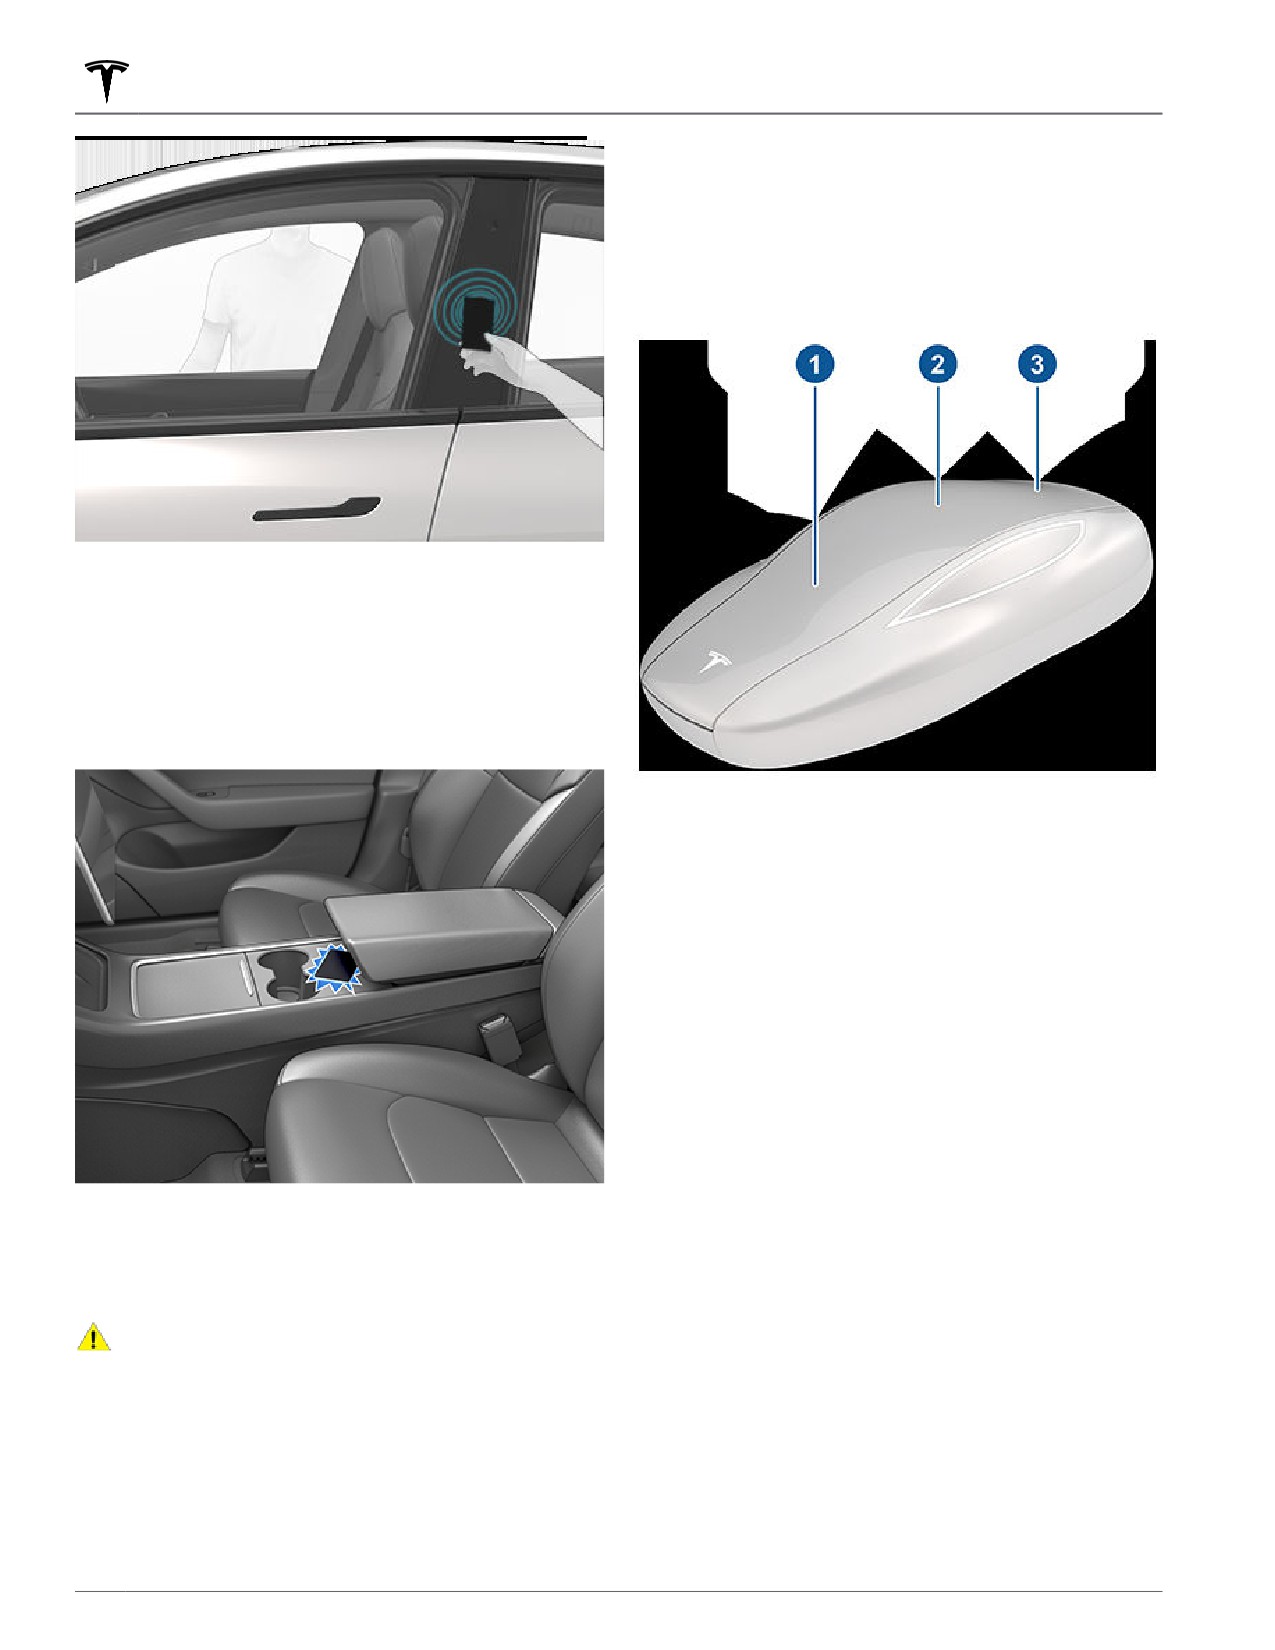
To use a key card to unlock or lock Model Y, position the
account username and password.
card as shown and tap it against the card reader located
just below the Autopilot camera on the driver's side
NOTE: You must remain logged in to your Tesla
door pillar. When Model Y detects the key card, the
account to use your phone to access Model Y.
exterior lights flash, the mirrors unfold or fold (if Fold
NOTE: If multiple vehicles are linked to your Tesla
Mirrors is on), the horn sounds (if Lock Confirmation
account, you must ensure that the vehicle you want
Sound is on), and the doors unlock or lock.
the mobile app to access is currently selected on the
NOTE: You may need to physically touch the center
mobile app.
console or driver's side door pillar with the key card, and
you may need to hold it against the transmitter for one
3. Ensure:
or two seconds.
Opening and Closing
7
Keys
Key Fob
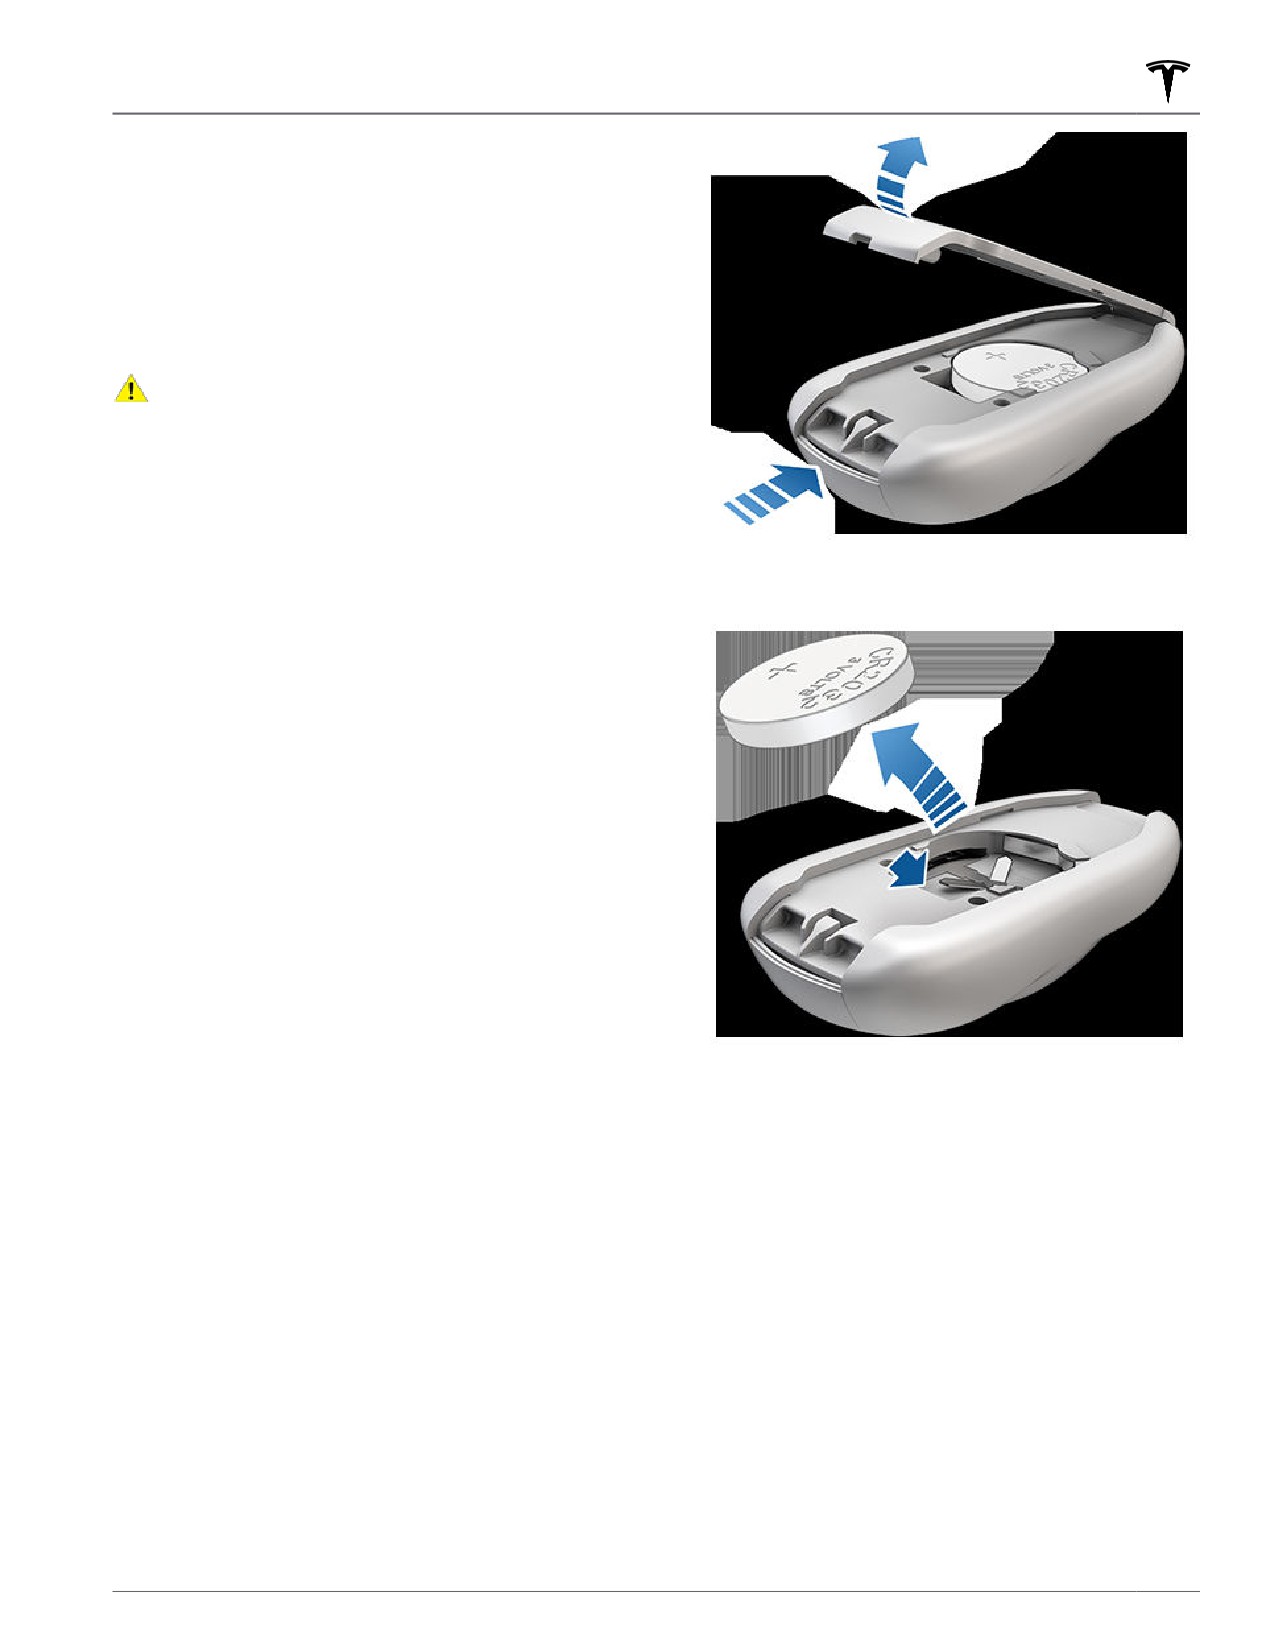
If you have purchased the key fob accessory, you can
quickly familiarize yourself with this key by thinking of it
as a miniature version of Model Y, with the Tesla badge
representing the front. The key has three buttons that
feel like softer areas on the surface.
Once inside, power up Model Y by pressing the brake
pedal within two minutes of scanning the key card (see
Starting and Powering Off on page 52). If you wait
longer than two minutes, you must re-authenticate by
placing the key card near the card reader located behind
the cup holders on the center console. When your key
card is detected, your two minute authentication period
restarts.
1. Front trunk - Double-click to unlatch the front trunk.
2. Lock/Unlock All - Single-click to lock doors and
trunks (all doors and trunks must be closed). Double-
click to unlock doors and trunks.
3. Rear trunk - Double-click to unlatch the rear trunk.
Hold down for one to two seconds to open the
charge port door.
Once inside, power up Model Y by pressing the brake
pedal within two minutes of pressing the unlock button
on the key fob (see Starting and Powering Off on page
52). If you wait longer than two minutes, you must
press the unlock button again, or place the key fob near
the card reader located behind the cup holders on the
center console. When your key fob is detected, the two
minute authentication period restarts.
NOTE: If enabled, Walk-Away Door Lock (see Walk-
Away Door Lock on page 12) operates only when you
When approaching or leaving Model Y carrying the key
walk away using a phone key or passive key fob. When
fob, you do not need to point the key fob at Model Y as
you walk away carrying your key card, Model Y does not
you press a button, but you must be within operating
automatically unlock/lock.
range.
CAUTION: Always carry your key card with you in
Radio equipment on a similar frequency can affect the
your purse or wallet to use as a backup in case
key. If this happens, move the key at least one foot
your authenticated phone has a dead battery, or is
lost or stolen.
(30 cm) away from other electronic devices (phones,
laptops, etc.).
In the event that the key fob's battery is dead, you can
still use it to drive the vehicle by scanning the key fob on
the card reader located on the driver's side door pillar
(like the key card).
8
Keys
Instructions for changing the battery are provided in
Replacing the Key Fob Battery on page 9.
NOTE: You can use the same key fob with multiple
Model Y vehicles provided you authenticate it (see
Managing Keys on page 10). However, key fob works
with only one Model Y at a time. Therefore, to use a key
fob for a different Model Y, touch its flat side against the
card reader on the driver's side door pillar.
NOTE: Model Y supports up to four different key fobs.
CAUTION: Protect the key from impact, high
temperatures, and damage from liquids. Avoid
contact with solvents, waxes, and abrasive
cleaners.
Passive Locking and Unlocking
Locking and unlocking Model Y with your key fob is
conveniently hands-free. Although you must be carrying
2. Remove the battery by lifting it away from the
a paired key fob, there is no need to use it. Model Y has
retaining clips.
sensors around the vehicle that can recognize the
presence of a key fob within a range of approximately
six feet (two meters). Therefore, you can keep your key
fob in your pocket or purse and simply pull on the door
handle to unlock. When carrying your key fob with you,
you can also open the trunk without having to use the
key by pressing the liftgate's exterior door handle. If
Walk-Away Door Lock is enabled, Model Y automatically
locks when you exit and the key fob is no longer in range
(see Walk-Away Door Lock on page 12). Passive
locking and unlocking is automatically enabled when
you pair your key fob to Model Y.
Although you can use the same key fob with multiple
vehicles, it can only be paired to one vehicle at a time.
To activate a paired key fob to a different vehicle, touch
the flat side onto the driver's side door pillar and click
any button on the key fob to confirm.
NOTE: For increased security, passive locking and
unlocking disables after being stationary for five minutes
3. While avoiding touching the battery's flat surfaces,
while within vehicle range when the vehicle is not in use
insert the new battery (type CR2032 ) with the ‘+’
(for example, you are standing outside your vehicle). In
side facing up.
this situation, you must shake or press a button on the
NOTE: Wipe the battery clean before fitting and
key fob to re-enable passive locking and unlocking.
avoid touching the battery's flat surfaces. Finger
marks on the flat surfaces of the battery can reduce
Replacing the Key Fob Battery
battery life.
NOTE: CR2032 batteries can be purchased from any
Under normal use, the accessory key fob has a battery
retailer that sells batteries.
that lasts for up to one year, depending on key fob
version and selected vehicle settings. When the battery
4. Holding the bottom cover at an angle, align the tabs
is low, a message displays on the touchscreen.
on the cover with the corresponding slots on the key
fob, then press the cover firmly onto the key fob until
To replace the key fob battery:
it snaps into place.
5. Test that the key fob works by unlocking and locking
1. With the key fob placed button side down on a soft
Model Y.
surface, release the bottom cover, using a small flat-
bladed tool.
Opening and Closing
9
Keys
WARNING: Key fob batteries contain a chemical
2. In the key list, find the key that you would like to
burn hazard and should not be ingested. The key
delete and touch its associated trash icon.
fob contains a coin cell battery. If the coin cell
3. When prompted, scan an authenticated key card or
battery is swallowed, it can cause severe internal
key fob on the card reader to confirm the deletion.
burns within two hours and can lead to death.
When complete, the key list no longer includes the
Keep new and used batteries away from children. If
deleted key.
the battery compartment does not close securely,
stop using the product and keep it away from
children. If you think batteries might have been
NOTE: Model Y requires at least one authenticated key
swallowed or placed inside any part of the body,
card or key fob at all times. If only one key card remains
seek immediate medical attention.
on the key list, you cannot delete it.
Managing Keys
To display a list of all keys (phone keys, key cards, and
key fobs) that can access your Model Y, touch Controls
> Locks. An icon displays next to each key to indicate
whether the key is a phone key, key card, or key fob. Use
this list to manage keys that have access to your Model
Y. To add or delete keys, see Adding and Removing Keys
on page 10.
Model Y supports up to 19 keys. When you reach this
limit, you must delete a key before adding a new one.
NOTE: You can use the same key for more than one
Model Y. This prevents you from having to deal with
multiple keys when you switch vehicles. If you customize
the name of an authenticated key card or key fob on one
Model Y (by touching the pencil icon), any other Model
Y to which the key card or key fob is authenticated also
displays the changed name.
Adding and Removing Keys
To add a new key card or key fob:
NOTE: When adding a key fob, ensure it is at room
temperature. Pairing a key fob that is very cold can be
unsuccessful.
1. On the touchscreen, touch Controls > Locks then
touch + in the Keys section.
2. Scan your new key card or key fob on the card reader
located behind the cup holders on the top of the
center console. After the new key card or key fob is
recognized, remove it from the card reader.
3. Scan a key card or key fob that has already been
paired to the vehicle to confirm new key pairing.
4. When complete, the key list includes the new key.
Touch the associated pencil icon to customize the
name of the key.
Removing a key:
When you no longer want a key to access Model Y (for
example, you lost your phone or key card, etc.), follow
these steps to remove it.
1. On the touchscreen, touch Controls > Locks.
10
Doors
Using Exterior Door Handles
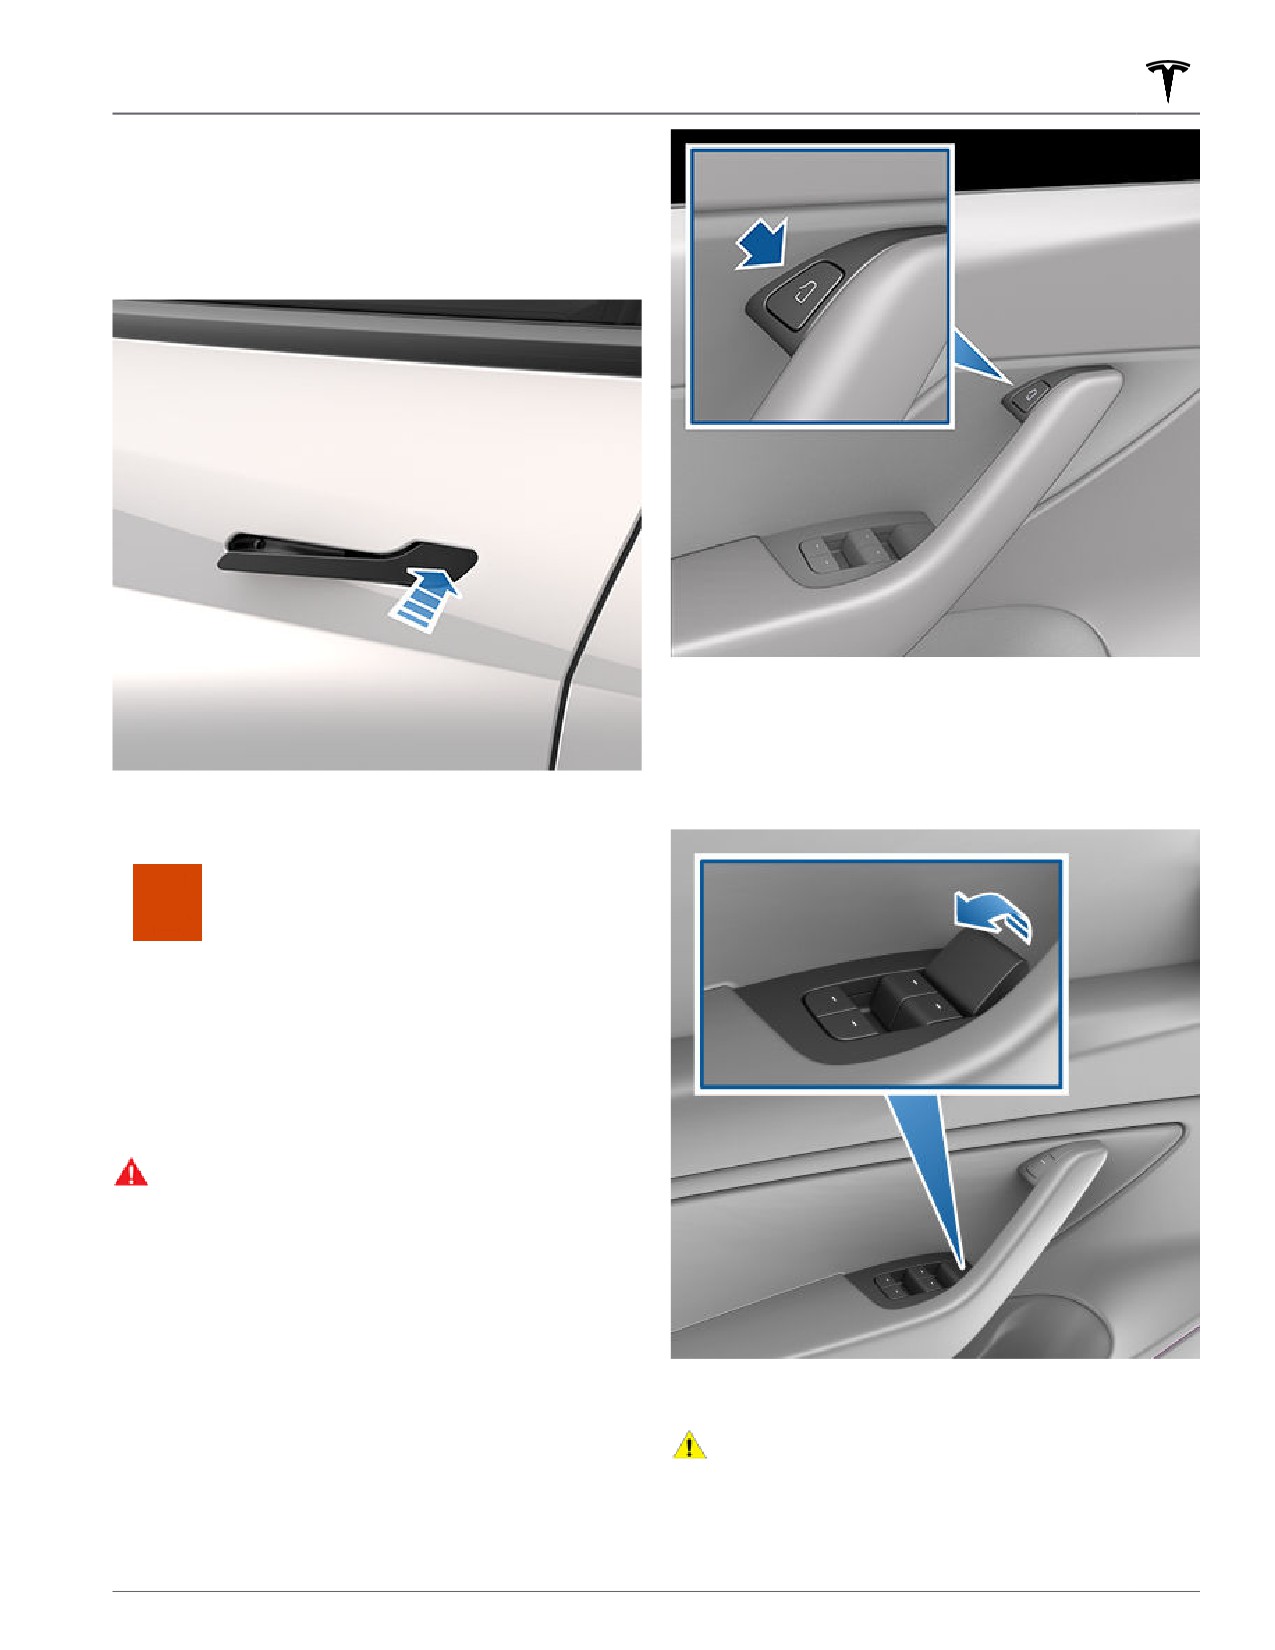
Use your thumb to push the wide part of the door
handle. The handle pivots toward you, and you can open
the door by pulling the handle or pulling the edge of the
door.
NOTE: To prevent children from opening the rear doors,
turn on child locks (see Child Locks on page 12).
To open a front door in the unlikely situation when
Model Y has no power, pull up the manual door release
located in front of the window switches.
The handle retracts automatically.
When a door or trunk is open, the
touchscreen displays the Door Open
indicator light.
You can specify that you want to unlock only the driver's
door when you shift into Park by turning on Controls >
Locks > Driver Door Unlock Mode. If off, all doors unlock
when you shift into Park.
NOTE: See Cold Weather Best Practices on page 81 to
ensure door handles function properly in cold weather.
WARNING: While using the door handle, take care
to avoid allowing fingers, jewelry, acrylic nails, etc.
from being pinched by the door or door handle
mechanism. Failure to do so may result in damage
or injury.
Opening Doors from the Interior
Model Y doors are electrically powered. To open a door
while sitting inside, press the button located at the top
NOTE: Only the front doors are equipped with a manual
of the interior door handle and push the door open.
door release.
CAUTION: Manual door releases are designed to
be used only in situations when Model Y has no
power. When Model Y has power, use the button
located at the top of the interior door handle.
Opening and Closing
11
Doors
Interior Locking and Unlocking
Drive Away Locking
While sitting inside Model Y, you can lock and unlock all
Model Y automatically locks all doors (including the
doors and trunks by touching the lock icon on the
trunks) when your driving speed exceeds 5 mph
touchscreen.
(8 km/h).
The icon changes to indicate whether
Child Locks
doors are locked or unlocked.
Model Y has child locks on the rear doors to prevent
them from being opened using the interior release
buttons. On the touchscreen, touch Controls > Locks >
Child Lock. You can choose Both to engage the child
You can also unlock the doors by pressing the Park
lock on both rear doors, or you can choose Left or Right
button on the end of the drive stalk a second time.
to engage it on just a specific door.
Pressing this button once engages Park and pressing it
again unlocks the doors.
WARNING: It is recommended that you turn on
child locks when children are seated in the rear
seats.
Driver Door Unlock Mode
Enabling Controls > Locks > Driver Door Unlock Mode
Unlock on Park
only unlocks the driver door when you first unlock Model
Y.
When you stop Model Y and engage Park, you can
choose to unlock all doors. To turn this feature on or off,
touch Controls > Locks > Unlock on Park.
Walk-Away Door Lock
NOTE: If set to OFF, you can unlock all doors by
Doors and trunks can automatically lock when you walk
pressing the Park button a second time after engaging
away carrying your phone key or paired key fob. To turn
Park.
this feature on or off, touch Controls > Locks > Walk-
Away Door Lock.
When the doors lock, the exterior lights flash once and
the mirrors fold (if Fold Mirrors is on). To also hear a
confirmation sound when Model Y locks, touch Controls
> Locks > Lock Confirmation Sound.
Model Y does not automatically lock if:
• You check the Exclude Home checkbox and Model Y
is parked at the location you have designated as
Home. For details on how to designate a location as
Home, see Home, Work, and Favorite Destinations on
page 137.
• A phone key or paired key fob is detected inside
Model Y.
• A door or trunk is not fully closed.
• The phone key's Bluetooth setting is turned off.
• Key fob or phone key remains within range for five
minutes after all doors have been closed.
NOTE: If Model Y detects an authenticated key for five
minutes after you exit the vehicle and close all doors,
Walk-Away Lock disables and doors do not lock when
you walk away. In this case, you must manually lock your
vehicle until after your next drive.
NOTE: It is ultimately your responsibility to ensure your
vehicle is locked, even when Walk-Away Door Lock is
enabled.
12
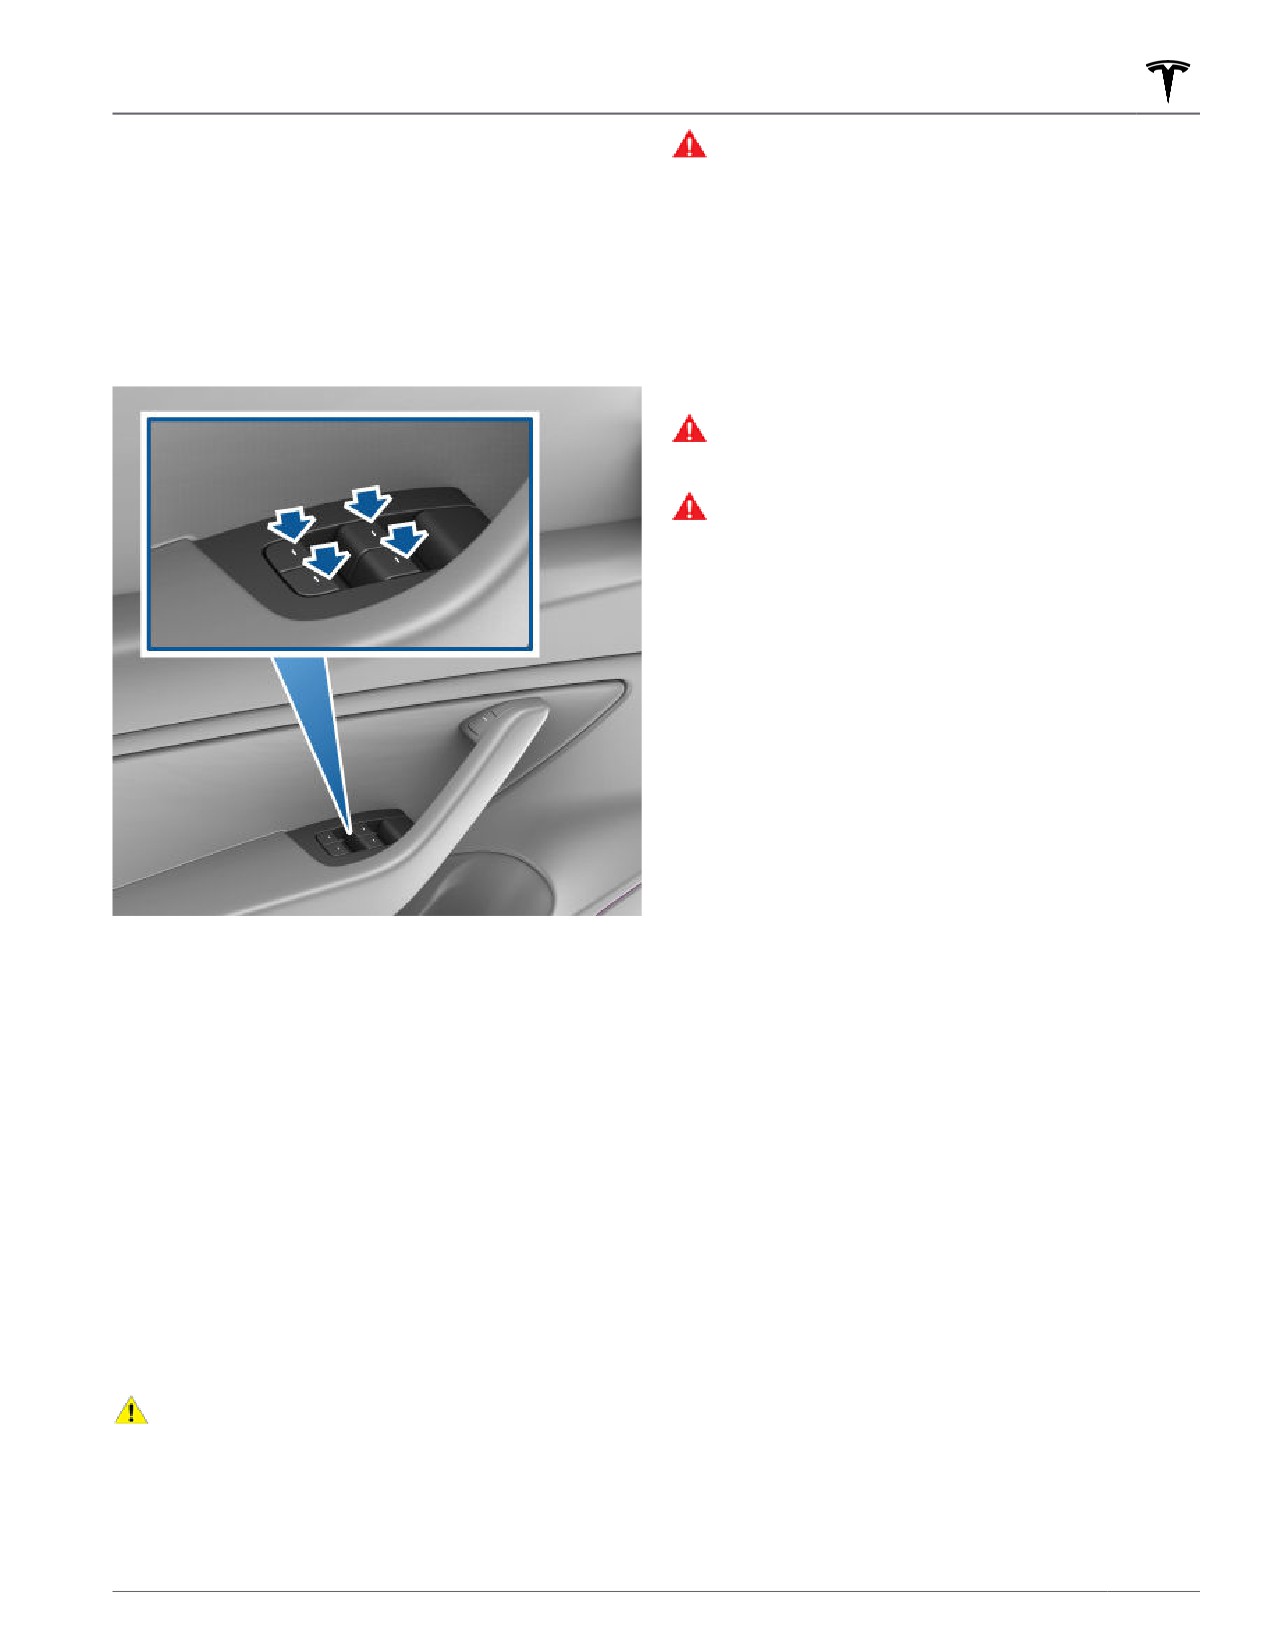
Windows
WARNING: Before closing a window, it is the
Opening and Closing
driver’s responsibility to ensure that all occupants,
especially children, do not have any body parts
Press down on a switch to lower the associated window.
extended through the window’s opening. Failure to
Window switches operate at two levels:
do so can cause serious injury.
• To lower a window fully, press the switch all the way
Locking Rear Windows
down and immediately release.
• To lower a window partially, press the switch gently
To prevent passengers from using the rear window
and release when the window is where you want it.
switches, touch Controls > Locks > Window Lock. To
unlock the rear windows, touch Window Lock again.
WARNING: To ensure safety, it is recommended
that you lock the rear window switches whenever
children are seated in the rear seats.
WARNING: Never leave children unattended in
Model Y.
Calibrating Windows
In the unlikely event that a window behaves
unexpectedly (touches the bright molding, fails to open
or close properly, goes down more than normal when
the door opens, etc.), you can calibrate it to potentially
fix the issue.
To calibrate a window:
1. Close the door with the affected window.
2. Sit in the driver's seat and close the driver door.
3. Using the window's switch on the driver's door, raise
the affected window until it stalls.
4. Using the window's switch on the driver's door, lower
Similarly, pull a switch to raise the associated window:
the affected window until it stalls.
5. Repeat step 3 and raise the affected window until it
• To raise a window fully, pull the switch all the way up
stalls.
and immediately release.
• To raise a window partially, pull the switch gently and
The window should now be calibrated. If the issue
release when the window is where you want it.
continues after attempting the calibration procedure a
couple times, contact Tesla.
If a window is left open unintentionally, Model Y can
send a notification to the mobile app (touch Controls >
Locks > Car Left Open Notification, then choose Doors
& Windows).
You can also enable Close Windows on Lock by
touching Controls > Locks > Close Windows on Lock.
When enabled, your vehicle automatically closes the
windows when Model Y locks.
NOTE: See Cold Weather Best Practices on page 81
for information on preparing windows for cold weather.
CAUTION: To avoid damage, windows
automatically lower slightly when you open or
close a door. If you manually raise a window when
the door is open, ensure it is slightly lowered
before closing the door.
Opening and Closing
13
Rear Trunk
NOTE: In emergency situations, you can override an
Opening
open or close command by grasping the liftgate to stop
it in place.
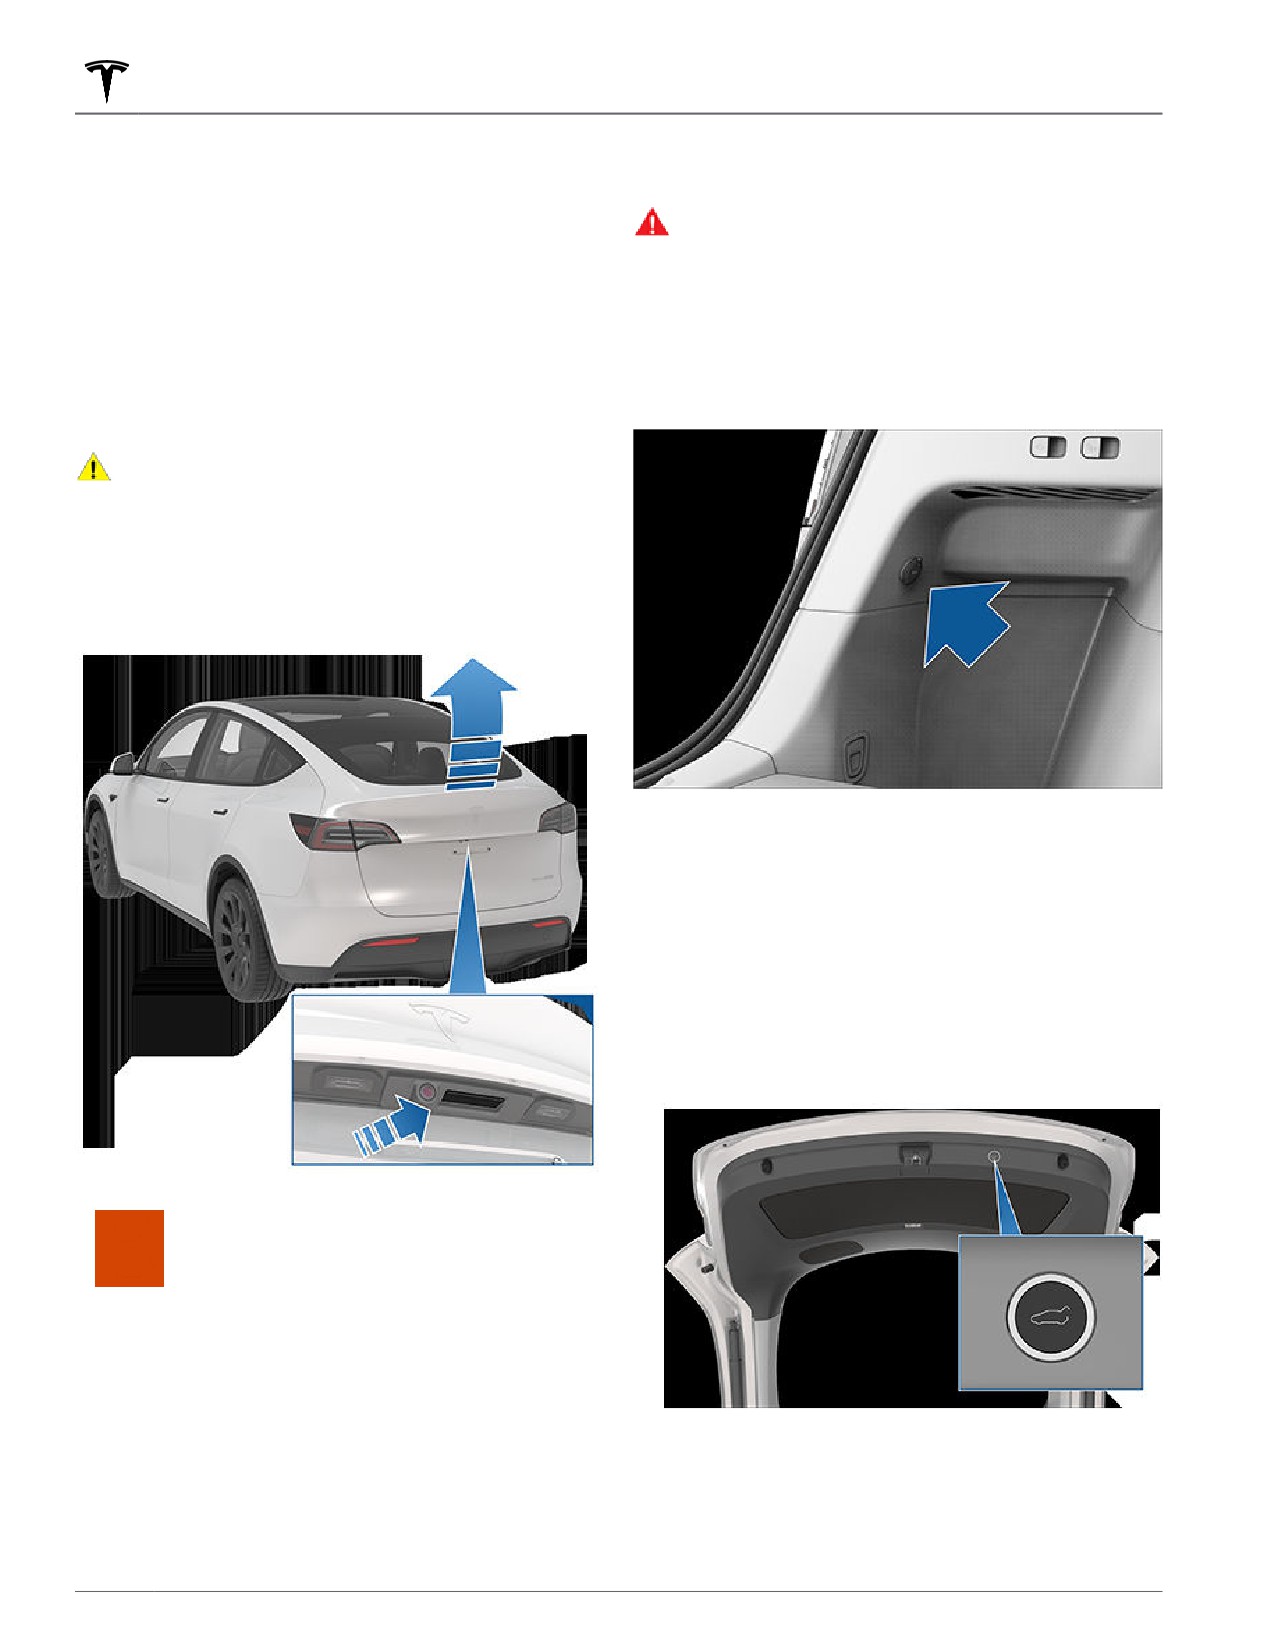
To open the rear trunk, ensure Model Y is in Park, then
do one of the following:
WARNING: Before opening or closing the liftgate,
check the surrounding area (for people and
objects). You must proactively monitor the liftgate
• Touch the associated Open button on the
to ensure that it does not come into contact with a
touchscreen.
person or object. Failure to do so may result in
• Double-click the rear trunk button on the key fob.
damage or injury.
• Touch the rear trunk button on the mobile app.
A low voltage power socket is located on the left side of
• Press the switch located under the liftgate's exterior
the rear trunk.
handle (a valid key must be detected).
CAUTION: Before opening the liftgate in an
enclosed area (such as a garage), ensure the
opening height of the liftgate is properly adjusted
to avoid low-hanging ceilings or objects (see
Adjusting Liftgate Opening Height on page 14).
Model Y must be unlocked or detect a key before you
can use the switch to open the liftgate.
Adjusting Liftgate Opening Height
You can adjust the opening height of the liftgate to
make it easier to reach or to avoid low-hanging ceilings
or objects (for example, a garage door or light):
1. Open the trunk, then manually lower or raise the
liftgate to the desired opening height.
2. Press and hold the button on the underside of the
liftgate for three seconds until you hear a
confirmation chime.
When a door or trunk is open, the
touchscreen displays the Door Open
indicator light. The image of your Model Y
on the touchscreen also displays the open
trunk.
To stop a liftgate while it is moving, single-click the rear
trunk button on the key fob. Then, when you double-
click the rear trunk button, it moves again, but in the
3. Confirm that you have set it to the desired height by
opposite direction (provided it was not almost entirely
closing the liftgate, then reopening it.
open or closed when you stopped it). For example, if
you single-click to stop the liftgate while opening, when
you double-click, it closes.
14
Rear Trunk
CAUTION: Depending on configuration (such as
suspension height or wheel selection), your
vehicle's liftgate can open up to approximately 7.5
feet (2.3 meters) high. Adjust the liftgate height to
prevent it from coming into contact with low
ceilings or other objects.
Closing
To close the liftgate, do one of the following:
• Touch the associated Close button on the
touchscreen.
• Double-click the rear trunk button on the key fob.
• Press the switch located on the underside of the
liftgate
If the liftgate senses an obstruction when closing, it
stops moving and chimes two times. Remove the
obstruction and try closing it again.
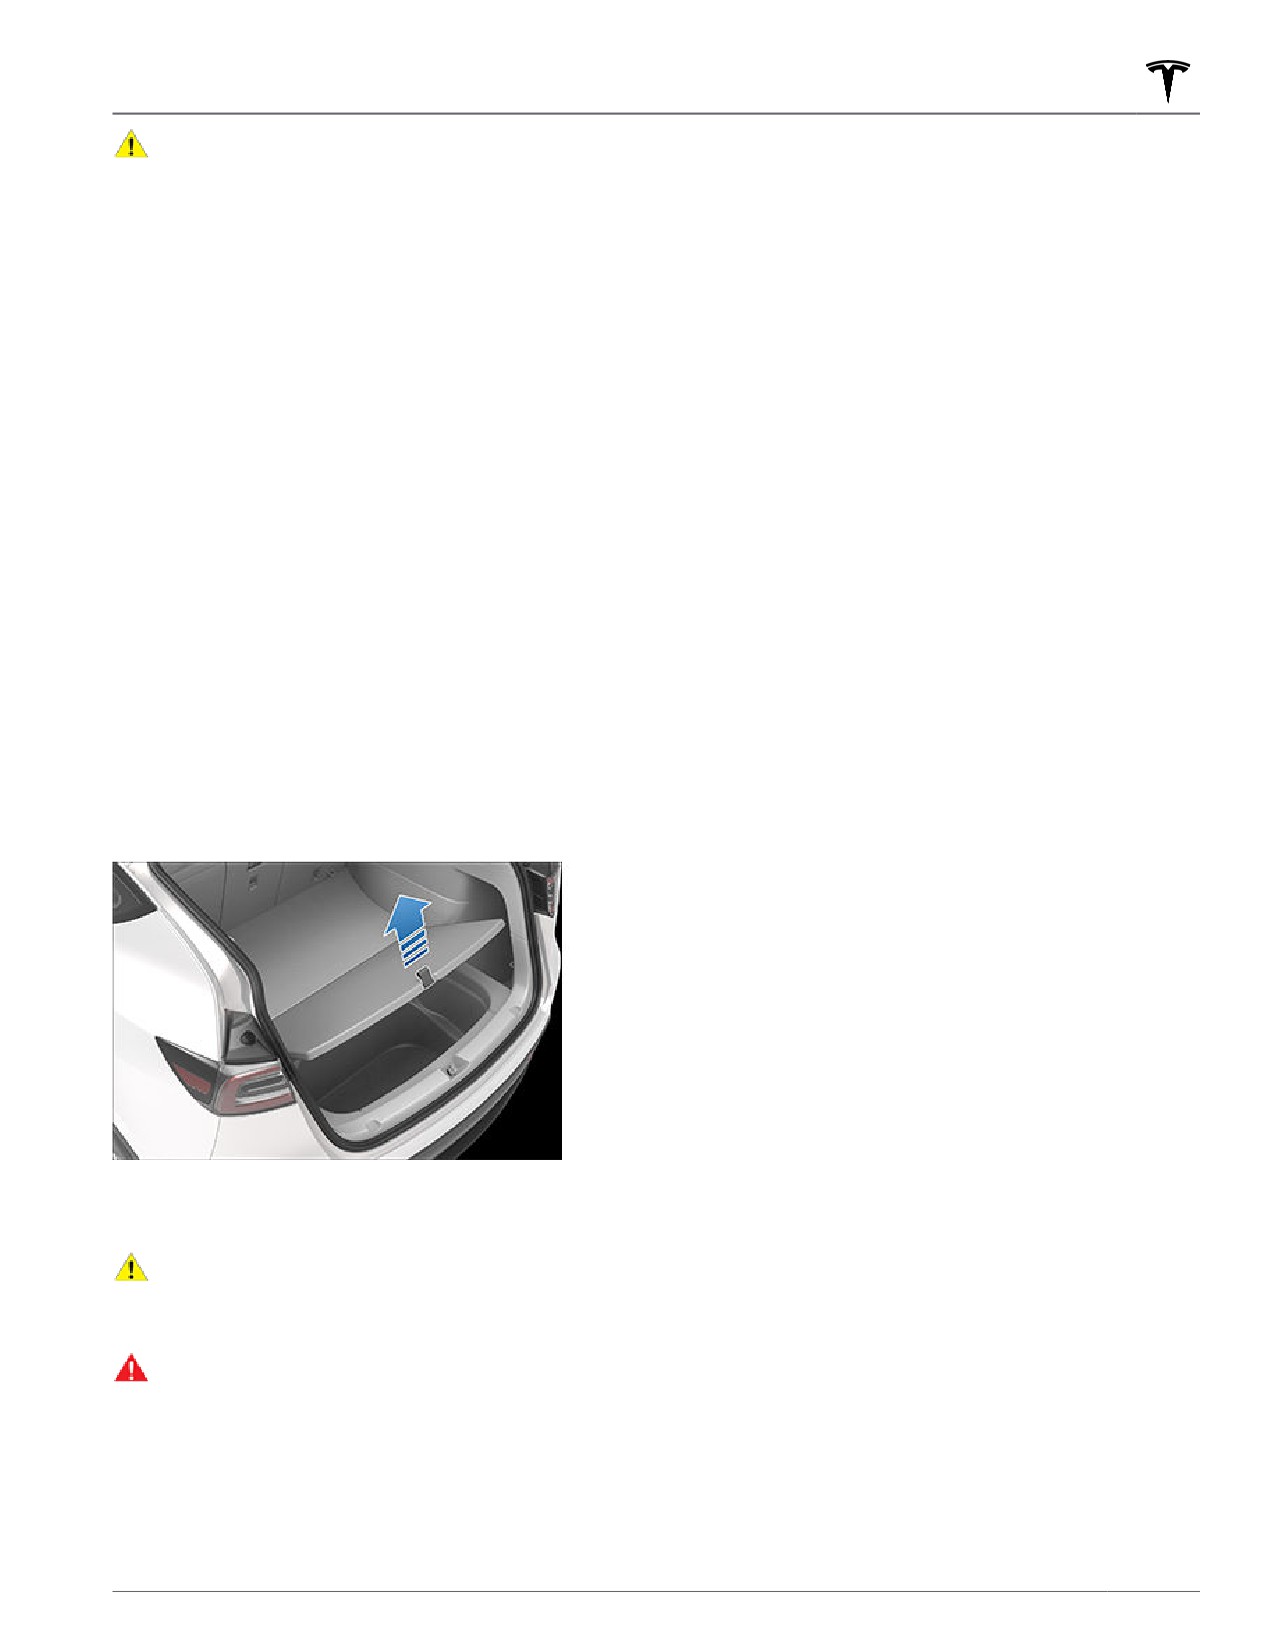
Accessing the Cargo Area
To access the cargo area inside the rear trunk, pull up
the strap at the rear of the cargo cover. You can then
fold the cargo cover forward or remove it from Model Y.
Secure all cargo before moving Model Y, and place
heavy cargo in the lower trunk compartment.
The cargo weight should be distributed as evenly as
possible between the front and rear trunks.
CAUTION: Never load more than 176 lbs (80 kg) in
the lower tub compartment of the rear trunk or
more than 397 lbs (180 kg) on the upper floor.
Doing so can cause damage.
WARNING: When loading cargo, always consider
the vehicle's Gross Vehicle Weight Rating (GVWR)
(see Vehicle Loading on page 194). The GVWR is
the maximum allowable total mass of the vehicle
including all passengers, fluids, and cargo.
Opening and Closing
15
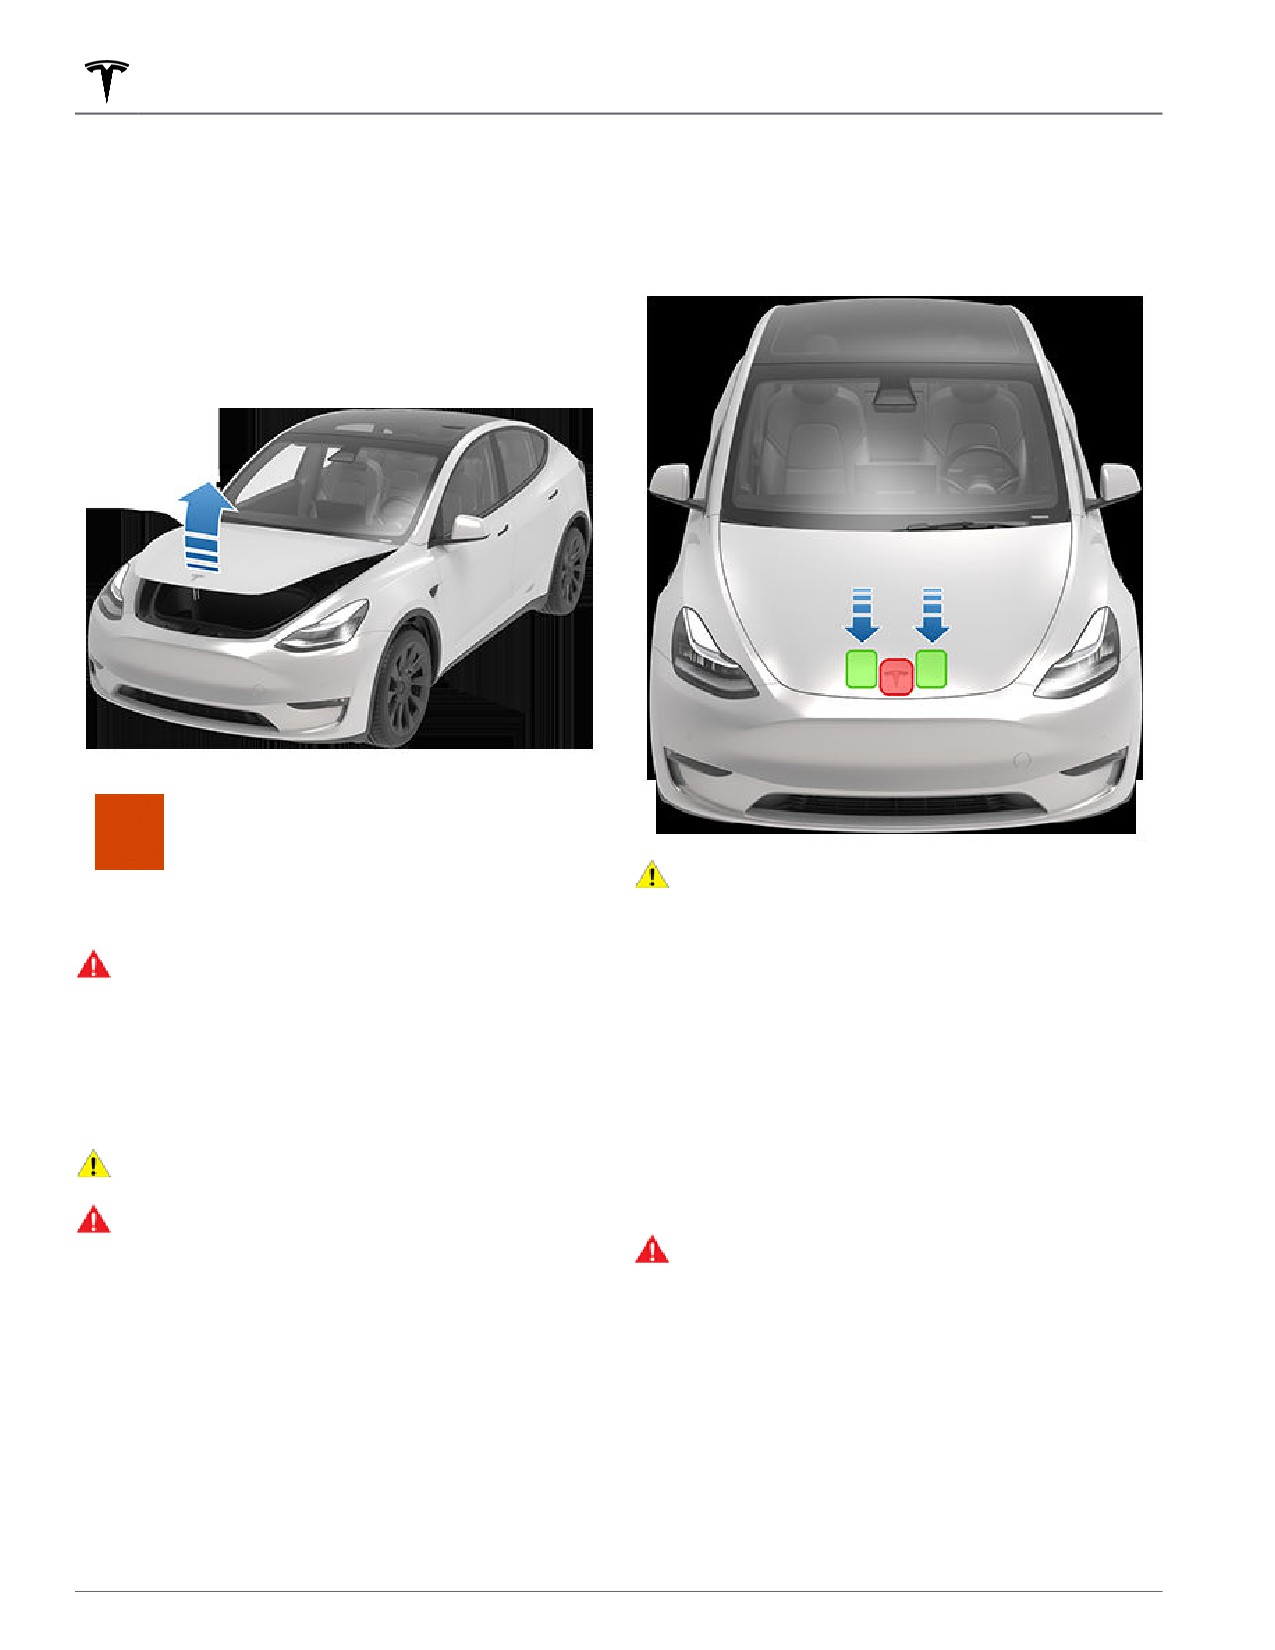
Front Trunk
Opening
2. Place both hands on the front of the hood in the
areas shown (in green), then press down firmly to
engage the latches.
To open the front trunk, ensure Model Y is in Park, and
then do one of the following before pulling the hood
3. Carefully try to lift the front edge of the hood to
open:
ensure that it is fully closed.
• Touch the associated Open icon on the touchscreen.
• Double-click the front trunk button on the key fob.
• Touch the front trunk button in the mobile app.
When a door or trunk/liftgate is open, the
touchscreen displays the Door Open
indicator light. The image of your Model Y
CAUTION: To prevent damage:
on the touchscreen also displays the open
front trunk.
• Apply pressure only to the green areas shown.
Applying pressure to the red areas can cause
WARNING: Before opening or closing the hood, it
damage.
is important to check that the area around the
• Do not close the hood with one hand. Doing so
hood is free of obstacles (people and objects).
applies concentrated force in one area and can
Failure to do so may result in damage or serious
result in a dent or crease.
injury.
• Do not apply pressure to the front edge of the
The cargo weight should be distributed as evenly as
hood. Doing so can crease the edge.
possible between the front and rear trunks.
• Do not slam or drop the hood.
CAUTION: Never load more than 110 lbs (50 kg) in
• To avoid scratches, don't have anything in your
the front trunk. Doing so can cause damage.
hands (keys). Jewelry can also cause scratches.
WARNING: When loading cargo, always consider
the vehicle's Gross Vehicle Weight Rating (GVWR)
WARNING: Before driving, you must ensure that
(see Vehicle Loading on page 194). The GVWR is
the hood is securely latched in the fully closed
the maximum allowable total mass of the vehicle
position by carefully trying to lift the front edge of
including all passengers, fluids, and cargo.
the hood upward and confirming there is no
movement. If the front trunk is not closed, a
Closing
message displays on the touchscreen that you
cannot shift the vehicle out of Park until the front
trunk is securely closed (see Park on page 53).
The Model Y hood is not heavy enough to latch under its
own weight and applying pressure on the front edge or
The front trunk locks when:
center of the hood can cause damage.
• You lock Model Y using the touchscreen, key or
To properly close the hood:
mobile app.
1. Lower the hood until the striker touches the latches.
16
Front Trunk
• You leave Model Y carrying your key (if Walk-Away
Door Lock on page 12 is turned on).
• Valet mode is active (see Valet Mode on page 47).
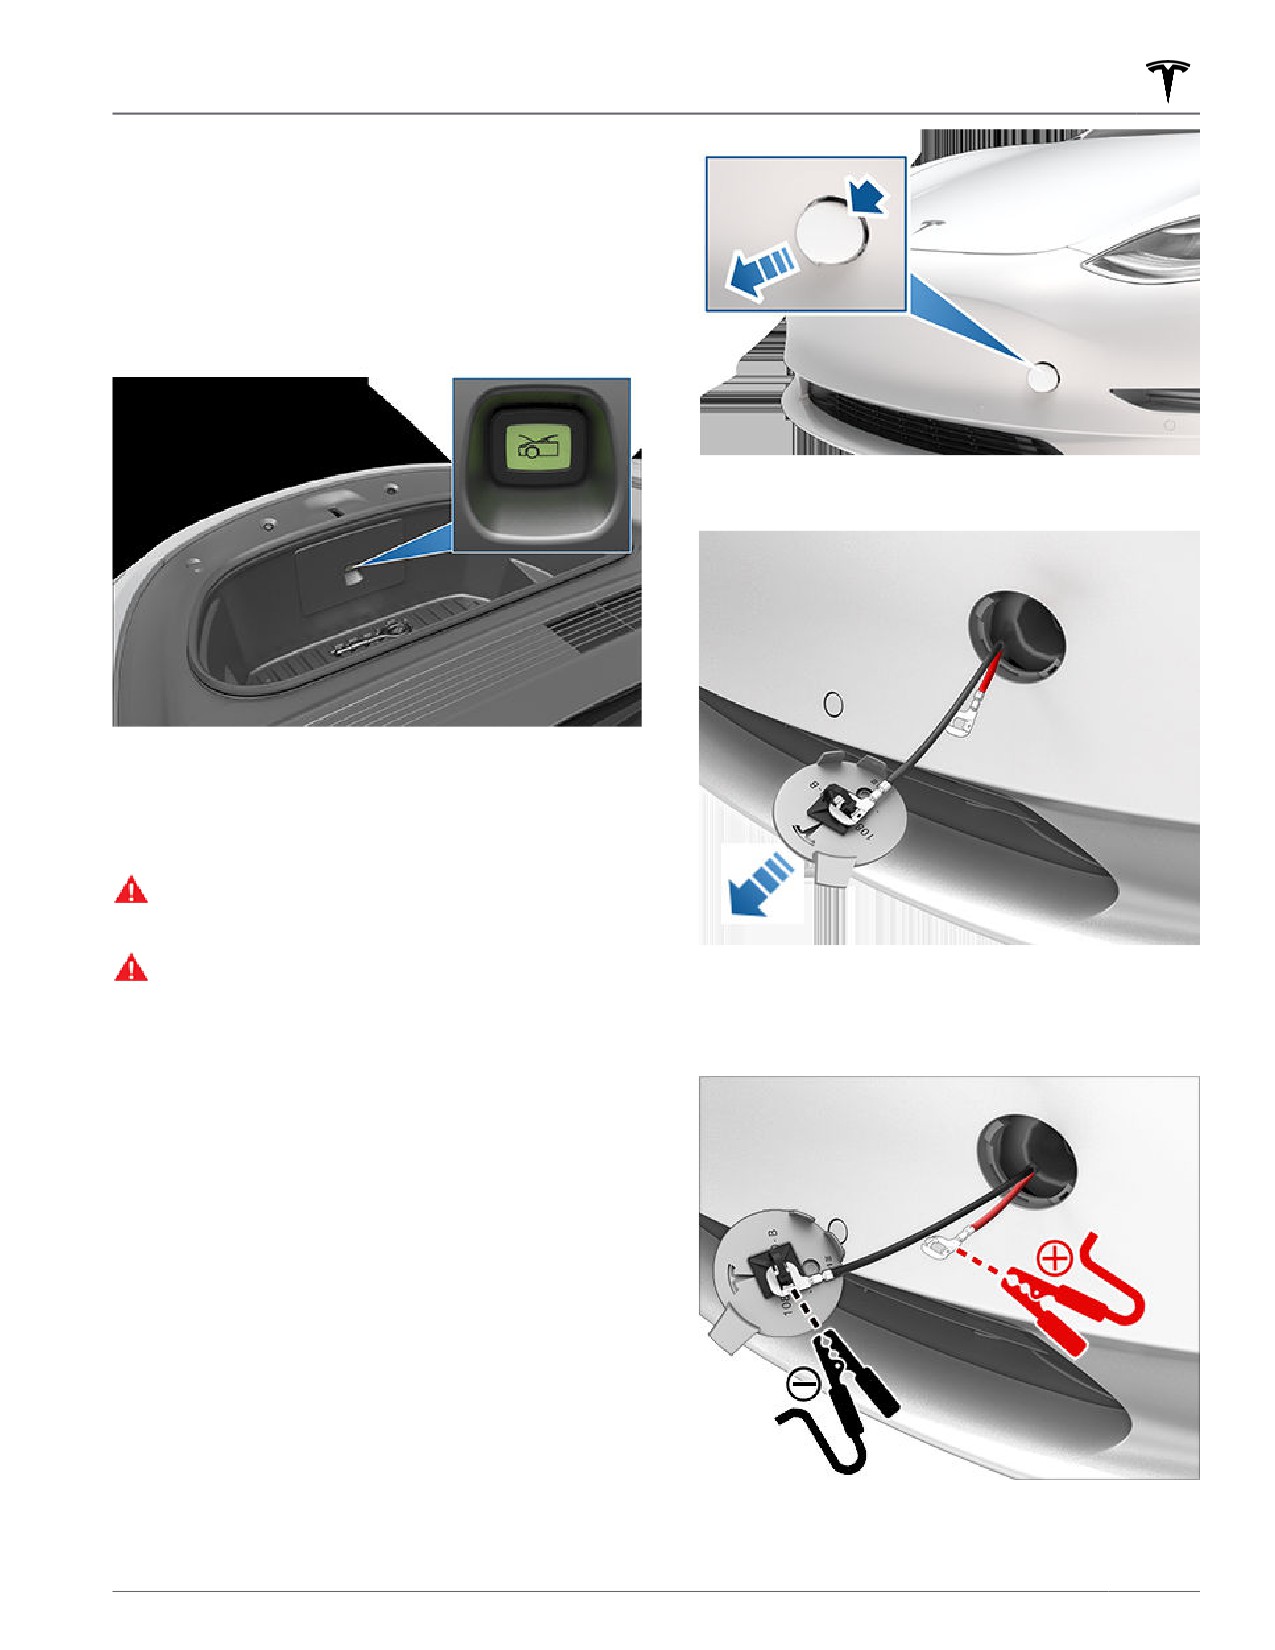
Interior Emergency Release
An illuminated interior release button inside the front
trunk allows a person locked inside to get out.
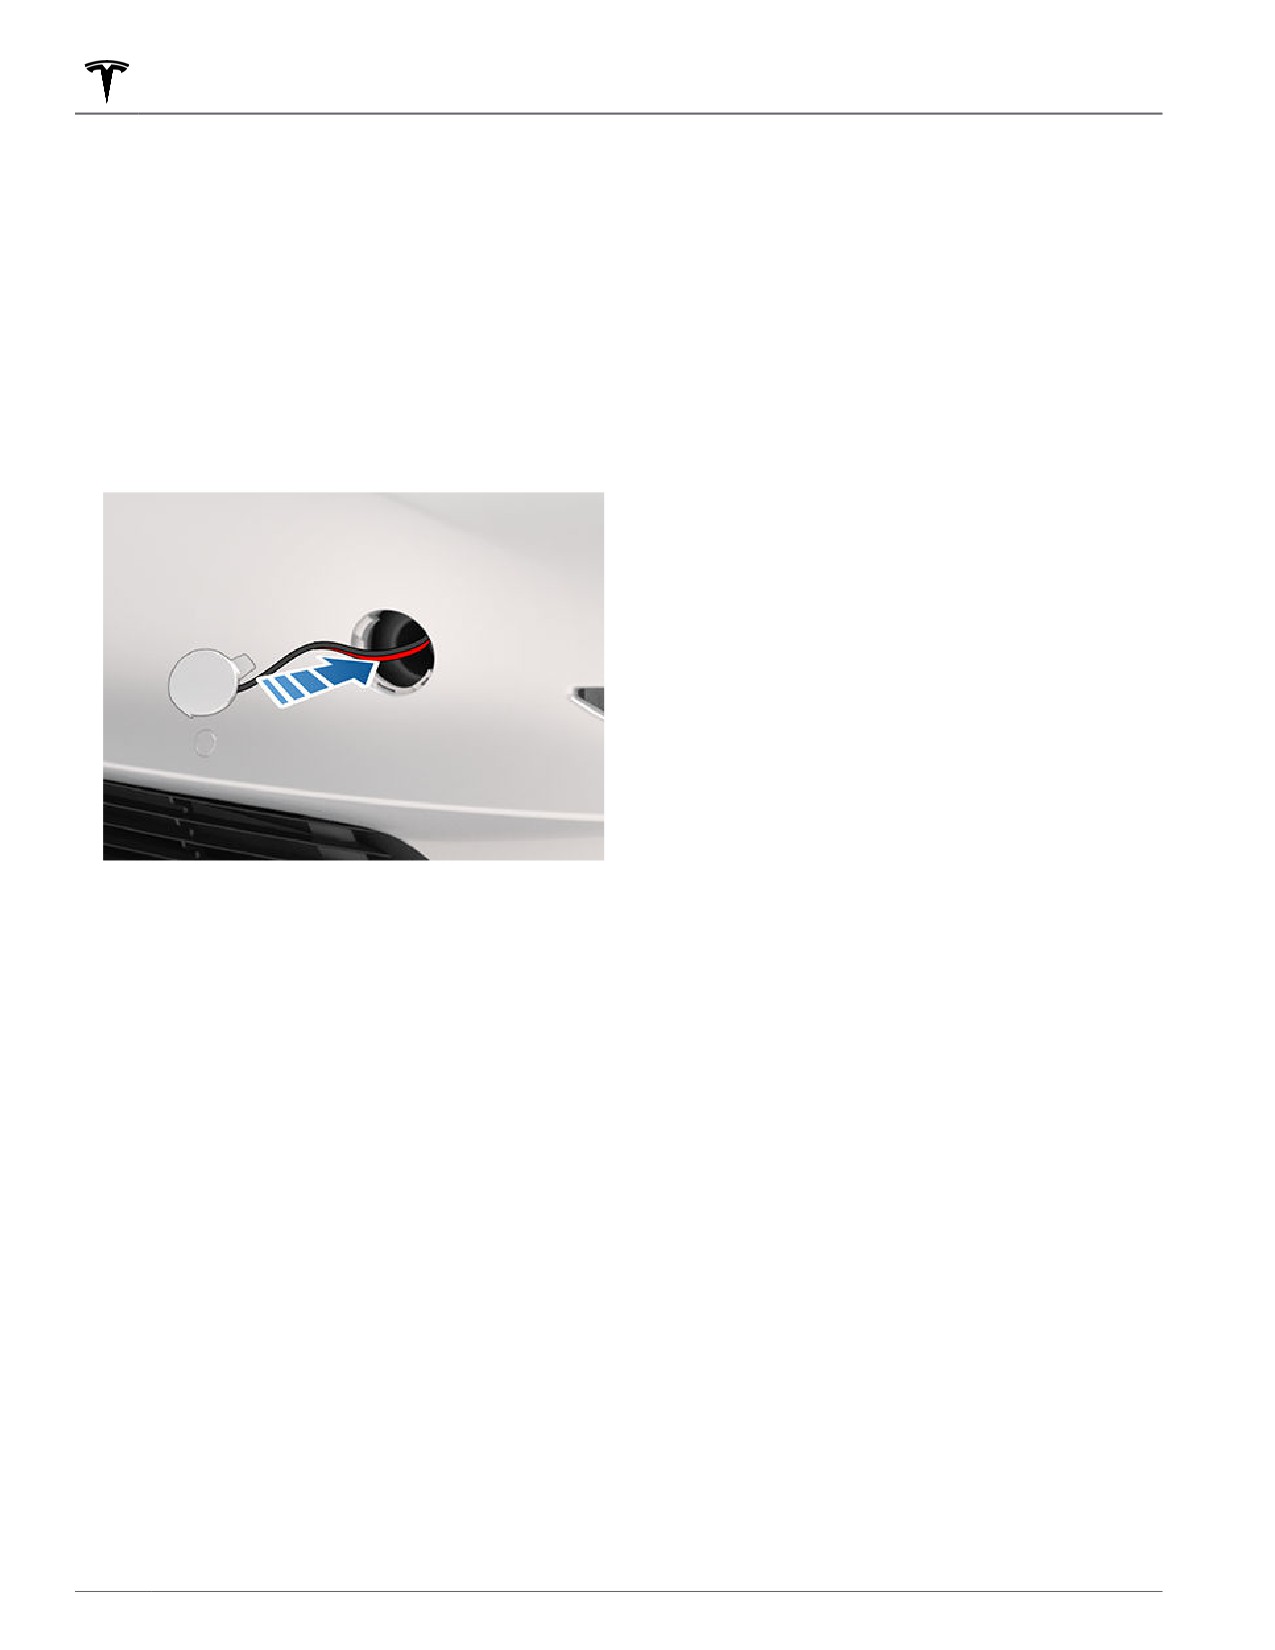
3. Pull the two wires out of the tow eye opening to
expose both terminals.
Press the interior release button to open the front trunk,
then push up on the hood.
NOTE: The interior release button glows following a brief
exposure to ambient light.
WARNING: People should never climb inside the
front trunk. Never shut the front trunk when a
person is inside.
WARNING: Care should be taken to ensure that
objects inside the front trunk do not bump against
4. Connect the low voltage power supply's red positive
(+) cable to the red positive (+) terminal.
the release button, causing the hood to
accidentally open.
5. Connect the low voltage power supply's black
negative (-) cable to the black negative (-) terminal.
Opening Hood with No Power
In the unlikely event that Model Y has no low voltage
power, you will be unable to open the front trunk using
the touchscreen, key fob, or mobile app. To open the
front trunk in this situation:
NOTE: The following steps do not open the front trunk if
Model Y is locked and has low voltage power.
1. Locate an external low voltage power supply (such as
a portable jump starter).
2. Release the tow eye cover by pressing firmly on the
top right perimeter of the cover until it pivots inward,
then gently pulling the raised section toward you.
NOTE: Depending on production date, either the
positive or negative terminal may be attached to the
tow eye cover.
Opening and Closing
17
Front Trunk
NOTE: Applying external low voltage power to these
terminals only releases the hood latches. You cannot
charge the low voltage battery using these terminals.
6. Turn on the external power supply (refer to the
manufacturer’s instructions). The hood latches are
immediately released and you can now open the
hood to access the front trunk area.
7. Disconnect both cables, beginning with the black
negative (-) cable.
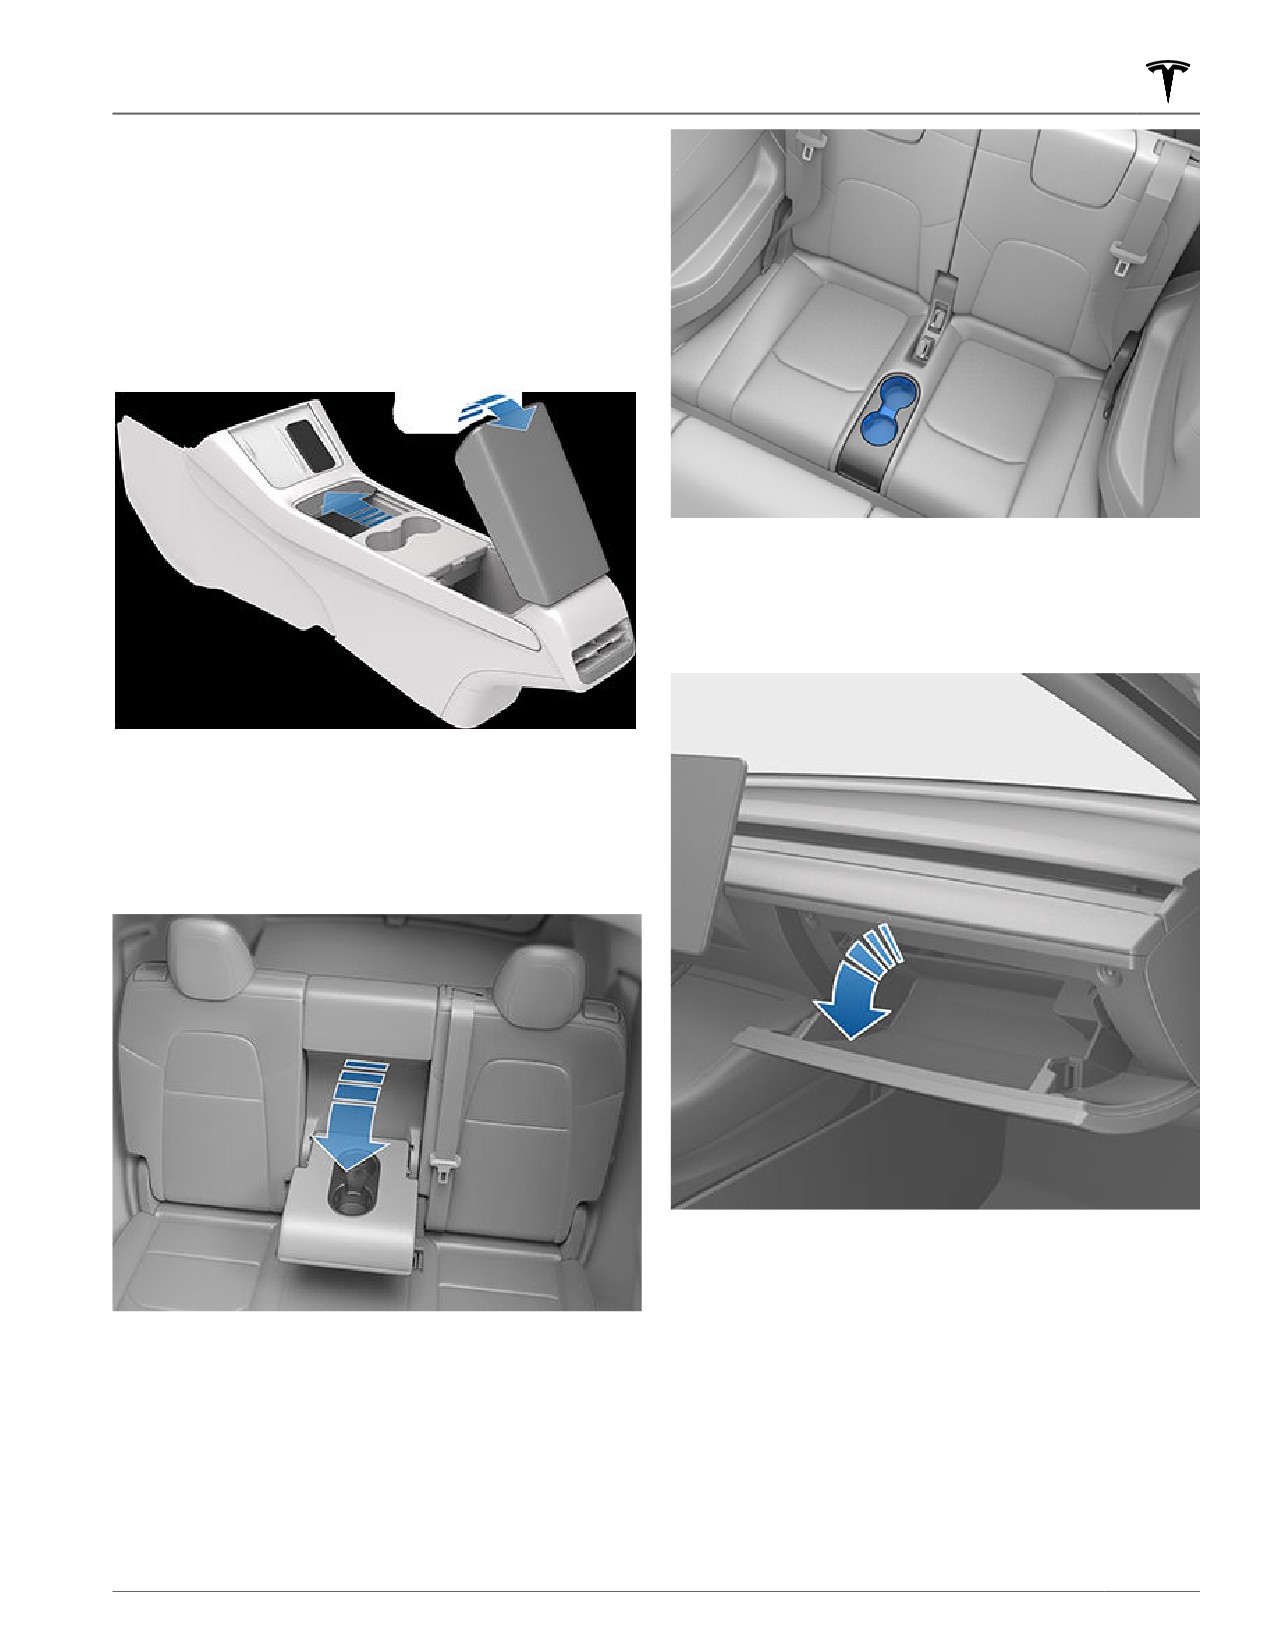
8. If pulling the vehicle onto a flatbed truck, do not
replace the tow eye cover yet. If necessary, install the
tow eye cover by inserting the wires into the tow eye
opening and aligning the tow eye cover into position
and snapping it into place.
18
Interior Storage and Electronics
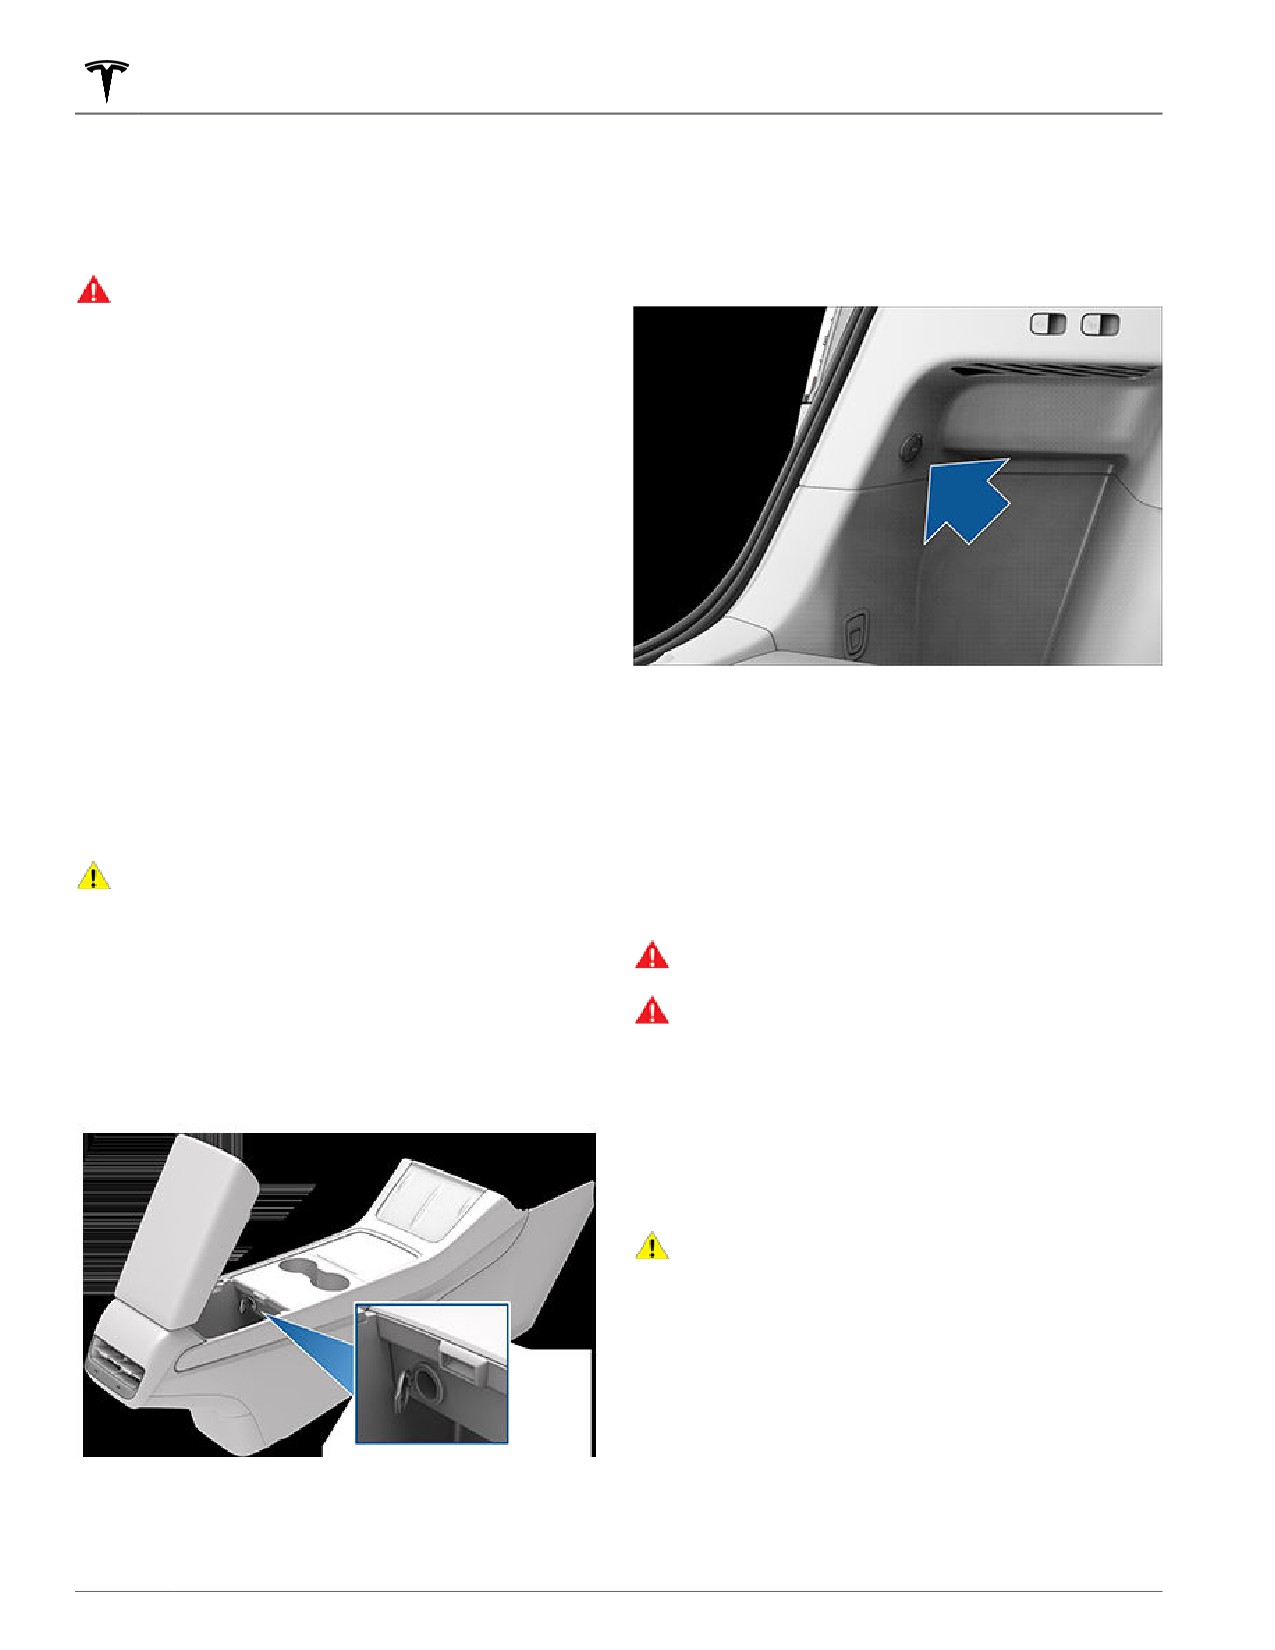
Center Console
In addition to housing an RFID transmitter that reads key
fobs and key cards (see Key Card on page 7), the center
console includes cup holders, two storage
compartments, and a wireless phone charger.
To open the main storage compartment, pull its cover
upward. Open the front storage compartment by sliding
its cover forward.
Glovebox
To open the glovebox, touch Controls > Glovebox. The
glovebox automatically opens and its light turns on.
Second Row Console
Your Model Y has a rear console integrated in the center
of the second row seat back. Pull the console down to
access the rear cup holders, or use it as an armrest.
To close the glovebox, push it upward until it clicks into
its closed position.
For additional glovebox security, touch Controls >
Safety > Glovebox PIN to set a 4-digit PIN (see
Third Row Cup Holders (7-seat
Glovebox PIN on page 152).
models only)
NOTE: If you leave the glovebox open, its light
eventually turns off.
If Model Y is equipped with seven seats, two cup holders
are located between the third row seats.
Opening and Closing
19
Interior Storage and Electronics
NOTE: The glovebox locks whenever closed and you
NOTE: For vehicles manufactured after approximately
lock Model Y using the mobile app, key card, you leave
November 2021, power inverters plugged into the low
Model Y carrying your phone key (if Walk-Away Door
voltage power socket must support 16V DC input to
Lock is turned on), or if Valet mode is active (see Valet
function.
Mode on page 47). It does not lock when Model Y is
locked by touching the lock icon on the touchscreen.
An additional low voltage power socket is located on the
left side of the rear trunk.
WARNING: When driving, keep the glovebox
closed to prevent injury to a passenger if a
collision or sudden stop occurs.
Wireless Phone Charger
A wireless phone charger is integrated into the front
console to provide up to 15W of power to charge a Qi-
enabled phone. Simply place your phone on the charger.
Your device may feel warm while charging, but this is a
normal effect of inductive charging.
When placed on the wireless charger, your phone
charges whenever the vehicle is powered on (the
touchscreen is on and you are in the vehicle). Your
phone will not charge after exiting the vehicle unless a
feature (such as Sentry mode) is enabled and therefore
providing power to the USB ports (see Using Sentry
NOTE: Power is available whenever the vehicle is
Mode on page 154). Model Y will also not charge a
considered "awake". The vehicle may be awake for many
phone if the vehicle's Battery is discharged.
reasons. For example, when using features such as
Summon, or when features such as Preconditioning,
NOTE: The wireless phone charger may not work if your
Cabin Overheat Protection, Keep Climate On, Dog Mode,
phone case is too large or is made of metal. Try
Camp Mode, Sentry Mode, etc. are enabled. The vehicle
removing the phone from its case before placing in the
is also awake whenever the low voltage battery is being
charger.
charged or is in use, during HV charging, when the
CAUTION: The phone must be in direct contact
vehicle is communicating with the mobile app, etc.
with the wireless charger. Do not place objects
Leaving an accessory plugged in does not deplete the
between the phone and the charger (for example,
low voltage battery.
credit cards, key cards, coins, keys, metal objects,
WARNING: The power socket and an accessory’s
etc.).
connector can become hot.
WARNING: To prevent excessive interference with
Low Voltage Power Socket
the vehicle’s electronics, Tesla recommends that
you do not plug any non-Tesla accessories,
Your Model Y has a power socket located in the center
including power inverters, into the low voltage
console's rear compartment.
power socket. However, if you do use a non-Tesla
accessory and notice any malfunctions or
unexpected behavior, such as indicator lights, alert
messages, or excessive heat from the accessory,
unplug the accessory from the low voltage power
socket immediately.
CAUTION: Do not attempt to jump start Model Y
using the low voltage power socket. Doing so can
result in damage.
USB Ports
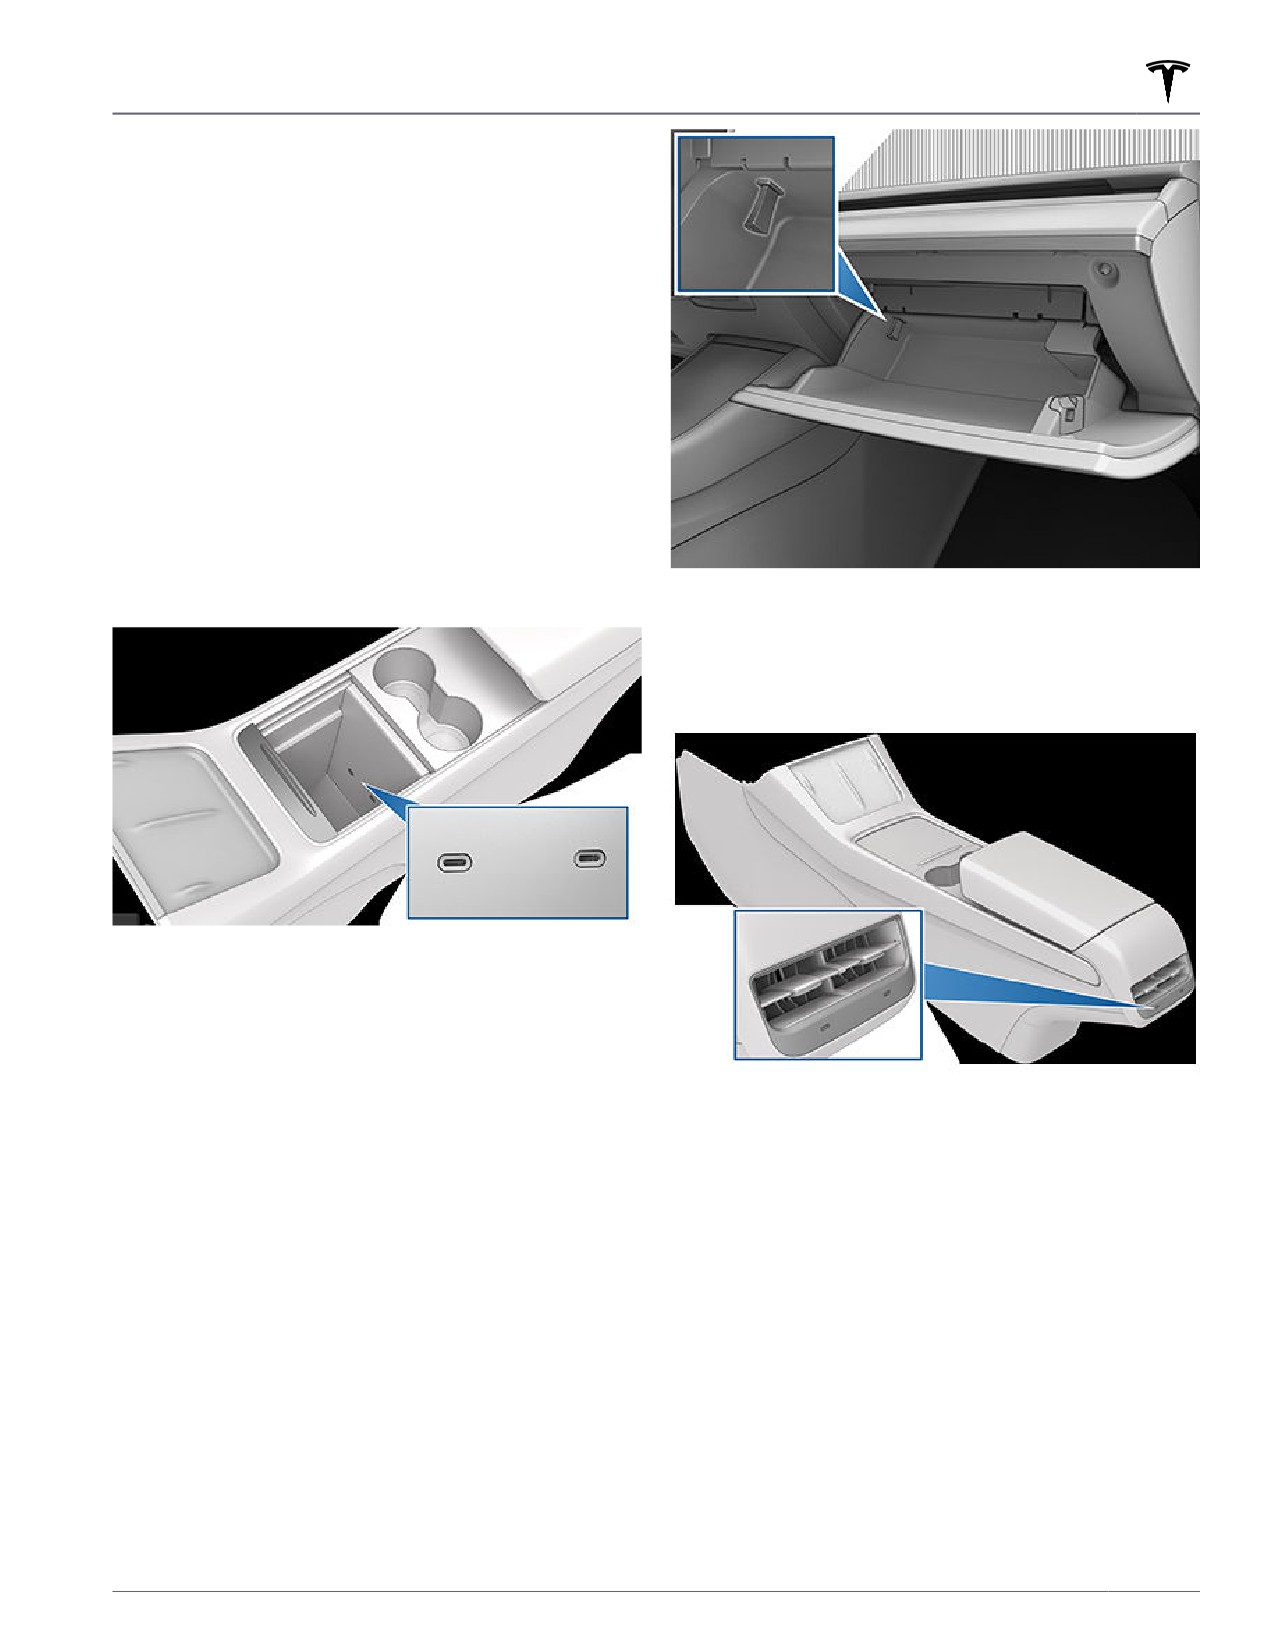
Model Y has two USB ports located in the front
compartment of the center console. These ports can be
used to:
• Connect and charge USB devices.
The power socket is suitable for accessories requiring up
to 12A continuous draw (16A peak).
• Play audio files stored on a phone or USB device (see
Playing Media from Devices on page 142).
20
Interior Storage and Electronics
• Save videos when using features such as Sentry
Mode or Dashcam (see Dashcam and Sentry Mode on
page 154).
NOTE: If your Model Y is equipped with a USB port
located in the glove box (described below), it is
recommended that you use the glovebox USB to save
Sentry Mode or Dashcam videos because power
consumption is minimized and the location is more
secure.
NOTE: For some vehicles manufactured after
approximately November 1, 2021, the center console USB
ports may only support charging devices. Use the USB
port inside the glove box for all other functions.
Both ports are USB-C compatible.
Open the front compartment of the center console. The
front USB ports are located on the rear wall of the
compartment.
Two additional USB ports are located in the rear of the
center console (on vehicles manufactured since
approximately June 2020, these ports are USB-C). These
ports charge USB-connected devices but do not
communicate with the vehicle.
Depending on date of manufacture, some vehicles
include a USB port located at the rear of the glovebox.
This USB-A port is equipped with a pre-formatted flash
drive, ready to save videos when using features such as
Sentry Mode and Dashcam. Although not its primary
purpose, this port can also communicate with the
vehicle and can be used to charge a USB-connected
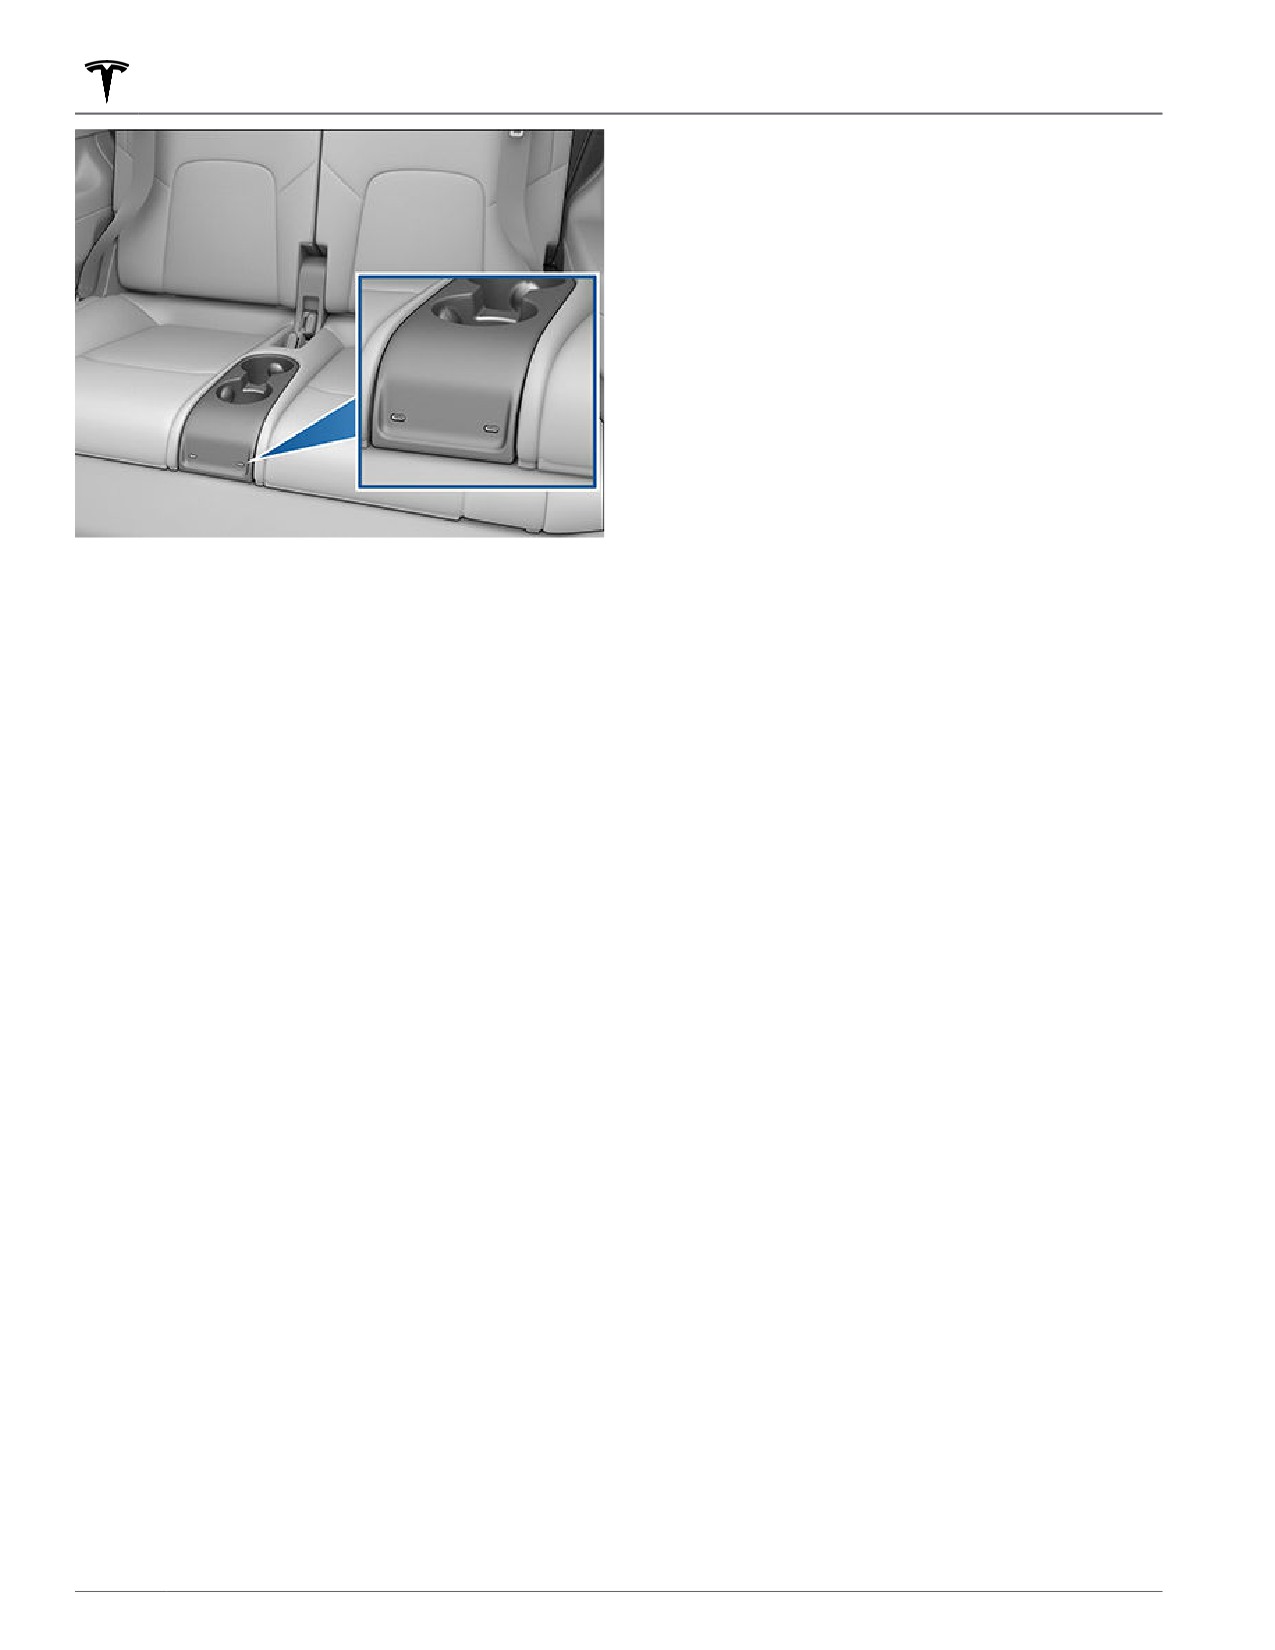
If Model Y is equipped with seven seats, two USB-C
device.
ports are located at the front of the console located
between the third row seats. These ports charge USB-
connected devices but do not communicate with the
vehicle.
Opening and Closing
21
Interior Storage and Electronics
NOTE: In some market regions you can purchase
recommended USB drives on http://www.tesla.com.
Formatting a USB Flash Drive
To save and retrieve video footage, Model Y requires a
USB flash drive formatted as exFAT, MS-DOS FAT (for
Mac), ext3, or ext4 (NTFS is currently not supported).
For use with Dashcam and Sentry Mode, the flash drive
must contain a base-level folder called TeslaCam.
Model Y can format a USB flash drive for you. Insert the
flash drive into a front USB port, and touch Controls >
Safety > Format USB Drive. Doing so automatically
formats the drive as exFAT and creates a folder for
TeslaCam. The USB flash drive is now ready to record
and save video footage. Format USB Drive is available
only when a USB flash drive (with one or fewer
NOTE: Power is available whenever the vehicle is
partitions) is inserted into a front USB port. Choosing
considered "awake". The vehicle may be awake for many
Format USB Drive erases any existing content on the
reasons. For example, when using features such as
flash drive—before using this feature, you must move
Summon, or when features such as Preconditioning,
any content you want to keep to a different device.
Keep Climate On, Dog Mode, Camp Mode, Sentry Mode,
etc. are enabled. The vehicle is also awake whenever the
NOTE: For some vehicles manufactured after
low voltage battery is being charged or is in use, during
approximately November 1, 2021, the center console USB
HV charging, when the vehicle is communicating with
ports may only support charging devices. Use the USB
the mobile app, etc. Leaving an accessory plugged in
port inside the glove box for all other functions.
does not deplete the low voltage battery.
If Model Y is unable to format the flash drive, you must
NOTE: Use USB 3.0 compliant cables to connect a
format it using a computer. Remember to manually
device to a USB port. Using non-compliant cables can
create the TeslaCam folder (if equipped).
result in slower charging, potential connection problems
or degraded performance.
You can also format the USB flash drive with a computer
NOTE: Do not connect multiple devices using a USB
to use a single flash drive for Dashcam, Sentry Mode,
hub. This can prevent connected devices from charging
Track Mode (if equipped), and audio files. Create
or from being recognized by Media Player, Sentry Mode,
separate partitions on the drive formatted as exFAT; for
example, one for Dashcam and Sentry Mode (you must
Dashcam, etc.
create the TeslaCam folder), one for Track Mode (create
the TeslaTrackMode folder), and an audio partition.
USB Drive Requirements for
Once the USB flash drive is formatted and contains the
Recording Videos
necessary folder(s), insert it into a front (or glovebox, if
equipped) USB port. Do not use a rear USB port— these
NOTE: For saving Sentry Mode and Dashcam footage,
are used only to charge USB devices. Once inserted, it
Tesla recommends using the USB port located in the
can take up to 15 seconds for Model Y to recognize the
glovebox. Doing so increases security and minimizes
flash drive. When recognized, icons for Dashcam and
power consumption.
Sentry Mode are available when you touch Controls and
your vehicle is ready to record videos. You may need to
One or more features on your Model Y requires the use
first enable Sentry Mode (if equipped) by touching
of a flash drive (for example, Dashcam, Sentry Mode that
Controls > Sentry.
meets these requirements:
• Minimum storage capacity of 64 GB. Use a flash drive
Viewing Video Recordings
with as much available storage as possible. Video
footage can occupy a large amount of space.
You can view recorded footage on the touchscreen
when Model Y is in Park. Touch the Dashcam icon
• A sustained write speed of at least 4 MB/s. Note that
sustained write speed differs from peak write speed.
located in the app launcher or the Dashcam icon on the
Controls screen. Touch the menu icon in the top corner
• USB 2.0 compatible. If using a USB 3.0 flash drive, it
of the screen. The tabs display a list of all video clips,
must support USB 2.0.
organized by location and timestamp. Pause, rewind,
• Properly formatted (described below).
fast forward, and delete video recordings as needed.
22
Interior Storage and Electronics
You can also navigate to Controls > Safety > Delete
Dashcam Clips to delete all dashcam and Sentry Mode
footage, including recent and saved clips.
NOTE: Dashcam recording pauses when you launch the
Viewer.
You can also view video footage by removing and
inserting the USB flash drive into a computer and
navigating to the TeslaCam (if equipped) folder.
The TeslaCam folder contains three sub-folders:
• Recent Clips: When recording, Dashcam continuously
saves footage to Recent Clips in 60-minute cycles.
Footage is overwritten every hour unless you
manually save it. Four videos are recorded for each
clip, one from each camera (front, rear, left, and
right).
NOTE: Rear camera recordings are available only on
vehicles manufactured after approximately February
2018.
• Saved Clips: Contains all recordings that are saved
using Dashcam.
• Sentry Clips: Contains the last 10 minutes of footage
from all Sentry Mode events that triggered an Alert
or Alarm state. If storage space on the USB flash
drive becomes limited, the oldest Sentry Clips are
deleted to provide space for new ones. Once deleted,
you cannot retrieve them.
When the USB flash drive runs out of storage space,
video footage can no longer be saved. To prevent the
flash drive from getting full, regularly move saved videos
to another device and delete them from the flash drive.
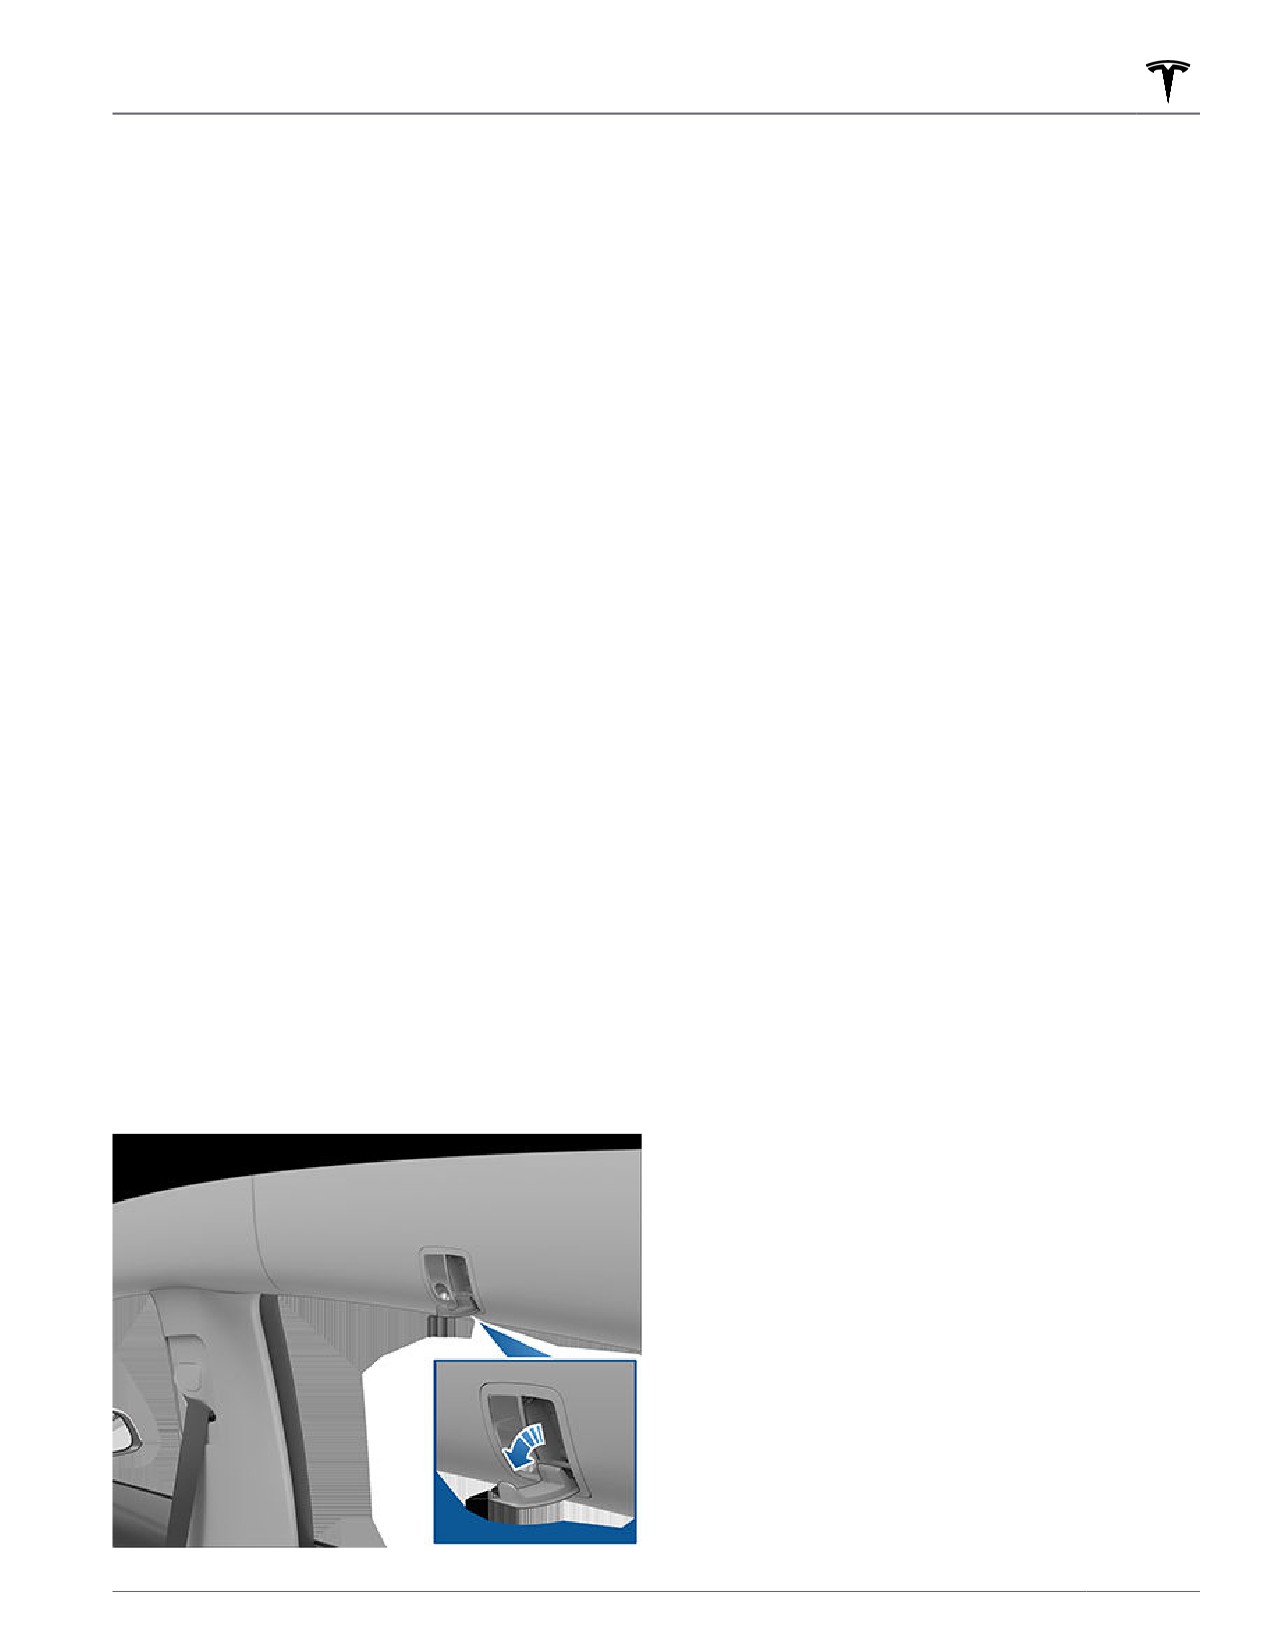
Coat Hangers
Your Model Y has a coat hanger on each side of the
vehicle in the second row next to the reading light. Push
the coat hanger to release it. Push it again to retract it.
Opening and Closing
23
Front and Rear Seats
Correct Driving Position
Adjusting the Front Seats
The seat, head support, seat belt and airbags work
together to maximize your safety. Using these correctly
ensures greater protection.
Position the seat so you can wear the seat belt correctly,
while being as far away from the front airbag as
possible:
1. Sit upright with both feet on the floor and the seat
back reclined no more than 30 degrees.
2. Make sure you can easily reach the pedals and that
your arms are slightly bent when holding the steering
wheel. Your chest should be at least 10 inches
(25 cm) from the center of the airbag cover.
3. Place the shoulder section of the seat belt mid-way
between your neck and your shoulder. Fit the lap
section of the belt tightly across your hips, not across
your stomach.
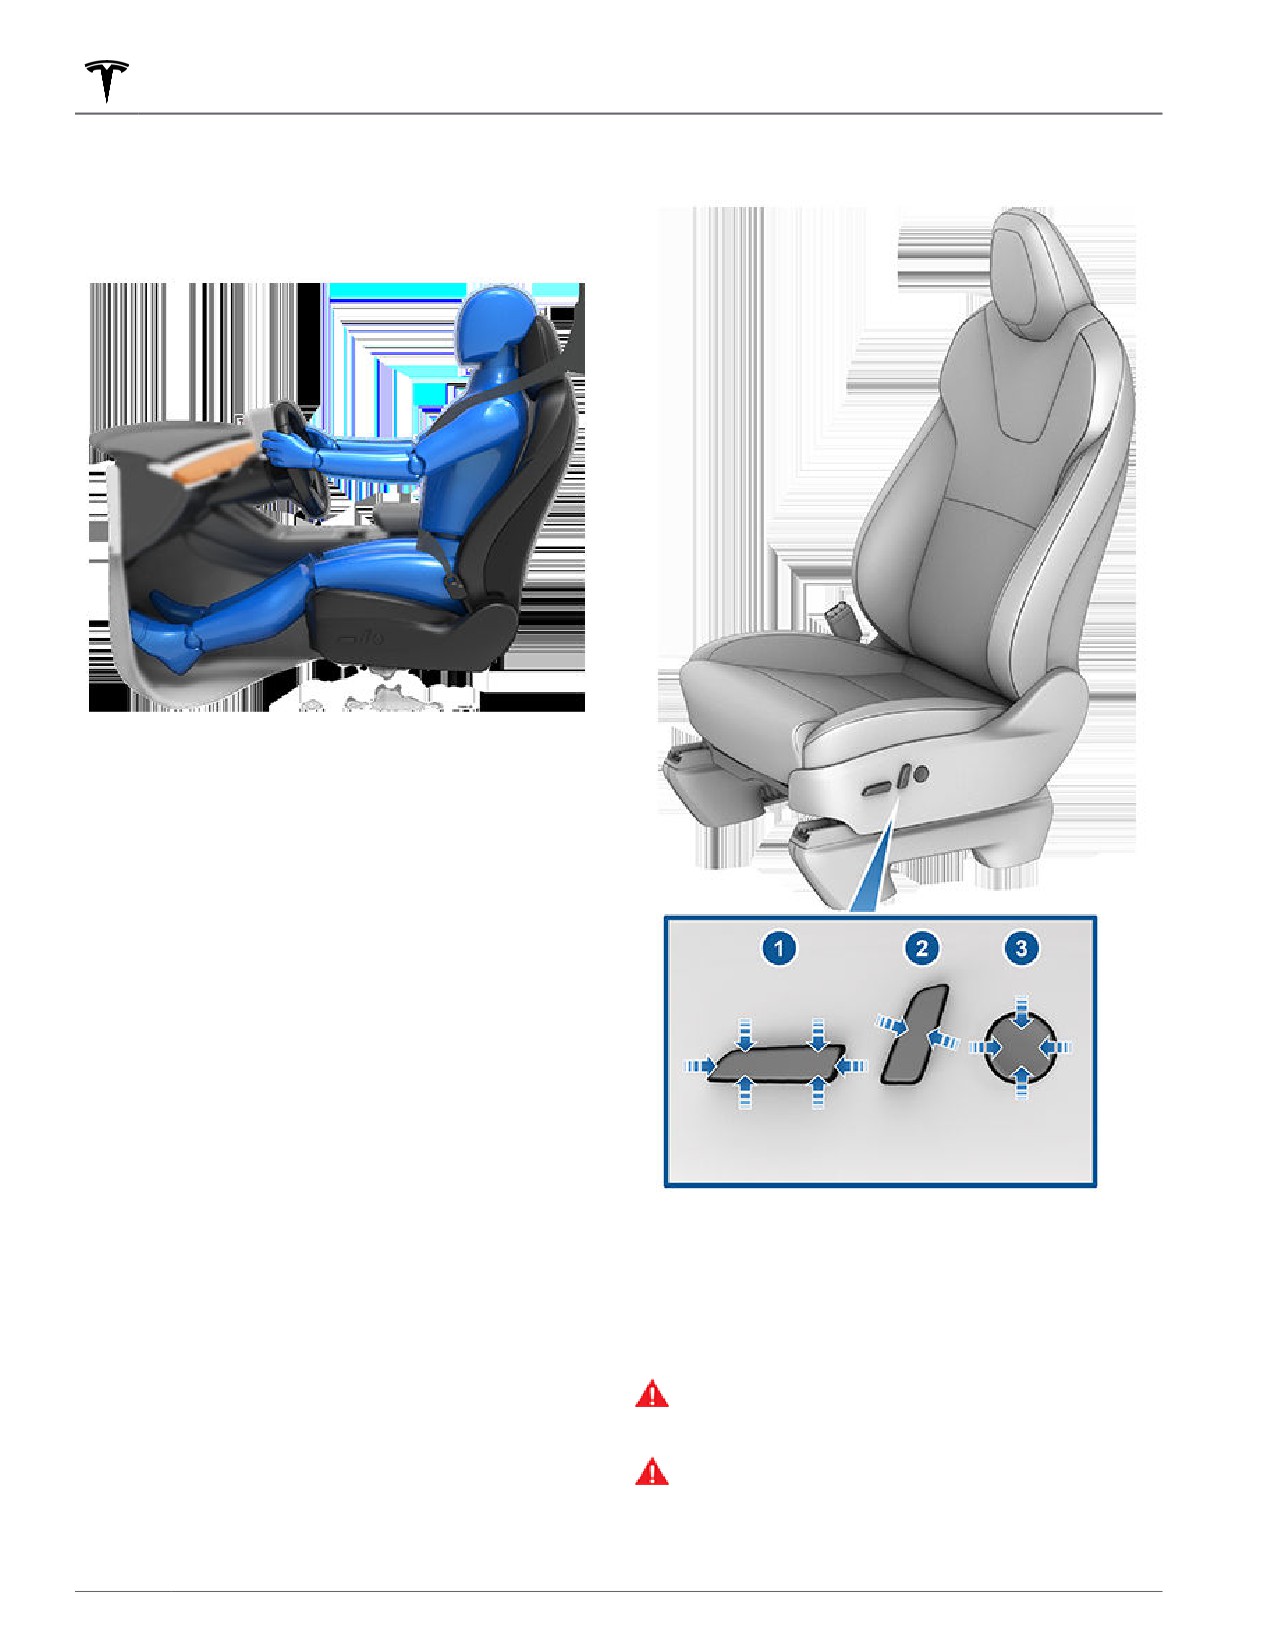
Model Y seats include integrated head supports in the
front that cannot be adjusted or removed.
1. Move seat forward/backward and adjust the seat’s
height and tilt angle up/down.
2. Adjust backrest.
3. Adjust lumbar support (if equipped).
WARNING: Before adjusting a front seat, check
that the area around the seat is free of obstacles
(people and objects).
WARNING: Do not adjust seats while driving.
Doing so increases the risk of a collision.
24
Front and Rear Seats
WARNING: Riding in a moving vehicle with the
seat back reclined can result in serious injuries in a
collision, as you could slide under the lap belt or
be propelled into the seat belt. Ensure your seat
back is reclined no more than 30 degrees when
the vehicle is moving.
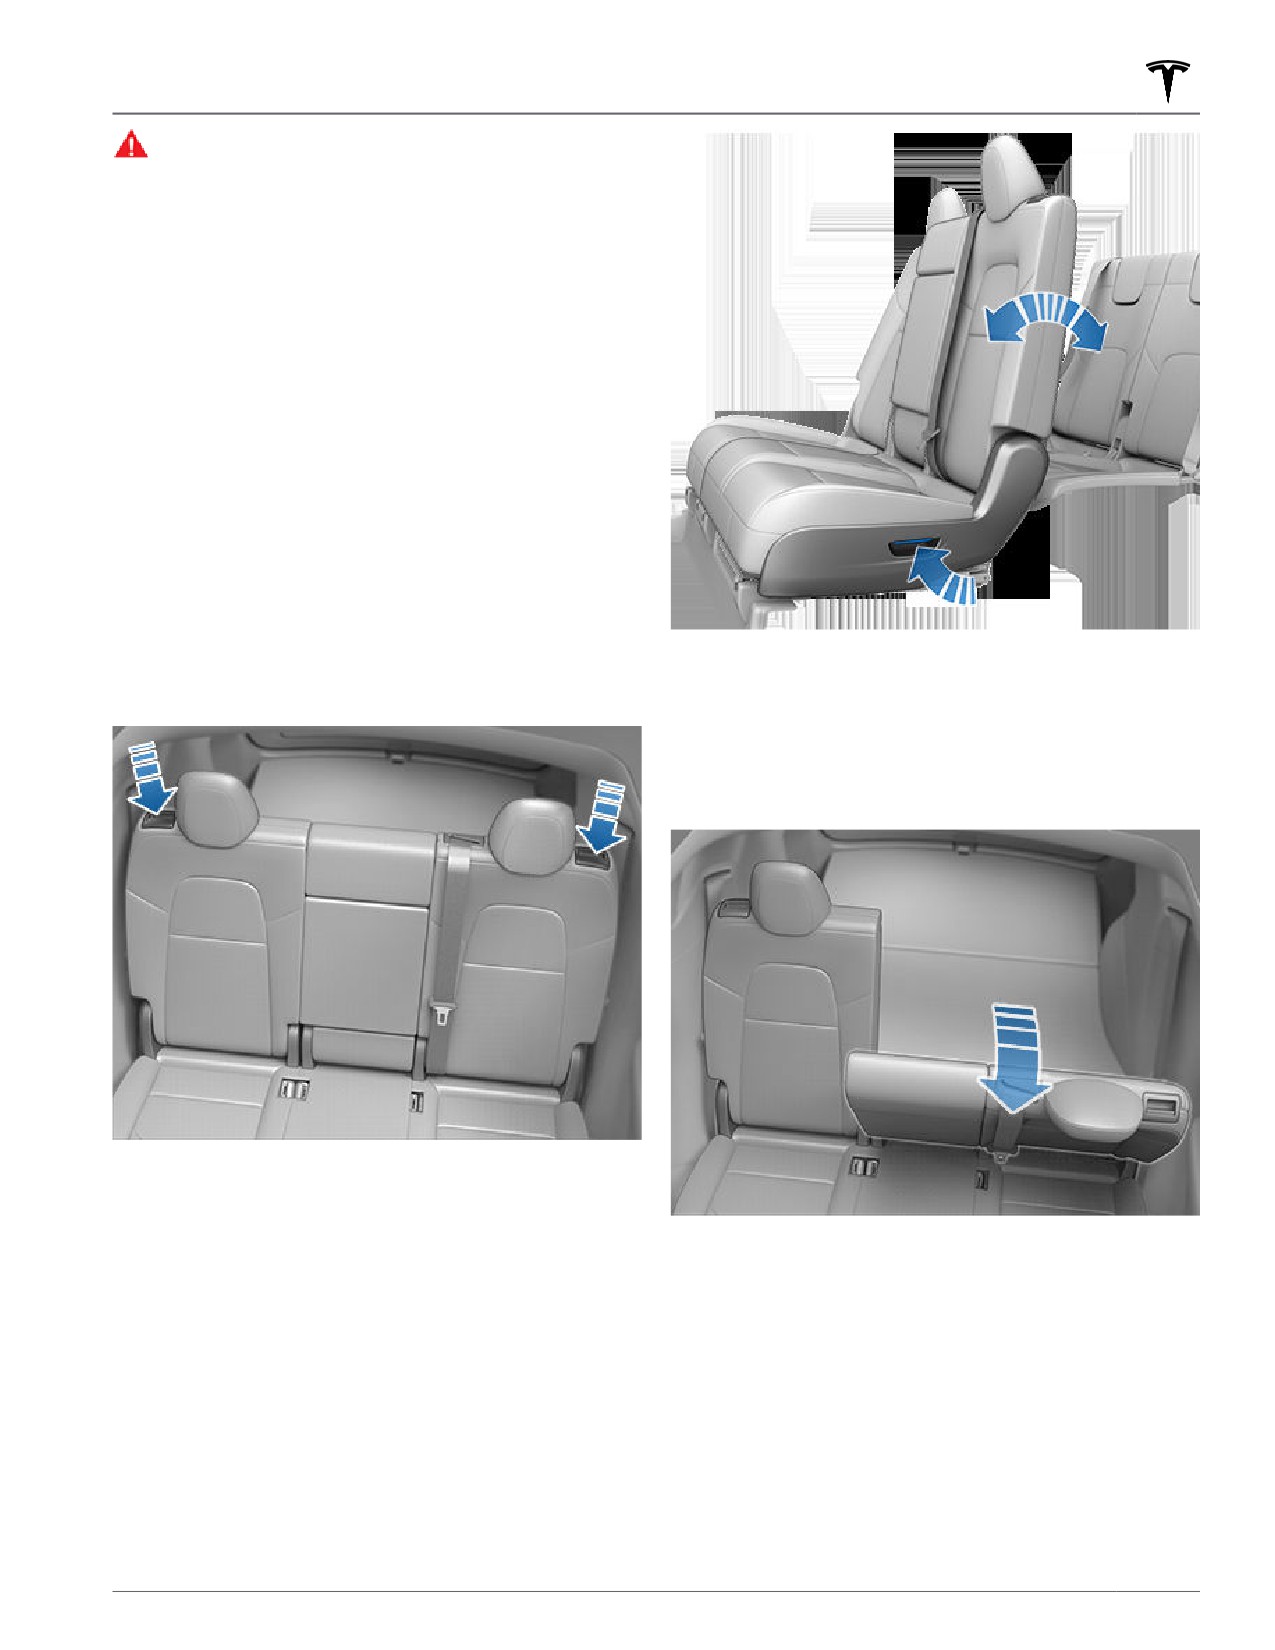
Adjusting Second Row Seat Backs
Model Y provides seating for up to three passengers in
the second row. The seat back is split 60/40 so
adjusting the left seat back moves the seat backs for
both the left and center seating positions, whereas
adjusting the right seat back moves only the rightmost
seat back.
For vehicles with 5 seats:
Use the adjustment handles on the outside corner of
each second row outboard seat back to adjust the
corresponding seat back. While pulling and holding the
handle, move the seat back to the desired position, and
then release the handle. Ensure the seat back is securely
latched into position by pushing it forward and
Folding Second Row Seat Backs
rearward.
To maximize cargo space, each second row seat back
can be folded fully forward to lay flat. While pulling and
holding the handle, push the corresponding seat back
fully forward.
For vehicles with 7 seats:
Use the adjustment handles on the side shield of each
outboard seating position to adjust the corresponding
NOTE: Before folding seats fully forward, remove any
second row seat backs. While pulling and holding the
items from the seats and the rear footwell. To allow the
handle, move the seat back to the desired position, and
seat backs to fold completely flat, you may need to
then release the handle. Ensure the seat back is securely
move the front seats forward.
latched into position by pushing it forward and
NOTE: Driving with second row seats folded forward
rearward.
may increase perceivable noise and/or vibration coming
from the rear of the vehicle (trunk, suspension, etc.).
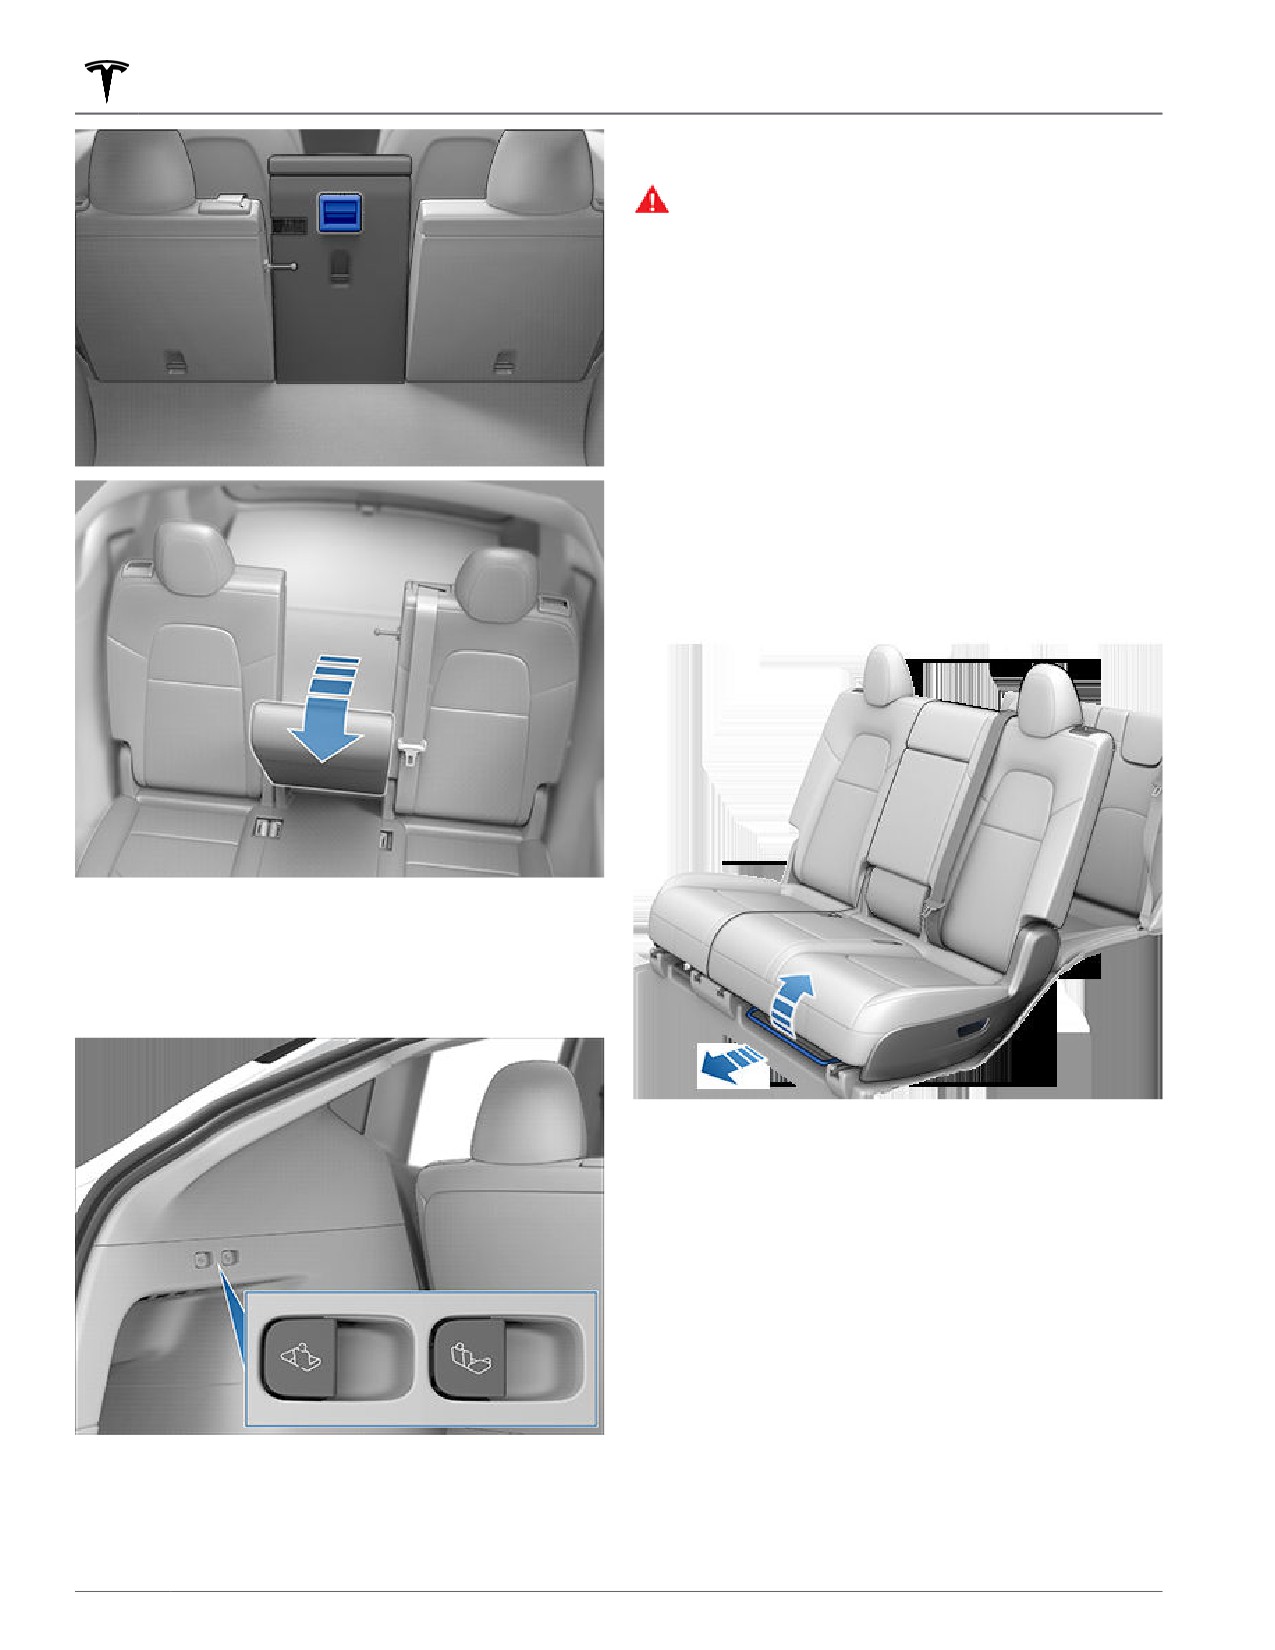
To allow you to carry long items (such as skis) in the rear
of Model Y, the center seat back can also be
independently folded forward. Pull the handle on the
rear of the seat back to unlatch it, then pull it forward.
Seating and Safety Restraints
25
Front and Rear Seats
NOTE: Before raising a second row seat back, make sure
that the seat belts are not trapped behind the backrest.
WARNING: Always ensure the seat backs are
locked in their upright position by pushing it
forward or rearward. Failure to do so increases the
risk of injury.
Moving Second Row Seats (7-seater
only)
Lift the bar located beneath each outboard seating
position to unlock and move the second row seats
forward or rearward. The bench seats have a 60/40
split. Therefore, the bar on the left side moves the seat
for the left and center seats, whereas the bar on the
right side moves only the rightmost seat. Pull up and
hold the bar while moving the seat forward or rearward.
Release the lever when the seat is at the desired
location. Push the seat rearward and forward to ensure
the seat(s) are locked into position.
You can also fold the second row seat backs fully
forward by pressing the corresponding switch located
on the left side of the rear trunk. Pressing the switch
causes the seat back to swing forward. You can then
push it downward so it lays fully flat.
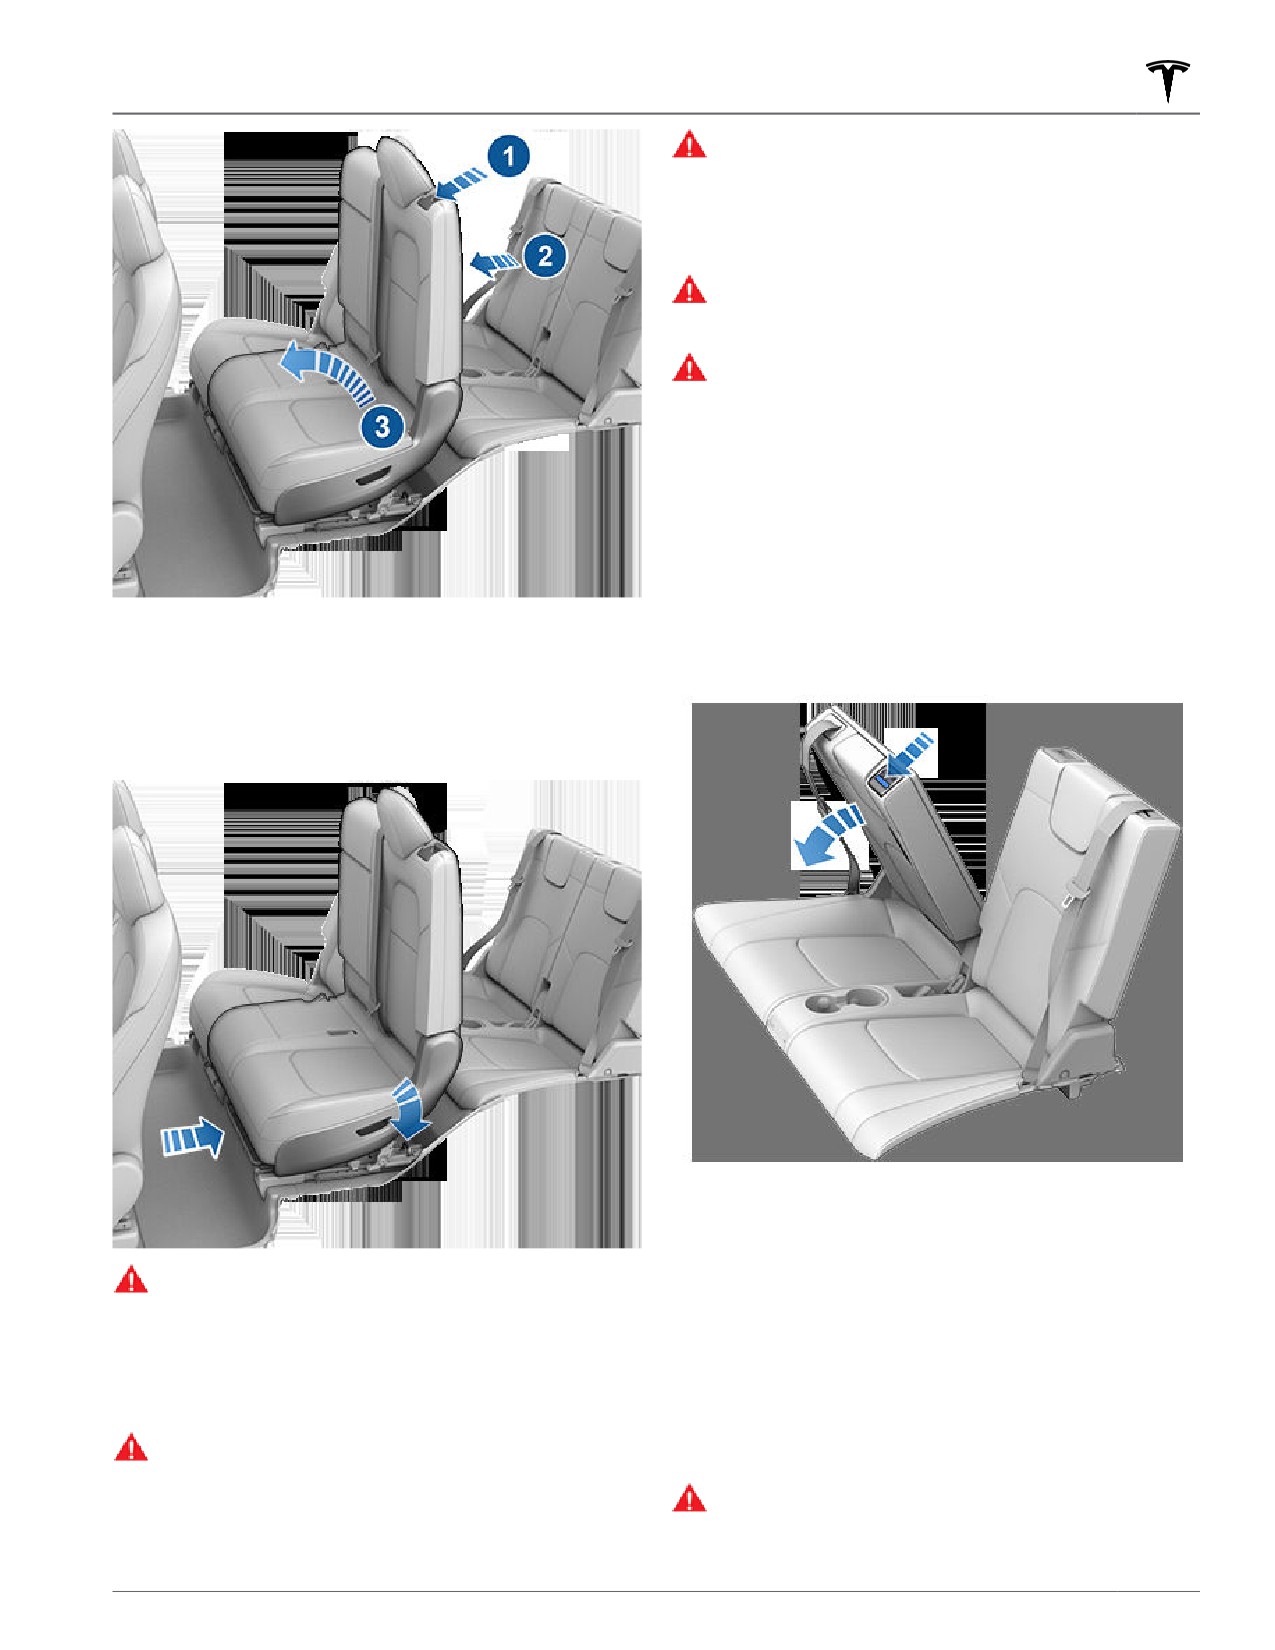
Accessing Third Row Seats (7-
seater only)
A third row ingress button is located on the backrest of
each second row outside seat. This button makes it easy
for passengers to access the third row seating positions.
To access a third row seat:
1. Press the button on the associated second row
backrest.
NOTE: If you press the button and do not move the
seats, the seats relock.
To return the seat backs to their upright position, pull it
2. Push the second row backrest forward. The seat then
upwards until it locks into place. To confirm that the seat
releases and pitches upward.
back is locked in the upright position, try pulling it
3. Push the seat fully forward.
forward.
26
Front and Rear Seats
WARNING: After using the button to access the
third row, push the second row seat backs into
their upright position, ensuring that the seat backs
are securely latched and "clicked" into position by
trying to move them forward and rearward. Failure
to do so increases the risk of injury.
WARNING: Keep the area on the underside of the
second row seats free of debris to ensure reliable
locking of the floor latches.
WARNING: If an occupant is seated in the the third
row when pushing down on the second row seat to
engage the floor latches, ensure that the
occupant's feet are not located under the second
row seat.
Folding Third Row Seat Backs (7-
seater only)
To fold a third row seat, first ensure that the head
support is fully down as shown (see Head Supports on
To relock the seats, first push the seat rearward. You will
page 28). Then press the button located in the top
hear the seat tracks lock. Then push the seat downward
corner of the seat back and fold the backrest downward.
to engage the rear latches onto the floor strikes. You will
hear the latches lock. If the seat does not latch onto the
floor, the touchscreen displays a warning indicating that
the seat is not properly locked into position.
NOTE: To return the seat backs to the upright position,
pull the seat back upward until it latches into place. Try
pulling the backrest forward to confirm that it is securely
latched in the upright position.
WARNING: Do not use the button when a child is
seated in a seat that will move. Using the button
NOTE: Before folding the seat backs, remove any items
moves the combined left and center seats forward
from the seats and the footwell. To allow the backrests
to fold completely flat, you may need to move the
and can squeeze the occupant. Use this button
only when the second row seat is unoccupied.
second row seats forward.
Before driving, ensure the seat and the seat back
NOTE: Driving with the third row backrests folded
are securely latched into position.
forward may result in increased perceivable noise and/or
WARNING: Do not use a second row seating
vibration coming from the rear of the vehicle (trunk,
suspension, etc.).
position when the seat is not securely latched into
position,
WARNING: Always ensure the seat backrests are
locked in their upright position before travel.
Failure to do so increases the risk of injury.
Seating and Safety Restraints
27
Front and Rear Seats
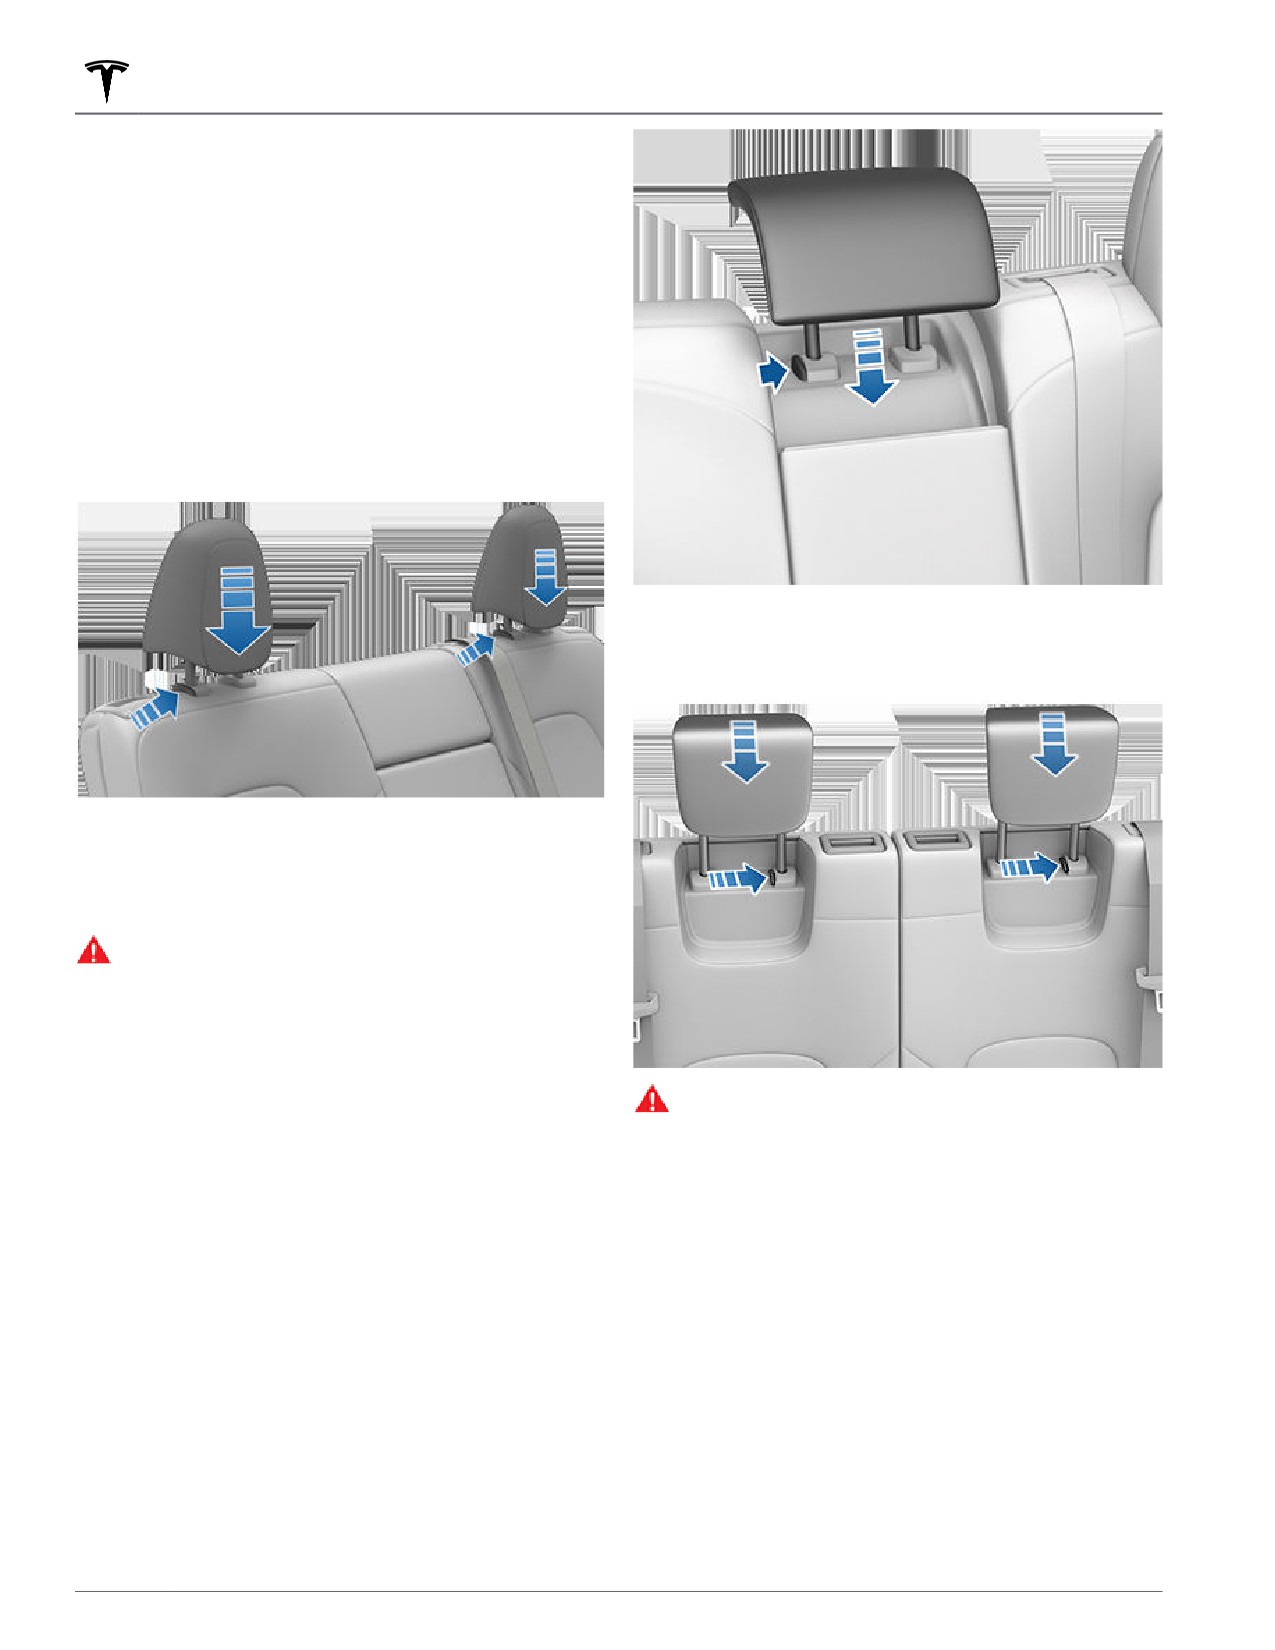
Head Supports
The front seats include integrated head supports that
you can not adjust.
The second row outboard seats include an adjustable
head support that you can raise, lower, or remove. When
either of these seats is occupied by a passenger that is
not in a child safety seat, the corresponding head
support should be adjusted (align the center of the head
support with the center of the occupant's head) and
locked into position. To raise a head support on a
second row outboard seat, pull it upward to the desired
position. To lower it, press and hold the button on the
base of the outer post while pushing it downward.
To lower a head support in the third row, press and hold
the button on the base of the post while pushing the
head support fully downward.
The second row center seat, and both third row seats (if
equipped), are equipped with the option to raise a head
support. Initially stowed into the seat's back rest, you
can access the head support by pulling it upward.
WARNING: When installing a child safety seat in a
second row seating position, or in the third row (if
equipped), you must lower the head support. The
headrest must be raised and locked in place when
sitting in the rear middle seat.
To stow the head support in the second row center seat,
WARNING: To minimize the risk of severe injury or
press and hold the button on the base of the post while
death in the event of a collision, ensure that head
pushing the head support fully downward.
supports are positioned correctly before driving.
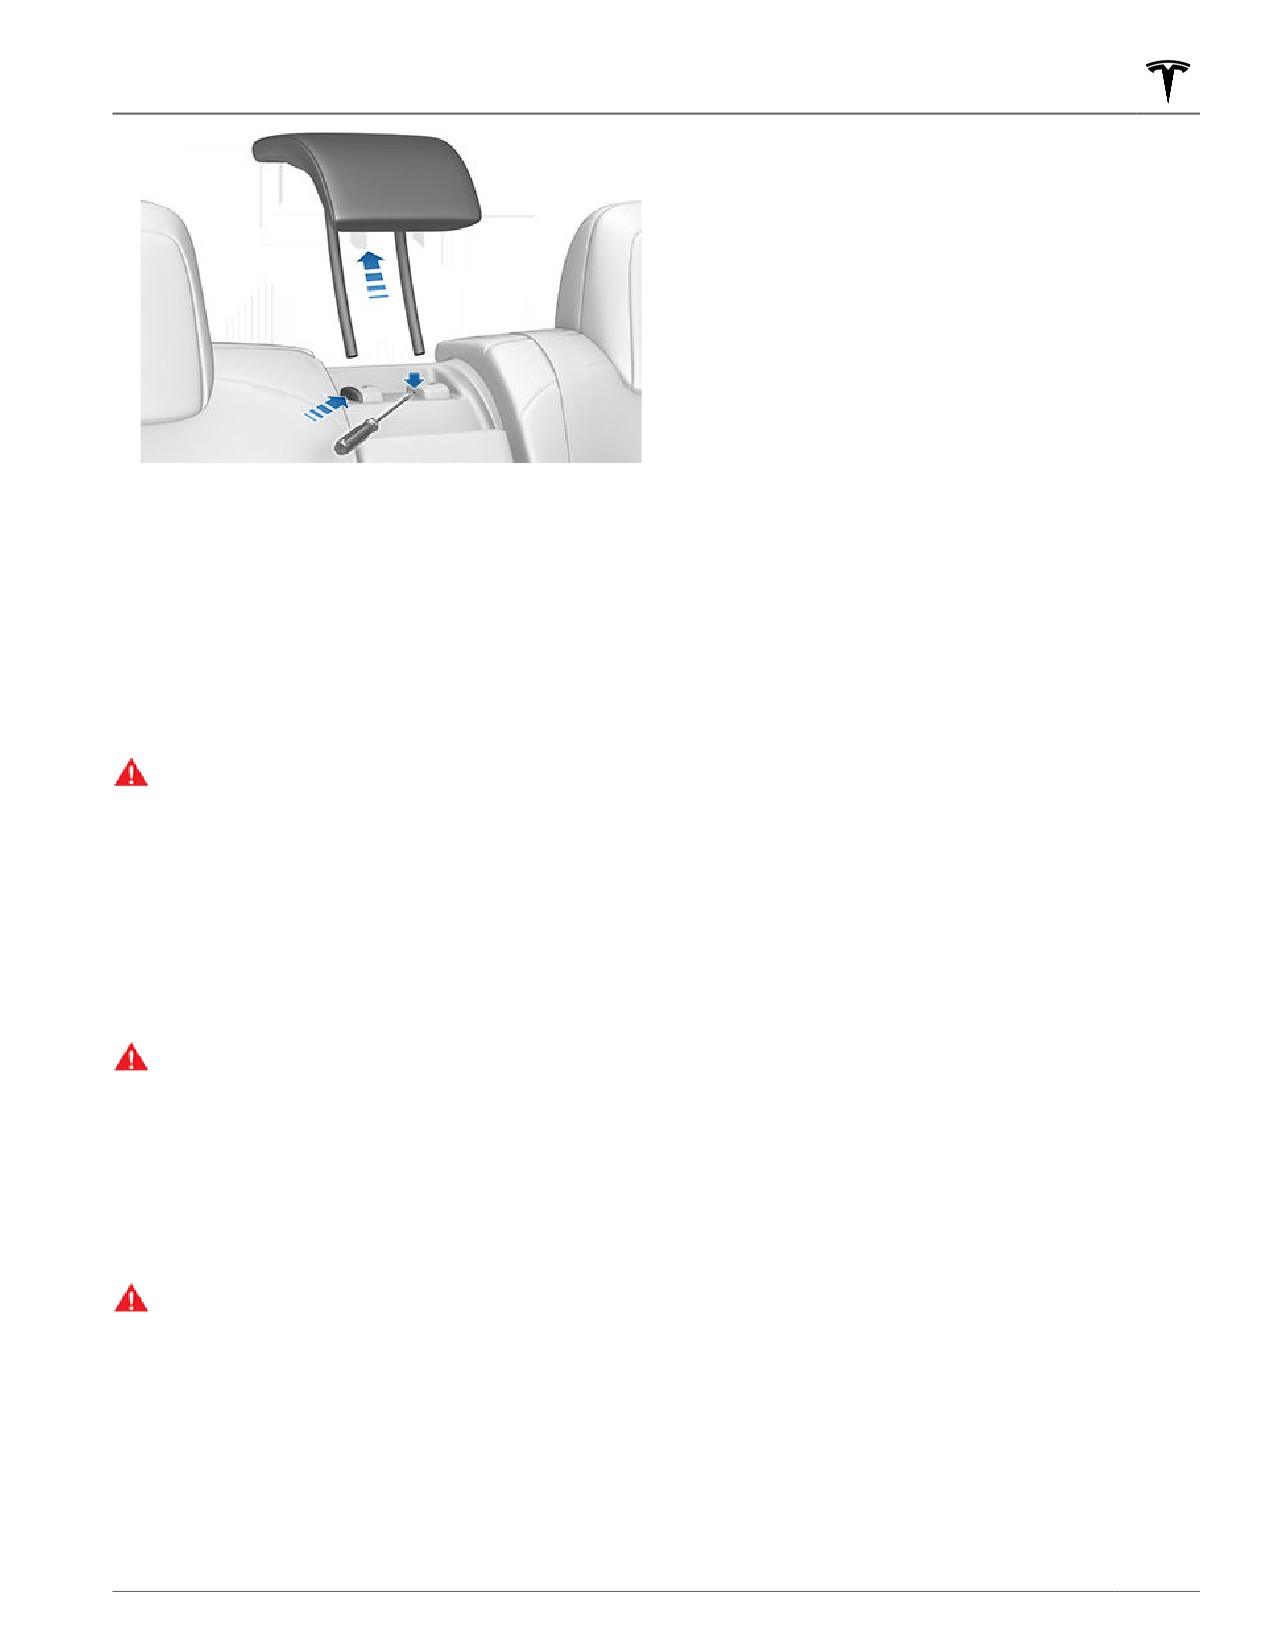
Removing/Installing a Head Support
All head supports in the second and third row (if
equipped) seating positions can be removed. To remove
a head support:
1. Fully raise the head support by pulling it upward.
2. Press and hold the button located at the base of one
of the posts.
3. Insert a short, flat object (such as a small flat-head
screwdriver) into the opening in the base of the
opposite post and pull the head support upward.
28
Front and Rear Seats
To re-install the head support:
1. With the front of the head support facing forward,
insert both posts into the corresponding holes on the
seat back.
2. Press downward on the head support until it clicks
into place.
3. Pull upward on the head support to ensure that it is
secure.
WARNING: Ensure that the head support is
correctly installed before seating an occupant.
Failure to do so increases the risk of injury or
death if a collision occurs.
Seat Heaters
The front and second row seats contain heating pads
that operate at three levels from 3 (highest) to 1
(lowest). To operate the seat heaters, see Climate
Controls on page 130.
WARNING: To avoid burns resulting from
prolonged use, individuals who have peripheral
neuropathy, or whose capacity to feel pain is
limited because of diabetes, age, neurological
injury, or some other condition, should exercise
caution when using the climate control system and
seat heaters.
Seat Covers
WARNING: Do not use seat covers in Model Y.
Doing so could restrict deployment of the seat-
mounted side air bags if a collision occurs. Also, if
the vehicle is equipped with an occupant detection
system that is used to determine the status of the
passenger front airbag, seat covers may interfere
with this system.
Seating and Safety Restraints
29
Seat Belts
Wearing Seat Belts
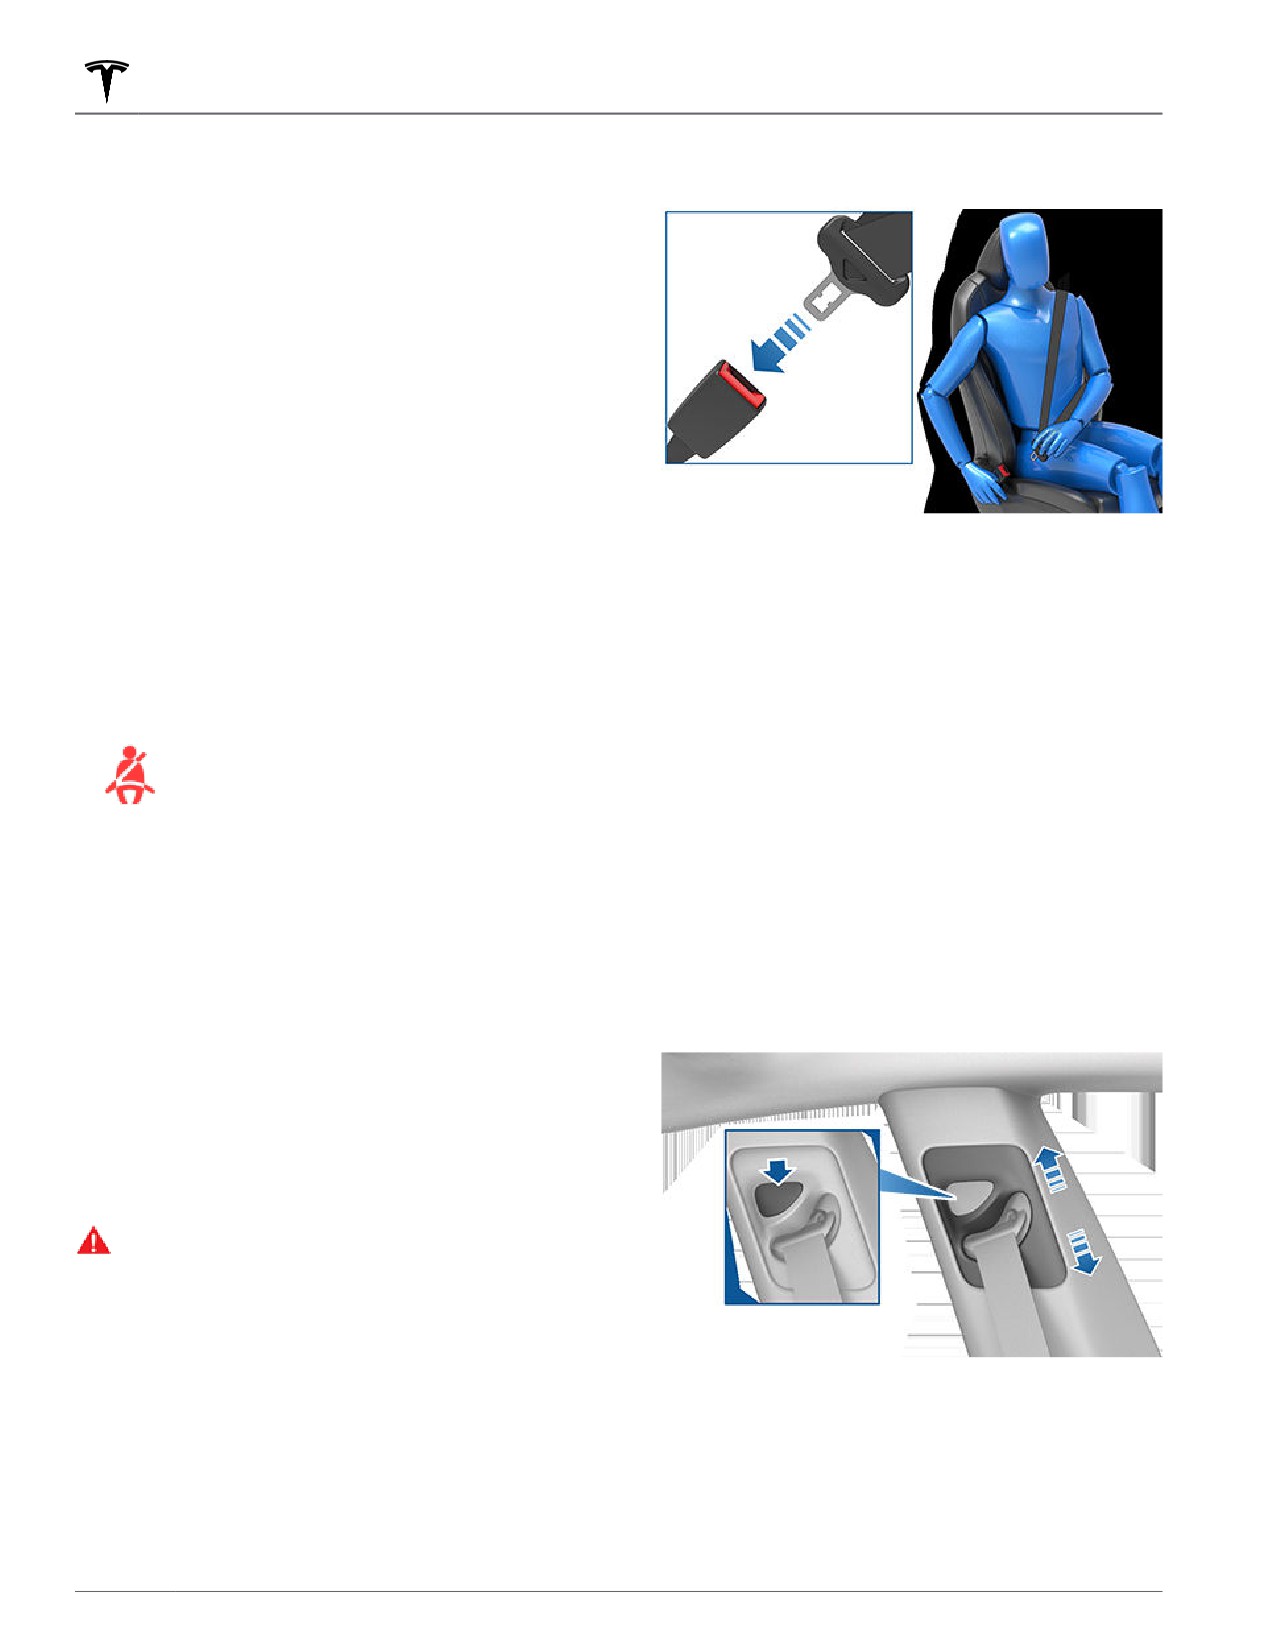
3. Insert the latch plate into the buckle and press
together until you hear a click indicating it is locked
in place.
Using seat belts and child safety seats is the most
effective way to protect occupants if a collision occurs.
Therefore, wearing a seat belt is required by law in most
jurisdictions.
Both the driver and passenger seats are equipped with
three-point inertia reel seat belts. Inertia reel belts are
automatically tensioned to allow occupants to move
comfortably during normal driving conditions. To
securely hold child safety seats, all passenger seating
positions are equipped with an automatic locking
retractor (ALR) feature that, by fully extracting the seat
belt (beyond the length needed for a typical adult
occupant), locks the belt into place until the seat belt is
unbuckled.
4. Pull the belt to check that it is securely fastened.
The seat belt reel automatically locks to prevent
movement of occupants if Model Y experiences a force
5. Pull the diagonal part of the belt toward the reel to
associated with hard acceleration, braking, cornering, or
remove excess slack.
an impact in a collision.
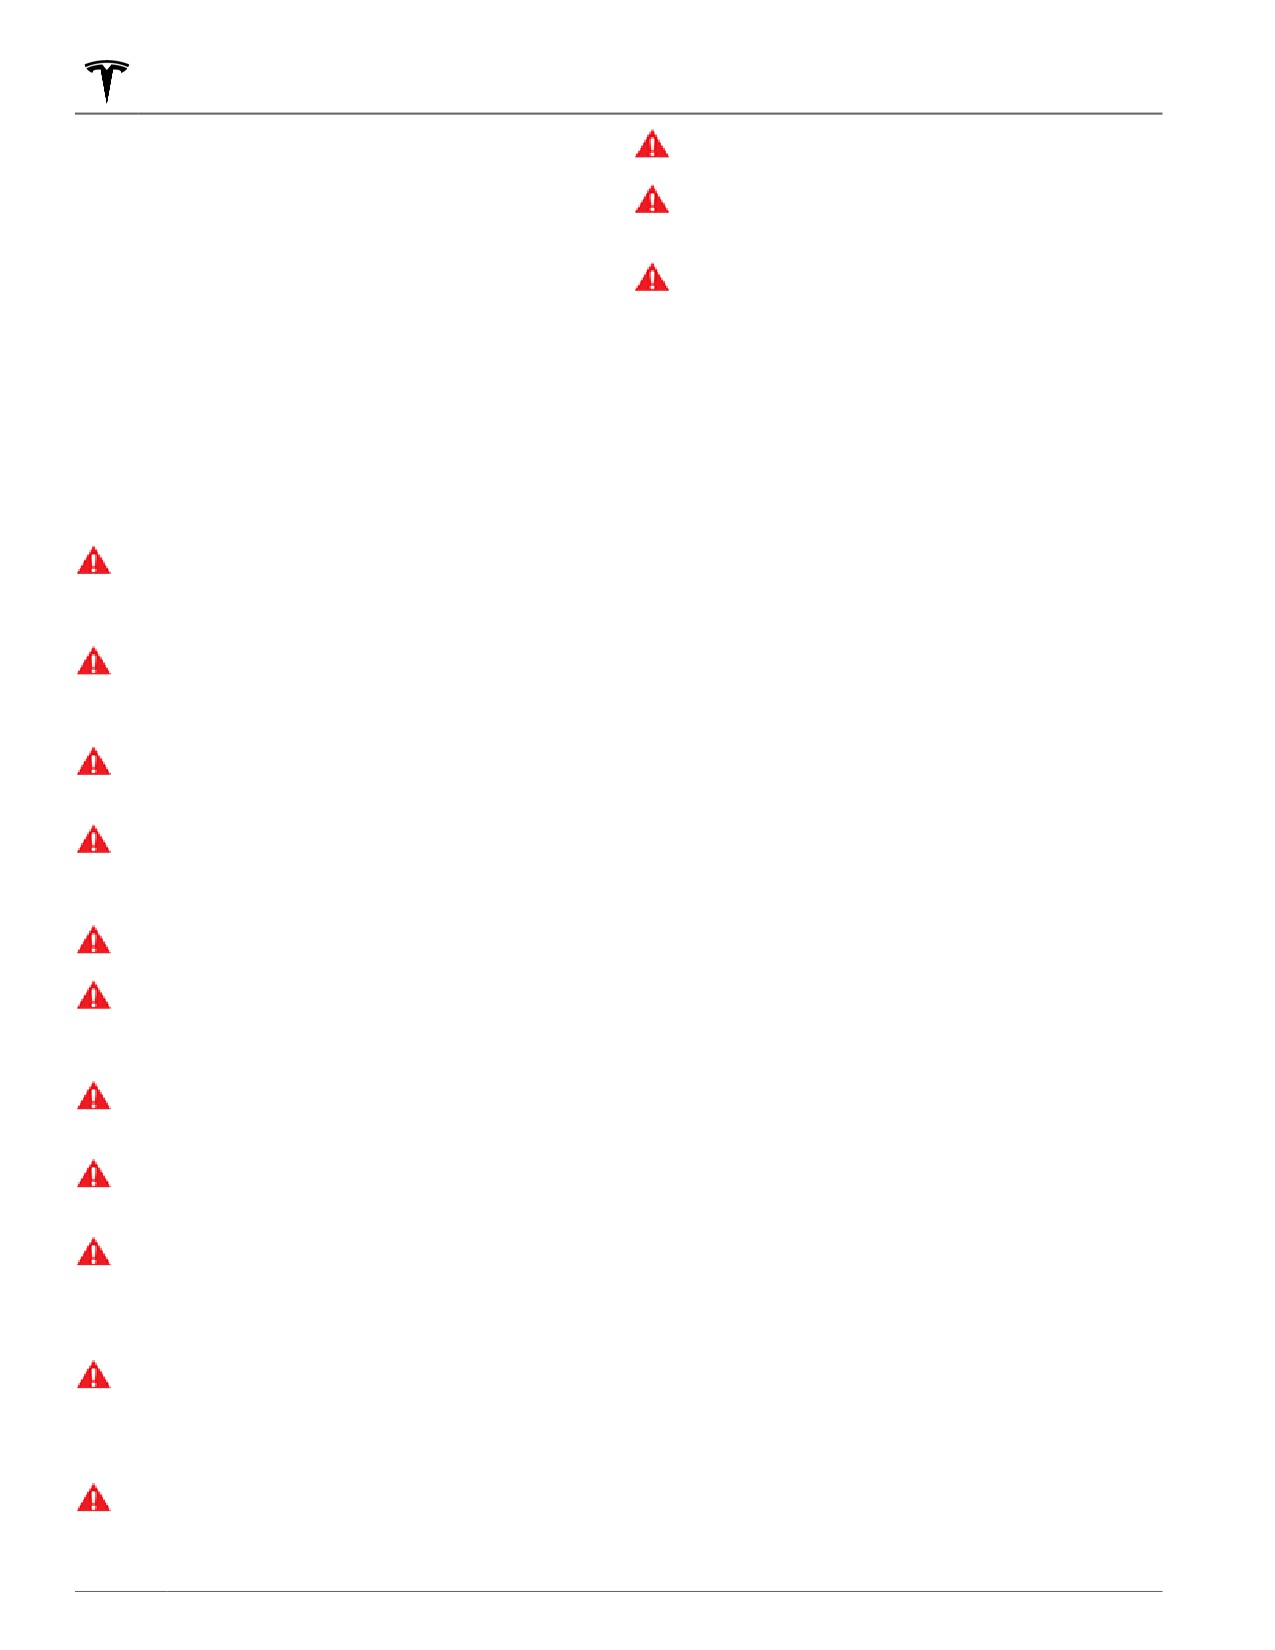
To Adjust the Shoulder Anchor
Seat Belt Reminders
Height
The seat belt reminder on the touchscreen
Model Y is equipped with an adjustable shoulder anchor
alerts you if a seat belt for an occupied
for each front seat to ensure that the seat belt is
driver or passenger seat is unbuckled. If all
positioned correctly. The seat belt should lay flat across
occupants are buckled up and the
the mid-point of your collar bone while in the correct
reminder stays on, re-buckle seat belts to
driving position (see Correct Driving Position on page
ensure they are correctly latched. Also
24). Adjust the height of the shoulder anchor if the seat
remove any heavy objects (such as a
belt is not positioned correctly:
briefcase) from an unoccupied seat. If the
reminder light continues to stay on,
1. Press and hold the button on the shoulder anchor to
contact Tesla.
release the locking mechanism.
You can temporarily disable a seat belt reminder
2. While holding the button, move the shoulder anchor
associated with a rear seating position. This is useful
up or down, as necessary, to correctly position the
when you are carrying an object in a rear seat that
seat belt.
triggers the seat belt reminder alert. To disable the
reminder, touch the associated seat on the seat belt
reminder popup message that displays on the
touchscreen when a seat belt reminder is active. When a
reminder is disabled, the seat belt reminder icon is
replaced by a seat icon, for the current drive only. Touch
the seat again to re-enable the reminder.
WARNING: Seat belts must be worn by passengers
in all seating positions. Do not disable a seat belt
reminder when the seating position is occupied by
a passenger.
To Fasten a Belt
3. Release the button on the shoulder anchor so that it
1. Ensure correct positioning of the seat (see Correct
locks into position.
Driving Position on page 24).
4. Without pressing the button, pull on the seat belt
2. Draw the belt out smoothly, ensuring the belt lays flat
webbing and attempt to move the shoulder anchor
across the pelvis, chest and mid-point of your collar
downward to check that it is locked into position.
bone, between the neck and shoulder.
30
Seat Belts
WARNING: Ensure that the seat belt is positioned
Seat Belt Pre-tensioners
correctly and that the shoulder anchor is locked
into position before driving. Riding in a moving
The front seat belts are equipped with pre-tensioners
vehicle with the seat belt positioned incorrectly or
that work in conjunction with the airbags in a severe
with the shoulder anchor not locked into position
frontal collision. The pre-tensioners automatically retract
can reduce the effectiveness of the seat belt in a
both the seat belt anchor and the seat belt webbing,
collision.
reducing slack in both the lap and diagonal portions of
the belts, resulting in reduced forward movement of the
To Release a Belt
occupant.
Hold the belt near the buckle to prevent the belt from
The second row outboard seats are equipped with
retracting too quickly, then press the button on the
shoulder pre-tensioners to retract the seat belt webbing
buckle. The belt retracts automatically. Ensure there is
to reduce forward movement of the occupant.
no obstruction that prevents the belt from fully
retracting. The belt should not hang loose. If a seat belt
does not fully retract, contact Tesla.
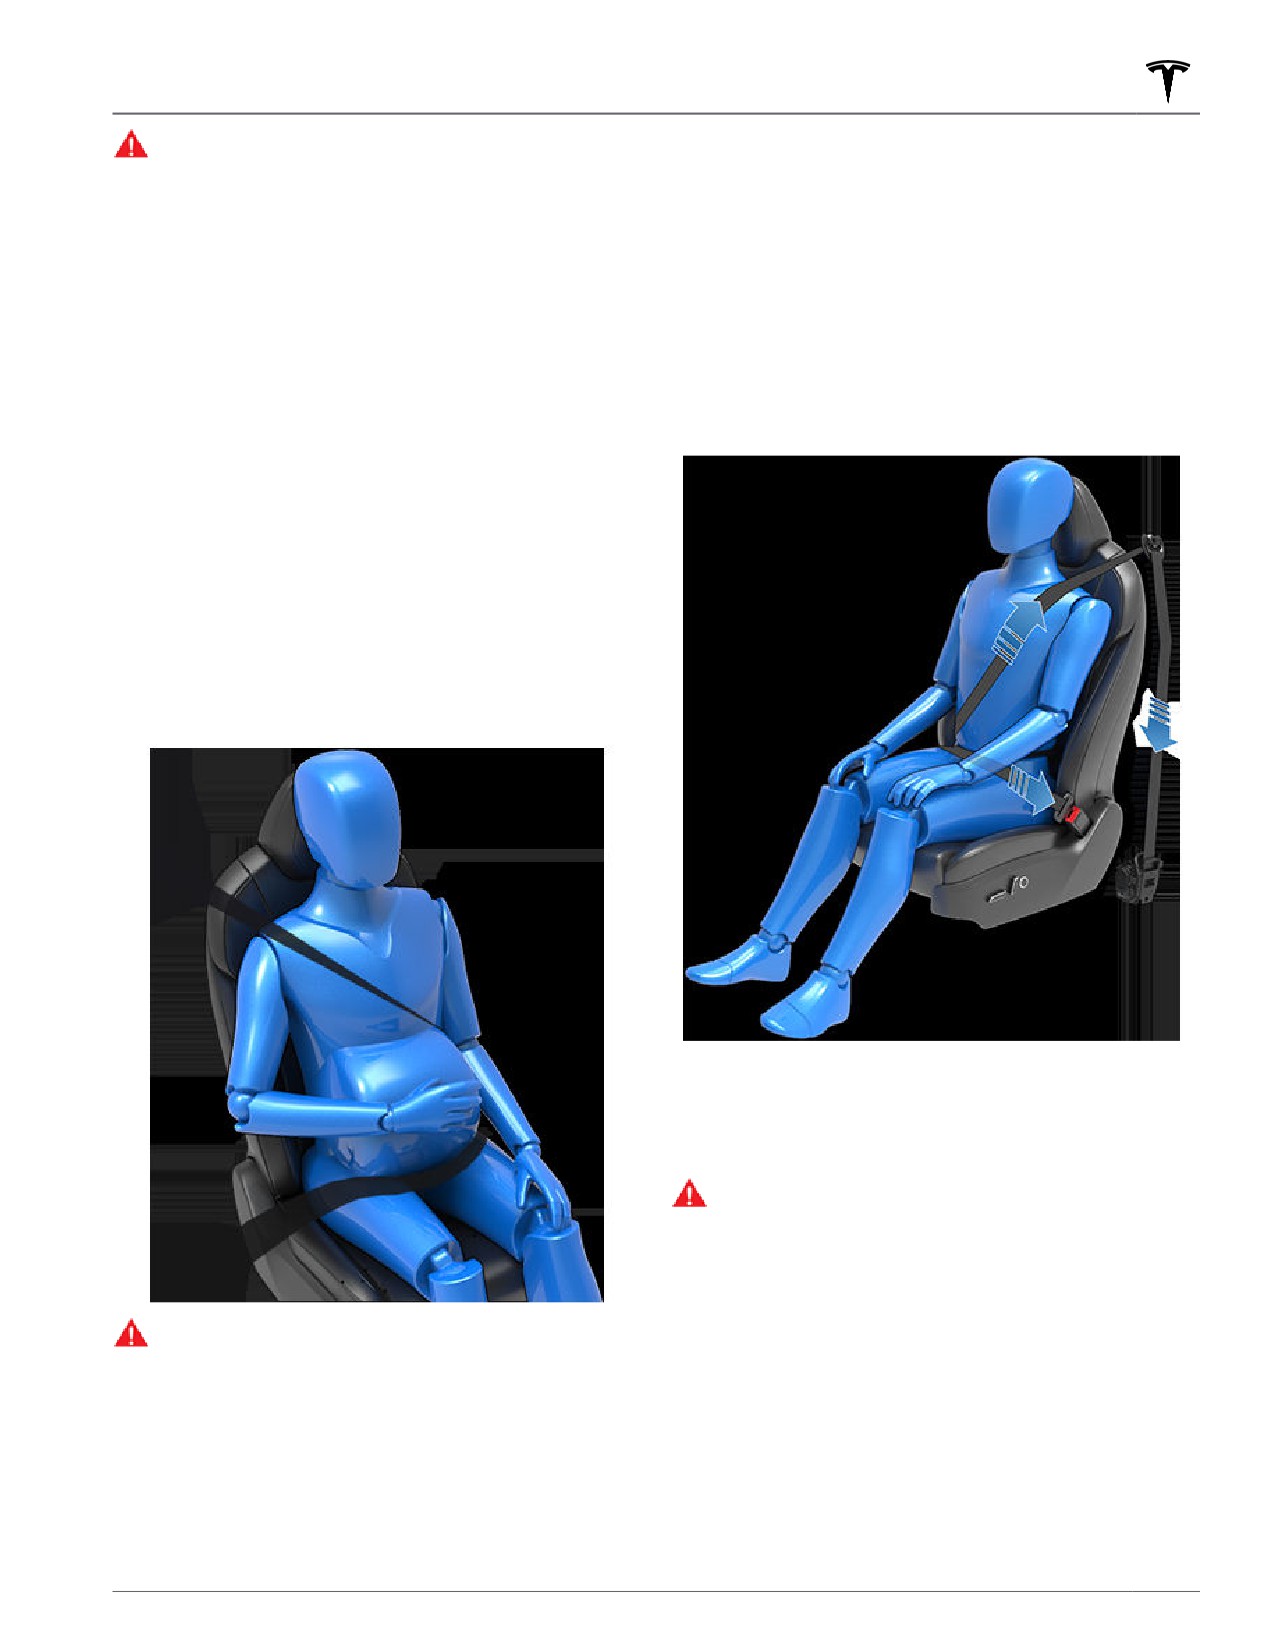
Wearing Seat Belts When Pregnant
Do not put the lap or shoulder sections of the seat belt
over the abdominal area. Wear the lap section of the
belt as low as possible across the hips, not the waist.
Position the shoulder portion of the belt between the
breasts and to the side of the abdomen. Consult your
doctor for specific guidance.
If the pre-tensioners and airbags did not activate in an
impact, this does not mean they malfunctioned. It
usually means that the strength or type of force needed
to activate them was not present.
WARNING: Once the seat belt pre-tensioners have
been activated, they must be replaced. After any
collision, have the airbags, seat belt pre-tensioners
and any associated components checked and, if
necessary, replaced.
WARNING: Never place anything between you and
Testing Seat Belts
the seat belt to cushion the impact in the event of
a collision.
To confirm that seat belts are operating correctly,
perform these three simple checks on each seat belt.
1. With the seat belt fastened, give the webbing nearest
the buckle a quick pull. The buckle should remain
securely locked.
Seating and Safety Restraints
31
Seat Belts
2. With the belt unfastened, unreel the webbing to its
WARNING: Do not use after market comfort and
limit. Check that unreeling is free from snags, and
convenience products that attach to the seat belts.
visually check the webbing for wear. Allow the
WARNING: When seat belts are not in use, they
webbing to retract, checking that retraction is
should be fully retracted and not hanging loose. If
smooth and complete.
a seat belt does not fully retract, contact Tesla.
3. With the webbing half unreeled, hold the tongue
WARNING: The seat belt system has no user
plate and pull forward quickly. The mechanism should
serviceable parts and may contain pyrotechnics.
lock automatically and prevent further unreeling.
Do not disassemble, remove, or replace
components.
If a seat belt fails any of these tests, contact Tesla
immediately.
For information about cleaning seat belts, see Seat Belts
on page 184.
Seat Belt Warnings
WARNING: Seat belts should be worn by all
occupants at all times, even if driving for a very
short distance. Failure to do so increases the risk
of injury or death if a collision occurs.
WARNING: Secure small children in a suitable child
safety seat as described in the Child Safety Seat
topic. Always follow the child safety seat
manufacturer's instructions when installing.
WARNING: Ensure that all seat belts are worn
correctly. An improperly worn seat belt increases
the risk of injury or death if a collision occurs.
WARNING: Do not wear seat belts over hard,
fragile or sharp items in clothing, such as pens,
keys, eyeglasses, etc. The pressure from the seat
belt on such items can cause injury.
WARNING: Seat belts should not be worn with any
part of the strap twisted.
WARNING: Each seat belt assembly must be used
by one occupant only. It is dangerous to put a seat
belt around a child being carried on an occupant’s
lap.
WARNING: Seat belts that have been worn in a
collision must be inspected or replaced by Tesla,
even if damage to the assembly is not obvious.
WARNING: Seat belts that show signs of wear
(such as fraying), or have been cut or damaged in
any way, must be replaced by Tesla.
WARNING: Avoid contaminating a seat belt’s
components with any chemicals, liquids, grit, dirt
or cleaning products. If a seat belt fails to retract
or latch into the buckle, it must be replaced
immediately. Contact Tesla.
WARNING: Do not make modifications or
additions that can prevent a seat belt mechanism
from taking up slack, or that can prevent a seat
belt from being adjusted to remove slack. A slack
belt greatly reduces occupant protection.
WARNING: Do not make modifications that can
interfere with the operation of a seat belt, or that
can cause a seat belt to become inoperable.
32
Child Safety Seats
Guidelines for Seating Children
Your Model Y seat belts are designed for adults and larger children. You must restrain infants and small children in a
rear seating position only, and you must use a suitable child safety seat appropriate for the child’s age, weight, and
size.
WARNING: Never seat a child on a rear-facing child seat with an ACTIVE AIRBAG in front of it. DEATH or
SERIOUS INJURY to the child can occur. See Passenger Front Airbag Status on page 40.
WARNING: Never seat a child on a seat with an ACTIVE AIRBAG in front of it. DEATH or SERIOUS INJURY to
the child can occur.
WARNING: Always ensure that all Model Y seats are locked in position before traveling. Failure to do so
increases the risk of injury. Pay attention to all warnings displayed on the touchscreen.
WARNING: Do not associate the Easy Entry setting with the driver's profile when a child is seated in the
second row. Doing so can cause the driver's seat to push against the child, especially when a child is seated in
a forward-facing child seat or booster seat. Do not rely on Model Y to recognize or accommodate a child
seated in the second row while using this setting (see Driver Profiles on page 46).
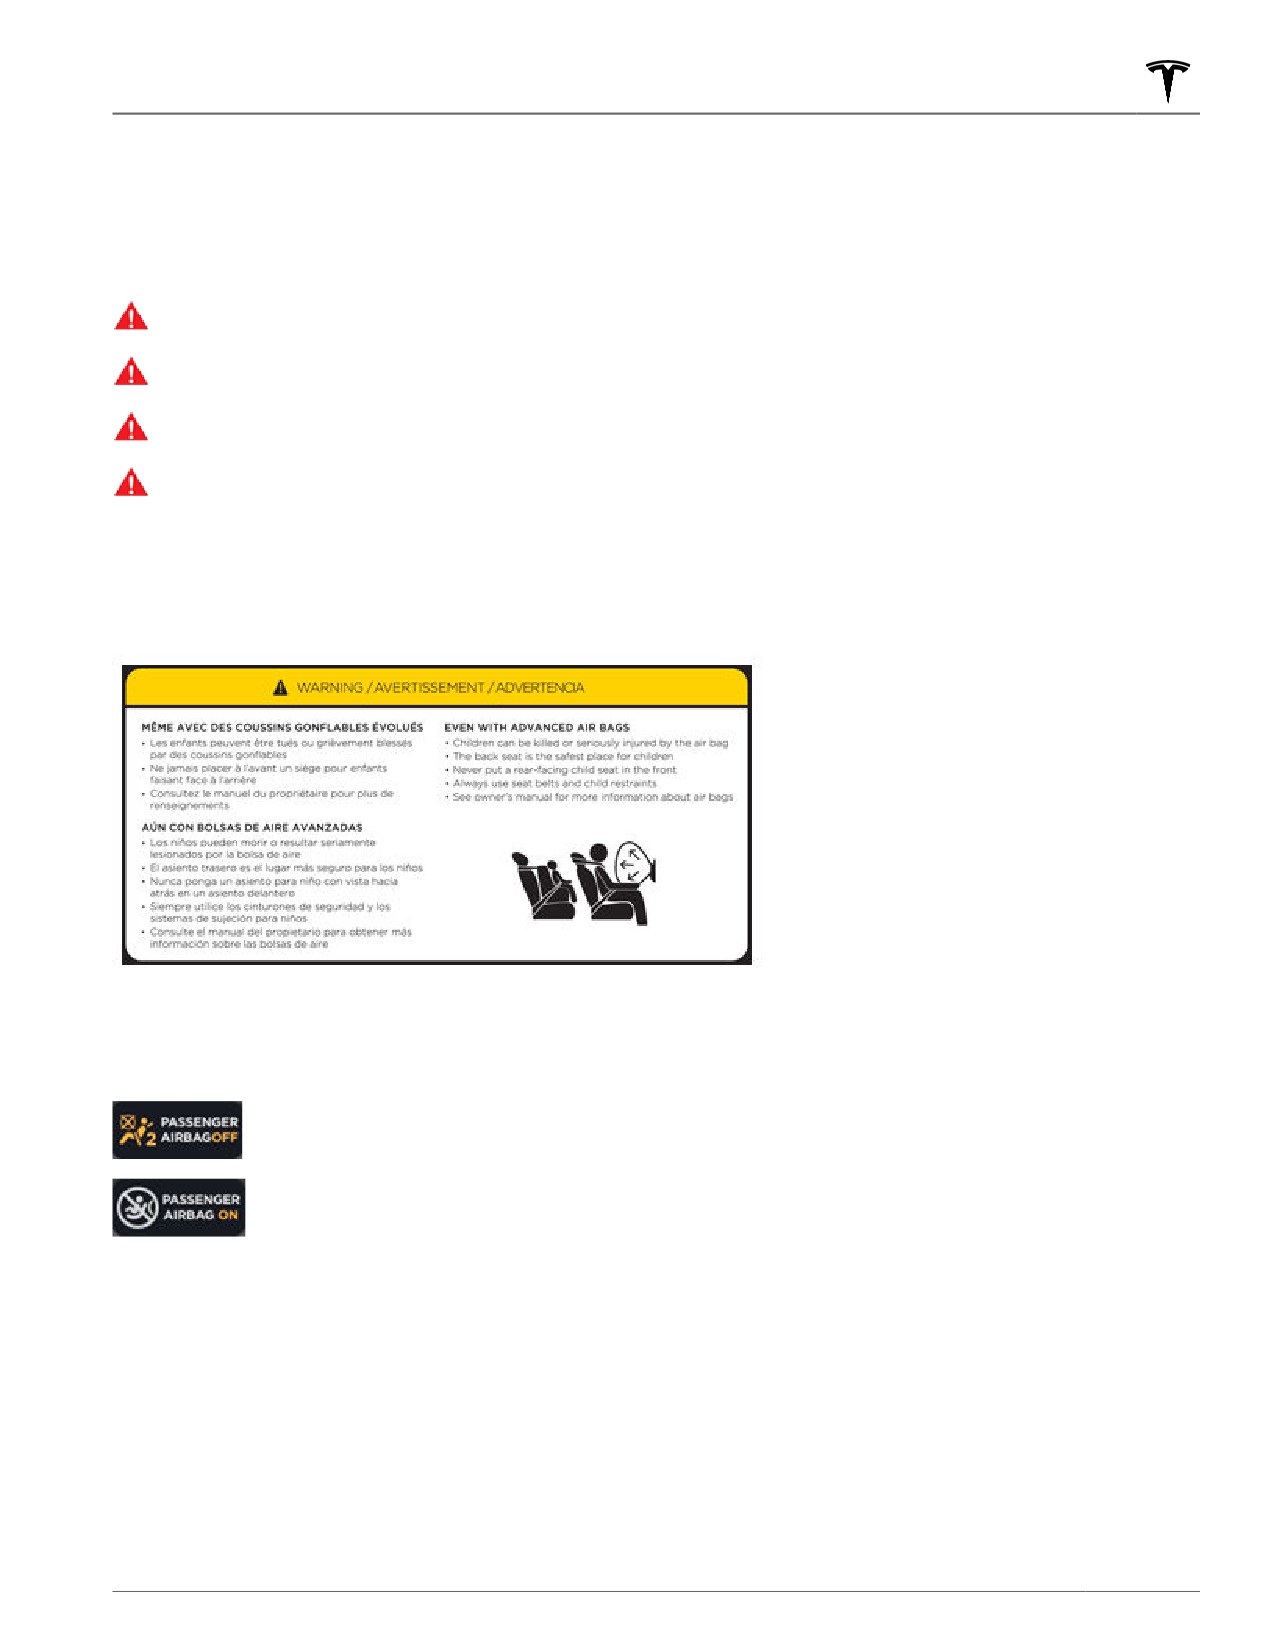
Refer to the following label located on the sun visors.
NOTE: The image shown below is representative only and may not be identical to the label(s) in your vehicle.
Model Y has an occupancy sensor in the front passenger seat that controls the status of the passenger front airbag
(see Airbags on page 39).
When driving with a child seat on the front passenger seat, always double-check the status of the
passenger front airbag to confirm that it is OFF.
To protect an adult subsequently occupying the front passenger seat, check to verify that the
passenger front airbag is ON.
Opening and Closing
33
Child Safety Seats
Choosing a Child Safety Seat
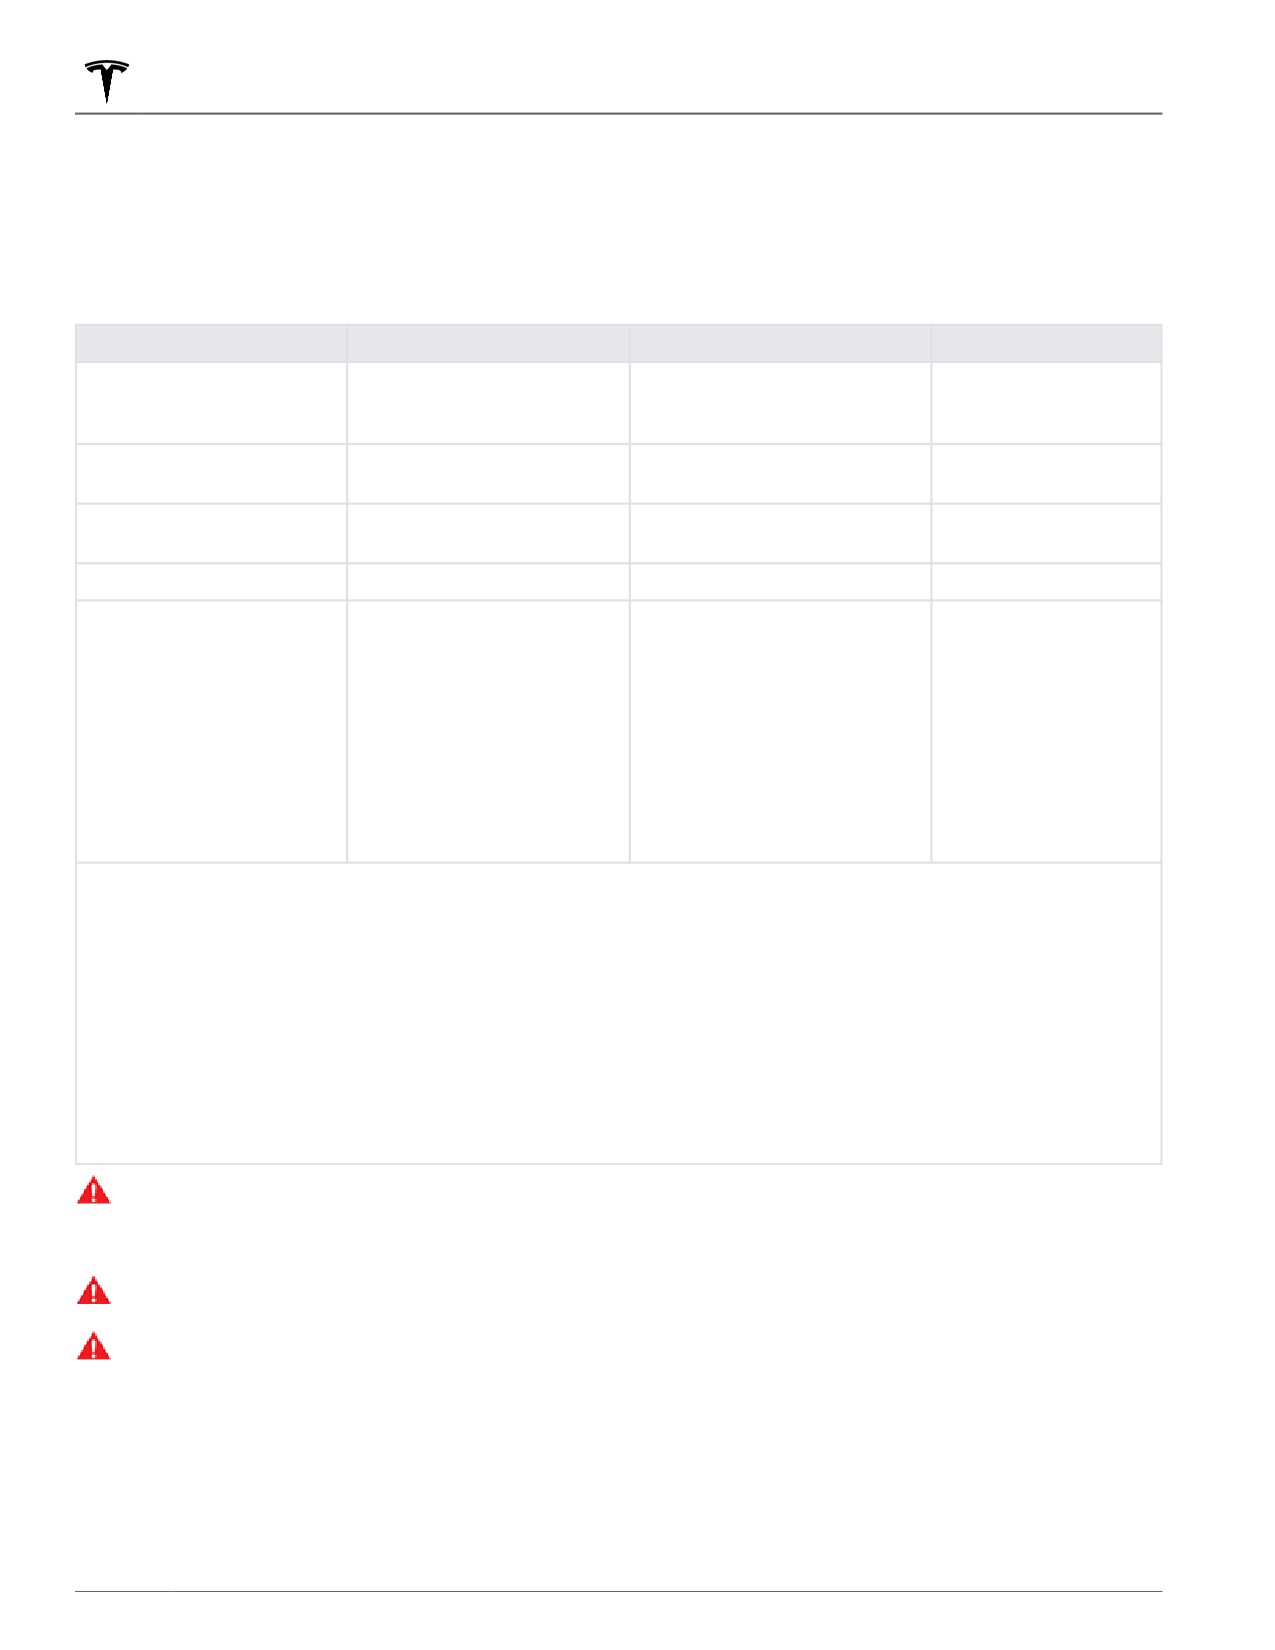
All children age 12 and under should ride in the second and third row seats. Always use a child safety seat suitable
for a young child’s age and weight. The following table is based on child safety seat recommendations determined
by the National Highway Tra
c Safety Administration (NHTSA) in the United States (for more information, go to
Infants
Toddlers
Young children
Age
Birth to 1 year*
Over 1 year*
4 years and older, and
less than 57 in.
(145 cm) tall
Weight
Up to at least 20 lbs (9 kg)**
Over 20 lbs (9 kg) (minimum)
Over 40 lbs (18 kg)
and up to 40 lbs (18 kg)*
Type of child safety seat
Rear-facing (or convertible)
Forward-facing (or
Seat belt retained
convertible)*
booster seat
Seat position
Rear-facing only*
Forward-facing*
Forward-facing
Recommended attachment
If combined weight of child
If combined weight of child
Attach booster seats
method
and safety seat is up to 65
and safety seat is up to 65 lbs
using the seat belt
lbs (29.5 kg), attach using
(29.5 kg), attach using either
only.
either LATCH** (lower
LATCH** (both lower anchors
anchor only) or the seat belt
and top tether anchor), or the
only.*** If combined weight
seat belt and upper tether
of child and safety seat is
strap.*** If combined weight of
over 65 lbs (29.5 kg), attach
child and safety seat is over
using the seat belt only.***
65 lbs (29.5 kg), attach using
the seat belt and upper tether
strap.***
* Many child safety seats currently available allow children to ride rear-facing using the child safety seat’s
integrated 5-point harness for a longer period of time BASED UPON SPECIFIC HEIGHT AND WEIGHT LIMITS.
Keep your child in a rear-facing seat for as long as possible. CHECK THE CHILD SAFETY SEAT MANUFACTURER’S
INSTRUCTIONS AND CAREFULLY FOLLOW ALL INSTRUCTIONS
** ISOFIX is the international standard for attachment points for child safety seats in passenger cars. The system
has other regional names including LATCH ("Lower Anchors and Tethers for Children") in the United States and
LUAS ("Lower Universal Anchorage System") or Canfix in Canada. It has also been called the "Universal Child
Safety Seat System" or UCSSS.
*** Subject to instructions provided by the child safety seat manufacturer.
WARNING: Laws that govern how and where children should be carried when traveling in a vehicle are subject
to change. It is the driver’s responsibility to keep up to date on, and comply with, all current regulations in the
region(s) where Model Y is driven. To check the child passenger safety laws for states in the U.S., go to: http://
WARNING: Do not use LATCH/Isofix/i-Size anchors with child safety seats or booster seats that have an
integral safety belt where the combined weight of the child plus the child safety seat exceeds 65 lbs (29.5 kg).
WARNING: Do not use Easy Entry (as described in Driver Profiles on page 46) to automatically move the
driver's seat to the full rearward position if a child safety seat is installed in the second row located behind the
driver's seat. With reduced clearance, the movement of the seat may impact a child's legs, cause injury, or
dislodge the seat.
34
///////////////////////////////////////