MINI Convertible (2021 year). Manual in english - page 2
AT A GLANCE
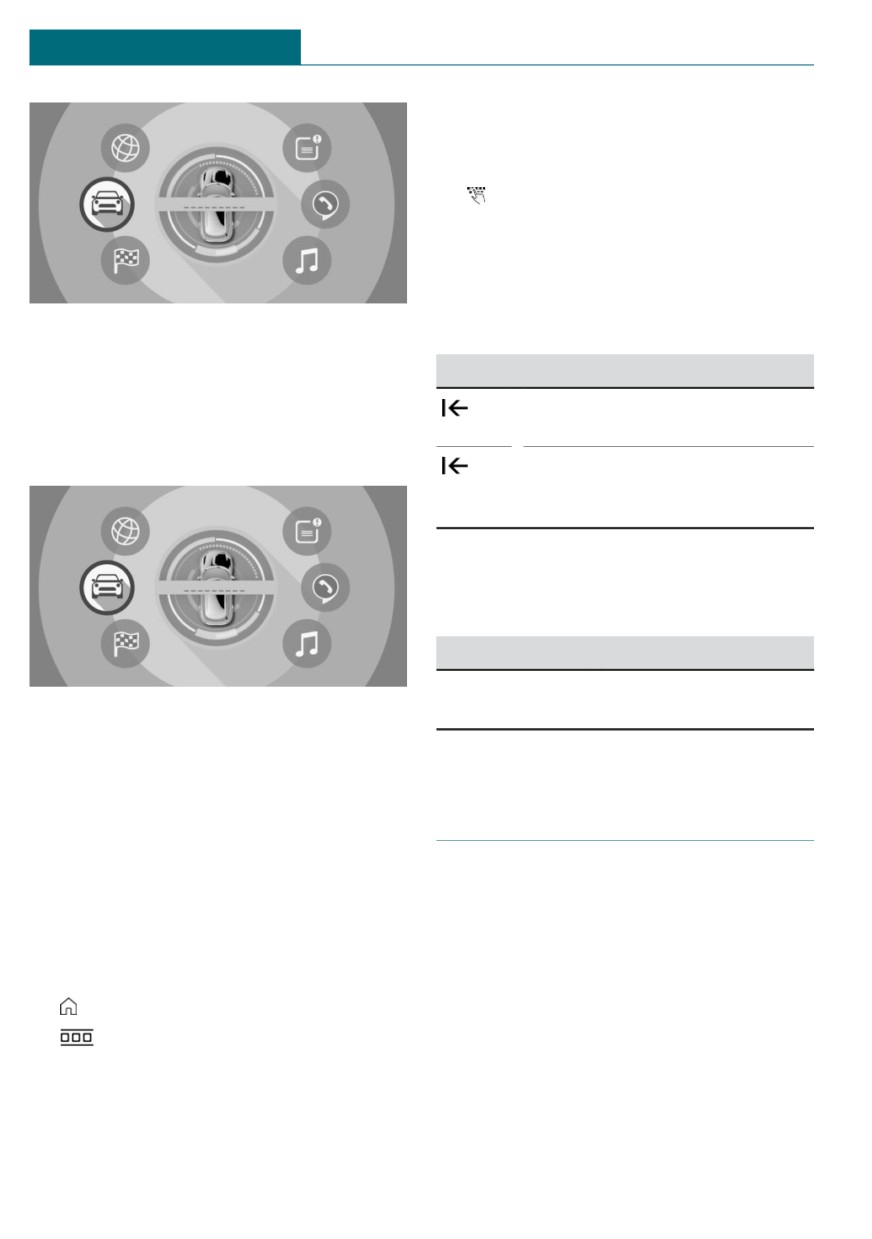
Central Information Display (CID)
Entering letters and numbers
Input
1.
Tap the symbol on the touchscreen.
A keyboard is displayed on the Control
Display.
2. Enter desired letters and numbers.
The main menu is displayed.
Deleting
All Central Information Display (CID) func-
Symbol Function
tions can be called up via the main menu.
Tapping the symbol: deletes the
Selecting menu items
letter or number.
Tap the desired menu item.
Tapping and holding the symbol
all letters: deletes all letters or
numbers.
Operating navigation map
The navigation map can be moved using the
touchscreen.
Function
Operation
Enlarge/shrink
Drag in or out with the
map.
fingers.
Changing between displays
After a menu item is selected, a new display
opens.
Programmable memory but-
An arrow indicates that additional displays
tons
can be opened.
- Swipe to the left.
General information
- Tap arrow.
The Central Information Display (CID) func-
The new display opens.
tions can be stored on the programmable
memory buttons and called up directly, for
Opening recently used menus
instance radio stations, navigation destina-
1.
Tap on the symbol.
tions, phone numbers and menu entries.
Settings are stored for the driver profile
2.
Tap on the symbol.
currently used.
40

Central Information Display (CID)
AT A GLANCE
Storing a function
1. Select the function via the Central Infor-
mation Display (CID).
2.
Press and hold the desired but-
ton, until a signal sounds.
Executing a function
Press the button.
The function will work immediately.
This means, for instance that the number is
dialed when a phone number is selected.
Displaying the key assignment
Touch buttons with finger. Do not wear
gloves or use objects.
The assignment of the buttons is displayed
in the upper area of the Control Display.
Deleting the button assignments
1. Press buttons 1 and 6 simultaneously
for approx. 5 seconds.
2. "OK"
41

AT A GLANCE
Voice activation system
Voice activation system
activation system. To set the language,
Vehicle features and options
refer to page 46.
- Always say commands in the language
This chapter describes all standard, country-
of the voice activation system.
specific and optional features offered with
the series. It also describes features and
functions that are not necessarily available
in your vehicle, e.g., due to the selected op-
Using the voice activation sys-
tions or country versions. This also applies
tem
to safety-related functions and systems.
When using these functions and systems,
Activating the voice activation
the applicable laws and regulations must be
observed.
system
1.
Press the button on the steering
wheel.
Concept
2. Wait for the signal.
Most functions displayed on the Control
3. Say the command.
Display can be operated by voice commands
This symbol indicates that the voice ac-
via the voice activation system. The system
tivation system is active.
supports you with announcements during
No other commands may be available. In
input.
this case, operate the function via the Cen-
tral Information Display (CID).
General information
Terminating the voice activation
system
- Functions that can only be used when
the vehicle is stationary can only be op-
Press the button on the steering
erated via the voice activation system to
wheel or ›Cancel‹.
a limited extent.
- The system uses a special microphone
on the driver's side.
Possible commands
-
bal instructions to use with the voice ac-
General information
tivation system.
Most menu items on the Control Display can
be spoken as commands.
Functional requirements
Commands from other menus can also be
spoken.
You can also select list entries such as
- A language must be set via the Control
phone list entries via voice activation. Read
Display that is supported by the voice
42

Voice activation system
AT A GLANCE
these list entries out loud exactly as they
Adjusting
are shown in the respective list.
Setting the language
Displaying possible commands
The language to be used for voice activation
The following is displayed in the top area of
and system announcements can be set.
the Control Display:
Via the Central Information Display (CID):
- Some possible commands for the current
menu.
1.
"My MINI"
- Some possible commands from other
2. "System settings"
menus.
3. If necessary, "Language"
- Status of the voice recognition.
4. "Language:"
-
Encrypted connection is not availa-
ble.
5. Select the desired language.
Help on the voice activation system
Setting the voice dialog
-
›General information on voice control‹:
You can set the system to use standard dia-
have information on the operating prin-
log or a short version.
ciple of the voice activation system read
The short version of the voice dialog plays
out loud.
back short messages in abbreviated form.
-
›Help‹: have help for the current menu
Via the Central Information Display (CID):
read out loud.
1.
"My MINI"
2. "System settings"
Example: opening the tone set-
3. "Language"
tings
4. "Speech mode:"
5. Select the desired setting.
The commands of the menu items are spo-
ken just as they are selected via the Con-
Speaking during voice output
troller.
It is possible to answer during inquiries of
1. Switch on the Entertainment sound out-
the voice activation system. The function
put, if needed.
can be deactivated if inquiries are often un-
desirably interrupted, for instance due to
2.
Press the button on the steering
background noise or conversations in the
wheel.
vehicle.
3.
›Media and radio‹
Via the Central Information Display (CID):
4.
›Tone‹
1.
"My MINI"
2. "System settings"
3. "Language"
4. "Speaking during voice output"
43

AT A GLANCE
Voice activation system
Activating voice recognition via
System limits
the server
The voice recognition feature via the server
- Certain noises can be detected and may
provides a dictation function and a natural
lead to problems. Keep the doors, win-
method of entering destinations while im-
dows and convertible top closed.
proving the quality of voice recognition. To
- Noises from the front passenger or the
use the functions, data is transmitted to a
rear seat bench can impair the system.
service provider via an encrypted connec-
Avoid making other noise in the vehicle
tion and stored locally there.
while speaking.
Via the Central Information Display (CID):
- Major language dialects can cause prob-
lems with the voice recognition feature.
1.
"My MINI"
Speak loud and clear.
2. "System settings"
3. "Language"
Using the voice activation sys-
4. "Server speech recognition"
tem of the smartphone
Adjusting the volume
Turn the volume button during the spoken
A smartphone connected to the vehicle can
instructions until the desired volume is set.
be used via voice activation.
- The volume remains constant even if the
Activate voice command response on the
volume of other audio sources is
smartphone for this purpose.
changed.
- The volume is stored for the profile cur-
1.
Press and hold the button on the
rently used.
steering wheel for approx. 3 seconds.
Voice command response is activated on
the smartphone.
Information on Emergency
2.
Release the button.
Requests
If activation is successful, a confirma-
tion appears on the Control Display.
Do not use the voice activation system to
If it was not possible to activate voice com-
initiate an Emergency Request. In stressful
mand response, the list of Bluetooth devices
situations, the voice and vocal pitch can
appears on the Control Display.
change. This can unnecessarily delay the es-
tablishment of a phone connection.
Instead, use the SOS button, refer to
Amazon Alexa Car Integration
page 282, close to the interior mirror.
Concept
Alexa is a digital voice-controlled assistant
by Amazon. With Amazon Alexa Car Inte-
gration, Alexa can be used in the vehicle.
44

Voice activation system
AT A GLANCE
General information
Information about the active function is
displayed on the Control Display.
Some of the Alexa functions are limited in
the vehicle to prevent any impairment of
Malfunction
safety while driving.
In case of a malfunction, switch off the en-
Functional requirements
gine and start the engine again.
- Connected Voice Services purchased via
MINI Connected Store.
- Same MINI Connected account used in
the vehicle and in the MINI Connected
app.
- Vehicle added in the MINI Connected
app.
- Amazon account and MINI account con-
nected in the MINI Connected app.
- Smartphone connected to the vehicle via
Bluetooth or USB.
Activation in the MINI Connected
app
The Amazon Alexa Car Integration is acti-
vated in the MINI Connected app.
Follow the instructions in the app.
Activation in the vehicle
An authorization for the use of Amazon
Alexa Car Integration is required every time
before starting a trip.
1. Authorizing Amazon Alexa Car Integra-
tion:
- Connect the smartphone to the vehi-
cle via Bluetooth.
- Selects appropriate driver profile, re-
fer to page 69.
2.
Press the button on the steering
wheel.
3. Wait for the signal.
4. Say activation word ›Alexa‹ and desired
command.
45

AT A GLANCE
General settings
General settings
Vehicle features and options
Time
This chapter describes all standard, country-
Setting the time zone
specific and optional features offered with
Via the Central Information Display (CID):
the series. It also describes features and
functions that are not necessarily available
1.
"My MINI"
in your vehicle, e.g., due to the selected op-
2. "System settings"
tions or country versions. This also applies
to safety-related functions and systems.
3. "Date and time"
When using these functions and systems,
4. "Time zone:"
the applicable laws and regulations must be
5. Select the desired setting.
observed.
The setting is stored for the driver profile
currently used.
Language
Setting the time
Via the Central Information Display (CID):
Setting the language
Via the Central Information Display (CID):
1.
"My MINI"
2. "System settings"
1.
"My MINI"
3. "Date and time"
2. "System settings"
4. "Time:"
3. If necessary, "Language"
5. Turn the Controller until the desired
4. "Language:"
hours are displayed.
5. Select the desired setting.
6. Press the Controller.
The setting is stored for the driver profile
7. Turn the Controller until the desired mi-
currently used.
nutes are displayed.
Setting the voice dialog
8. Press the Controller.
For voice dialog for the voice activation sys-
Setting the time format
tem, refer to page 43.
Via the Central Information Display (CID):
1.
"My MINI"
2. "System settings"
3. "Date and time"
4. "Time format:"
5. Select the desired setting.
46

General settings
AT A GLANCE
The setting is stored for the driver profile
Via the Central Information Display (CID):
currently used.
1.
"My MINI"
2. "System settings"
Date
3. "Units"
4. Select the desired menu item.
Setting the date
5. Select the desired setting.
Via the Central Information Display (CID):
The setting is stored for the driver profile
currently used.
1.
"My MINI"
2. "System settings"
3. "Date and time"
Activating/deactivating the
4. "Date:"
display of the current vehicle
5. Turn the Controller until the desired day
position
is displayed.
6. Press the Controller.
Concept
7. Make the settings for the month and
If vehicle tracking has been activated, the
year.
current vehicle position can be displayed in
the MINI Connected app.
Setting the date format
Via the Central Information Display (CID):
Activating/deactivating
Via the Central Information Display (CID):
1.
"My MINI"
2. "System settings"
1.
"My MINI"
3. "Date and time"
2. "Vehicle settings"
4. "Date format:"
3. "Vehicle tracking"
5. Select the desired setting.
4. "Vehicle tracking"
The setting is stored for the driver profile
5. Select the desired setting.
currently used.
Activating/deactivating
Setting the units of measure-
popup windows
ment
For some functions, popup windows are dis-
You can set the units of measurement for
played automatically on the Control Display.
some values, for example, consumption, dis-
Some of these popup windows can be acti-
tances and temperature.
vated or deactivated.
47

AT A GLANCE
General settings
Via the Central Information Display (CID):
5. "Screensaver"
1.
"My MINI"
6. Select the desired setting.
The setting is stored for the driver profile
2. "System settings"
currently used.
3. "Pop-ups"
4. Select the desired setting.
The setting is stored for the driver profile
Messages
currently used.
Concept
The menu centrally displays all messages ar-
Control Display
riving in the vehicle in list form.
Brightness
General information
Via the Central Information Display (CID):
The following messages can be displayed:
1.
"My MINI"
- Traffic messages.
- Communication messages, for example
2. "System settings"
e-mails, SMS text messages or remind-
3. "Displays"
ers.
4. "Control display"
- Check Control messages.
5. "Brightness at night"
- Messages on service notifications.
6. Turn the Controller until the desired
- Messages from the vehicle manufac-
brightness is set.
turer.
7. Press the Controller.
Messages are additionally displayed in the
status field.
The setting is stored for the driver profile
currently used.
Retrieving messages
Depending on the light conditions, the
brightness settings may not be clearly visi-
Via the Central Information Display (CID):
ble.
1.
"Notifications"
Screensaver
2. Select the desired message.
The menu in which the message is dis-
If no entries are made via the Central Infor-
played will open.
mation Display (CID), a screensaver can be
displayed after an adjustable time.
Deleting messages
Via the Central Information Display (CID):
All messages, except Check Control mes-
1.
"My MINI"
sages or messages from the vehicle manu-
2. "System settings"
facturer, can be deleted from the list.
3. "Displays"
Check Control messages or messages from
the vehicle manufacturer are displayed as
4. "Control display"
long as they are relevant.
48

General settings
AT A GLANCE
Via the Central Information Display (CID):
Via the Central Information Display (CID):
1.
"Notifications"
1.
"My MINI"
2. Select the desired message.
2. "System settings"
3. "Data privacy"
3.
Press the button.
4. Select the desired setting.
4. "Delete this notification" or "Delete all
notifications"
Deleting personal data in the
vehicle
Adjusting
The following settings can be adjusted:
Concept
- Select the applications, from which mes-
Depending on the usage, the vehicle stores
sages will be permitted.
personal data, such as stored radio stations.
- Sort the messages according to date or
This personal data can be permanently de-
priority.
leted via the Central Information Display
Via the Central Information Display (CID):
(CID).
1.
"My MINI"
General information
2. "System settings"
Depending on the vehicle equipment, the
3. "Notifications"
following data is deleted:
4. Select the desired setting.
- Driver profile settings.
- Stored radio stations.
- Stored programmable memory buttons.
Data protection
- Travel and Onboard Computer informa-
tion.
Data transfer
- Music hard disk.
- Navigation, for instance stored destina-
Concept
tions.
The vehicle offers various functions which
- Phone book.
require data to be transferred to MINI or a
- Office data, for instance voice notes.
service provider. The data transfer can be
deactivated for some functions.
- Login accounts.
Altogether, the deletion of the data can take
General information
up to 15 minutes.
With data transfer deactivated, the respec-
tive function cannot be used.
Functional requirement
Only make these settings while stationary.
Data can only be deleted while stationary.
Activating/deactivating
Deleting data
Follow the instructions on the Control Dis-
Note and follow the instructions on the Con-
play.
trol Display.
49

AT A GLANCE
General settings
Via the Central Information Display (CID):
Function
Connec-
tion type
1.
"My MINI"
Making calls via the hands-
Bluetooth.
2. "System settings"
free system.
3. "Data privacy"
Using phone functions via
4. "Delete personal data"
the Central Information Dis-
5. "Delete personal data"
play (CID).
6. "OK"
Using the smartphone Of-
fice functions.
7. Exit and lock the vehicle.
Playing music from the
Bluetooth
The deletion process takes 15 minutes to
smartphone or the audio
or USB.
complete.
player.
If not all data was deleted, repeat the dele-
tion.
Using compatible apps via
Bluetooth
the Central Information Dis-
or USB.
Canceling deletion
play (CID).
Start the engine to cancel deletion of the
USB storage device:
USB.
data.
Exporting and importing
driver profiles.
Update the software.
Connections
Playing music.
Playing videos from the
USB.
Concept
smartphone or the USB de-
Various connection types are available for
vice.
using mobile devices in the vehicle. The
connection type to select depends on the
Using Apple CarPlay apps
Bluetooth
mobile device and the desired function.
via the Central Information
and
Display (CID) and voice op-
WLAN.
eration.
General information
The following overview shows possible
The following connection types require one-
functions and the suitable connection types
time pairing with the vehicle:
for them. The scope of functions depends on
the mobile device.
- Bluetooth.
- Apple CarPlay
Paired devices are automatically recognized
later on and connected to the vehicle.
50

General settings
AT A GLANCE
Safety information
- The vehicle key is in the vehicle.
- The device is ready for operation.
Warning
- Bluetooth is activated on the device and
in the vehicle, refer to page 51.
Operating the integrated information sys-
tems and communication devices while
- Bluetooth presettings, such as visibility,
driving can distract from traffic. It is pos-
may be required on the device; refer to
sible to lose control of the vehicle. There is
the owner's manual of the device.
a risk of accident. Only use the systems or
devices when the traffic situation allows.
Switching on Bluetooth
As warranted, stop and use the systems
Via the Central Information Display (CID):
and devices while the vehicle is stationary.
1.
"My MINI"
2. "System settings"
Compatible devices
3. "Mobile devices"
General information
4. "Settings"
Malfunctions may occur with devices not
5. "Bluetooth®"
listed or deviating software versions.
Activating/deactivating telephone
Displaying the vehicle identification
functions
number and software part number
To use all supported functions of a mobile
When looking for compatible devices, you
phone, the following functions must be acti-
may have to state the vehicle identification
vated prior to pairing.
number and the software part number.
Via the Central Information Display (CID):
These numbers can be displayed in the ve-
hicle.
1.
"My MINI"
Via the Central Information Display (CID):
2.
"System settings"
3.
"Mobile devices"
1.
"My MINI"
4.
"Settings"
2. "System settings"
5.
Select the desired setting:
3. "Mobile devices"
- "Office"
4. "Settings"
Activate function to transmit short
5. "Bluetooth® info"
messages, e-mails, calendars, tasks,
6. "System information"
notes, and reminders to the vehicle.
A software update, refer to page 56, can
Costs can be incurred by transmit-
be performed.
ting all data to the vehicle.
- "Contact images"
Bluetooth connection
Activate function to show the con-
tact pictures.
Functional requirements
6.
Move the Controller to the left.
- Compatible device, refer to page 51,
with Bluetooth interface.
51

AT A GLANCE
General settings
Pairing the mobile device with the
Frequently Asked Questions
vehicle
All requirements are met and all required
Via the Central Information Display (CID):
steps were completed in the specified order.
Despite that, the mobile device does not
1.
"My MINI"
function as expected.
2.
"System settings"
In this case, the following explanations can
3.
"Mobile devices"
help:
Why could the mobile phone not be paired
4.
"Connect new device"
or connected?
5.
Select the functions for which the de-
- There are too many Bluetooth devices
vice will be used:
connected to the mobile phone or vehi-
-
"Telephone"
cle.
–
"Bluetooth® audio"
In the vehicle, delete Bluetooth connec-
–
"Apps"
tions with other devices.
–
"Apple CarPlay"
Delete all known Bluetooth connections
The vehicle's Bluetooth name is dis-
from the device list on the mobile phone
played on the Control Display.
and start a new device search.
6.
On the mobile device, search for Blue-
- The mobile phone is in power-save mode
tooth devices in the vicinity.
or has only a limited remaining battery
life.
The Bluetooth name of the vehicle ap-
pears on the mobile device display.
Charge the mobile phone.
Select the Bluetooth name of the vehi-
Why does the mobile phone no longer re-
cle.
act?
- The applications on the mobile phone do
7.
Depending on the mobile device, a con-
not function anymore.
trol number is displayed or the control
number must be entered.
Switch the mobile phone off and on
again.
- Compare the control number dis-
played on the Control Display with
- Possibly too high or too low ambient
the control number on the display of
temperatures for mobile phone opera-
the device.
tion.
Confirm the control number on the
Do not subject the mobile phone to ex-
device and on the Control Display.
treme ambient temperatures.
- Enter and confirm the same control
Why can phone functions not be used via
number on the device and via the
the Central Information Display (CID)?
Central Information Display (CID).
- The mobile phone may not be properly
The device is connected and displayed
configured, for instance as Bluetooth au-
in the device list.
dio device.
If connection was not successful: Fre-
Connect the mobile phone with the tele-
quently Asked Questions, refer to page 52.
phone or additional phone function.
Why are no or not all phone book entries
displayed or why are they incomplete?
52
General settings
AT A GLANCE
-
Transmission of the phone book entries
- Audio devices with USB port, for in-
is not yet complete.
stance MP3 players.
-
It is possible that only the phone book
- USB storage devices.
entries of the mobile phone or the SIM
Common file systems are supported.
card are transmitted.
FAT32 and exFAT are the recommended
-
It may not be possible to display phone
formats.
book entries with special characters.
A connected USB storage device will be
-
It may not be possible to transmit con-
supplied with charge current via the USB
tacts from social networks.
port if the device supports this. Follow the
maximum charge current of the USB port.
-
The number of phone book entries to be
stored is too high.
The following uses are possible on USB
ports with data transfer:
-
Data volume of the contact too large, for
instance due to stored information such
- Exporting and importing driver profiles,
as notes.
refer to page 69.
Reduce the data volume of the contact.
- Playing music files via USB audio.
-
A mobile phone is only connected as an
- Playing videos via USB video.
audio source.
- Loading of software updates, refer to
Reconfigure the mobile phone and con-
page 56.
nect it with the telephone or additional
Follow the following when connecting:
phone function.
-
Do not use force when plugging the con-
How can the phone connection quality be
nector into the USB port.
improved?
-
Use a flexible adapter cable.
- The strength of the Bluetooth signal on
–
Protect the USB storage device against
the mobile phone can be adjusted, de-
mechanical damage.
pending on the mobile phone.
-
Due to the large number of USB storage
- Insert the mobile phone into the wire-
devices available on the market, it can-
less charging tray.
not be guaranteed that every device is
- Adjust the volume of the microphone
operable on the vehicle.
and loudspeakers separately.
-
Do not expose USB storage devices to
If all points in this list have been checked
extreme environmental conditions, such
and the required function is still not availa-
as very high temperatures; refer to the
ble, contact the hotline, a dealer’s service
owner's manual of the device.
center or another qualified service center or
-
Due to the many different compression
repair shop.
techniques, proper playback of the me-
dia stored on the USB storage device
USB connection
cannot be guaranteed in all cases.
-
To ensure proper transmission of the
General information
stored data, do not charge a USB storage
The following mobile devices can be con-
device via the onboard socket, when it
nected to the USB port:
is connected to the USB port.
- Mobile phones.
-
Depending on how the USB storage de-
vice is being used, settings may be re-
53

AT A GLANCE
General settings
quired on the USB storage device, refer
Switching on Bluetooth and CarPlay
to the owner's manual of the device.
Via the Central Information Display (CID):
Not compatible USB media:
1.
"My MINI"
- USB hard drives.
2. "System settings"
- USB hubs.
3. "Mobile devices"
- USB memory card readers with multiple
slots.
4. "Settings"
- HFS-formatted USB storage devices.
5. Select the following settings:
- Devices such as fans or lamps.
- "Bluetooth®"
- "Apple CarPlay"
Functional requirement
Compatible device, refer to page 51, with
Pairing the iPhone with CarPlay
USB port.
Pairing an iPhone with the vehicle, refer to
page 52, via Bluetooth
Connecting the device
Select CarPlay as the function:
Connect the USB device using a suitable
"Apple CarPlay"
adapter cable to a USB port, refer to
page 212.
The iPhone is connected to the vehicle and
displayed in the device list, refer to
The USB device is connected to the vehicle
page 55.
and displayed in the device list.
Operation
Apple CarPlay preparation
For more information, refer to the
Concept
Manual for Navigation, Entertainment, Com-
CarPlay allows certain functions of a com-
munication.
patible Apple iPhone to be used via Siri
voice operation and the Central Information
Frequently Asked Questions
Display (CID).
All requirements are met and all required
steps were completed in the specified order.
Functional requirements
Despite that, the mobile device does not
- Compatible iPhone, refer to page 51.
function as expected.
iPhone 5 or later with iOS 7.1 or later.
In this case, the following explanations can
- Corresponding mobile contract.
help:
- Bluetooth, WLAN, and Siri voice opera-
The iPhone has already been paired with
tion are activated on the iPhone.
Apple CarPlay. When a new connection is
- Booking the MINI Connected service:
established, CarPlay can no longer be se-
Apple CarPlay preparation.
lected.
- Delete the iPhone concerned from the
device list.
54

General settings
AT A GLANCE
– On the iPhone, delete the vehicle con-
Configuring the device
cerned from the list of stored vehicles
Functions can be activated or deactivated
under Bluetooth and under WLAN.
for paired and connected devices.
- Pair the iPhone as a new device.
Via the Central Information Display (CID):
If the steps listed have been carried out and
1.
"My MINI"
the required function is still not available:
contact the hotline, a dealer's service center
2. "System settings"
or another qualified service center or repair
3. "Mobile devices"
shop.
4. Select the desired device.
Managing mobile devices
5. Select the desired setting.
If a function is assigned to a device, the
General information
function will be deactivated where appro-
- After one-time pairing, the devices are
priate for a device that is already connected
automatically recognized and recon-
and the device will be disconnected.
nected when the ignition is switched on.
Disconnecting the device
- The data stored on the SIM card or in
the mobile phone is transferred to the
The device's connection to the vehicle is
vehicle after recognition.
disconnected.
- For some devices, certain settings may
The device remains paired and can be con-
be necessary, for instance authorization,
nected again, refer to page 55.
see owner's manual of the device.
Via the Central Information Display (CID):
Displaying the device list
1.
"My MINI"
All devices paired and/or connected with
2. "System settings"
the vehicle are displayed in the device list.
3. "Mobile devices"
Via the Central Information Display (CID):
4. Select device.
1.
"My MINI"
5. "Disconnect device"
2. "System settings"
Connecting the device
3. "Mobile devices"
A disconnected device can be reconnected.
A symbol indicates, for which function a de-
Via the Central Information Display (CID):
vice is used.
Symbol
Function
1.
"My MINI"
2. "System settings"
"Telephone"
3. "Mobile devices"
"Additional telephone"
4. Select device.
"Bluetooth® audio"
5. "Connect device"
"Apps"
The functions that were assigned to the de-
"Apple CarPlay"
vice before disconnecting are assigned to
the device when it is reconnected. The func-
55

AT A GLANCE
General settings
tions may be deactivated on a device al-
Displaying the version of the installed
ready connected.
software
The software version installed in the vehicle
Deleting the device
is displayed.
Via the Central Information Display (CID):
Via the Central Information Display (CID):
1.
"My MINI"
1.
"My MINI"
2. "System settings"
2. "System settings"
3. "Mobile devices"
3. "Software update"
4. Select device.
4. "Show current version"
5. "Delete device"
If an update has been carried out before, se-
The device is disconnected and removed
lect the desired version to display additional
from the device list.
information.
Swapping the telephone and additional
Updating software via USB
phone
The software may only be updated when the
If two mobile phones are connected to the
vehicle is stationary.
vehicle, the functions of the phone and ad-
Via the Central Information Display (CID):
ditional phone can be switched.
1. Store the file for the software update in
Via the Central Information Display (CID):
the main directory of a USB storage de-
1.
"My MINI"
vice.
2. "System settings"
2. Connecting USB storage devices to the
USB port.
3. "Mobile devices"
3.
"My MINI"
4. "Settings"
4. "System settings"
5. "Swap telephone/additional tel."
5. "Software update"
Software update
6. "Update software"
7. "USB"
General information
8. "Install software"
The vehicle supports a large number of mo-
9. "OK"
bile devices, for example mobile phones and
MP3 players. Software updates are available
10. Wait for the update to complete.
for many of the supported devices. The ve-
11. Confirm system restart.
hicle is kept up-to-date via regular vehicle
software updates.
Restoring the software version
Contact a dealer's service center or another
You can restore the software to the version
qualified service center or repair shop for
prior to the last update or to its factory set-
information on available software updates.
tings.
The software may only be restored when
the vehicle is stationary.
56

General settings
AT A GLANCE
Via the Central Information Display (CID):
1.
"My MINI"
2. "System settings"
3. "Software update"
4. "Restore software"
5.
- "Previous version"
The previous software version is re-
stored.
- "Default software settings"
The first software version is re-
stored.
6. "Remove software"
7. "OK"
8. Wait for restore.
9. Confirm system restart.
57

AT A GLANCE
Vehicle features and options
Also follow the Supplementary Owner's
This chapter describes all standard, country-
Manuals, which are included in addition to
specific and optional features offered with
the onboard literature.
the series. It also describes features and
functions that are not necessarily available
in your vehicle, e.g., due to the selected op-
tions or country versions. This also applies
the vehicle
to safety-related functions and systems.
When using these functions and systems,
the applicable laws and regulations must be
Concept
observed.
describes features and functions found in
General information
can be displayed on the Control Display.
You can use the following media formats to
1.
Press the button.
page 58.
2.
"My MINI"
cle, refer to page 58.
4. Select the desired method of accessing
the contents.
Scrolling through the Owner's
Manual
Concept
Turn the Controller, until the next or previ-
ous contents are displayed.
standard, country-specific, and optional fea-
tures offered with the series.
Context help
General information
General information
tainment, and Communication can be ob-
to the function that is currently selected
tained as a printed book from the service
can be displayed directly.
center.
58

AT A GLANCE
Opening via Central Information
Programmable memory buttons
Display (CID)
Change directly to the Options menu from
General information
the function on the Control Display:
programmable memory buttons and called
1.
Press the button.
up directly.
Storing
Opening when a Check Control
1. Select the desired entry point via the
Central Information Display (CID):
message is displayed
- "Quick reference"
Directly from the Check Control message on
the Control Display:
- "Search by pictures"
- "Keyword search"
- "Animations"
Changing between a function and the
2.
Press and hold the desired but-
ton, until a signal sounds.
To switch from a function, for instance
Display and to alternate between the two
Executing
displays:
Press the button.
1.
Press the button.
immediately.
3. Select the desired page in the Owner's
Manual.
4.
Press the button again to return to
the last displayed function.
5.
Press the button to return to the
last.
To alternate continuously between the last
displayed function and the last displayed
& 5. Opens a new display every time.
59

CONTROLS
Opening and closing
Opening and closing
Vehicle features and options
Safety information
This chapter describes all standard, country-
Warning
specific and optional features offered with
People or animals in the vehicle can lock
the series. It also describes features and
the doors from the inside and lock them-
functions that are not necessarily available
selves in. In this case, the vehicle cannot
in your vehicle, e.g., due to the selected op-
be opened from the outside. There is a risk
tions or country versions. This also applies
of injury. Take the vehicle key with you so
to safety-related functions and systems.
that the vehicle can be opened from the
When using these functions and systems,
outside.
the applicable laws and regulations must be
observed.
Warning
Vehicle key
Unlocking from the inside is only possible
with special knowledge.
Persons who spend a lengthy time in the
General information
vehicle while being exposed to extreme
The vehicle is supplied with two vehicle
temperatures are at risk of injury or death.
keys with integrated key.
Do not lock the vehicle from the outside
Each vehicle key contains a replaceable bat-
when there are people in it.
tery, refer to page 63.
Depending on the equipment and country
version, various settings, refer to page 71,
Warning
can be configured for the button functions.
Unattended children or animals in the ve-
A personal driver profile, refer to page 69,
hicle can cause the vehicle to move and
for each vehicle key is stored in the vehicle.
endanger themselves and traffic, for in-
To provide information on maintenance re-
stance due to the following actions:
quirements, the service data is stored in the
- Pressing the Start/Stop button.
vehicle key, refer to page 270.
- Releasing the parking brake.
To prevent possible locking in of the vehicle
- Opening and closing the doors or
key, take the vehicle key with you when ex-
windows.
iting the vehicle.
- Engaging selector lever position N.
- Using vehicle equipment.
There is a risk of accidents or injuries. Do
not leave children or animals unattended
in the vehicle. Take the vehicle key with
you when exiting and lock the vehicle.
60
Opening and closing
CONTROLS
Overview
- Depending on the settings, the welcome
light and pathway lighting, refer to
page 143, are switched on.
- Exterior mirrors folded through conven-
ient closing are folded open.
- The alarm system, refer to page 72, is
switched off.
The light functions may depend on the am-
bient brightness.
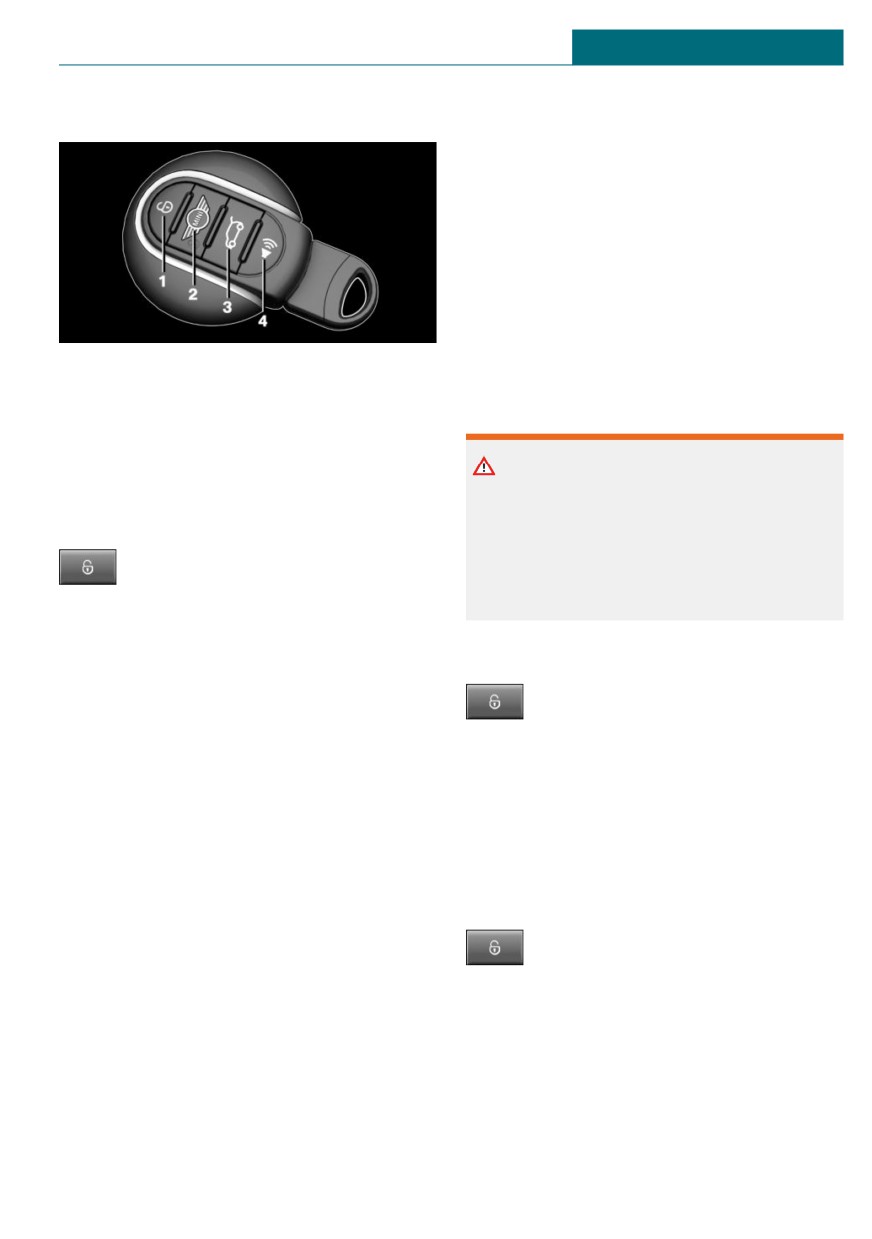
1
Unlocking
Convenient opening
2
Locking
Safety information
3
Unlocking the trunk lid
4
Panic mode
Warning
Body parts can be jammed when opening
Unlocking
and closing the convertible top. There is a
risk of injury. When opening and closing
Press the button on the vehicle key.
the convertible top, observe the movement
and keep the area of movement clear.
Depending on the settings, refer to
page 71, the following access points are
unlocked.
Opening
- Driver's door and fuel filler flap.
Press and hold the button on the ve-
Press the button on the vehicle key
hicle key after unlocking.
again to unlock the other vehicle access
The windows and the sliding sun roof
points.
integrated into the convertible top are
- All doors, trunk lid, and fuel filler flap.
opened, as long as the button on the vehicle
In addition, the following functions are exe-
key is pressed.
cuted:
With Comfort Access:
- Unlocking is confirmed by the turn sig-
If close to the vehicle, the convertible top
nals and the horn. This function must be
can also be opened.
activated in the settings, refer to
page 71.
Press the button on the vehicle key
again after the sliding sun roof
- The settings stored in the driver profile,
integrated into the convertible top
refer to page 69, are applied.
is fully opened. Press and hold the button
- The interior lights, refer to page 146,
until the convertible top is fully opened and
and the MINI logo projection are
locked.
switched on, provided that the interior
lights were not switched off manually.
Leaving the vicinity of the vehicle stops the
motion.
61

CONTROLS
Opening and closing
Locking
Press button in the vicinity of the vehicle
again until the convertible top operation is
1. Close the driver's door.
completed.
2.
Press the button on the vehicle
key.
Switch on interior lights and
The following functions are executed:
courtesy light
- All doors, the trunk lid, and the fuel filler
Press the button on the vehicle key
flap are locked.
with the vehicle locked.
- Locking is confirmed by the turn signals
The MINI logo projection is also switched
and the horn. This function must be ac-
on.
tivated in the settings, refer to
page 71.
These functions are not available if the inte-
rior lights were switched off manually.
- The alarm system, refer to page 72, is
switched on.
The light functions may depend on the am-
bient brightness.
If the engine or ignition is still switched on
when you lock the vehicle, the vehicle horn
After locking, wait 10 seconds before press-
honks twice. In this case, the engine or ig-
ing the button again.
nition must be switched off by means of the
Start/Stop button.
Trunk lid
With Comfort Access: convenient
General information
closing
To avoid locking the vehicle key in the vehi-
cle, do not place the remote control in the
Safety information
cargo area.
Depending on the vehicle equipment and
Warning
country version, it is possible to specify
whether the trunk lid can be unlocked with
With convenient closing, body parts can
the vehicle key and how the vehicle doors
be jammed. There is a risk of injury. Make
will respond to this. To perform settings, re-
sure that the area of movement of the
fer to page 71.
doors is clear during convenient closing.
Safety information
Closing
Press and hold the button on the ve-
Warning
hicle key in the area close to the ve-
Body parts can be jammed when operating
hicle, until the closing operation is
the trunk lid. There is a risk of injury.
completed.
Make sure that the area of movement of
The windows and convertible top close.
the trunk lid is clear during opening and
closing.
Releasing the button stops the closing pro-
cedure. Leaving the vicinity of the vehicle
stops the motion of the convertible top.
62
Opening and closing
CONTROLS
Opening
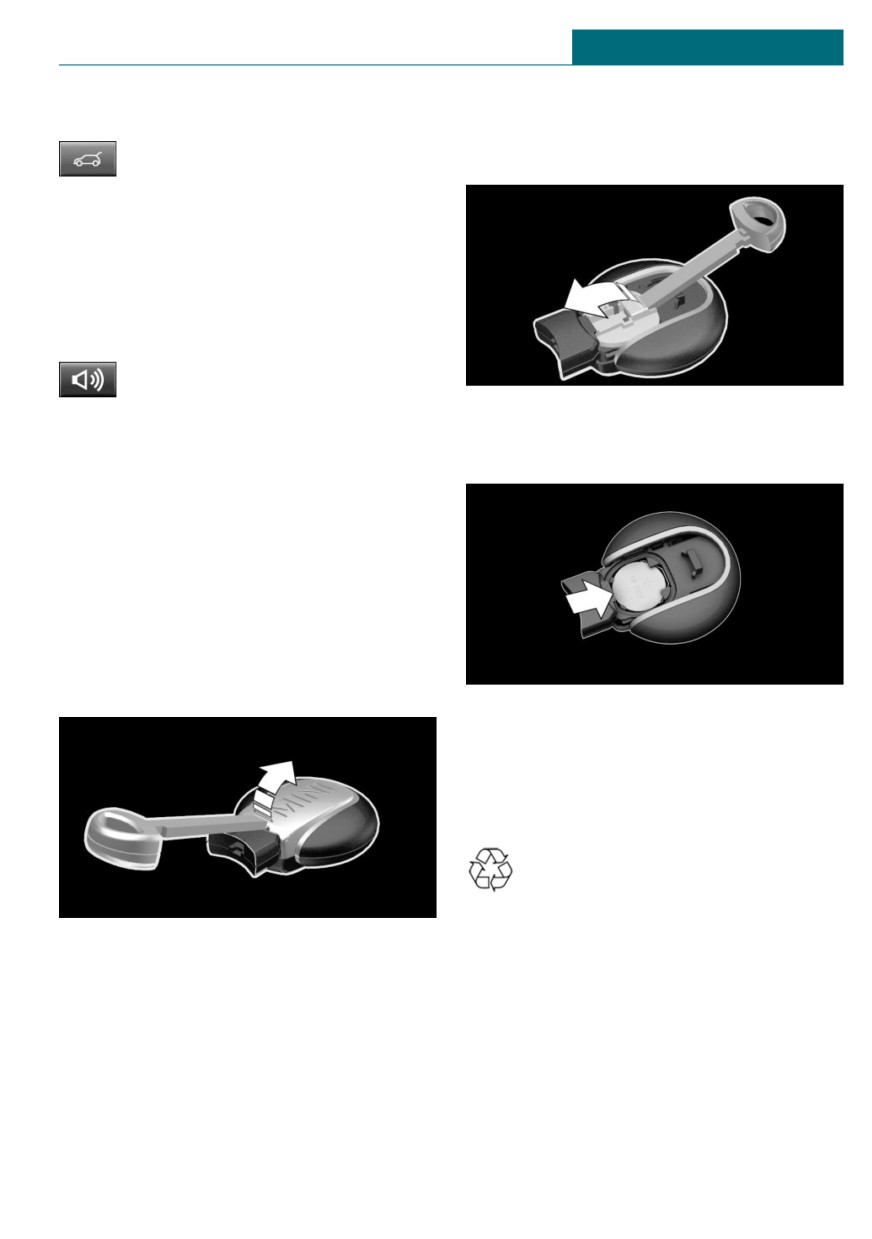
3.
Slide the integrated key in the cover of
the battery compartment and raise the
Press the button on the vehicle key
cover.
for approx. 1 second.
The trunk lid is unlocked and can be swung
downward.
Panic mode
You can trigger the alarm system if you find
yourself in a dangerous situation.
- Press the button on the vehicle
key and hold for at least 3 sec-
onds.
4.
Push battery in the direction of the ar-
row using a pointed object and lift it
- Briefly press the button on the vehicle
out.
key three times in succession.
To switch off the alarm: press any button.
Replacing the battery
1. Remove the integrated key from the ve-
hicle key, refer to page 65.
2. Slide the integrated key into the open-
ing and raise the cover.
The battery compartment is accessible.
5.
Insert a type CR 2032 battery with the
positive side facing up.
6.
Insert lid and cover.
7.
Push the integrated key into the vehicle
key until it engages.
Have old batteries disposed of by a
dealer’s service center or another
qualified service center or repair
shop or take them to a collection point.
Additional vehicle keys
Additional vehicle keys are available from a
service center or another qualified service
center or repair shop.
Loss of vehicle keys
A lost vehicle key can be blocked and re-
placed by a dealer’s service center or an-
63

CONTROLS
Opening and closing
other qualified service center or repair
Starting the engine via emergency
shop.
detection of the Vehicle key
Malfunction
General information
A Check Control message is displayed.
Vehicle key recognition by the vehicle may
malfunction under the following circum-
stances:
-
The battery of the vehicle key is dis-
charged. For replacing the battery, refer
It is not possible to start the engine if the
to page 63.
vehicle key has not been detected.
-
Interference of the radio connection
Proceed as follows in this case:
from transmission towers or other
1. Hold the vehicle key against the mark
equipment with high transmitting
on the steering column as shown. Pay
power.
attention to the display in the instru-
-
Shielding of the vehicle key due to metal
ment cluster.
objects.
2. If the vehicle key is detected:
Do not transport the vehicle key to-
Start the engine within 10 seconds.
gether with metal objects.
If the vehicle key is not recognized, slightly
-
Interference of the radio connection
change the position of the vehicle key and
from mobile phones or other electronic
repeat the procedure.
devices in direct proximity to the vehi-
cle key.
Frequently Asked Questions
Do not transport the vehicle key to-
gether with electronic devices.
What precautions can be taken to be able to
open a vehicle with an accidentally locked
-
Interference of radio transmission by a
in vehicle key?
charging process of mobile devices, for
instance charging of a mobile phone.
- The options provided by the Remote
Services of the MINI Connected app in-
-
The vehicle key is in direct proximity of
clude the ability to lock and unlock a ve-
the wireless charging tray.
hicle.
Place the vehicle key in a different loca-
This requires an active MINI Connected
tion.
contract and the MINI Connected app
In the case of interference, the vehicle can
must be installed on a smartphone.
be unlocked and locked from the outside
- Unlocking the vehicle can be requested
with the integrated key, refer to page 65.
via the MINI Connected Call Center.
An active MINI Connected contract is
required.
64
Opening and closing
CONTROLS
Integrated key
Removing
General information
The driver's door can be locked and un-
locked without the vehicle key using the
integrated key.
The integrated key can also be used for the
glove compartment on the front passenger
side.
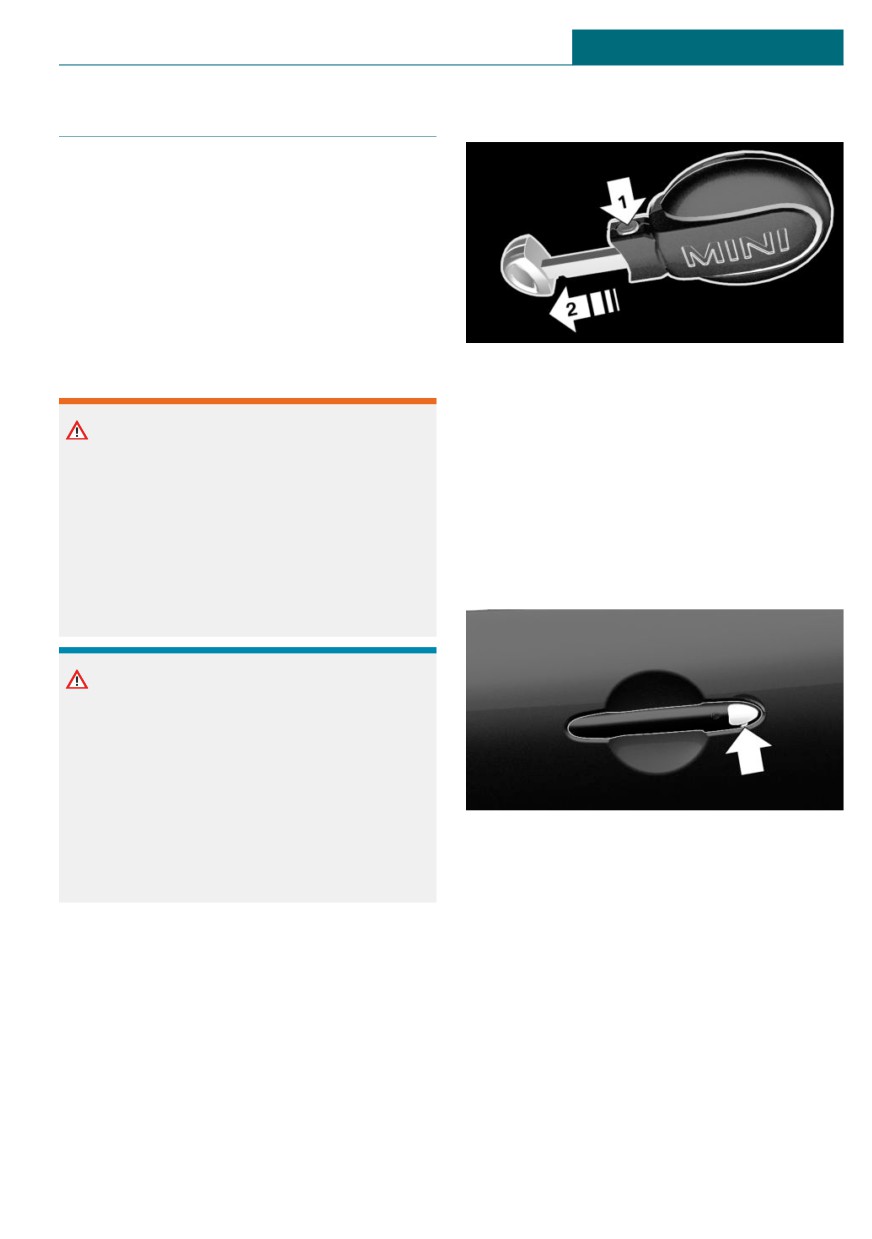
Press the button, arrow 1, and pull out the
Safety information
integrated key, arrow 2.
Warning
Locking/unlocking via the door
Unlocking from the inside is only possible
lock
with special knowledge.
1. Remove lid on the door lock.
Persons who spend a lengthy time in the
vehicle while being exposed to extreme
To do this, slide the integrated key into
temperatures are at risk of injury or death.
the opening from below and remove the
Do not lock the vehicle from the outside
lid.
when there are people in it.
NOTICE
The door lock is permanently joined with
the door. The door handle can be moved.
When pulling the door handle with the
integrated key inserted, paint or the
integrated key can be damaged. There is a
risk of damage to property. Remove the
2. Unlock or lock the door lock using the
integrated key before pulling the outside
integrated key.
door handle.
The other doors must be unlocked or locked
from the inside.
Alarm system
The alarm system is not switched on if the
vehicle is locked with the integrated key.
The alarm system is triggered when the
door is opened, if the vehicle has been un-
locked via the door lock.
65
CONTROLS
Opening and closing
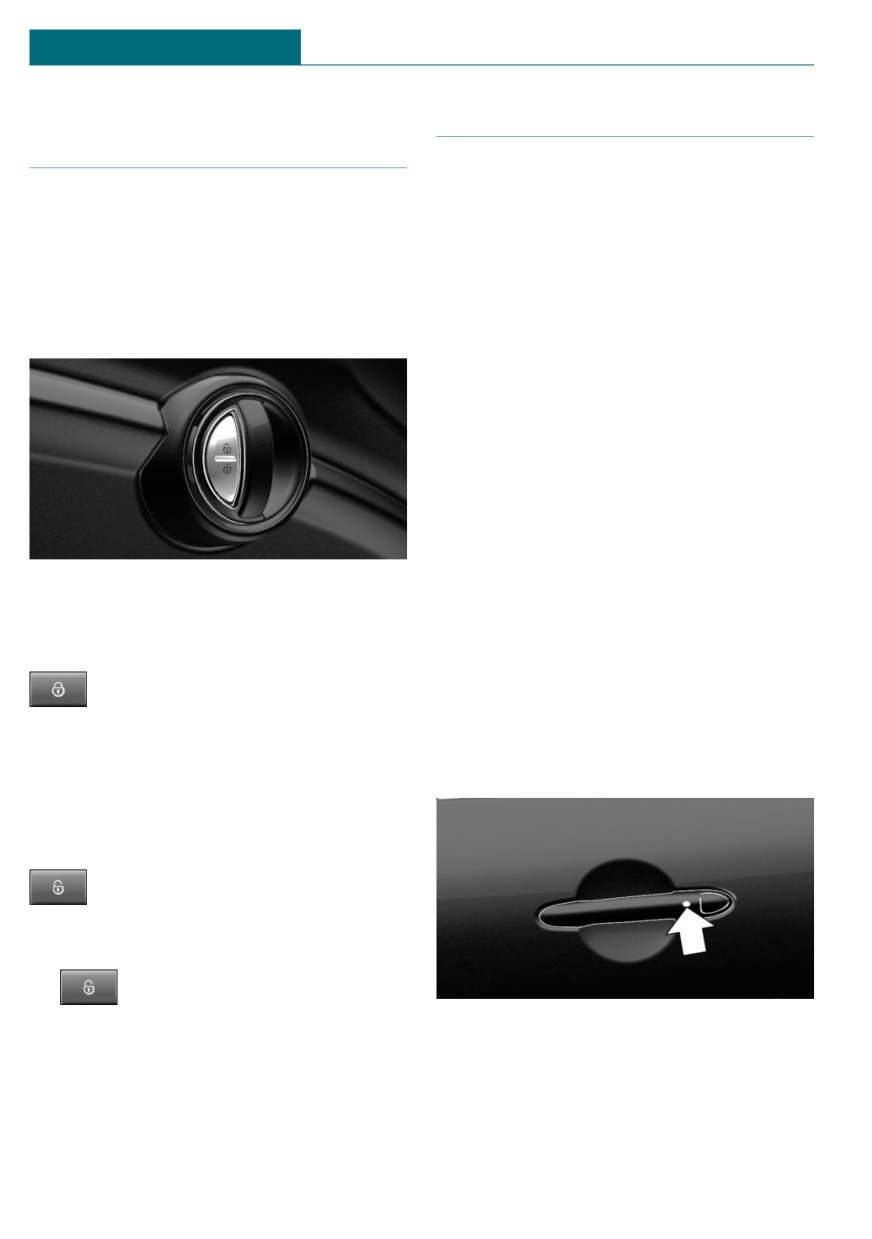
Buttons for the central locking
Comfort Access
system
Concept
General information
The vehicle can be accessed without operat-
ing the vehicle key.
In the event of a severe accident, the vehi-
cle is automatically unlocked. The hazard
Carrying the vehicle key with you, e.g., in
warning system and interior lights come on.
your pants pocket, is sufficient.
The vehicle automatically detects the vehi-
Overview
cle key when it is in close proximity or in
the car's interior.
General information
Comfort Access supports the following
functions:
- Unlocking and locking the vehicle.
- Convenient closing.
- Opening trunk lid.
Buttons for the central locking system.
Functional requirements
- To lock the vehicle, the vehicle key must
Locking
be outside of the vehicle near the doors.
Press the button with the doors
- The next unlocking and locking cycle is
closed.
not possible until after approx. 2 sec-
onds.
- The fuel filler flap remains unlocked.
- The vehicle is not secured against theft
Unlocking
when locking.
Unlocking
Press the button.
Opening
-
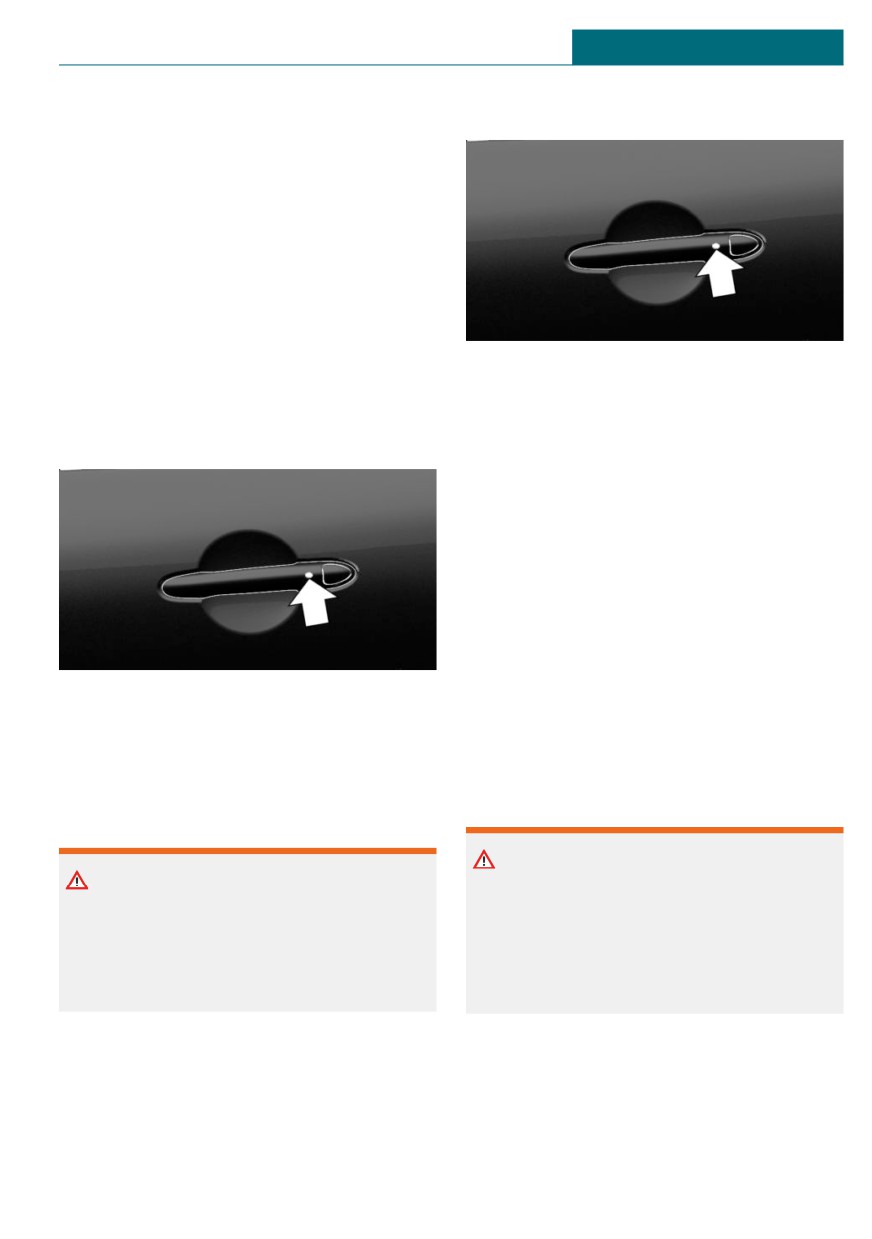
Press button to unlock the doors
together, and then pull the door handle
On the driver's or front passenger's outer
above the armrest.
door handle, press the button.
- Pull the door opener on the door to be
Depending on the settings, refer to
opened. The other door remain locked.
page 71, only the driver's door and the
fuel filler flap may be unlocked. Unlike
when unlocking using the vehicle key,
66
Opening and closing
CONTROLS
pressing the button on the outer door han-
Closing
dle again does not unlock the other vehicle
access points. Rather, the vehicle is locked
again.
If the vehicle was locked automatically after
driving off or with the button of the central
locking system from the inside, note the fol-
lowing: if a door on a locked vehicle is
opened from the inside with the door
opener, pressing the button on the outer
door handle will first lock the vehicle again.
To unlock, the button on the outer door han-
Press and hold down the button on the driv-
dle must be pressed again.
er's or front passenger's outer door handle.
In addition to locking, the convertible top
Locking
and the windows are closed.
Press and hold the button, until the
convertible top is fully closed.
The exterior mirrors are folded in.
Opening the trunk lid
General information
If you open the trunk lid via Comfort Ac-
cess, locked doors will not be unlocked.
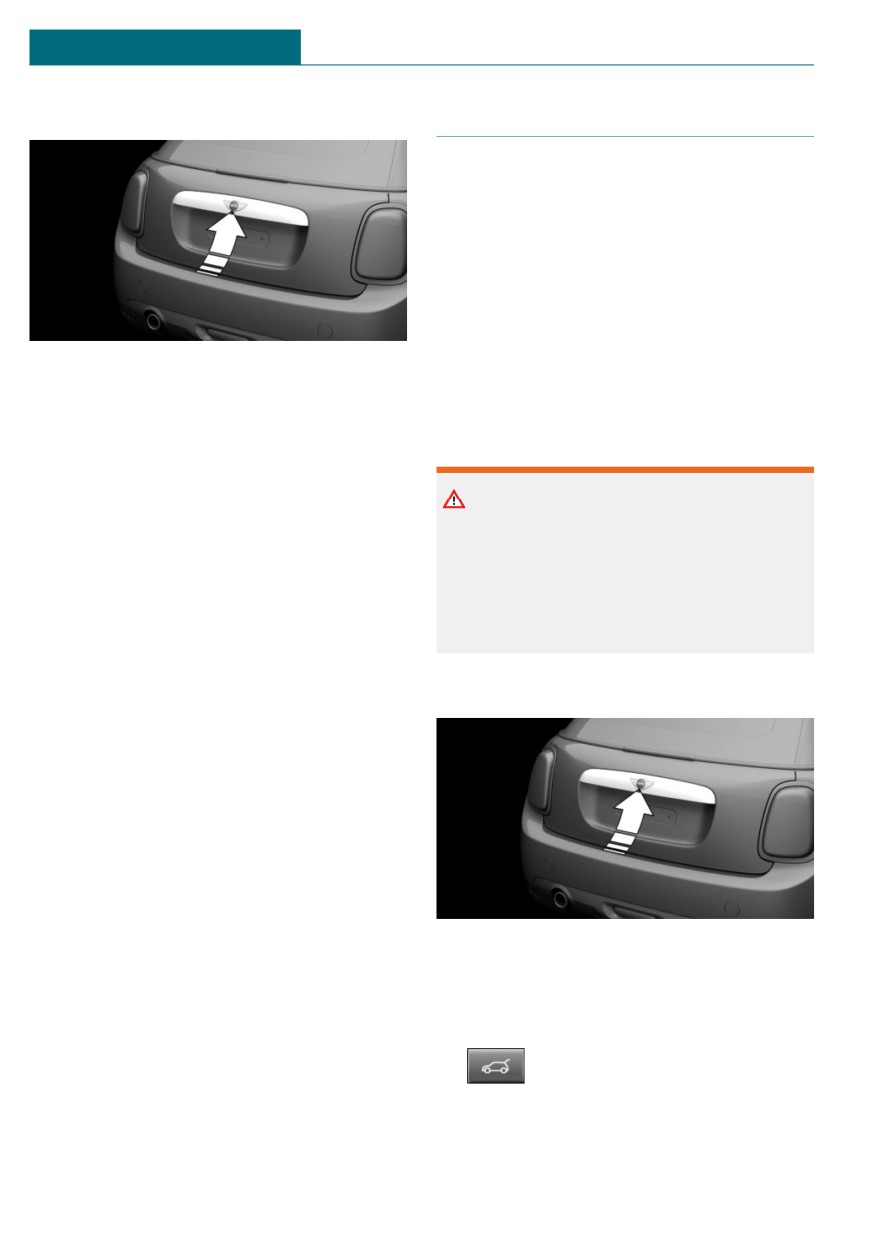
On the driver's or front passenger's outer
To avoid locking the vehicle key in the vehi-
door handle, press the button.
cle, do not place the vehicle key in the cargo
area.
Convenient closing
Safety information
Safety information
Warning
Warning
Body parts can be jammed when operating
With convenient closing, body parts can
the trunk lid. There is a risk of injury.
be jammed. There is a risk of injury. Make
Make sure that the area of movement of
sure that the area of movement of the
the trunk lid is clear during opening and
doors is clear during convenient closing.
closing.
67
CONTROLS
Opening and closing
Opening
Trunk lid
General information
To avoid locking the vehicle key in the vehi-
cle, do not place the remote control in the
cargo area.
Depending on the vehicle equipment and
country version, it is possible to specify
whether the trunk lid can be unlocked with
the vehicle key and how the vehicle doors
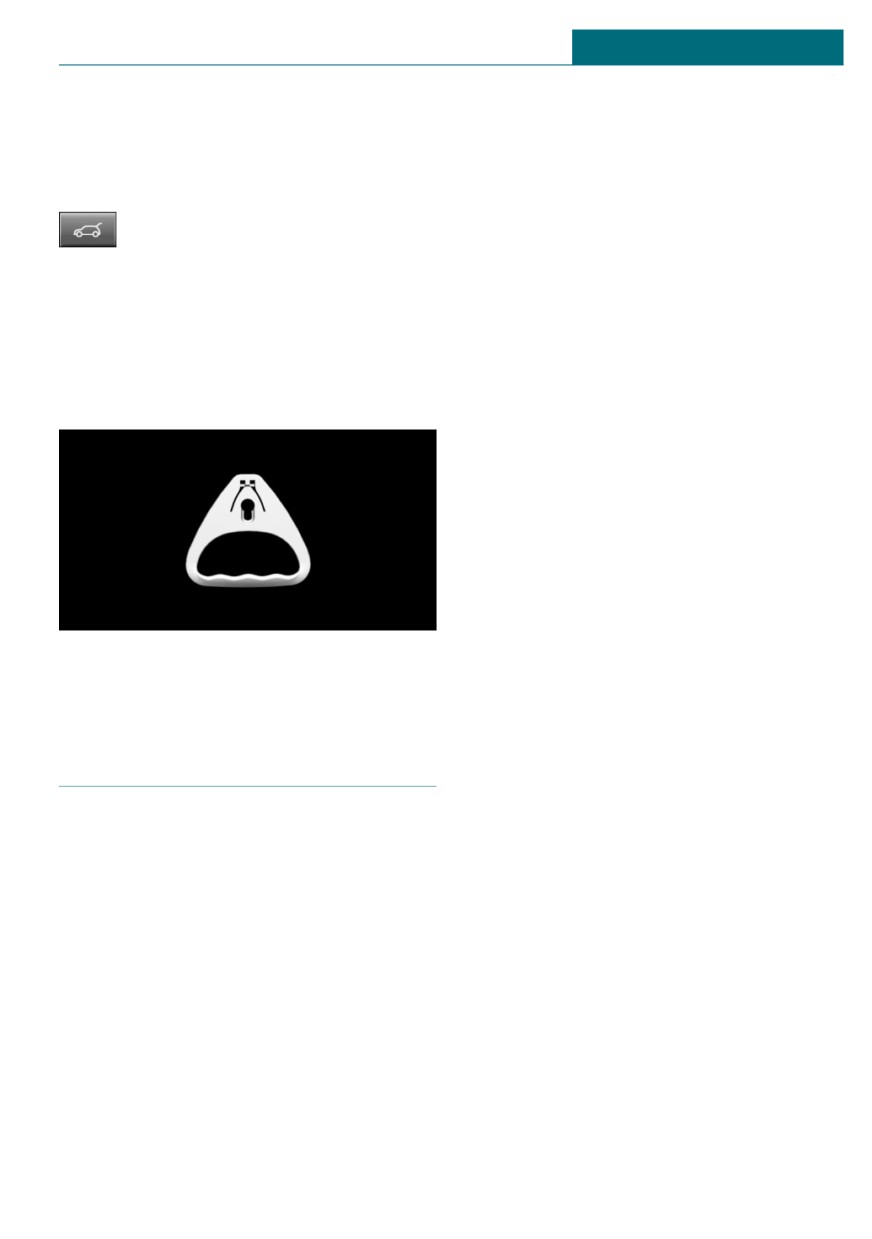
Press the button on the exterior of the
will respond to this. To perform settings, re-
trunk lid.
fer to page 71.
Malfunction
Safety information
Vehicle key recognition by the vehicle may
malfunction under the following circum-
Warning
stances:
Body parts can be jammed when operating
- The battery of the vehicle key is dis-
the trunk lid. There is a risk of injury.
charged. For replacing the battery, refer
Make sure that the area of movement of
to page 63.
the trunk lid is clear during opening and
- Interference of the radio connection
closing.
from transmission towers or other
equipment with high transmitting
Opening from the outside
power.
- Shielding of the vehicle key due to metal
objects.
Do not transport the vehicle key to-
gether with metal objects.
- Interference of the radio connection
from mobile phones or other electronic
devices in direct proximity to the vehi-
cle key.
Do not transport the vehicle key to-
-
Without Comfort Access: unlock vehicle.
gether with electronic devices.
With Comfort Access: unlock the vehi-
Wet or snowy conditions may disrupt the
cle or have the vehicle key with you.
locking request recognition function on the
door handles.
Press the button on the trunk lid.
In the case of a malfunction, unlock and
-
Press the button on the vehicle
lock the vehicle using the buttons of the ve-
key for approx. 1 second.
hicle key or use the integrated key, refer to
Depending on the setting, the doors may
page 65.
also be unlocked. Unlocking using the
vehicle key, refer to page 62.
68
Opening and closing
CONTROLS
The trunk lid is unlocked and can be swung
If several drivers use their own vehicle
downward.
keys, the vehicle will apply the personal set-
tings as it is being unlocked. These settings
Opening from the inside
are also restored, if the vehicle has been
used in the meantime by a person with a
With the vehicle stationary, press
different vehicle key.
the button in the driver's floor area.
Changes to the settings are automatically
stored in the driver profile currently acti-
Closing
vated.
To close the trunk lid, swivel it upwards and
If another driver profile is selected via the
press it closed.
Central Information Display (CID), the set-
tings stored in it will be applied automati-
Trunk emergency unlocking
cally. The new driver profile is assigned to
the vehicle key that is currently in use.
There is an additional guest profile available
that is not assigned to any vehicle key: it
can be used to apply settings in the vehicle
without changing the personal driver pro-
files.
Functional requirements
For the system to be able to identify the
driver profile associated to a particular
Pull the handle inside the cargo area.
driver, the detected vehicle key must be
The trunk lid unlocks.
clearly allocated to the driver.
This is the case when:
- The driver is only carrying his or her
Driver profiles
own vehicle key.
- The driver unlocks the vehicle.
Concept
- The driver gets into the vehicle through
In the driver profiles, individual settings for
the driver's door.
several drivers can be stored and called up
again when required.
Adjusting
The settings for the following systems and
General information
functions are stored in the active profile.
There are three driver profiles with which
The scope of storable settings depends on
personal vehicle settings can be stored. Ev-
country and equipment.
ery vehicle key has been assigned one of
- Unlocking and locking.
these driver profiles.
- Lights.
If the vehicle is unlocked using the vehicle
- Radio.
key, the assigned personal driver profile will
- Instrument cluster.
be activated. All settings stored in the
driver profile are automatically applied.
- Programmable memory buttons.
69

CONTROLS
Opening and closing
– Volumes, tone.
3. "Drive off (guest)"
– Control Display.
4. "OK"
- Climate control.
The guest profile cannot be renamed. It is
- Navigation.
assigned to the vehicle key that is not used
at the time.
- PDC Park Distance Control.
- Rearview camera.
Renaming a driver profile
- Head-up Display.
A personal name can be assigned to the ac-
- MINI Driving Modes.
tive driver profile to avoid confusion be-
- Intelligent Safety.
tween the driver profiles.
Via the Central Information Display (CID):
Profile management
1.
"My MINI"
Selecting a driver profile
2. "Driver profiles"
Regardless of the vehicle key in use, a dif-
3. Select driver profile.
ferent driver profile may be activated. This
The driver profile marked with this
allows you to call up personal vehicle set-
symbol can be renamed.
tings, even if you did not unlock the vehicle
4. "Change driver profile name"
with your own vehicle key.
5. Enter profile name.
Via the Central Information Display (CID):
6.
Select the symbol.
1.
"My MINI"
2. "Driver profiles"
Resetting a driver profile
3. Select driver profile.
The settings of the driver profile currently
in use are reset to their factory settings.
4. "OK"
Via the Central Information Display (CID):
- All settings stored in the selected driver
profile are automatically applied.
1.
"My MINI"
- The called-up driver profile is assigned
2. "Driver profiles"
to the vehicle key being used at the
3. Select driver profile.
time.
The driver profile marked with this
- If the driver profile is already assigned
symbol can be reset.
to a different vehicle key, this driver
profile will apply to both vehicle keys.
4. "Reset driver profile"
5. "OK"
Using a guest profile
The guest profile is for individual settings
Exporting driver profiles
that are stored in none of the three personal
Most settings of the active driver profile
driver profiles.
can be exported.
Via the Central Information Display (CID):
Exporting is helpful when storing and re-
1.
"My MINI"
trieving personal settings, for instance be-
fore delivering the vehicle to a workshop.
2. "Driver profiles"
70

Opening and closing
CONTROLS
The stored driver profiles can be taken into
System limits
another vehicle.
A clear assignment between the vehicle key
Via the Central Information Display (CID):
and driver may not be possible in the fol-
lowing cases, for example.
1.
"My MINI"
- The passenger unlocks the vehicle with
2. "Driver profiles"
his or her own vehicle key, but another
3. Select driver profile.
person is driving.
The driver profile marked with this
- The driver unlocks the vehicle via Com-
symbol can be exported.
fort Access and has multiple vehicle
4. "Export driver profile (USB)"
keys with him or her.
Select USB storage device as needed.
- The driver changes, but the vehicle is
not locked and unlocked.
Importing driver profiles
- Multiple vehicle keys are located out-
side of the vehicle.
Profiles stored on a USB storage device can
be imported via the USB port.
The existing settings of the active driver
Adjusting
profile are overwritten with the settings of
the imported driver profile.
Via the Central Information Display (CID):
General information
Depending on the package and country ver-
1.
"My MINI"
sion, various settings are available for the
2. "Driver profiles"
vehicle key functions.
3. Select the driver profile to overwrite.
These settings are stored for the driver pro-
The driver profile marked with this
file, refer to page 69, currently used.
symbol can be overwritten.
Unlocking
4. "Import driver profile (USB)"
Select USB storage device as needed.
Doors
5. Select the driver profile to be imported.
Via the Central Information Display (CID):
Displaying driver profiles during start
1.
"My MINI"
The driver profiles can be displayed at each
2. "Vehicle settings"
startup to select the desired profile.
3. "Doors/Key"
Via the Central Information Display (CID):
4. "Driver's door" or "All doors"
1.
"My MINI"
5. Select the desired setting:
2. "Driver profiles"
- "Driver's door only"
3. "Show driver profiles at startup"
Only the driver's door and the fuel
filler flap are unlocked. Pressing
again unlocks the entire vehicle.
- "All doors"
The entire vehicle is unlocked.
71

CONTROLS
Opening and closing
Trunk lid
Automatic unlocking
Via the Central Information Display (CID):
Via the Central Information Display (CID):
1.
"My MINI"
1.
"My MINI"
2.
"Vehicle settings"
2. "Vehicle settings"
3.
"Doors/Key"
3. "Doors/Key"
4.
4. "Unlock at end of trip"
The text next to the symbol indicates
After the engine is switched off by
the current setting.
pressing the Start/Stop button, the
5.
Select the desired setting:
locked vehicle is automatically un-
locked.
- "Tailgate"
Only the trunk lid is unlocked.
Confirmation signals from the
- "Tailgate and door(s)"
vehicle
The trunk lid and the doors are un-
Via the Central Information Display (CID):
locked.
1.
"My MINI"
- "Tailgate opens after unlocking"
2. "Vehicle settings"
The vehicle must be unlocked before
the trunk lid can be used with the re-
3. "Doors/Key"
mote control.
4. Deactivate or activate the desired con-
- "Button lock"
firmation signals.
It is not possible to use the trunk lid
- "Flash for lock/unlock"
via the vehicle key.
Unlocking is signaled by two flashes,
Depending on the vehicle equipment and
locking by one.
country version, this setting may not be of-
- With alarm system:
fered.
"Acoustic signal for lock/unlock"
Automatic locking
Unlocking is signaled by one honk of
the horn.
Via the Central Information Display (CID):
1.
"My MINI"
Alarm system
2. "Vehicle settings"
3. "Doors/Key"
General information
4. Select the desired setting:
When the vehicle is locked, the vehicle
- "Lock automatically"
alarm system reacts to the following
The vehicle locks automatically after
changes:
a while if no door is opened after un-
- Unauthorized opening of a door, the
locking.
hood or the trunk lid.
- "Lock after starting to drive"
- Movements in the car's interior.
The vehicle locks automatically after
you drive off.
72
Opening and closing
CONTROLS
– Changes in the vehicle tilt, for instance,
Opening the doors with the alarm
during attempts at stealing a wheel or
system switched on
when towing the vehicle.
The alarm system is triggered when a door
- Disconnected battery voltage.
is opened if the door was unlocked using
- Improper use of the socket for Onboard
the integrated key in the door lock.
Diagnosis.
Switching off the alarm, refer to page 74.
- Locking the vehicle while a device is
connected to the socket for the OBD On-
Opening the trunk lid with the
board-Diagnosis. For socket for the OBD
alarm system switched on
Onboard Diagnosis, refer to page 271.
The trunk lid can be opened even when the
The alarm system signals these changes vis-
alarm system is switched on.
ually and acoustically:
After the trunk lid is closed, it is locked and
- Acoustic alarm:
monitored again provided the doors are
Depending on local regulations, the
locked. The hazard warning system flashes
acoustic alarm may be suppressed.
once.
- Visual alarm:
By flashing of the hazard warning sys-
Panic mode
tem and headlights, where required.
You can trigger the alarm system if you find
Do not modify the system to ensure func-
yourself in a dangerous situation.
tion of the alarm system.
- Press the button on the vehicle
key and hold for at least 3 sec-
Overview
onds.
- Briefly press the button on the vehicle
key three times in succession.
To switch off the alarm: press any button.
Signals of the indicator light
- The indicator light flashes briefly every
2 seconds:
The alarm system is switched on.
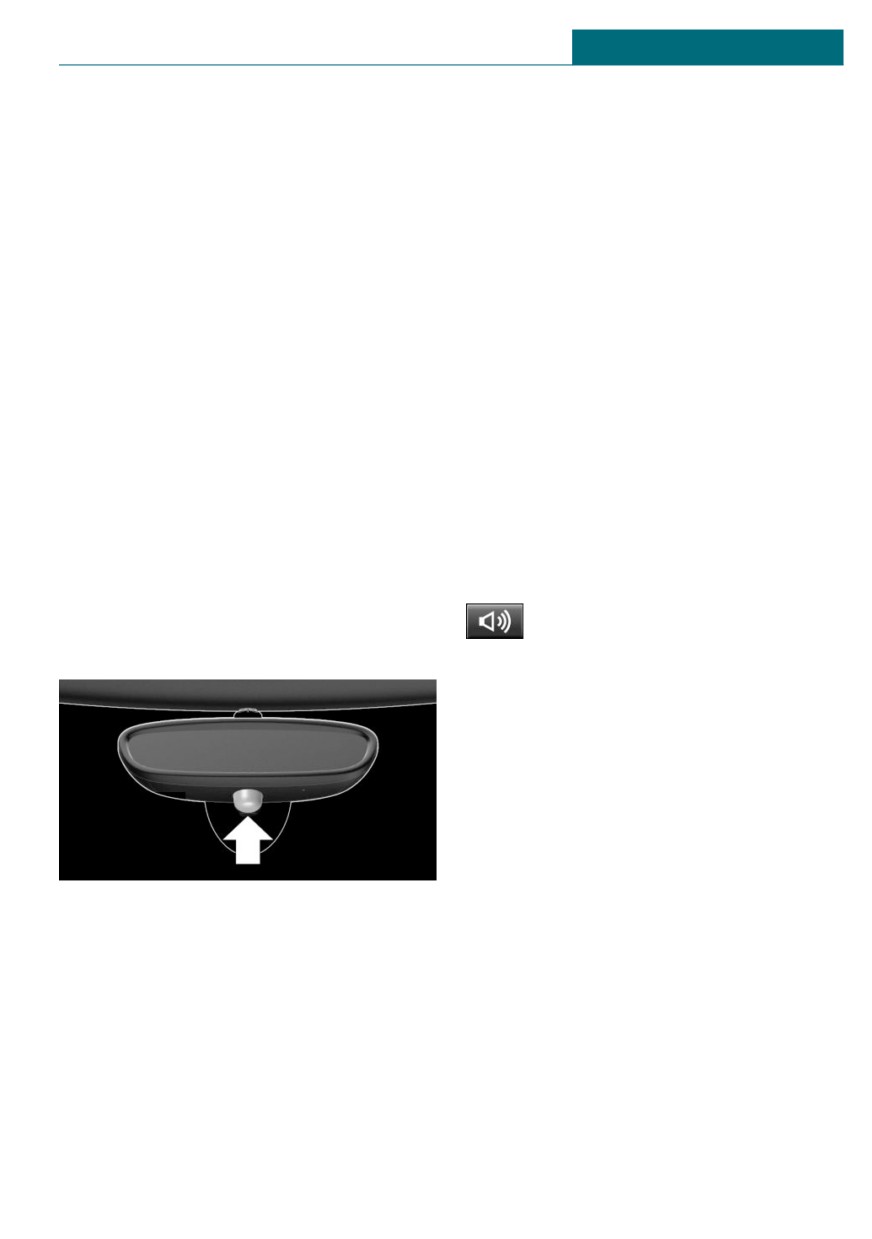
Indicator light on the interior mirror.
- Indicator light flashes for approx.
10 seconds, then it flashes briefly every
2 seconds:
Switching on/off
Interior motion sensor and tilt alarm
The alarm system is switched on or off as
sensor are not active, as doors, hood, or
soon as the vehicle is locked with the vehi-
trunk lid are not correctly closed. Cor-
cle key or unlocked or locked via Comfort
rectly closed access points are secured.
Access.
When the still open access points are
closed, the interior motion sensor and
tilt alarm sensor will be switched on.
73