Lincoln Corsair (2022 year). Manual in english - page 5
 

  Index      Manuals     Lincoln Corsair (2022 year). Manual in english


Search            copyright infringement  


Content      ..     3      4      5      6     ..


Lincoln Corsair (2022 year). Manual in english - page 5


LIFTGATE PRECAUTIONS

WARNING: It is extremely dangerous

to ride in a cargo area, inside or outside of
a vehicle. In a crash, people riding in these
areas are more likely to be seriously
injured or killed. Do not allow people to
ride in any area of your vehicle that is not
equipped with seats and seatbelts. Make
sure everyone in your vehicle is in a seat
and properly using a seatbelt. Failure to
follow this warning could result in serious
personal injury or death.

WARNING: Make sure that you fully

close the liftgate to prevent exhaust fumes
from entering your vehicle. If you are
unable to fully close the liftgate, open the
air vents or the windows to allow fresh air
to enter your vehicle. Failure to follow this
instruction could result in personal injury
or death.

WARNING: Keep keys out of reach

of children. Do not allow children to
operate or play near an open or moving
power liftgate. You should supervise the
operation of the power liftgate at all times.

OPENING THE LIFTGATE

OPENING THE LIFTGATE FROM INSIDE
YOUR VEHICLE

E138633

With the transmission in park (P),
press the button on the instrument
panel.

Note: Be careful when opening or closing
the liftgate in a garage or other enclosed
area to avoid damaging the liftgate.

Note:  Do not hang anything, for example a
bike rack, from the glass or liftgate.  This
could damage the liftgate and its
components.

Note:  Do not leave the liftgate open while
driving.  This could damage the liftgate and
its components.

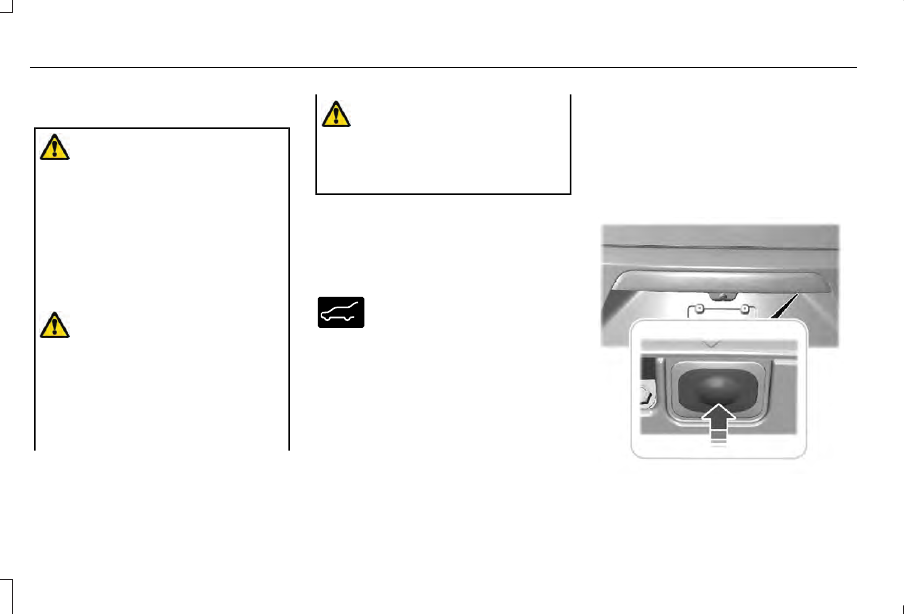
OPENING THE LIFTGATE FROM
OUTSIDE YOUR VEHICLE

1. Unlock the liftgate with the remote

control or power door unlock control.  If
a passive key is within 3 ft (1 m) of the
liftgate, the liftgate unlocks when you
press the liftgate release button.

E291352

2. Press and release the liftgate control

button.

88

Liftgate

-------------------------------------------------------------------------------------------------------------------------------------------------------------

Note: Allow the power system to open the
liftgate. Manually pushing or pulling the
liftgate could activate the system’s obstacle
detection feature and stop the power
operation or reverse its direction, replicate
a strut failure, or damage mechanical
components.

Note: Be careful when opening or closing
the liftgate in a garage or other enclosed
area to avoid damaging the liftgate.

Note:  Do not hang anything, for example a
bike rack, from the glass or liftgate.  This
could damage the liftgate and its
components.

Note:  Do not leave the liftgate open while
driving.  This could damage the liftgate and
its components.

Switching the Power Liftgate On or Off

You can switch the power liftgate on or off
through the vehicle settings on your
touchscreen.

When switched off, the liftgate only unlatches
and does not power open or close.

OPENING THE LIFTGATE USING THE
REMOTE CONTROL

E267940

Press the remote control button
twice within a few seconds.

OPENING THE HANDS-FREE LIFTGATE

(If Equipped)

Make sure you have the passive key within
3 ft (1 m) of the liftgate.

1. Stand behind your vehicle, and face the

liftgate.

2. Move your foot, in a single-kick motion,

without pausing, under and away from
the rear bumper detection area.

E300799

3. The liftgate opens.

Avoid the following actions when using the
hands-free opening feature:

Making physical contact with the bumper.

Holding your foot under the bumper.

Sweeping your foot from side to side, or
kicking at an odd angle.

89

Liftgate

-------------------------------------------------------------------------------------------------------------------------------------------------------------

Detection Zones

Vehicles Without a Trailer Hitch

E310717

The detection area is in the center of the rear
bumper.

Vehicles With a Trailer Hitch

E310718

The detection area is on the left-hand side
and right-hand side of the hitch, between the
exhaust and the hitch.

Note: Allow the power system to open the
liftgate. Manually pushing or pulling the
liftgate may activate the system’s obstacle
detection feature and stop the power
operation or reverse its direction, replicate
a strut failure, or damage mechanical
components.

Note:  Splashing water may cause the
hands-free liftgate to open.  Keep the
passive key away from the rear bumper
detection area when you wash your vehicle.

SETTING THE LIFTGATE OPENING
HEIGHT

1. Open the liftgate.

2. Stop the liftgate movement by pressing

the control button on the liftgate when it
reaches the desired height.

Note: Once the liftgate stops moving, you
can manually move it to the desired height.

3. Press and hold the control button on the

liftgate until a tone sounds, indicating
programming is complete.

Note: You can only use the liftgate control
button to program the height.

Note: You cannot program the height if the
liftgate position is too low.

4. The power liftgate now opens at the

programmed height. To change the
programmed height, repeat the steps.

Note: You can fully open the liftgate by
manually pushing it upward to the maximum
open position if it opens in a lower position.

90

Liftgate

-------------------------------------------------------------------------------------------------------------------------------------------------------------

Note: The system recalls the new
programmed height until you reprogram it,
even if you disconnect the battery.

CLOSING THE LIFTGATE

CLOSING THE LIFTGATE FROM INSIDE
YOUR VEHICLE

WARNING: Make sure all persons

are clear of the power liftgate area before
using the power liftgate control.

E138633

With the transmission in park (P),
press the button on the instrument
panel.

Note:  Make sure that you close the liftgate
before operating or moving your vehicle,
especially in an enclosure, like a garage or
a parking structure.  This could damage the
liftgate and its components.

Note:  Make sure the area behind your
vehicle is free from obstruction and that
there is enough room for you to operate the
liftgate.  Objects too close to your vehicle,
for example a wall, garage door or another
vehicle may come into contact with the
moving liftgate.  This could damage the
liftgate and its components.

Note: Make sure that you fully close the
liftgate to prevent cargo from falling out.

CLOSING THE LIFTGATE FROM
OUTSIDE YOUR VEHICLE

WARNING: Make sure all persons

are clear of the power liftgate area before
using the power liftgate control.

E291351

Press and release the liftgate button.

Note:  Make sure that you close the liftgate
before operating or moving your vehicle,
especially in an enclosure, like a garage or
a parking structure.  This could damage the
liftgate and its components.

Note:  Make sure the area behind your
vehicle is free from obstruction and that
there is enough room for you to operate the
liftgate.  Objects too close to your vehicle,
for example a wall, garage door or another
vehicle may come into contact with the
moving liftgate  This could damage the
liftgate and its components.

91

Liftgate

-------------------------------------------------------------------------------------------------------------------------------------------------------------

Note: Make sure you fully close the liftgate
to prevent cargo from falling out.

CLOSING THE LIFTGATE USING THE
REMOTE CONTROL

E267940

Press the remote control button
twice within three seconds.

CLOSING THE HANDS-FREE LIFTGATE

(If Equipped)

Make sure you have the passive key within
3 ft (1 m) of the liftgate.

1. Stand behind your vehicle, and face the

liftgate.

2. Move your foot, in a single-kick motion,

without pausing, under and away from
the rear bumper detection area.

E300799

3. The liftgate closes.

Avoid the following actions when using the
hands-free opening feature:

Making physical contact with the bumper.

Holding your foot under the bumper.

Sweeping your foot from side to side, or
kicking at an odd angle.

Detection Zones

Vehicles Without a Trailer Hitch

E310717

The detection area is in the center of the rear
bumper.

92

Liftgate

-------------------------------------------------------------------------------------------------------------------------------------------------------------

Vehicles With a Trailer Hitch

E310718

The detection area is on the left-hand side
and right-hand side of the hitch, between the
exhaust and the hitch.

Note: Allow the power system to close the
liftgate. Manually pushing or pulling the
liftgate may activate the system’s obstacle
detection feature and stop the power
operation or reverse its direction, replicate
a strut failure, or damage mechanical
components.

Note: Any physical actions that mimic a
kicking motion such as splashing water,
trailer chains or vacuum hoses may cause
the hands-free liftgate to activate. Switch the
power liftgate off through your vehicle
settings or keep the passive key away from
the rear bumper detection area.

STOPPING THE LIFTGATE
MOVEMENT

Note:  Do not apply sudden excessive force
to the liftgate while it is in motion.  This could
damage the power liftgate and its
components.

Note: Selections will vary depending on
region or options.

You can stop the liftgate movement by doing
any of the following:

Pressing the liftgate control button on
the liftgate.

Pressing the liftgate control button inside
the vehicle.

Pressing the liftgate button on the remote
control twice.

Pressing the liftgate button on an
authorized device.

Moving your foot under and away from
the center rear bumper in a single-kick
motion.

LIFTGATE OBSTACLE DETECTION

Closing the Liftgate

The system stops when it detects an
obstacle.  A tone sounds and the system
reverses to open.  Once you remove the
obstacle, you can power close the liftgate.

Note: To prevent accidental obstacle
detection, let the power liftgate close
completely before you enter your vehicle.

Opening the Liftgate

The system stops when it detects an
obstacle and a tone sounds.  Once you
remove the obstacle, you can continue to
operate the liftgate.

93

Liftgate

-------------------------------------------------------------------------------------------------------------------------------------------------------------

LIFTGATE – TROUBLESHOOTING

LIFTGATE – INFORMATION MESSAGES

Action

Message

The liftgate is not completely closed. Close the liftgate.

Liftgate Ajar

94

Liftgate

-------------------------------------------------------------------------------------------------------------------------------------------------------------

LIFTGATE – FREQUENTLY ASKED
QUESTIONS

Why won't my power liftgate function?

Make sure the transmission is in park
(P), ensure nothing is obstructing the
liftgate path and there is not excessive
weight on the liftgate. If there are
continued issues, the battery voltage
may be low or other system issues. See
an authorized dealer.

95

Liftgate

-------------------------------------------------------------------------------------------------------------------------------------------------------------

PASSIVE ANTI-THEFT SYSTEM

WHAT IS THE PASSIVE ANTI-THEFT
SYSTEM

The passive anti-theft system prevents
someone from starting the vehicle with an
incorrectly coded key.

Note: Do not leave a duplicate coded key
in your vehicle. Always take the keys and
lock all the doors when leaving your vehicle.

ARMING THE PASSIVE ANTI-THEFT
SYSTEM

The passive anti-theft system arms your
vehicle after a short period of time when you
switch the power off.

DISARMING THE PASSIVE ANTI-THEFT
SYSTEM

The passive anti-theft system disarms when
you switch the power on with a correctly
coded key.

Note: You could have difficulty starting the
vehicle if you have metallic objects,
electronic devices or a second coded key
on the same key chain.

ANTI-THEFT ALARM SYSTEM

WHAT IS THE ANTI-THEFT ALARM
SYSTEM

The Anti-Theft Alarm System warns you of
an unauthorized entry to your vehicle.

HOW DOES THE ANTI-THEFT ALARM
SYSTEM WORK

When armed, the anti-theft alarm is triggered
in any of the following ways:

If someone opens a door, the liftgate or
the hood without a correctly coded key
or remote control.

If you turn the power on without a
correctly coded key.

If the interior sensors detect movement
inside your vehicle.

If the inclination sensors detect an
attempt to raise your vehicle.

If someone disconnects the vehicle
battery or the battery backup alarm.

If the anti-theft alarm is triggered, the alarm
horn sounds for 30 seconds and the
direction indicators flash for 5 minutes.

Any further attempts to carry out one of the
above sounds the alarm again.

WHAT IS THE PERIMETER ALARM

The perimeter alarm is designed to detect
unauthorized access to your vehicle.

WHAT ARE THE INTERIOR SENSORS

The interior sensors are designed to detect
any movement inside your vehicle.

The interior sensors are in the overhead
console.

Note: Do not cover the interior sensors.

96

Security

-------------------------------------------------------------------------------------------------------------------------------------------------------------

WHAT ARE THE INCLINATION
SENSORS

The inclination sensor is designed to detect
an attempt to raise your vehicle, for example
to remove a wheel or to tow it away.

WHAT IS THE BATTERY BACKUP
ALARM

The battery backup alarm is an additional
alarm sounder that has its own battery. It can
detect if the vehicle battery is disconnected
to overcome the alarm system.

ARMING THE ANTI-THEFT ALARM
SYSTEM

The alarm is ready to arm when your vehicle
is switched off.

Lock your vehicle with your remote control
to arm the alarm.

DISARMING THE ANTI-THEFT ALARM
SYSTEM

Disarm the alarm by performing any of the
following actions:

Unlock the doors or luggage
compartment with the remote control.

Switch your vehicle on or start your
vehicle.

ANTI-THEFT ALARM SYSTEM
SETTINGS

WHAT ARE THE ALARM SECURITY
LEVELS

You can select two levels of alarm security,
all sensors and perimeter sensing.

All Sensors

All sensors is the standard setting.

In all sensors, all equipped sensors are on
when you arm the alarm.

Note: Do not arm the alarm with all sensors
if passengers, animals or other moving
objects are inside your vehicle.

Perimeter Sensing

In perimeter sensing, the interior sensors are
off when you arm the alarm.

All the other equipped sensors activate when
you arm the alarm in this mode.

SETTING THE ALARM SECURITY
LEVEL

1. Press Settings on the touchscreen.

2. Press Vehicle Settings.

3. Press Alarm System.

4. Press Sensor Set.

5. Press a setting.

WHAT IS ASK ON EXIT

You can choose which level of security you
require after you switch the ignition off.

97

Security

-------------------------------------------------------------------------------------------------------------------------------------------------------------

Note: If you do not choose a setting, the
system defaults to all sensors.

SWITCHING ASK ON EXIT ON AND
OFF

1. Press Settings on the touchscreen.

2. Press Vehicle Settings.

3. Press Alarm System.
4. Switch Ask on Exit on or off.

SECURITY – TROUBLESHOOTING

SECURITY – INFORMATION MESSAGES

Action

Message

The system has not detected a correctly coded key.

No Key Detected

The system has malfunctioned. Have your vehicle checked as soon as possible.

Starting System Fault

Displays when the alarm has been triggered due to unauthorized entry.

Vehicle Alarm To Stop Alarm, Start
Vehicle.

Alarm Announcement

98

Security

-------------------------------------------------------------------------------------------------------------------------------------------------------------

SECURITY – FREQUENTLY ASKED
QUESTIONS

What should I do if there is any potential
alarm problem with my vehicle?

Take all remote controls to an
authorized dealer if there is any
potential alarm problem with your
vehicle.

What should I do if the vehicle is unable to
start with a correctly coded key?

Have your vehicle checked as soon as
possible.

99

Security

-------------------------------------------------------------------------------------------------------------------------------------------------------------

ADJUSTING THE STEERING WHEEL
- VEHICLES WITH: POWER
ADJUSTABLE STEERING COLUMN

WARNING: Do not adjust the steering

wheel when your vehicle is moving.

Note:  Make sure that you are sitting in the
correct position.   See Sitting in the Correct
Position
 (page 175).

E261582

Press the top or bottom of the control to
move the steering wheel up or down.

Press the front or rear of the control to move
the steering wheel in or out.

ADJUSTING THE STEERING WHEEL
- VEHICLES WITH: MANUAL
ADJUSTABLE STEERING COLUMN

WARNING: Do not adjust the steering

wheel when your vehicle is moving.

Note: Make sure that you are sitting in the
correct position.  See Sitting in the Correct
Position
 (page 175).

E279960

100

Steering Wheel

-------------------------------------------------------------------------------------------------------------------------------------------------------------

1. Unlock the steering column.

2. Adjust the steering wheel to the desired

position.

E279962

3. Lock the steering column.

RESETTING THE STOPPING
POSITION - VEHICLES WITH:
POWER ADJUSTABLE STEERING
COLUMN

Note: The steering wheel stops when it
detects an obstruction. This sets a new
stopping position.

To reset the steering column to its normal
stopping position:

1. Confirm there is nothing obstructing the

motion of the steering column.

2. Press and hold the steering column

control until the steering column stops
moving.

3. Press the steering column control again.

Note: The steering column may start to move
again.

4. When the steering column stops,

continue holding the control for a few
seconds.

5. Repeat for each direction, as necessary.

HORN

E270945

Press on the center of the steering
wheel near the horn icon to
activate the horn.

SWITCHING THE HEATED
STEERING WHEEL ON AND OFF

 (IF

EQUIPPED)

To activate the heated steering
wheel, press the button on the
climate control unit.

On some vehicles, an indicator on the button
illuminates when the heated steering wheel
is on.

Note: A sensor regulates the temperature
of the steering wheel.

101

Steering Wheel

-------------------------------------------------------------------------------------------------------------------------------------------------------------

WINDSHIELD WIPERS

E270969

Push the lever up or down to
operate the windshield wiper.

E269410

Single wipe.

A

Intermittent wipe.

B

Normal wipe.

C

High-speed wipe.

D

Note: Fully defrost the windshield before you
switch the windshield wipers on.

Note: Make sure that you switch the
windshield wipers off before entering a car
wash.

Note:  If streaks or smears appear on the
windshield, clean the windshield and the
wiper blades.  If that does not resolve the
issue, install new wiper blades.

Note:  Do not operate the wipers on a dry
windshield.  This may scratch the glass,
damage the wiper blades or cause the wiper
motor to burn out.  Always use the
windshield washers before wiping a dry
windshield.

Intermittent Wipe

E269411

Intermittent wipe.

A

Shortest wipe interval.

B

Longest wipe interval.

C

Use the rotary control to adjust the
intermittent wipe interval.

Speed Dependent Wipers

When your vehicle speed increases, the
interval between wipes decreases.

102

Wipers and Washers

-------------------------------------------------------------------------------------------------------------------------------------------------------------

AUTOWIPERS

Wet or winter driving conditions with ice,
snow or salty road mist can cause
inconsistent and unexpected wiping or
smearing.

E269411

Autowipers On.

A

High sensitivity.

B

Low sensitivity.

C

E270969

Use the rotary control to adjust the
sensitivity of the autowipers.

When you select low sensitivity, the wipers
operate when the sensor detects a large
amount of water on the windshield. When
you select high sensitivity, the wipers
operate when the sensor detects a small
amount of water on the windshield.

Keep the outside of the windshield clean. 
The rain sensor is very sensitive and the
wipers may operate if dirt, mist or insects hit
the windshield.

In these conditions, you can do the following:

Lower the sensitivity of the autowipers
to reduce the amount of smearing on the
windshield.

Switch to normal or high-speed wipe.

Switch autowipers off.

Note: Fully defrost the windshield before you
switch the windshield wipers on.

Note: Make sure that you switch the
windshield wipers off before entering a car
wash.

Note:  If streaks or smears appear on the
windshield, clean the windshield and the
wiper blades.  If that does not resolve the
issue, install new wiper blades.

Note: If you switch autolamps and
autowipers on, the headlamps turn on when
the windshield wipers continuously operate.

Autowipers Settings

This setting defaults to on and remains on
until you switch it off in the touchscreen.

When you switch the feature off, the wipers
do not operate based on the rain sensor.
When you switch on the windshield wipers
to the intermittent wipe position with the
feature off, the wipers use the wipe speed
set by the rotary control.

Low Temperature Wipe Inhibit

The rain sensing feature will not operate
immediately after starting your vehicle when
it is in park (P) and the outside temperature
is below 32°F (0°C). You can switch on the
wipers by adjusting the rain sensor sensitivity
or adjusting the wiper speed.

This prevents damage to the wiper blades
from ice and snow on the windshield.

103

Wipers and Washers

-------------------------------------------------------------------------------------------------------------------------------------------------------------


Content      ..     3      4      5      6     ..