Dodge Challenger (2022 year). Manual in english - page 11
 

  Index      Manuals     Dodge Challenger (2022 year). Manual in english


Search            copyright infringement  


Content      ..     9      10      11      12     ..


Dodge Challenger (2022 year). Manual in english - page 11


MULTIMEDIA

169

Android Auto™, to activate Android™’s VR, which 

recognizes natural voice commands, to use a list of 

your smartphone’s features:

Maps

Music

Phone

Text Messages

Additional Apps

NOTE:

To use Android Auto™ on your car display, you’ll 

need an Android phone running Android 6.0 or 

higher, an active data plan, and the Android 

Auto™ app.

To wirelessly use Android Auto™ on your car 

display, you need a compatible Android smart

-

phone with an active data plan. You can check 

which smartphones are compatible at 

g.co/

androidauto/requirements

.

Android™ is a trademark of Google Inc.

A

PPLE

 C

AR

P

LAY

®

Use this QR code to access your 

digital experience.
Uconnect works seamlessly with 

Apple CarPlay®, the smarter, 

more secure way to use your 

iPhone® in the car, and stay 

focused on the road.

Use your Uconnect Touchscreen display, the 

vehicle's knobs and controls, and your voice with 

Siri to get access to Apple Music®, Maps, 

Messages, and more.

NOTE:

Feature availability depends on your carrier and 

mobile phone manufacturer. Some Apple 

CarPlay® features may or may not be available in 

every region and/or language.
To use Apple CarPlay®, make sure you are using 

iPhone® 5 or later, have Siri enabled in Settings, 

ensure your iPhone® is unlocked for the very first 

connection only, and then use the following 

procedure:
1. Connect your iPhone® to one of the media 

USB ports in your vehicle.

NOTE:

Be sure to use the factory-provided Lightning cable 

that came with your phone, as aftermarket cables 

may not work.
2. Once the device is connected and recognized, 

the Phone icon on the drag & drop menu bar 

changes to the Apple CarPlay® Icon.

NOTE:

Apple CarPlay® is set to launch immediately. You 

can also launch it by pressing the Apple CarPlay® 

icon on the touchscreen.

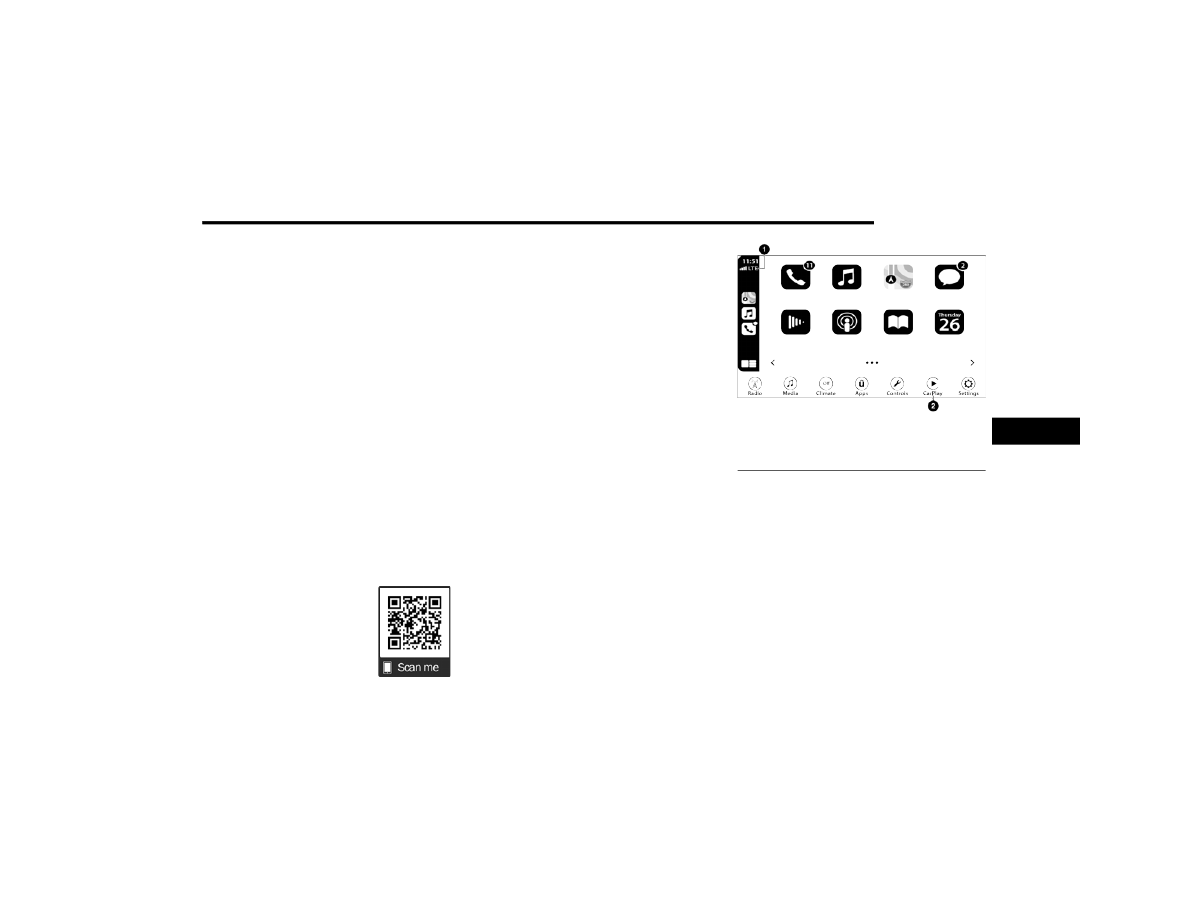
Apple CarPlay® And LTE Data Coverage

NOTE:

To use Apple CarPlay®, make sure that cellular 

data is turned on, and that you are in an area with 

cellular coverage. Your data and cellular coverage 

is shown on the left side of the radio screen. Data 

plan rates apply.

1 — LTE Data Coverage
2 — Apple CarPlay® Icon

5

170

MULTIMEDIA


Once Apple CarPlay® is up and running on your 

Uconnect system, the following features can be 

utilized using your iPhone’s® data plan:

Phone

Music

Messages

Maps

Phone

With Apple CarPlay®, push and hold the 

VR button on the steering wheel to 

activate a Siri voice recognition session. 

You can also press and hold the Home 

button within Apple CarPlay® to start talking to Siri. 

This allows you to make calls or listen to voicemail 

as you normally would using Siri on your iPhone®.

NOTE:

Only temporarily pushing the VR button on the 

steering wheel launches a built-in Uconnect VR 

session, not a Siri session, and it will not function 

with Apple CarPlay®.

Music

Apple CarPlay® allows you to access all 

your artists, playlists, and music from 

iTunes® or any third party application 

installed on your device. Using your 

iPhone’s® data plan, you can also use select third 

party audio apps including music, news, sports, 

podcasts, and more.

Messages

Push and hold the VR button on the 

steering wheel to activate a Siri voice 

recognition session. Apple CarPlay® 

allows you to use Siri to send or reply to 

text messages. Siri can also read incoming text 

messages, but drivers will not be able to read 

messages, as everything is done via voice.

Maps

Push and hold the VR button on the 

steering wheel until the beep or tap the 

Microphone icon to ask Apple® Siri to 

take you to a desired destination by 

voice. You can also touch the Navigation icon in 

Apple CarPlay® to access Apple® Maps.

Apps

The Apple CarPlay® App plays all compatible apps 

that are available to use, every time it is launched. 

You must have the compatible app downloaded, 

and you must be signed in to the app through your 

mobile device for it to work with Apple CarPlay®.
Refer to 

http://www.apple.com/ios/carplay/


(US) or 

https://www.apple.com/ca/ios/carplay/


(Canada) to see the latest list of available apps for 

Apple CarPlay®.

Apple CarPlay® Voice Command 

NOTE:

Feature availability depends on your carrier and 

mobile phone maker. Some Apple CarPlay® 

features may not be available in every region and/

or language.
Apple CarPlay® allows you to use your voice to 

interact with Siri through your vehicle’s voice 

recognition system, and use your smartphone’s 

data plan to project your iPhone® and a number of 

its apps onto your Uconnect touchscreen. Connect 

your iPhone® 5 or higher to one of the media USB 

ports, using the factory-provided Lightning cable, 

and press the new Apple CarPlay® icon that 

replaces your “Phone” icon on the main menu bar 

to begin Apple CarPlay®. Push and hold the VR 

button on the steering wheel, or press and hold the 

Home button within Apple CarPlay®, to activate 

Siri, which recognizes natural voice commands to 

use a list of your iPhone’s® features:

Phone

Music

Messages

Maps — If Equipped

Additional Apps — If Equipped

MULTIMEDIA

171

NOTE:

Apple CarPlay® is a trademark of Apple® Inc. 

iPhone® is a trademark of Apple® Inc., registered 

in the US and other countries. Apple® terms of use 

and privacy statements apply.

A

NDROID

 A

UTO

™ A

ND

 A

PPLE


C

AR

P

LAY

® T

IPS

 A

ND

 T

RICKS

Android Auto™ And Apple CarPlay® Automatic 

Bluetooth® Pairing
After connecting to Android Auto™ or Apple 

CarPlay® for the first time and undergoing the 

setup procedure, the smartphone pairs to the 

Uconnect system via Bluetooth® without any setup 

required every time it is within range, if Bluetooth® 

is turned on.

NOTE:

Apple CarPlay® uses a USB connection while 

Android Auto™ uses both USB and Bluetooth® 

connections to function. The connected device is 

unavailable to other devices when connected 

using Android Auto™ or Apple CarPlay®.

Multiple Devices Connecting To The Uconnect 

System — If Equipped
It is possible to have multiple devices connected to 

the Uconnect system. For example, if using Android 

Auto™/Apple CarPlay®, the connected device will 

be used to place hands-free phone calls or send 

hands-free text messages. However, another 

device can also be paired to the Uconnect system, 

via Bluetooth®, as an audio source, so the 

passenger can stream music.

NOTE:

Apple CarPlay® and Android Auto™ can only be 

launched from the front and center console USB 

ports.

PERFORMANCE PAGES

Performance Pages is an application that provides 

a display for performance indicators, as received 

from the instrument cluster, that will help you gain 

familiarity with the capabilities of your vehicle in 

real-time.
To access the Performance Pages, press the Apps 

button on the touchscreen then press the 

Performance Pages button on the touchscreen. 

Press the desired button on the touchscreen to 

access that specific Performance Page.

The Performance Pages include the following: 

Home

Timers

Gauges

G-Force

Engine

Dyno

WARNING!

Measurement of vehicle statistics with the 

Performance Pages is intended for off-highway 

or off-road use only and should not be done on 

any public roadways. It is recommended that 

these features be used in a controlled 

environment and within the limits of the law. The 

capabilities of the vehicle as measured by the 

Performance Pages must never be exploited in a 

reckless or dangerous manner, which can 

jeopardize the user’s safety or the safety of 

others. Only a safe, attentive, and skillful driver 

can prevent accidents.

5

172

MULTIMEDIA


If a USB drive is installed in the media hub, press 

the Camera icon on the top right of the 

touchscreen when using Performance Pages. A 

screen shot of the page will be taken and saved 

onto the USB.

Screenshot Camera Button

The following describes each feature and its 

operation:

H

OME

Performance Pages — Home

When Home is selected, a series of widgets 

(gauges) can be customized by the user. Follow 

these steps to change a widget. Either press 

directly on the widget you want to change, or:
1. Press the Settings button (gear icon) on the 

touchscreen to access the main menu for the 

widgets.

2. Select one the following options from the 

menu:

Set Widget: Top Left

Set Widget: Top Right

Set Widget: Bottom Left

Set Widget: Bottom Right

3. After selecting a widget location, select the 

gauge to display:

Gauge: Oil Temp

Gauge: Oil Pressure

Gauge: Coolant Temp

Gauge: Battery Voltage

Gauge: Trans Temp — If Equipped with an 

Automatic Transmission

Gauge: Boost Pressure — If Equipped

Gauge: Air/Fuel Ratio — If Equipped

Gauge: I/C Coolant Temp — If Equipped

Gauge: Intake Air Temp

Gauge: Engine Torque

Gauge: Engine Power

Gauge: G-Force

Gauge: Steering Angle

Gauge: Current Gear

Gauge: Current Speed

Timer: 0–60 mph (0–100 km/h)

Timer: 0–100 mph (0–160 km/h)

Timer: 60 ft (20 m)

Timer: 330 ft (100 m)

Timer: 1/8 Mile (200 m)

Timer: 1000 ft (300 m)

MULTIMEDIA

173

Timer: 1/4 Mile (400 m)

Timer: Braking Distance

Timer: Reaction Time

Historical Data
The Historical Data feature allows you to view 

information about your vehicle such as the VIN, 

miles on the odometer, longitude and latitude 

coordinates, and more.
To activate the Historical Data feature on your 

touchscreen, follow these steps:
1. Select the Home page tab within 

Performance Pages. Then, press the settings 

icon (gear icon) in the upper right hand corner 

of the touchscreen.

Home Page Settings

2. Towards the bottom of the screen, a checkbox 

will appear next to “Include historical data in 

screenshot.” Click the box to signify that this 

feature will be on.

Historical Data

NOTE:

Once the checkbox is selected, the bottom bar of 

the screen will be replaced with the historical data 

from your vehicle present at the time the 

screenshot icon was pressed.

Historical Data

1 — Outside Temperature
2 — Date
3 — Odometer
4 — VIN
5 — Longitude And Latitude Coordinates

5

174

MULTIMEDIA


3. To take a screenshot of the historical data, 

make sure a USB device is plugged into the 

vehicle. Next, click the Camera icon located in 

the top right corner of the touchscreen. The 

historical data image file will be saved to the 

USB drive.

Historical Data Camera Icon

T

IMERS

Performance Pages — Timers

When the Timers Page is selected, you will be able 

to select the Drag or Accel & Braking tabs. The 

following will be displayed:

Recent


The most recent successful run of performance 

timers. If a run does not complete within the 

timers limit, or is aborted, the values shown will 

revert to the most recent valid run.

Last


The last recorded successful run of perfor

-

mance timers.

Best


The best recorded run of performance timers, 

except for braking data.

Save


Pressing the Save button will let you save the 

visible page, Recent/Last/Best. Any saved run 

over 10 will overwrite the last saved run for 

Uconnect system storage. The operation of the 

Save feature is listed below:

NOTE:

Pressing the Camera icon in the upper right corner 

of the screen at any time will save a screenshot of 

the screen currently being viewed to the connected 

USB device.

Performance Pages — Save

MULTIMEDIA

175

With a USB jump drive installed, press the USB 

button to save to the jump drive.

Press the Uconnect button to save the runs to 

the Owner’s web page.

NOTE:

Uconnect option will be grayed out or missing if the 

vehicle does not have a valid Uconnect account 

associated with it.

Press the Cancel button to return to the Timers 

page.

The tabs on the Timers page contain the timers 

listed below:

Reaction Time


Measures the driver's reaction time for 

launching the vehicle against a simulated drag 

strip timing light (behavior modeled after 500 

Sportsman Tree) displayed in the instrument 

cluster display.

NOTE:

Drag timers (RT, 60 ft [20 m], 330 ft [100 m], 

1/8 mile [200 m], 1000 ft [300 m], and 1/4 mile 

[400 m]).

NOTE:

Accel & Braking timers (0-60 mph [0-100 km/h], 

0-100 mph [0-160 km/h], Brake from mph

[km/h], and Brake Distance ft [meters]).

0-60 mph (0-100 km/h)


Displays the time it takes for the vehicle to go 

from 0 to 60 mph (0 to 100 km/h).

0-100 mph (0-160 km/h)


Displays the time it takes for the vehicle to go 

from 0 to 100 mph (0 to 160 km/h).

60 ft (20 m) ET


Displays the time it takes the vehicle to go

60 feet (20 m).

330 ft (100 m) ET


Displays the time it takes the vehicle to go

330 feet (100 m).

⅛ Mile (200 m) ET


Displays the time it takes for the vehicle to 

go ⅛ mile (200 m).

⅛ Mile (200 m) mph


Displays the vehicle speed at the time ⅛ mile 

(200 m) was reached.

1000 ft (300 m) ET


Displays the time it takes the vehicle to go 

1000 ft (300 m).

¼ Mile (400 m) ET


Displays the time it takes for the vehicle to 

go ¼ mile (400 m).

¼ Mile (400 m) mph


Displays the speed the vehicle was at

when ¼ mile (400 m) was reached.

Brake Distance ft (meters)


Displays the distance it takes the vehicle to 

make a complete stop.

NOTE:

The distance measurement will be aborted if the 

brake pedal is released or the parking brake is 

engaged, before the vehicle comes to a complete 

stop.

Brake from mph (km/h)


Displays the speed the vehicle is traveling when 

the brake pedal is pressed.

NOTE:

Brake Distance and Speed timers only display 

"ready" when the vehicle is traveling at greater 

than 30 mph (48 km/h).

5

176

MULTIMEDIA


G

AUGES

Performance Pages — Gauges

When selected, this screen displays the following 

values:

Oil Temperature


Shows the actual oil temperature.

Oil Pressure


Shows the actual oil pressure.

Coolant Temperature


Shows the actual coolant temperature.

Battery Voltage


Shows actual battery voltage.

Trans Oil Temp — If Equipped with an Automatic 

Transmission


Shows actual transmission oil temperature.

Boost Pressure — If Equipped


Shows actual boost pressure.

Air Fuel Ratio — If Equipped


Shows current air fuel ratio.

I/C Coolant Temp — If Equipped


Shows actual I/C Coolant temperature.

Intake Air Temp


Shows actual air intake temperature.

If a gauge is selected, the Gauge Detail View page 

will appear on the screen. This page shows gauge 

values for the previous two minutes on the 

selected gauge.

Pressing the Left and Right arrows will cycle 

through the details for each of the gauges. 

Pressing the minimize button above the graph will 

return to the gauge menu.

Gauge Detail View Page

MULTIMEDIA

177

G-F

ORCE

G-Force

When selected, this screen displays all four 

G-Force values as well as steering angle.
When G-Force is selected, the following features 

will be available:

Vehicle Speed:


Measures the current speed of the vehicle in 

either mph or km/h, starting at zero with no 

maximum value.

Front G-Force:


Measures the peak braking force on the front of 

the vehicle.

Right G-Force:


Measures the peak force on the right side of the 

vehicle.

Left G-Force:


Measures the peak force on the left side of the 

vehicle.

Rear G-Force:


Measures the peak acceleration force on the 

rear of the vehicle.

NOTE:

Front, Right, Left, and Rear G-Forces are all peak 

values. These readings can be reset by clearing 

peak G-Force on the instrument cluster.

Steering Wheel Angle


Steering Wheel Angle utilizes the steering angle 

sensor to measure the degree of the steering 

wheel relative to zero (straight ahead) reference 

angle. The zero degree reference angle 

measurement indicates a steering wheel 

straight ahead position.

The friction circle display shows instantaneous 

G-Force as a highlight and previous G-Force as 

dots within the circle. The system records previous 

G-Force for three minutes. If there are multiple 

samples at a given point, the color of the dot will 

darken from blue to red. Vectors more frequent will 

show in red; infrequent vectors will show in blue.

5

178

MULTIMEDIA


E

NGINE

Engine

When selected, this screen displays the following 

values:

Vehicle Speed


Shows the actual vehicle speed.

Engine Power


Shows the instantaneous power.

Engine Torque


Shows the instantaneous torque.

Oil Pressure (6.4L Only) — If Equipped


Shows the actual engine oil pressure.

Boost Pressure (6.2L Only) — If Equipped


Shows the actual boost pressure.

Gear (Automatic Transmission Only)


Shows the current (or pending) operating gear 

of the vehicle.

D

YNAMOMETER

 (D

YNO

)

Dyno Page

The system will start drawing graphs for Power and 

Torque (top chart) and Engine Speed (bottom 

chart). The graph will fill to the right side of the 

page (based on History time selected). Once the 

right side of the page is reached, the graph will 

scroll with the right side always being the most 

recent recorded sample.
The following options can be selected:

Pressing the STOP button will freeze the graph. 

Selecting Play will clear the graph and restart 

the process over.

Press the + or – buttons to change the history of 

the graph. The selectable options are “30”, 

“60”, “90”, or “120” seconds. The graph will 

expand or constrict depending on the setting 

selected.

Select the “Gear” display setting to turn the 

graph gear markers on and off for automatic 

transmission vehicles only.

NOTE:

The Gear on/off feature will only display if 

your vehicle is equipped with an Automatic 

Transmission.

MULTIMEDIA

179

DODGE DRIVE MODES — IF EQUIPPED

P

ERFORMANCE

 C

ONTROL

 — 

I

F

 E

QUIPPED

Your vehicle may be equipped with a Performance 

Control feature which allows for coordinating the 

operation of various vehicle systems depending 

upon the type of driving behavior desired. The 

Performance Control feature is controlled through 

the Uconnect system and may be accessed by 

performing any of the following:

Pushing the Super Track Pack button on the 

instrument panel switch bank.

Selecting “Performance Control” from the Apps 

menu.

Selecting “Performance Control” from within the 

Performance Pages menu.

You will be able to enable, disable, and customize 

the functionality of the Launch Control and 

Performance Control Set-Up features within 

Performance Control.
Descriptions of these features are provided below. 

To access information about the functionality of 

these features through the Uconnect system, 

press the Info button on the touchscreen.

NOTE:

Dodge vehicles equipped with a 6.4L engine, 

except for R/T Scat Pack 1320 6.4L non-widebody 

vehicles, will use SRT Drive Modes rather than the 

Dodge Performance Control Pages. Please refer to 

the following sections for further information on 

the SRT Drive Modes.

Drive Mode Set-Up

Performance Control Set-Up

Pressing the Drive Mode Set-Up button on the 

touchscreen within the Performance Control 

screen indicates the real-time status of the various 

systems. Pressing the Sport Mode Set-Up, Drag 

Mode Set-Up (1320 only), or Default Mode Set-Up 

buttons on the touchscreen allows the driver to 

configure their individual performance control and 

see how those configurations affect the 

performance of the vehicle.

NOTE:

Not all of the options listed in this manual are 

available on every vehicle. Below is a chart with all 

available Performance Control vehicle configura

-

tions.

5

180

MULTIMEDIA


Available Mode Configurations

Refer to the Sport and Default Modes for their 

detailed operation.

NOTE:

These settings will remain in effect when using the 

Launch Control feature.

Default Mode

Default Mode

The vehicle will always start in Default Mode. This 

mode is for typical driving conditions. While in 

Default Mode, the Engine, Transmission and 

Traction will operate in their Normal settings and 

cannot be changed. The Steering Assist may be 

configured to “Normal”, “Sport”, or “Comfort” by 

pressing the corresponding button on the 

touchscreen. The Paddle Shifters (if equipped) 

may be enabled or disabled while in this mode.

Engine

If Manual Transmission

Engine/Transmission

If Auto Transmission

Steering

X

Paddle Shifters

If Auto Transmission

Traction Control

X

Suspension

If Adaptive Suspension

MULTIMEDIA

181

Default Mode Set-Up

Launch Control

Launch Control

This vehicle is equipped with a Launch Control 

system that is designed to allow the driver to 

achieve quick, consistent vehicle acceleration in a 

straight line. Launch Control is a form of traction 

control that manages tire slip while launching the 

vehicle. This feature is intended for use during race 

events on a closed course where consistent 

quarter-mile and 0-to-60 times are desired. The 

system is not intended to compensate for lack of 

driver experience or familiarity with the race track. 

Use of this feature in low traction (cold, wet, gravel, 

etc.) conditions may result in excess wheel slip 

outside this system’s control resulting in an 

aborted launch.

NOTE:

Launch Control should not be used on public 

roads. Always check track conditions and the 

surrounding area.

Launch Control is not available for the first 

500 miles (805 km) of the vehicle’s life.

Launch Control should only be used when the 

engine and transmission are at operating 

temperature.

Launch Control is intended to be used on dry, 

paved road surfaces only. Use on slippery or 

loose surfaces may cause damage to vehicle 

components and is not recommended.

Launch Control is not available in ESC Full Off 

mode.

WARNING!

Launch Control is intended for off-highway or 

off-road use only and should not be used on any 

public roadways. It is recommended that this 

feature be used in a controlled environment, and 

within the limits of the law. The capabilities of 

the vehicle as measured by the performance 

pages must never be exploited in a reckless or 

dangerous manner, which can jeopardize the 

user’s safety or the safety of others. Only a safe, 

attentive, and skillful driver can prevent 

accidents.

5

182

MULTIMEDIA


Sport Mode

Sport Mode

Sport Mode is a configuration setup for typical 

enthusiast driving. The Transmission and Steering 

are both set to their Sport settings. The steering 

wheel Paddle switches are enabled. Traction 

Control defaults to Normal. Any of these four 

settings may be changed to the driver’s 

preferences by pressing the buttons on the 

touchscreen. Push the Sport button on the 

instrument panel switch bank to put the vehicle in 

Sport Mode and activate these settings. The 

customized settings will only be active when the 

Sport button is active.

Sport Mode Set-Up

Possible Performance Control configurations are 

listed below with accompanying descriptions. The 

information contained in the list below can also be 

accessed from within the mode Set-Up menus. To 

access the information, press the Info button on 

the touchscreen from the mode Set-Up menu, and 

use the Left/Right arrows to toggle through 

available descriptions. The title for each system in 

the Set-Up menu can be pressed, which provides 

the descriptions for each function of that system.

ENGINE/TRANS (IF EQUIPPED WITH 

AUTOMATIC TRANSMISSION)

Engine/Trans

SPORT 
Press the Sport button on the touchscreen for 

improved throttle response and modified 

shifting for an enhanced driving experience.

NORMAL 
Press the Normal button on the touchscreen for 

a balance of throttle response, shift comfort and 

economy for normal driving.

MULTIMEDIA

183

PADDLE SHIFTERS — IF EQUIPPED WITH 

AUTOMATIC TRANSMISSION

Paddle – Automatic Transmission

ON 
Press the On button on the touchscreen to 

enable steering wheel Paddle Shifters.

OFF 
Press the Off button on the touchscreen to 

disable steering wheel Paddle Shifters.

TRACTION

Traction Control

SPORT 
Press the Sport button on the touchscreen to 

turn off traction control and reduce stability 

control.

NORMAL 
Press the Normal button on the touchscreen to 

provide full traction control and full stability 

control.

STEERING — IF EQUIPPED

Steering

SPORT 
Press the Sport button on the touchscreen to 

provide an increased amount of steering feel, 

requiring a higher amount of steering effort.

NORMAL 
Press the Normal button on the touchscreen to 

provide a balanced steering feel and steering 

effort. This is also your vehicle’s preset steering 

setting.

COMFORT 
Press the Comfort button on the touchscreen to 

provide a lower steering effort.

5

184

MULTIMEDIA


RADIO OPERATION AND MOBILE PHONES  

Under certain conditions, the mobile phone being 

on in your vehicle can cause erratic or noisy 

performance from your radio. This condition may 

be lessened or eliminated by repositioning the 

mobile phone within the vehicle. This condition is 

not harmful to the radio. If your radio performance 

does not satisfactorily improve from repositioning 

the mobile phone, it is recommended that the 

volume be turned down or off during mobile phone 

operation when not using the Uconnect system.

R

EGULATORY

 A

ND

 S

AFETY


I

NFORMATION

US/CANADA
Exposure to Radio Frequency Radiation
The radiated output power of the internal wireless 

radio is far below the FCC and IC radio frequency 

exposure limits. Nevertheless, the wireless radio 

will be used in such a manner that the radio is 8 in 

(20 cm) or further from the human body.
The internal wireless radio operates within 

guidelines found in radio frequency safety 

standards and recommendations, which reflect 

the consensus of the scientific community.

The radio manufacturer believes the internal 

wireless radio is safe for use by consumers. The 

level of energy emitted is far less than the 

electromagnetic energy emitted by wireless 

devices such as mobile phones. However, the use 

of wireless radios may be restricted in some 

situations or environments, such as aboard 

airplanes. If you are unsure of restrictions, you are 

encouraged to ask for authorization before turning 

on the wireless radio  

Ú

page 322.


Content      ..     9      10      11      12     ..