Dodge Avenger (2020 year). Manual in english - page 9


  Index      Manuals     Dodge Avenger (2020 year). Manual in english


Search            copyright infringement  


Content      ..     7      8      9      10     ..


Dodge Avenger (2020 year). Manual in english - page 9


-------------------------------------------------------------------------------------------------------------------------------------------------------------
UNDERSTANDING THE FEATURES OF YOUR VEHICLE
195
NOTE:
POWER SUNROOF — IF EQUIPPED
The transmitter has been tested and it complies with
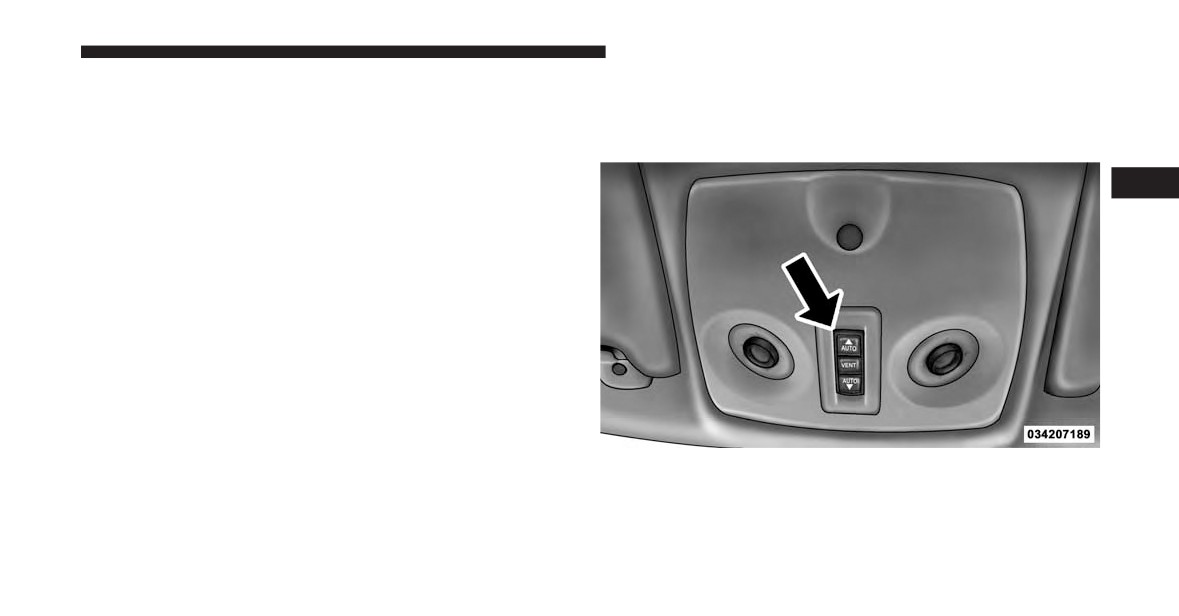
The sunroof controls are mounted between the dome/
FCC and IC rules. Changes or modifications not ex-
reading lights.
pressly approved by the party responsible for compli-
3
ance could void the user’s authority to operate the
device.
The term IC before the certification/registration num-
ber only signifies that Industry Canada technical speci-
fications were met.
Power Sunroof Switch

-------------------------------------------------------------------------------------------------------------------------------------------------------------

196
UNDERSTANDING THE FEATURES OF YOUR VEHICLE
Opening Sunroof — Express
WARNING!
Press the switch rearward and release it within one-half
Never leave children alone in a vehicle, or with
second. The sunroof and sunshade will open automati-
access to an unlocked vehicle. Never leave the Key
cally from any position. The sunroof and sunshade will
Fob in or near the vehicle, or in a location acces-
open fully and stop automatically. This is called “Express
sible to children. Occupants, particularly unat-
Open”. During Express Open operation, any movement
tended children, can become entrapped by the
of the sunroof switch will stop the sunroof.
power sunroof while operating the power sunroof
Opening Sunroof — Manual Mode
switch. Such entrapment may result in serious
injury or death.
To open the sunroof, press and hold the switch rearward
In a collision, there is a greater risk of being thrown
to full open. Any release of the switch will stop the
from a vehicle with an open sunroof. You could
movement. The sunroof and sunshade will remain in a
also be seriously injured or killed. Always fasten
partially opened condition until the switch is pushed and
your seat belt properly and make sure all passen-
held rearward again.
gers are properly secured.
Closing Sunroof — Express
Do not allow small children to operate the sunroof.
Never allow your fingers, other body parts, or any
Press the switch forward and release it within one-half
object to project through the sunroof opening.
second and the sunroof will close automatically from any
Injury may result.

-------------------------------------------------------------------------------------------------------------------------------------------------------------

UNDERSTANDING THE FEATURES OF YOUR VEHICLE
197
position. The sunroof will close fully and stop automati-
NOTE: If three consecutive sunroof close attempts re-
cally. This is called
“Express Close”. During Express
sult in Pinch Protect reversals, the fourth close attempt
Close operation, any movement of the switch will stop
will be a Manual Close movement with Pinch Protect
the sunroof.
disabled.
3
Closing Sunroof — Manual Mode
Venting Sunroof — Express
To close the sunroof, press and hold the switch in the
Press and release the Vent button within one half second
forward position. Any release of the switch will stop the
and the sunroof will open to the vent position. This is
movement and the sunroof will remain in a partially
called “Express Vent”, and it will occur regardless of
closed condition until the switch is pushed and held
sunroof position. During Express Vent operation, any
forward again.
movement of the switch will stop the sunroof.
Pinch Protect Feature
Sunshade Operation
This feature will detect an obstruction in the opening of
The sunshade can be opened manually. However, the
the sunroof during Express Close operation. If an ob-
sunshade will open automatically as the sunroof opens.
struction in the path of the sunroof is detected, the
NOTE: The sunshade cannot be closed if the sunroof is
sunroof will automatically retract. Remove the obstruc-
open.
tion if this occurs. Next, press the switch forward and
release to Express Close.

-------------------------------------------------------------------------------------------------------------------------------------------------------------

198
UNDERSTANDING THE FEATURES OF YOUR VEHICLE
Wind Buffeting
Ignition Off Operation
Wind buffeting can be described as the perception of
For Vehicles Not Equipped With The Electronic Vehicle
pressure on the ears or a helicopter-type sound in the
Information Center (EVIC)
ears. Your vehicle may exhibit wind buffeting with the
The power sunroof switch will remain active for 45
windows down, or the sunroof (if equipped) in certain
seconds after the ignition switch is turned to the LOCK
open or partially open positions. This is a normal occur-
position. Opening either front door will cancel this
rence and can be minimized. If the buffeting occurs with
feature.
the rear windows open, open the front and rear windows
together to minimize the buffeting. If the buffeting occurs
For Vehicles Equipped With The EVIC
with the sunroof open, adjust the sunroof opening to
The power sunroof switch will remain active for up to
minimize the buffeting or open any window.
approximately ten minutes after the ignition switch is
turned to the LOCK position. Opening either front door
Sunroof Maintenance
will cancel this feature.
Use only a non-abrasive cleaner and a soft cloth to clean
the glass panel.

-------------------------------------------------------------------------------------------------------------------------------------------------------------

UNDERSTANDING THE FEATURES OF YOUR VEHICLE
199
ELECTRICAL POWER OUTLETS
There are two 12 Volt (13 Amp) electrical power outlets
on this vehicle. Both of the power outlets are protected by
a fuse.
3
The instrument panel power outlet, located below the
climate control knobs, has power available only when the
ignition is ON. This power outlet will also operate a
conventional cigar lighter unit.
Instrument Panel Power Outlet
NOTE: To preserve the heating element, do not hold the
lighter in the heating position.

-------------------------------------------------------------------------------------------------------------------------------------------------------------

200
UNDERSTANDING THE FEATURES OF YOUR VEHICLE
A second power outlet is located inside the center con-
NOTE: To ensure proper operation a MOPAR® knob
sole.
and element must be used.
CAUTION!
Do not exceed the maximum power of 160 Watts
(13 Amps) at 12 Volts. If the 160 Watt (13 Amp)
power rating is exceeded the fuse protecting the
system will need to be replaced.
Power outlets are designed for accessory plugs
only. Do not insert any other object in the power
outlets as this will damage the outlet and blow the
fuse. Improper use of the power outlet can cause
damage not covered by your New Vehicle Limited
Warranty.
Center Console Power Outlet
The center console power outlet is powered directly from
the battery (power available at all times). Items plugged
into this power outlet may discharge the battery and/or
prevent the engine from starting.

-------------------------------------------------------------------------------------------------------------------------------------------------------------

UNDERSTANDING THE FEATURES OF YOUR VEHICLE
201
WARNING!
To avoid serious injury or death:
Only devices designed for use in this type of outlet
should be inserted into any 12 Volt outlet.
3
Do not touch with wet hands.
Close the lid when not in use and while driving the
vehicle.
If this outlet is mishandled, it may cause an electric
shock and failure.
Power Outlet Fuse Locations
1 — #16 Fuse 15 A Blue Cigar Lighter Instrument Panel
2—#11Fuse15ABluePowerOutletInsideArmRest

-------------------------------------------------------------------------------------------------------------------------------------------------------------

202
UNDERSTANDING THE FEATURES OF YOUR VEHICLE
CIGAR LIGHTER AND ASH RECEIVER — IF
CAUTION!
EQUIPPED
Many accessories that can be plugged in draw
An optional ash receiver is available from your autho-
power from the vehicle’s battery, even when not in
rized dealer and will fit in the center console front
use
(i.e., cellular phones, etc.). Eventually, if
cupholder.
plugged in long enough, the vehicle’s battery will
discharge sufficiently to degrade battery life and/or
The optional ash receiver also comes with a cigar lighter
prevent the engine from starting.
that can be used with the power outlets. Refer to “Power
Outlets” in “Understanding The Features Of Your Ve-
Accessories that draw higher power (i.e., coolers,
hicle” for further information.
vacuum cleaners, lights, etc.) will degrade the bat-
tery even more quickly. Only use these intermit-
tently and with greater caution.
After the use of high power draw accessories, or
long periods of the vehicle not being started (with
accessories still plugged in), the vehicle must be
driven a sufficient length of time to allow the
generator to recharge the vehicle’s battery.

-------------------------------------------------------------------------------------------------------------------------------------------------------------

UNDERSTANDING THE FEATURES OF YOUR VEHICLE
203
CUPHOLDERS
Rear Seat Bottle Holder
There are two cupholders located in the center console There are built-in bottle holders located in both rear door
for the front passengers.
trim panels.
3
Front Cupholders
Rear Bottle Holder

-------------------------------------------------------------------------------------------------------------------------------------------------------------

204
UNDERSTANDING THE FEATURES OF YOUR VEHICLE
STORAGE
WARNING!
Glove Compartment
If containers of hot liquid are placed in the bottle
holder, they can spill when the door is closed, burn-
The glove compartment is located on the right side of the
ing the occupants. Be careful when closing the doors
instrument panel.
to avoid injury.
Glove Compartment
Pull on the handle to open the glove compartment.

-------------------------------------------------------------------------------------------------------------------------------------------------------------

UNDERSTANDING THE FEATURES OF YOUR VEHICLE
205
CONSOLE FEATURES
Storage
The center console is located between the front driver
and passenger seats. The center console armrest slides
3
forward from design position to provide added user
comfort. The center console can be used for storage and
is also equipped with an electrical power outlet. Refer to
“Power Outlets” in “Understanding The Feature Of Your
Vehicle” for further information.
Opened Glove Compartment

-------------------------------------------------------------------------------------------------------------------------------------------------------------

206
UNDERSTANDING THE FEATURES OF YOUR VEHICLE
Center Console Armrest
Center Console Storage
Two separate storage compartments are also located
The top compartment holds small items, such as a pen
underneath the armrest.
and note pad, while the larger bottom compartment will
hold CDs and alike. The bottom compartment also con-
tains a 12 Volt power outlet. The console’s front opening
lid allows for easy access to these compartments.

-------------------------------------------------------------------------------------------------------------------------------------------------------------

UNDERSTANDING THE FEATURES OF YOUR VEHICLE
207
NOTE:
CARGO AREA FEATURES
A notch in the front of the console base allows for use
The 60/40 split-folding rear seat provides cargo-carrying
of a cellular phone while it is plugged into the power
versatility. The seatbacks fold down easily by pulling
outlet with the armrest latched down.
nylon tabs between the seatbacks and the bolsters. When
3
the seats are folded down, they provide a continuous,
The power outlet can also energize the cigar lighter in
nearly flat extension of the load floor.
the optional cup holder ash receiver.
When the seatback is folded to the upright position, make
WARNING!
sure it is latched by strongly pulling on the top of the
seatback above the seat strap.
Do not operate this vehicle with a console compart-
ment lid in the open position. Driving with the
WARNING!
console compartment lid open may result in injury in
a collision.
Be certain that the seatback is securely locked into
position. If the seatback in not securely locked into
position, the seat will not provide the proper sta-
bility for child seats and/or passengers. An improp-
erly latched seat could cause serious injury.
(Continued)

-------------------------------------------------------------------------------------------------------------------------------------------------------------

208
UNDERSTANDING THE FEATURES OF YOUR VEHICLE
Always place cargo evenly on the cargo floor. Put heavier
WARNING! (Continued)
objects as low and as far forward as possible. Place as
The cargo area in the rear of the vehicle (with the
much cargo as possible in front of the rear axle. Too much
rear seatbacks in the locked-up or folded down
weight or improperly placed weight over or behind the
position) should not be used as a play area by
rear axle can cause the rear of the vehicle to sway.
children when the vehicle is in motion. They could
be seriously injured in a collision. Children should
Do not pile luggage or cargo higher than the top of the
be seated and using the proper restraint system.
seatback. This could impair visibility or become a dan-
gerous projectile in a sudden stop or collision.
To help protect against personal injury, passengers
should not be seated in the rear cargo area. The rear
cargo space is intended for load carrying purposes
only, not for passengers, who should sit in seats
and use seat belts.
The weight and position of cargo and passengers
can change the vehicle center of gravity and vehicle
handling. To avoid loss of control resulting in
personal injury, follow these guidelines for loading
your vehicle:

-------------------------------------------------------------------------------------------------------------------------------------------------------------

UNDERSTANDING THE FEATURES OF YOUR VEHICLE
209
Ski Pass-Through
REAR WINDOW FEATURES
There is a ski pass-through door located behind the rear
Rear Window Defroster
seat armrest that allows longer items, such as snow skis,
to be stored in the rear cargo area. Lower the armrest and
The rear window defroster button is located on
3
pull downward on the latch to open the ski pass-through
the climate control (Mode) knob. Press this button
door.
to turn on the rear window defroster and the heated
outside mirrors (if equipped). An indicator in the button
will illuminate when the rear window defroster is on. The
rear window defroster automatically turns off after ap-
proximately 10 minutes. For an additional five minutes of
operation, press the button a second time.
NOTE: To prevent excessive battery drain, use the rear
window defroster only when the engine is operating.
Ski Pass-Through

-------------------------------------------------------------------------------------------------------------------------------------------------------------

210
UNDERSTANDING THE FEATURES OF YOUR VEHICLE
CAUTION!
Failure to follow these cautions can cause damage to
the heating elements:
Use care when washing the inside of the rear
window. Do not use abrasive window cleaners on
the interior surface of the window. Use a soft cloth
and a mild washing solution, wiping parallel to the
heating elements. Labels can be peeled off after
soaking with warm water.
Do not use scrapers, sharp instruments, or abrasive
window cleaners on the interior surface of the
window.
Keep all objects a safe distance from the window.

-------------------------------------------------------------------------------------------------------------------------------------------------------------

UNDERSTANDING YOUR INSTRUMENT PANEL
CONTENTS
INSTRUMENT PANEL FEATURES
214
Oil Change Required — If Equipped
236
4
INSTRUMENT CLUSTER
215
EVIC Main Menu
237
INSTRUMENT CLUSTER — R/T
216
Compass Display
238
INSTRUMENT CLUSTER DESCRIPTIONS
217
Average Fuel Economy
241
MINI-TRIP COMPUTER — IF EQUIPPED
231
Distance To Empty (DTE)
241
Control Buttons
232
Tire PSI
242
ELECTRONIC VEHICLE INFORMATION CENTER
Elapsed Time
242
(EVIC) — IF EQUIPPED
233
EVIC Units Selection (UNITS IN Display)
242
Electronic Vehicle Information Center (EVIC)
System Status
243
Displays
235

-------------------------------------------------------------------------------------------------------------------------------------------------------------

212
UNDERSTANDING YOUR INSTRUMENT PANEL
Personal Settings (Customer-Programmable
Operating Instructions — Radio Mode
256
Features)
243
Operation Instructions — CD MODE For CD And
Uconnect® 730N/430/430N CD/DVD/HDD/NAV
MP3 Audio Play
262
— IF EQUIPPED
246
Notes On Playing MP3 Files
264
Operating Instructions (Voice Command System)
LIST Button (CD Mode For MP3 Play)
267
— If Equipped
246
INFO Button (CD Mode For MP3 Play)
267
Operating Instructions (Uconnect® Phone) — If
Equipped
246
Operating Instructions (Uconnect® Phone) — If
Equipped
268
Uconnect® 130
246
Uconnect® Multimedia (Satellite Radio) — If
Operating Instructions — Radio Mode
246
Equipped
268
Operation Instructions — CD MODE For CD And
iPod®/USB/MP3 CONTROL — IF EQUIPPED . . .272
MP3 Audio Play
250
Connecting The iPod® Or External USB
Notes On Playing MP3 Files
252
Device
273
Operation Instructions — Auxiliary Mode
255
Using This Feature
274
Uconnect® 130 WITH SATELLITE RADIO
256

-------------------------------------------------------------------------------------------------------------------------------------------------------------

UNDERSTANDING YOUR INSTRUMENT PANEL
213
Controlling The iPod® Or External USB Device
Left-Hand Switch Functions For Media (i.e., CD)
Using Radio Buttons
274
Operation
281
Play Mode
274
CD/DVD DISC MAINTENANCE
281
List Or Browse Mode
276
RADIO OPERATION AND MOBILE PHONES . .282
Bluetooth® Streaming Audio (BTSA)
278
CLIMATE CONTROLS
282
4
STEERING WHEEL AUDIO CONTROLS — IF
Manual Heating And Air Conditioning
282
EQUIPPED
279
Automatic Temperature Control (ATC) — If
Right-Hand Switch Functions
280
Equipped
287
Left-Hand Switch Functions For Radio
Operating Tips
292
Operation
280

-------------------------------------------------------------------------------------------------------------------------------------------------------------

214
UNDERSTANDING YOUR INSTRUMENT PANEL
INSTRUMENT PANEL FEATURES
1 — Air Outlet
5 — Passenger Airbag
9 — Power Outlet
2 — Side Window Demister Outlet
6 — Glove Compartment
10 — Climate Controls
3 — Instrument Cluster
7 — Heated Seat Switch — If Equipped
11 — Ignition Switch
4 — Radio
8 — Hazard Switch
12 — Trunk Release Button

-------------------------------------------------------------------------------------------------------------------------------------------------------------

UNDERSTANDING YOUR INSTRUMENT PANEL
215
INSTRUMENT CLUSTER
4

-------------------------------------------------------------------------------------------------------------------------------------------------------------

216
UNDERSTANDING YOUR INSTRUMENT PANEL
INSTRUMENT CLUSTER — R/T

-------------------------------------------------------------------------------------------------------------------------------------------------------------

UNDERSTANDING YOUR INSTRUMENT PANEL
217
INSTRUMENT CLUSTER DESCRIPTIONS
removes this heat. You can also turn the Temperature
control to maximum heat, the Mode control to Floor and
1. Temperature Gauge
the Fan control to High. This allows the heater core to act
The temperature gauge shows engine coolant tempera-
as a supplement to the radiator and aids in removing heat
ture. Any reading below the red mark of the gauge shows
from the engine cooling system.
that the engine cooling system is operating properly. The
2. Fuel Door Reminder
gauge pointer may show a higher than normal tempera-
4
ture when driving in hot weather, up mountain grades, in
This is a reminder that the Fuel Filler Door is
heavy stop and go traffic, or when towing a trailer.
located on the left side of the vehicle.
If the pointer rises to the H (red) mark, the instrument
cluster will sound a chime. Pull over and stop the vehicle.
3. Fuel Gauge
Idle the vehicle with the air conditioner turned off until
the pointer drops back into the normal range. If the
When the ignition switch is in the ON/RUN position, the
pointer remains on the H (red) mark, turn the engine off
pointer will show the level of fuel remaining in the fuel
immediately and call for service.
tank.
There are steps that you can take to slow down an
4. Speedometer
impending overheat condition. If your air conditioning is
Indicates the vehicle speed in miles per hour (MPH) and
on, turn it off. The air conditioning system adds heat to
kilometers per hour (km/h).
the engine cooling system and turning off the A/C


Content      ..     7      8      9      10     ..