Lincoln Navigator (2019 year). Manual - part 20


  Index      Lincoln     Lincoln Navigator (2019 year) - manual in english


Search            copyright infringement  


Content      ..     18      19      20      21     ..


Lincoln Navigator (2019 year). Manual - part 20


ESSENTIAL TOWING CHECKS

Follow these guidelines for safe towing:

Do not tow a trailer until you drive your
vehicle at least 1,000 mi (1,600 km).

Consult your local motor vehicle laws for
towing a trailer.

See any instructions that come with
towing accessories for the proper
installation and adjustment specifications.

Service your vehicle more frequently if
you tow a trailer. See Scheduled
Maintenance
 (page 547).

If you use a rental trailer, follow the
instructions the rental agency gives you.

You can find information on load
specification terms found on the tire label
and Safety Compliance label as well as
instructions on calculating your vehicle's load
in the Load Carrying chapter. See Load Limit
(page 292).

Remember to account for the trailer tongue
weight as part of your vehicle load when
calculating the total vehicle weight.

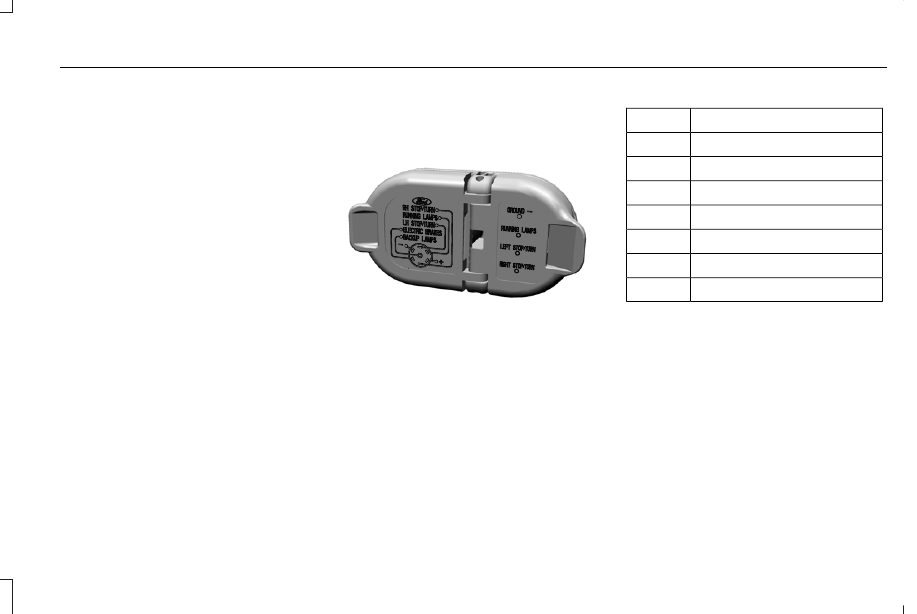
Trailer Towing Connector (Vehicles
with a Trailer Towing Package and
7–Pin Connector)

E163167

When attaching the trailer wiring connector
to your vehicle, only use a proper fitting
connector that works with the vehicle and
trailer functions. Some seven-position
connectors may have the SAE J2863 logo,
which confirms that it is the proper wiring
connector and works correctly with your
vehicle.

Function

Color

Left turn signal and stop lamp.

Yellow

Ground (-).

White

Electric brakes.

Blue

Right turn signal and stop lamp.

Green

Battery (+).

Orange

Running lights.

Brown

Reverse lights.

Grey

Trailer Hitch Cover

Your vehicle has a removable trailer hitch
cover. To remove the trailer hitch cover:

311

Navigator (TB9) Canada/United States of America, enUSA, Edition date: 201808, First-Printing

Towing

-------------------------------------------------------------------------------------------------------------------------------------------------------------

E268259

1. Grab the trailer hitch cover at the bottom

and pull towards the rear of the vehicle
until the bottom of the trailer hitch cover
unsnaps from the bumper.

2. Grab the trailer hitch cover at the edge

and rotate until the top of the trailer hitch
cover unsnaps from the bumper, then
remove the trailer hitch cover.

To install the trailer hitch cover:

E268260

1. Line up the snaps on the trailer hitch

cover to the holes on the bumper and
push forward until it snaps into place.

Hitches

WARNING: Do not cut, drill, weld or

modify the trailer hitch. Modifying the trailer
hitch could reduce the hitch rating.

Do not use a hitch that either clamps onto
the bumper or attaches to the axle.

Distribute the trailer load so 10-15% of the
total trailer weight is on the tongue.

Integrated Hitch Rating

WARNING: Towing trailers beyond

the maximum recommended gross trailer
weight exceeds the limit of your vehicle
and could result in engine damage,
transmission damage, structural damage,
loss of vehicle control, vehicle rollover and
personal injury.

The standard integrated hitch has two ratings
depending on mode of operation:

Weight-carrying mode requires a draw
bar and hitch ball. The draw bar supports
all the vertical tongue load of the trailer.

Weight-distributing mode requires an
aftermarket weight-distributing system,
which includes draw bar, hitch ball, spring
bars and snap-up brackets. This system
distributes the vertical tongue load of the
trailer between the truck and the trailer.

312

Navigator (TB9) Canada/United States of America, enUSA, Edition date: 201808, First-Printing

Towing

-------------------------------------------------------------------------------------------------------------------------------------------------------------

Maximum Tongue Weight

Maximum Trailer Weight

Mode

600 lb (272 kg)

6,000 lb (2,722 kg)

Weight carrying

900 lb (408 kg)

9,000 lb (4,082 kg)

Weight distributing

Note: These are hitch ratings only. Actual
vehicle ratings are dependent on engine,
transmission and axle combinations.

Weight-distributing Hitch

WARNING: Do not adjust the spring

bars so that your vehicle's rear bumper is
higher than before attaching the trailer.
Doing so will defeat the function of the
weight-distributing hitch, which may cause
unpredictable handling, and could result
in serious personal injury.

When hooking-up a trailer using a
weight-distributing hitch, always use the
following procedure:

1. Park the loaded vehicle, without the

trailer, on a level surface.

2. Measure the height to the top of your

vehicle's front wheel opening on the
fender. This is H1.

3. Attach the loaded trailer to your vehicle

without the weight-distributing bars
connected.

4. Measure the height to the top of your

vehicle's front wheel opening on the
fender a second time. This is H2.

5. Install and adjust the tension in the

weight-distributing bars so that the height
of your vehicle's front wheel opening on
the fender is approximately half the way
down from H2, toward H1.

6. Check that the trailer is level or slightly

nose down toward your vehicle. If not,
adjust the ball height accordingly and
repeat Steps 2-6.

When the trailer is level or slightly nose down
toward the vehicle:

Lock the bar tension adjuster in place.

Check that the trailer tongue securely
attaches and locks onto the hitch.

Install safety chains, lighting and trailer
brake controls as required by law or the
trailer manufacturer.

Safety Chains

Note: Do not attach safety chains to the
bumper. Always connect the safety chains
to the frame or hook retainers of your trailer
hitch.

Install trailer safety chains to the trailer hitch
as recommended by the manufacturer. Cross
the chains under the trailer tongue and allow
enough slack for turning tight corners. Do
not allow the chains to drag on the ground.

313

Navigator (TB9) Canada/United States of America, enUSA, Edition date: 201808, First-Printing

Towing

-------------------------------------------------------------------------------------------------------------------------------------------------------------

E265060

If the trailer safety chain hook has a latch,
make sure the latch fully closes.

Trailer Brakes

 (If Equipped)

WARNING: Do not connect a trailer's

hydraulic brake system directly to your
vehicle's brake system. Your vehicle may
not have enough braking power and your
chances of having a collision greatly
increase.

Electric brakes and manual, automatic or
surge-type trailer brakes are safe if you install
them properly and adjust them to the
manufacturer's specifications. The trailer
brakes must meet local and federal
regulations.

The rating for the tow vehicle's braking
system operation is at the gross vehicle
weight rating, not the gross combined
weight rating.

Separate functioning brake systems are
required for safe control of towed vehicles
and trailers weighing more than 1500 lb
(680 kg) when loaded.

Integrated Trailer Brake Controller

 (If

Equipped)

WARNING: Use the integrated trailer

brake controller to properly adjust the
trailer brakes and check all connections
before towing a trailer. Failure to follow
this instruction could result in the loss of
control of your vehicle, personal injury or
death.

E183395

When used properly, the trailer brake
controller assists in smooth and effective
trailer braking by powering the trailer’s
electric or electric-over-hydraulic brakes with
a proportional output based on the towing
vehicle’s brake pressure.

The controller user interface consists of the
following:

A: + and - (Gain adjustment buttons): Pressing
these buttons adjusts the controller's power
output to the trailer brakes in 0.5 increments.
You can increase the gain setting to 10.0
(maximum trailer braking) or decrease it to
0 (no trailer braking). The gain setting
displays in the message center.

314

Navigator (TB9) Canada/United States of America, enUSA, Edition date: 201808, First-Printing

Towing

-------------------------------------------------------------------------------------------------------------------------------------------------------------

The controller shows gain setting, output bar
graph, and trailer connectivity status in the
information display. They appear in the
information display as follows:

Trailer Brake Controller Gain (without
trailer connected): Shows the current gain
setting during a given ignition cycle and
when adjusting the gain. This also
displays if you use the manual control
lever or make gain adjustments with no
trailer connected.

Trailer Brake Controller Gain Output:
Displays when you push your vehicle's
brake pedal, or upon use of the manual
control. Bar indicators illuminate in the
information display to indicate the
amount of power going to the trailer
brakes relative to the brake pedal or
manual control input. One bar indicates
the least amount of output; six bars
indicate maximum output.

Trailer Connected: Displays when the
system senses a correct trailer wiring
connection (a trailer with electric trailer
brakes) during a given ignition cycle.

Trailer Disconnected: Displays,
accompanied by a single audible time,
when the system senses a trailer
connection and then a disconnection,
either intentional or unintentional, during
a given ignition cycle. It also displays if a
truck or trailer-wiring fault occurs causing
the trailer to appear disconnected. This
message can also display if you use the
manual control lever without a trailer
connected. After disconnecting the trailer
connector, press the brake pedal for
approximately five seconds to allow the
system to detect and update the trailer
status.

B: Manual control lever: Slide the control
lever to the left to turn on the trailer's electric
brakes independent of the tow vehicle's. See
the following Procedure for adjusting gain
section for instructions on proper use of this
feature. If you use the manual control while
the brake is also applied, the greater of the
two inputs determines the power sent to the
trailer brakes.

Stop lamps: Using the manual control
lever illuminates both the trailer brake
lamps and your vehicle brake lamps
except the center high-mount stop lamp,
if you make the proper electrical
connection to the trailer. Pressing your
vehicle brake pedal also illuminates both
trailer and vehicle brake lamps.

Procedure for Adjusting Gain

Note: Only perform this procedure in a
traffic-free environment at speeds of
approximately 20–25 mph (32–40 km/h).

315

Navigator (TB9) Canada/United States of America, enUSA, Edition date: 201808, First-Printing

Towing

-------------------------------------------------------------------------------------------------------------------------------------------------------------

The gain setting sets the trailer brake
controller for the specific towing condition.
You should change the setting as towing
conditions change. Changes to towing
conditions include trailer load, vehicle load,
road conditions and weather.

The gain should be set to provide the
maximum trailer braking assistance while
making sure the trailer wheels do not lock
when using the brakes. Locked trailer wheels
may lead to trailer instability.

1. Make sure the trailer brakes are in good

working condition, functioning normally
and properly adjusted. See your trailer
dealer if necessary.

2. Hook up the trailer and make the

electrical connections according to the
trailer manufacturer's instructions.

3. When you plug in a trailer with electric or

electric-over-hydraulic brakes, a message
confirming connection appears in the
information display.

4. Use the gain adjustment (+ and -) buttons

to increase or decrease the gain setting
to the desired starting point. A gain
setting of 6.0 is a good starting point for
heavier loads.

5. In a traffic-free environment, tow the

trailer on a dry, level surface at a speed
of 20–25 mph (32–40 km/h) and
squeeze the manual control lever
completely.

6. If the trailer wheels lock up, indicated by

squealing tires, reduce the gain setting.
If the trailer wheels turn freely, increase
the gain setting. Repeat Steps 5 and 6
until the gain setting is at a point just
below trailer wheel lock-up. If towing a
heavier trailer, trailer wheel lock-up may
not be attainable even with the maximum
gain setting of 10.

Explanation of Information Display Warning
Messages

Note: An authorized dealer can diagnose
the trailer brake controller to determine
exactly which trailer fault has occurred.
However, your warranty does not cover this
diagnosis if the fault is with the trailer.

A message indicating a trailer brake module
fault may display in response to faults sensed
by the trailer brake controller, accompanied
by a single tone. If this message appears,
contact an authorized dealer as soon as
possible for diagnosis and repair. The
controller may still function, but performance
may be degraded.

A message indicating a trailer wiring fault
may display when there is a short circuit on
the electric brake output wire. If this message
displays, accompanied by a single tone, with
no trailer connected, the problem is with your
vehicle wiring between the trailer brake
controller and the 7-pin connector at the
bumper. If the message only displays with a
trailer connected, the problem is with the
trailer wiring. Consult your trailer dealer for
assistance. This can be a short to ground
(such as a chaffed wire), short to voltage
(such as a pulled pin on trailer emergency
breakaway battery) or the trailer brakes may
be drawing too much current.

316

Navigator (TB9) Canada/United States of America, enUSA, Edition date: 201808, First-Printing

Towing

-------------------------------------------------------------------------------------------------------------------------------------------------------------

Points to Remember

Note: Do not attempt removal of the trailer
brake controller without consulting the
Workshop Manual. Damage to the unit may
result.

Adjust gain setting before using the
trailer brake controller for the first time.

Adjust gain setting, using the procedure
above, whenever road, weather and
trailer or vehicle loading conditions
change from when the gain was initially
set.

Only use the manual control lever for
proper adjustment of the gain during
trailer setup. Misuse, such as application
during trailer sway, could cause instability
of trailer or tow vehicle.

Avoid towing in adverse weather
conditions. The trailer brake controller
does not provide anti-lock control of the
trailer wheels. Trailer wheels can lock up
on slippery surfaces, resulting in reduced
stability of trailer and tow vehicle.

The trailer brake controller is equipped
with a feature that reduces output at
vehicle speeds below 11 mph (18 km/h)
so trailer and vehicle braking is not jerky
or harsh. This feature is only available
when applying the brakes using your
vehicle's brake pedal, not the controller.

The controller interacts with the brake
control system and powertrain control
system of your vehicle to provide the
best performance on different road
conditions.

Your vehicle's brake system and the
trailer brake system work independently
of each other. Changing the gain setting
on the controller does not affect the
operation of your vehicle's brakes
whether you attach a trailer or not.

When you switch the engine off, the
controller output is disabled and the
display and module shut down. The
controller module and display turn on
when you switch the ignition on.

The trailer brake controller is only a
factory-installed or dealer-installed item.
Lincoln is not responsible for warranty or
performance of the controller due to
misuse or customer installation.

Trailer Lamps

WARNING: Never connect any trailer

lamp wiring to the vehicle's tail lamp wiring;
this may damage the electrical system
resulting in fire. Contact your authorized
dealer as soon as possible for assistance
in proper trailer tow wiring installation.
Additional electrical equipment may be
required.

Trailer lamps are required on most towed
vehicles. Make sure all running lights, brake
lights, turn signals and hazard lights are
working.

317

Navigator (TB9) Canada/United States of America, enUSA, Edition date: 201808, First-Printing

Towing

-------------------------------------------------------------------------------------------------------------------------------------------------------------

Before Towing a Trailer

Practice turning, stopping and backing up to
get the feel of your vehicle-trailer
combination before starting on a trip. When
turning, make wider turns so the trailer
wheels clear curbs and other obstacles.

When Towing a Trailer

Do not drive faster than 70 mph
(113 km/h) during the first 500 mi
(800 km).

Do not make full-throttle starts.

Check your hitch, electrical connections
and trailer wheel lug nuts thoroughly after
you have traveled 50 mi (80 km).

When stopped in congested or heavy
traffic during hot weather, place the
transmission in park (P) to aid engine and
transmission cooling and to help A/C
performance.

Turn off the speed control when carrying
heavy loads or in hilly terrain. The speed
control may turn off automatically when
you are towing on long, steep grades.

Shift to a lower gear when driving down
a long or steep hill. Do not apply the
brakes continuously, as they may
overheat and become less effective.

If your transmission has a Grade Assist
or Tow/Haul feature, use this feature
when towing. This provides engine
braking and helps eliminate excessive
transmission shifting for optimum fuel
economy and transmission cooling.

If your vehicle has AdvanceTrac with
RSC, this system may turn on during
typical cornering maneuvers with a
heavily loaded trailer. This is normal.
Turning the corner at a slower speed
while towing may reduce this tendency.

If your vehicle has Adaptive suspension,
you can select NORMAL or SPORT drive
control modes for better experience
when towing a trailer.  See Information
Displays
 (page 120).

If you are towing a trailer frequently in
hot weather, hilly conditions, at the gross
combined weight rating (or any
combination of these factors), consider
refilling your rear axle with synthetic gear
lubricant (if the axle is not already filled
with it).  See Capacities and
Specifications
 (page 418).

Allow more distance for stopping with a
trailer attached. Anticipate stops and
brake gradually.

Avoid parking on a grade. However, if
you must park on a grade:

1. Turn the steering wheel to point your

vehicle tires away from traffic flow.

2. Set your vehicle parking brake.

3. Place the transmission in park (P).

4. Place wheel chocks in the front and back

of the trailer wheels.

Note: Chocks are not included with your
vehicle.

318

Navigator (TB9) Canada/United States of America, enUSA, Edition date: 201808, First-Printing

Towing

-------------------------------------------------------------------------------------------------------------------------------------------------------------

Your vehicle may be equipped with a
temporary or conventional spare tire. A
temporary spare tire is different in size
(diameter or width), tread-type (All-Season
or All-Terrain) or is from a different
manufacturer than the road tires on your
vehicle. Consult information on the tire label
or Safety Compliance label for limitations
when using.

Launching or Retrieving a Boat or
Personal Watercraft (PWC)

Note: Disconnect the wiring to the trailer
before backing the trailer into the water.

Note: Reconnect the wiring to the trailer
after removing the trailer from the water.

When backing down a ramp during boat
launching or retrieval:

Do not allow the static water level to rise
above the bottom edge of the rear
bumper.

Do not allow waves to break higher than
6 in (15 cm) above the bottom edge of
the rear bumper.

Exceeding these limits may allow water to
enter vehicle components:

Causing internal damage to the
components.

Affecting driveability, emissions, and
reliability.

Replace the rear axle lubricant anytime the
rear axle has been submerged in water.
Water may have contaminated the rear axle
lubricant, which is not normally checked or
changed unless a leak is suspected or other
axle repair is required.

TOWING THE VEHICLE ON FOUR
WHEELS

WARNING: If your vehicle has a

steering wheel lock make sure the ignition
is in the accessory or on position when
being towed.

Recreational Towing

Note: Put your climate control system in
recirculated air mode to prevent exhaust
fumes from entering your vehicle.  See
Climate Control (page 152).

Follow these guidelines if you have a need
for recreational towing, such as towing your
vehicle behind a motorhome. These
guidelines are designed to prevent damage
to your transmission.

Two-wheel Drive Vehicles

You cannot tow a two-wheel drive vehicle
with any wheels on the ground as vehicle or
transmission damage may occur. You must
tow your vehicle with all four wheels off the
ground, for example when using a
car-hauling trailer.

319

Navigator (TB9) Canada/United States of America, enUSA, Edition date: 201808, First-Printing

Towing

-------------------------------------------------------------------------------------------------------------------------------------------------------------

Four-wheel Drive Vehicles Without 4x4
LOW

If your vehicle does not have 4x4 Low, you
cannot tow your vehicle with any wheels on
the ground or vehicle damage may occur.
You must tow your vehicle with all four
wheels off the ground, for example when
using a car-hauling trailer.

Four-wheel Drive Vehicles With 4x4 LOW

You can only tow a vehicle with 4X4 LOW
with all wheels on the ground by placing the
transfer case in its neutral position and
engaging the four wheel down towing
feature. Perform the steps outlined in the
following section after positioning your
vehicle behind the tow vehicle and properly
securing them together.

Four-wheel-down Towing

Note: If completed successfully, the
information display shows Neutral Tow
Enabled Leave Transmission in Neutral
.
This indicates that your vehicle is safe to tow
with all wheels on the ground.

Note: If you do not see the message in the
information display, you must perform the
procedure again from the beginning.

Note: Make sure you properly secure your
vehicle to the tow vehicle.

1. Start your vehicle.

2. Confirm that your vehicle is in NORMAL

mode. See Drive Mode Control (page
284).

3. Place your vehicle in stay in neutral

mode. See Automatic Transmission
(page 210).

4. Switch your vehicle off by pressing the

engine START/STOP button once. A
Transmission Not in Park message
appears in the information display.

5. Place your vehicle in accessory mode by

pressing the start button once without
pressing the brake pedal.

6. Press and hold the brake pedal.

7. Enable neutral tow through the

information display by selecting Settings
from the menu. See General Information
(page 120).

8. Then select Advanced Settings.
9. Then select Vehicle.
10.

Then select Neutral Tow.

11.

Press and hold the OK button until the
information display states Neutral Tow
Enabled Leave Transmission in
Neutral
.

Note: If completed successfully, the
information display shows Neutral Tow
Enabled Leave Transmission in Neutral
.
This indicates that your vehicle is safe to tow
with all wheels on the ground.

Note: If you do not see the message in the
information display, you must perform the
procedure again from the beginning.

Note: You may hear an audible noise as the
transfer case shifts into neutral, this is
normal.

12.

Leave the transmission in neutral (N)
and switch the ignition off by pressing
the engine START/STOP button once
without pressing the brake pedal. You
do not need to leave your keys in the
vehicle. You can lock and unlock your
vehicle as you normally do.

320

Navigator (TB9) Canada/United States of America, enUSA, Edition date: 201808, First-Printing

Towing

-------------------------------------------------------------------------------------------------------------------------------------------------------------

WARNING: Do not disconnect the

battery during recreational towing. It
prevents the transfer case from shifting
properly and may cause the vehicle to roll,
even if the transmission is in park (P).

WARNING: Shifting the transfer case

to its neutral position for recreational
towing may cause the vehicle to roll, even
if the transmission is in park (P). It may
injure the driver and others. Make sure you
press the foot brake and the vehicle is in
a secure, safe position when you shift to
neutral (N).

Note: Failing to put the transfer case in its
neutral position can damage vehicle
components.

Note: You can check four-wheel-down
towing status at any time by opening the
driver's door or turning the ignition to the
accessory or on position. A message
appears in the information display confirming
your vehicle is in neutral tow.

To exit four-wheel-down towing and return
the transfer case to its 2H position:

1. With your vehicle still properly secured

to the tow vehicle, press the brake pedal
and start the engine.

2. Switch your vehicle off by pressing the

engine START/STOP button once.

3. Place your vehicle in accessory mode by

pressing the start button once without
pressing the brake pedal.

4. Press the brake pedal.

5. Place the transmission back into park (P).

6. Release the brake pedal.

Note: If completed successfully, the
information display shows 2H and Neutral
Tow Disabled
.

Note: If the indicator light and message do
not display, you must perform the procedure
again from the beginning.

Note: You may hear an audible noise as the
transfer case shifts out of its neutral position,
this is normal.

Note: If Shift Delayed Pull Forward displays
in the instrument cluster, transfer case gear
tooth blockage is present. See the
instructions following this section.

7. Apply the parking brake, then disconnect

your vehicle from the tow vehicle.

8. Release the parking brake, start the

engine, and shift the transmission into
drive (D) to make sure the transfer case
is out of the neutral tow position.

9. If the transfer case does not successfully

shift out of neutral (N), set the parking
brake until you can have your vehicle
serviced.

Resolving the Shift Delayed Pull Forward
or To Exit 4x4 LOW Shift to N Message

If the instrument cluster displays these
messages, perform the following:

1. Press and hold the brake pedal.

2. Put the transmission into neutral (N), then

start the engine.

3. With the engine running, shift the

transmission into drive (D) and let the
vehicle roll forward, up to 3 ft (1 m). You
may hear an audible noise as the transfer
case shifts out of its neutral position. This
is normal.

321

Navigator (TB9) Canada/United States of America, enUSA, Edition date: 201808, First-Printing

Towing

-------------------------------------------------------------------------------------------------------------------------------------------------------------

4. Make sure the instrument cluster displays

Neutral Tow Disabled.

322

Navigator (TB9) Canada/United States of America, enUSA, Edition date: 201808, First-Printing

Towing

-------------------------------------------------------------------------------------------------------------------------------------------------------------

BREAKING-IN

You need to break in new tires for
approximately 300 mi (480 km). During this
time, your vehicle may exhibit some unusual
driving characteristics.

Avoid driving too fast during the first 1,000 mi
(1,600 km). Vary your speed frequently and
change up through the gears early. Do not
labor the engine.

Do not tow during the first 1,000 mi
(1,600 km).

REDUCED ENGINE PERFORMANCE

WARNING: If you continue to drive

your vehicle when the engine is
overheating, the engine could stop without
warning. Failure to follow this instruction
could result in the loss of control of your
vehicle.

If the engine coolant temperature gauge
needle moves to the upper limit position, the
engine is overheating.  See Gauges (page
113).

You must only drive your vehicle for a short
distance if the engine overheats. The
distance you can travel depends on ambient
temperature, vehicle load and terrain. The
engine continues to operate with limited
power for a short period of time.

If the engine temperature continues to rise,
the fuel supply to the engine reduces.  The
air conditioning switches off and the engine
cooling fan operates continually.

1. Gradually reduce your speed and stop

your vehicle as soon as it is safe to do
so.

2. Immediately switch the engine off to

prevent severe engine damage.

3. Wait for the engine to cool down.

4. Check the coolant level.  See Engine

Coolant Check (page 364).

5. Have your vehicle checked as soon as

possible.

ECONOMICAL DRIVING

Fuel economy is affected by several things
such as how you drive, the conditions you
drive under and how you maintain your
vehicle.

There are some things to keep in mind that
may improve your fuel economy:

Accelerate and slow down in a smooth,
moderate fashion.

Drive at steady speeds.

Anticipate stops; slowing down may
eliminate the need to stop.

Combine errands and minimize
stop-and-go driving (When running
errands, go to the furthest destination
first and then work your way back home).

Close the windows for high-speed
driving.

Drive at reasonable speeds.

Keep the tires properly inflated and use
only the recommended size.

Use the recommended engine oil.

Perform all regularly scheduled
maintenance.

323

Navigator (TB9) Canada/United States of America, enUSA, Edition date: 201808, First-Printing

Driving Hints

-------------------------------------------------------------------------------------------------------------------------------------------------------------

There are also some things you may want to
avoid doing because they reduce your fuel
economy:

Avoid sudden or hard accelerations.

Avoid revving the engine before turning
off the car.

Avoid long idle periods.

Do not warm up your vehicle on cold
mornings.

Reduce the use of air conditioning and
heat.

Avoid using speed control in hilly terrain.

Do not rest your foot on the brake pedal
while driving.

Avoid carrying unnecessary weight.

Avoid adding particular accessories to
your vehicle (e.g. bug deflectors,
rollbars/light bars, running boards, ski
racks).

Avoid driving with the wheels out of
alignment.

DRIVING THROUGH WATER

WARNING: Do not drive through

flowing or deep water as you may lose
control of your vehicle.

Note: Driving through standing water can
cause vehicle damage.

Note: Engine damage can occur if water
enters the air filter.

Before driving through standing water, check
the depth. Never drive through water that is
higher than the bottom of the wheel hubs.

E176913

When driving through standing water, drive
very slowly and do not stop your vehicle.
Your brake performance and traction may
be limited. After driving through water and
as soon as it is safe to do so:

Lightly press the brake pedal to dry the
brakes and to check that they work.

Check that the horn works.

Check that the exterior lights work.

Turn the steering wheel to check that the
steering power assist works.

FLOOR MATS

WARNING: Use a floor mat designed

to fit the footwell of your vehicle that does
not obstruct the pedal area. Failure to
follow this instruction could result in the
loss of control of your vehicle, personal
injury or death.

WARNING: Pedals that cannot move

freely can cause loss of vehicle control and
increase the risk of serious personal injury.

324

Navigator (TB9) Canada/United States of America, enUSA, Edition date: 201808, First-Printing

Driving Hints

-------------------------------------------------------------------------------------------------------------------------------------------------------------

WARNING: Secure the floor mat to

both retention devices so that it cannot slip
out of position and interfere with the
pedals. Failure to follow this instruction
could result in the loss of control of your
vehicle, personal injury or death.

WARNING: Do not place additional

floor mats or any other covering on top of
the original floor mats. This could result in
the floor mat interfering with the operation
of the pedals. Failure to follow this
instruction could result in the loss of
control of your vehicle, personal injury or
death.

WARNING: Always make sure that

objects cannot fall into the driver foot well
while your vehicle is moving. Objects that
are loose can become trapped under the
pedals causing a loss of vehicle control.

E142666

To install the floor mats, position the floor
mat eyelet over the retention post and press
down to lock in position.

To remove the floor mat, reverse the
installation procedure.

Note: Regularly check the floor mats to make
sure they are secure.

325

Navigator (TB9) Canada/United States of America, enUSA, Edition date: 201808, First-Printing

Driving Hints

-------------------------------------------------------------------------------------------------------------------------------------------------------------

ROADSIDE ASSISTANCE

Vehicles Sold in the United States:
Getting Roadside Assistance

To fully assist you should you have a vehicle
concern, Lincoln Motor Company offers a
complimentary roadside assistance program.
This program is separate from the New
Vehicle Limited Warranty.

The service is available:

Throughout the life of the vehicle for
original owners.

For six years or 70,000 mi (110,000 km)
(whichever comes first) for subsequent
owners.

Roadside Assistance covers:

A flat tire change with a good spare
(except vehicles supplied with a tire
inflation kit).

Battery jump start.

Lock-out assistance (key replacement
cost is the client's responsibility).

Fuel delivery — independent service
contractors, if not prohibited by state,
local or municipal law shall deliver up to
2 gal (8 L) of gasoline or 5 gal (20 L) of
diesel fuel to a disabled vehicle.
Roadside Assistance limits fuel delivery
service to two no-charge occurrences
within a 12-month period.

Winch out — available within 100 ft (30 m)
of a paved or county maintained road,
no recoveries.

Towing — independent service
contractors, if not prohibited by state,
local or municipal law shall tow Lincoln
eligible vehicles to the client's selling or
preferred dealer within 100 mi (160 km)
of the disablement location or to the
nearest Lincoln dealer. If a client requests
a tow to a selling or preferred dealer that
is more than 100 mi (160 km) from the
disablement location, the client is
responsible for any mileage costs in
excess of 100 mi (160 km).

Roadside Assistance includes up to $200
for a towed trailer if the disabled eligible
vehicle requires service at the nearest
authorized dealer.  If the towing vehicle
is operational but the trailer is not, then
the trailer does not qualify for any
roadside services.

Vehicles Sold in the United States:
Using Roadside Assistance

United States clients who require roadside
assistance, call 1-800-521-4140.

326

Navigator (TB9) Canada/United States of America, enUSA, Edition date: 201808, First-Printing

Roadside Emergencies

-------------------------------------------------------------------------------------------------------------------------------------------------------------


Content      ..     18      19      20      21     ..