Lincoln MKT (2019 year). Manual - part 15


  Index      Lincoln     Lincoln MKT (2019 year) - manual in english


Search            copyright infringement  


Content      ..     13      14      15      16     ..


Lincoln MKT (2019 year). Manual - part 15


E156130

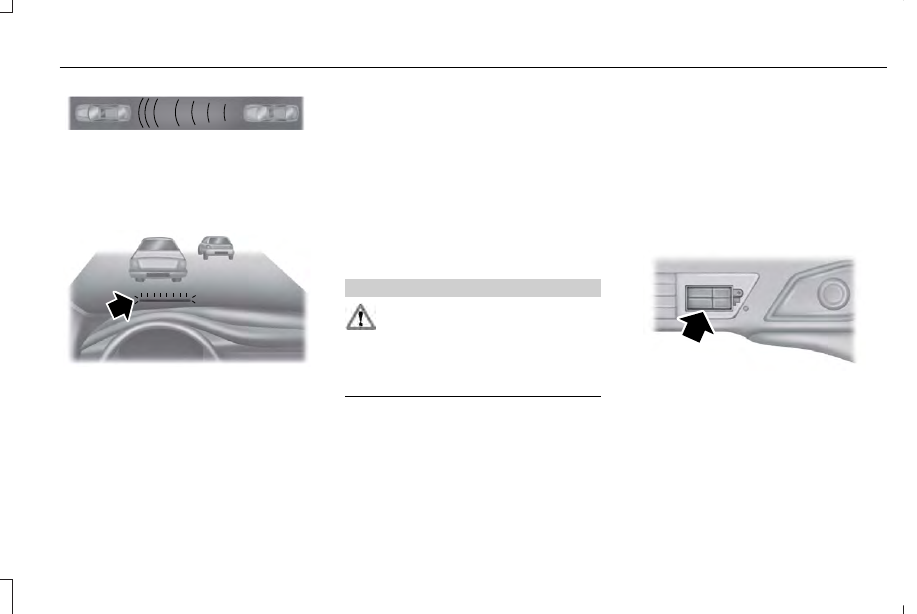
This system is designed to alert the driver of
certain collision risks. A radar detects if your
vehicle is rapidly approaching another
vehicle traveling in the same direction as
yours.

E156131

If it is, a red warning light illuminates and an
audible warning chime sounds.

The brake support system assists the driver
in reducing the collision speed by charging
the brakes. If the risk of collision further
increases after the warning light illuminates,
the brake support prepares the brake system
for rapid braking. This may be apparent to
the driver. The system does not automatically
activate the brakes but, if the brake pedal is
pressed, full force braking is applied even if
the brake pedal is lightly pressed.

Using the Collision Warning System

WARNING

The collision warning system’s brake
support can only help reduce the

speed at which a collision occurs if the driver
applies the vehicle’s brakes. The brake pedal
must be pressed just like any typical braking
situation.

The warning system sensitivity can be
adjusted to one of three possible settings by
using the information display control.  See
General Information (page 108).

Note: If collision warnings are perceived as
being too frequent or disturbing then the
warning sensitivity can be reduced, though
the manufacturer recommends using the
highest sensitivity setting where possible.
Setting lower sensitivity would lead to fewer
and later system warnings.  See General
Information
 (page 108).

Blocked Sensors

E145632

231

MKT (TP4) , enUSA, Edition date: 201803, First-Printing

Driving Aids

-------------------------------------------------------------------------------------------------------------------------------------------------------------

If a message regarding a blocked sensor
appears in the information display, the radar
signals from the sensor have been
obstructed. The sensors are located behind
a fascia cover near the driver side of the
lower grille. When the sensors are

obstructed, a vehicle ahead cannot be
detected and the collision warning system
does not function. The following table lists
possible causes and actions for this message
being displayed.

Action

Cause

Clean the grille surface in front of the radar or remove the object

causing the obstruction

The surface of the radar in the grille is dirty or obstructed in some

way

Wait a short time. It may take several minutes for the radar to detect

that it is no longer obstructed

The surface of the radar in the grille is clean but the message remains

in the display

The collision warning system is temporarily disabled. Collision warning
should automatically reactivate a short time after the weather condi-

tions improve

Heavy rain, spray, snow, or fog is interfering with the radar signals

The collision warning system is temporarily disabled. Collision warning
should automatically reactivate a short time after the weather condi-

tions improve

Swirling water, or snow or ice on the surface of the road may interfere

with the radar signals

232

MKT (TP4) , enUSA, Edition date: 201803, First-Printing

Driving Aids

-------------------------------------------------------------------------------------------------------------------------------------------------------------

System Limitations

WARNING

The collision warning system’s brake
support can only help reduce the

speed at which a collision occurs if the driver
applies the vehicle’s brakes. The brake pedal
must be pressed just like any typical braking
situation.

Due to the nature of radar technology, there
may be certain instances where vehicles do
not provide a collision warning. These
include:

Stationary vehicles or vehicles moving
below 6 mph (10 km/h).

Pedestrians or objects in the roadway.

Oncoming vehicles in the same lane.

Severe weather conditions (see blocked
sensor section).

Debris build-up on the grille near the
headlamps (see blocked sensor section).

Small distance to vehicle ahead.

Steering wheel and pedal movements
are large (very active driving style).

If the front end of the vehicle is hit or
damaged, the radar sensing zone may be
altered causing missed or false collision
warnings. See your authorized dealer to have
your collision warning radar checked for
proper coverage and operation.

DRIVE CONTROL

 (If Equipped)

Lincoln Drive Control

Lincoln Drive Control delivers the Lincoln
driving experience through a suite of
sophisticated electronic vehicle systems.
These systems continuously monitor your
driving inputs and the road conditions to
optimize ride comfort, steering, handling,
powertrain response and sound. You can
preset your preferences for these systems
within the information display. Lincoln Drive
Control will respond to your preferences
based on what gear position you select. This
provides a single location to control multiple
systems performance settings.

Lincoln Drive Control consists of the
following systems:

Adaptive suspension dynamically adjusts
the shock absorbers stiffness in real time
to match the road surface and driver
inputs. This system continuously monitors
your vehicle’s motion, suspension
position, load, speed, road conditions
and steering to adjust the suspension
damping for optimal vehicle control.

Electronically power-assisted steering
adjusts steering effort and feel based on
your vehicle speed and your inputs.

Active noise control utilizes your vehicle
electronics to enhance the acoustic
experience.

Electronic stability control and traction
control maintain your vehicle control in
adverse conditions or high performance
driving.

Electronic throttle control enhances the
powertrain response to your inputs.

233

MKT (TP4) , enUSA, Edition date: 201803, First-Printing

Driving Aids

-------------------------------------------------------------------------------------------------------------------------------------------------------------

Using Lincoln Drive Control

You can configure which of the drive control
modes are active when your vehicle is in
drive (D) or sport (S). The configuration
remains active until modified from the main
menu on the information display.

These systems have a range of modes which
you can choose from in order to customize
your ideal driving experience:

Comfort – Provides a more relaxed
driving experience, maximizing comfort.
Your steering effort decreases and the
suspension movement is more fluid.
Comfort mode is ideal when you desire
enhanced traveling comfort.

Normal – Delivers a balanced
combination of comfortable, controlled
ride and confident handling. This mode
provides an engaging drive experience
and a direct connection to the road
without sacrificing any of the composure
demanded from a luxury vehicle.

Sport – Provides a sportier driving
experience. The suspension stiffens, with
an emphasis on handling and control.
The engine responds more directly to
your inputs and takes on a more powerful
tone. Sport mode is ideal for use during
more spirited driving.

You can change your vehicle's Drive Control
settings from the menu on the display
screen.  See General Information (page 372).

Note: Not all settings may be available.

Note: Lincoln Drive Control has diagnostic
checks that continuously monitor the system
to ensure proper operation. Certain types of
system errors gray out the mode selections
within the information display, preventing
you from changing states when the gear
position is changed. Other types of errors
produce a temporary message in the
information display. See Information
Messages
 (page 115).  If either condition
persists for multiple key cycles, see an
authorized dealer.

234

MKT (TP4) , enUSA, Edition date: 201803, First-Printing

Driving Aids

-------------------------------------------------------------------------------------------------------------------------------------------------------------

REAR UNDER FLOOR STORAGE

 (If

Equipped)

E210725

Pull the strap at the front of the cargo area
to open the storage compartment.

CARGO NETS

 (If Equipped)

WARNING

This net is not designed to restrain
objects during a collision or heavy

braking.

E210726

The cargo net secures lightweight objects
in the cargo area.  Attach the net to the
provided anchors.  Do not put more than
50 lb (22 kg) in the net.

LUGGAGE COVERS

 (If Equipped)

WARNINGS

Make sure that the posts are properly
latched in mounting features. The

cover may cause injury in a sudden stop or
accident if it is not securely installed.

WARNINGS

Do not place any objects on the cargo
area shade. They may obstruct your

vision or strike occupants of your vehicle in
a sudden stop or crash.

Use the cargo shade to cover items in the
cargo area of your vehicle.

E142447

Insert the ends of the cargo shade into the
mounting features located behind the rear
seat on the rear trim panels to install the
cargo shade.

To operate the cargo shade:

235

MKT (TP4) , enUSA, Edition date: 201803, First-Printing

Load Carrying

-------------------------------------------------------------------------------------------------------------------------------------------------------------

1. Pull the rear edge of the cargo shade

rearward.

2. Secure both ends of the support rod into

the retention slots located on the rear
quarter trim panels.

LOAD LIMIT

Vehicle Loading - with and without a
Trailer

This section guides you in the proper
loading of your vehicle, trailer, or both.
Keep your loaded vehicle weight within
its design rating capability, with or
without a trailer. Properly loading your
vehicle provides maximum return of
vehicle design performance. Before you
load your vehicle, become familiar with
the following terms for determining your
vehicle’s weight rating, with or without
a trailer, from the vehicle’s Tire and
Loading Information label or Safety
Compliance Certification label.

Tire and Loading Label Information
Example:

E198719

236

MKT (TP4) , enUSA, Edition date: 201803, First-Printing

Load Carrying

-------------------------------------------------------------------------------------------------------------------------------------------------------------

Payload

E143816

PAYLOAD

Payload is the combined weight of cargo
and passengers that your vehicle is
carrying. The maximum payload for your
vehicle appears on the Tire and Loading
label. The label is either on the B-pillar
or the edge of the driver door. Vehicles
exported outside the US and Canada
may not have a tire and loading label.
Look for “The combined weight of
occupants and cargo should never
exceed XXX kg OR XXX lb” for
maximum payload. The payload listed
on the Tire and Loading Information
label is the maximum payload for your
vehicle as built by the assembly plant. If

you install any additional equipment on
your vehicle, you must determine the
new payload. Subtract the weight of the
equipment from the payload listed on
the Tire and Loading label. When towing,
trailer tongue weight or king pin weight
is also part of payload.

WARNING

The appropriate loading capacity
of your vehicle can be limited

either by volume capacity (how much
space is available) or by payload
capacity (how much weight the vehicle
should carry). Once you have reached
the maximum payload of your vehicle,
do not add more cargo, even if there is
space available. Overloading or
improperly loading your vehicle can
contribute to loss of vehicle control and
vehicle rollover.

237

MKT (TP4) , enUSA, Edition date: 201803, First-Printing

Load Carrying

-------------------------------------------------------------------------------------------------------------------------------------------------------------

GAWR (Gross Axle Weight Rating)

GAWR is the maximum allowable weight
that a single axle (front or rear) can carry.
These numbers are on the Safety
Compliance Certification label. The label
is located on the door hinge pillar,
door-latch post, or the door edge that
meets the door-latch post, next to the
driver seating position.

The total load on each axle must never
exceed its Gross Axle Weight Rating.

GVWR (Gross Vehicle Weight Rating)

GVWR is the maximum allowable weight
of the fully loaded vehicle. This includes
all options, equipment, passengers and
cargo. It appears on the Safety
Compliance Certification label. The label
is located on the door hinge pillar,
door-latch post, or the door edge that
meets the door-latch post, next to the
driver seating position.

The gross vehicle weight must never
exceed the Gross Vehicle Weight Rating.

Safety Compliance Certification Label
Example:

E198828

WARNING

Exceeding the Safety Compliance
Certification label vehicle weight

limits can adversely affect the
performance and handling of your
vehicle, cause vehicle damage and can
result in the loss of control of your
vehicle, serious personal injury or death.

Maximum Loaded Trailer Weight

Maximum loaded trailer weight is the
highest possible weight of a fully loaded
trailer the vehicle can tow. Consult an
authorized dealer (or the RV and Trailer
Towing Guide available at an authorized
dealer) for more detailed information.

GCWR (Gross Combined Weight
Rating)

GCWR is the maximum allowable weight
of the vehicle and the loaded trailer,
including all cargo and passengers, that
the vehicle can handle without risking
damage. (Important: The towing
vehicle’s braking system is rated for
operation at Gross Vehicle Weight
Rating, not at Gross Combined Weight
Rating.) Separate functional brakes
should be used for safe control of towed
vehicles and for trailers where the Gross
Combined Weight of the towing vehicle
plus the trailer exceed the Gross Vehicle
Weight Rating of the towing vehicle.

238

MKT (TP4) , enUSA, Edition date: 201803, First-Printing

Load Carrying

-------------------------------------------------------------------------------------------------------------------------------------------------------------

The gross combined weight must never
exceed the Gross Combined Weight
Rating.

Note:  For trailer towing information
refer to the RV and Trailer Towing Guide
available at an authorized dealer.

WARNINGS

Do not exceed the GVWR or the
GAWR specified on the certification

label.

Do not use replacement tires with
lower load carrying capacities than

the original tires because they may
lower your vehicle's GVWR and GAWR
limitations. Replacement tires with a
higher limit than the original tires do not
increase the GVWR and GAWR
limitations.

Exceeding any vehicle weight
rating can adversely affect the

performance and handling of your
vehicle, cause vehicle damage and can
result in the loss of control of your
vehicle, serious personal injury or death.

Steps for determining the correct load
limit:

1. Locate the statement "The combined

weight of occupants and cargo
should never exceed XXX kg or XXX
lb." on your vehicle’s placard.

2. Determine the combined weight of

the driver and passengers that will
be riding in your vehicle.

3. Subtract the combined weight of the

driver and passengers from XXX kg
or XXX lb.

4. The resulting figure equals the

available amount of cargo and
luggage load capacity. For example,
if the “XXX” amount equals 1,400 lb.
and there will be five 150 lb.
passengers in your vehicle, the
amount of available cargo and
luggage load capacity is 650 lb.
(1400-750 (5 x 150) = 650 lb.)

5. Determine the combined weight of

luggage and cargo being loaded on
the vehicle. That weight may not
safely exceed the available cargo
and luggage load capacity calculated
in Step 4.

6. If your vehicle will be towing a trailer,

load from your trailer will be
transferred to your vehicle. Consult
this manual to determine how this
reduces the available cargo and
luggage load capacity of your
vehicle.

Helpful examples for calculating the
available amount of cargo and
luggage load capacity

Suppose your vehicle has a 1400-pound
(635-kilogram) cargo and luggage
capacity. You decide to go golfing. Is
there enough load capacity to carry you,
four of your friends and all the golf bags?
You and four friends average 220
pounds (99 kilograms) each and the golf
bags weigh approximately 30 pounds
(13.5 kilograms) each. The calculation
would be: 1400 - (5 x 220) - (5 x 30) =

239

MKT (TP4) , enUSA, Edition date: 201803, First-Printing

Load Carrying

-------------------------------------------------------------------------------------------------------------------------------------------------------------

1400 - 1100 - 150 = 150 pounds. Yes, you
have enough load capacity in your
vehicle to transport four friends and your
golf bags. In metric units, the calculation
would be: 635 kilograms - (5 x 99
kilograms) - (5 x 13.5 kilograms) = 635 -
495 - 67.5 = 72.5 kilograms.

Suppose your vehicle has a 1400-pound
(635-kilogram) cargo and luggage
capacity. You and one of your friends
decide to pick up cement from the local
home improvement store to finish that
patio you have been planning for the
past two years. Measuring the inside of
the vehicle with the rear seat folded
down, you have room for twelve
100-pound (45-kilogram) bags of
cement. Do you have enough load
capacity to transport the cement to your
home? If you and your friend each weigh
220 pounds (99 kilograms), the
calculation would be: 1400 - (2 x 220) -
(12 x 100) = 1400 - 440 - 1200 = - 240
pounds. No, you do not have enough
cargo capacity to carry that much
weight. In metric units, the calculation
would be: 635 kilograms - (2 x 99

kilograms) - (12 x 45 kilograms) = 635 -
198 - 540 = -103 kilograms. You will need
to reduce the load weight by at least
240 pounds (104 kilograms). If you
remove three 100-pound (45-kilogram)
cement bags, then the load calculation
would be:1400 - (2 x 220) - (9 x 100) =
1400 - 440 - 900 = 60 pounds. Now you
have the load capacity to transport the
cement and your friend home. In metric
units, the calculation would be: 635
kilograms - (2 x 99 kilograms) - (9 x 45
kilograms) = 635 - 198 - 405 = 32
kilograms.

The above calculations also assume that
the loads are positioned in your vehicle
in a manner that does not overload the
front or the rear gross axle weight rating
specified for your vehicle on the Safety
Compliance Certification label.

Special Loading Instructions for
Owners of Pick-up Trucks and Utility-
type Vehicles

WARNING

When loading the roof racks, we
recommend you evenly distribute

the load, as well as maintain a low center
of gravity. Loaded vehicles, with higher
centers of gravity, may handle differently
than unloaded vehicles. Take extra
precautions, such as slower speeds and
increased stopping distance, when
driving a heavily loaded vehicle.

240

MKT (TP4) , enUSA, Edition date: 201803, First-Printing

Load Carrying

-------------------------------------------------------------------------------------------------------------------------------------------------------------

TOWING A TRAILER

WARNINGS

Do not exceed the GVWR or the
GAWR specified on the certification

label.

Towing trailers beyond the
maximum recommended gross

trailer weight exceeds the limit of your
vehicle and could result in engine
damage, transmission damage,
structural damage, loss of vehicle
control, vehicle rollover and personal
injury.

Note: Your vehicle may have electrical
items, such as fuses or relays, related
to towing.  See Fuses (page 266).

Your vehicle's load capacity designation
is by weight, not by volume, so you
cannot necessarily use all available
space when loading a vehicle or trailer.

Towing a trailer places an extra load on
your vehicle's engine, transmission, axle,

brakes, tires and suspension. Inspect
these components periodically during,
and after, any towing operation.

Load Placement

To help minimize how trailer movement
affects your vehicle when driving:

Load the heaviest items closest to
the trailer floor.

Load the heaviest items centered
between the left and right side trailer
tires.

Load the heaviest items above the
trailer axles or just slightly forward
toward the trailer tongue. Do not
allow the final trailer tongue weight
to go above or below 10-15% of the
loaded trailer weight.

Select a ball mount with the correct
rise or drop. When both the loaded
vehicle and trailer are connected, the
trailer frame should be level, or
slightly angled down toward your
vehicle, when viewed from the side.

When driving with a trailer or payload, a
slight takeoff vibration or shudder may
be present due to the increased payload
weight. Additional information regarding
proper trailer loading and setting your
vehicle up for towing is located in the
Load Carrying chapter.  See Load Limit

(page 236).

You can also find information in the RV
& Trailer Towing Guide
 available at your
authorized dealer, or online.

241

MKT (TP4) , enUSA, Edition date: 201803, First-Printing

Towing

-------------------------------------------------------------------------------------------------------------------------------------------------------------

RV & Trailer Towing Guide Online

http://www.fleet.ford.com/towing-guides/

Website

TRAILER SWAY CONTROL

 (If Equipped)

WARNING

Turning off trailer sway control
increases the risk of loss of vehicle

control, serious injury or death. Ford does
not recommend disabling this feature except
in situations where speed reduction may be
detrimental (such as hill climbing), the driver
has significant trailer towing experience, and
can control trailer sway and maintain safe
operation.

Note: This feature does not prevent trailer
sway, but reduces it when it begins.

Note: This feature cannot stop all trailers
from swaying.

Note: In some cases, if your vehicle speed
is too high, the system may turn on multiple
times, gradually reducing your vehicle speed.

The system applies the brakes to the
individual wheels and reduces engine torque
to aid vehicle stability.  If the trailer begins
to sway, the stability control warning lamp
flashes and a message appears in the
information display.  See Information
Messages
 (page 115).   Slow your vehicle
down, pull safely to the side of the road and
check for correct load distribution.  See Load
Carrying
 (page 235).

You can switch this feature off in the
information display.  When you switch the
ignition on, the system automatically turns
on.

RECOMMENDED TOWING
WEIGHTS

Note: Trailer tow is not permitted on all
applications of Livery and Limousine.

Note: Do not exceed the trailer weight
for your vehicle configuration listed in
the chart below.

Note: Make sure to take into
consideration trailer frontal area. Do not
exceed 20 ft² (1.86 m²) if your vehicle
can tow a class I trailer or 40 ft² (3.72
m²) if your vehicle can tow a class III
trailer.

Note: For high altitude operation,
reduce the gross combined weight by
2% per 1,000 ft (300 m) starting at the

1,000 ft (300 m) elevation point.

242

MKT (TP4) , enUSA, Edition date: 201803, First-Printing

Towing

-------------------------------------------------------------------------------------------------------------------------------------------------------------

Note: Certain states require electric
trailer brakes for trailers over a specified
weight. Be sure to check state
regulations for this specified weight. The
maximum trailer weights listed may be
limited to this specified weight, as the
vehicle’s electrical system may not
include the wiring connector needed to
use electric trailer brakes.

Your vehicle may tow a class I or III
trailer provided the maximum trailer
weight is less than or equal to the
maximum trailer weight listed for your
vehicle configuration on the following
chart.

Maximum Trailer Weight

Maximum GCWR

Powertrain and Trailer Class

2,000 lb (907 kg)

6,900 lb (3,131 kg)

3.7L TiVCT front-wheel drive, Class I

2,000 lb (907 kg)

7,200 lb (3,267 kg)

3.5L GTDi all-wheel drive, Class I

4,500 lb (2,042 kg)

*

9,750 lb (4,424 kg)

3.5L GTDi all-wheel drive, Class III

*

 For towing trailers up to 4500 lb (2042 kg), use a weight-carrying hitch and ball, which uniformly spreads the trailer tongue

loads through your vehicle’s underbody structure.

243

MKT (TP4) , enUSA, Edition date: 201803, First-Printing

Towing

-------------------------------------------------------------------------------------------------------------------------------------------------------------

ESSENTIAL TOWING CHECKS

Follow these guidelines for safe towing:

Do not tow a trailer until you drive your
vehicle at least 1,000 mi (1,600 km).

Consult your local motor vehicle laws for
towing a trailer.

See the instructions included with towing
accessories for the proper installation
and adjustment specifications.

Service your vehicle more frequently if
you tow a trailer. See Scheduled
Maintenance
 (page 483).

If you use a rental trailer, follow the
instructions the rental agency gives you.

You can find information on load
specification terms found on the tire label
and Safety Compliance label as well as
instructions on calculating your vehicle's load
in the Load Carrying chapter.  See Load Limit
(page 236).

Remember to account for the trailer tongue
weight as part of your vehicle load when
calculating the total vehicle weight.

Trailer Towing Connector (Vehicles
with a Trailer Towing Package and
7–Pin Connector)

E211391

When attaching the trailer wiring connector
to your vehicle, only use a proper fitting
connector that works with the vehicle and
trailer functions. Some seven-position
connectors may have the SAE J2863 logo,
which confirms that it is the proper wiring
connector and works correctly with your
vehicle.

Function

Color

Left turn signal and stop lamp

Yellow

Ground (-)

White

Electric brakes

Blue

Right turn signal and stop lamp

Green

Battery (+)

Orange

Running lights

Brown

Reverse lights

Grey

Hitches

Do not use a hitch that either clamps onto
the bumper or attaches to the axle.

244

MKT (TP4) , enUSA, Edition date: 201803, First-Printing

Towing

-------------------------------------------------------------------------------------------------------------------------------------------------------------

Distribute the trailer load so 10-15% of the
total trailer weight is on the tongue.

Weight-Distributing Hitch

WARNING

Do not adjust the spring bars so that
your vehicle's rear bumper is higher

than before attaching the trailer. Doing so
will defeat the function of the
weight-distributing hitch, which may cause
unpredictable handling, and could result in
serious personal injury.

When hooking-up a trailer using a
weight-distributing hitch, always use the
following procedure:
1. Park your vehicle, without the trailer, on

a level surface.

2. Measure the height of the top of your

vehicle’s front wheel opening on the
fender. This is H1.

3. Attach the trailer to your vehicle without

the weight-distributing bars connected.

4. Measure the height of the top of your

vehicle’s front wheel opening on the
fender a second time. This is H2.

5. Install and adjust the tension in the

weight distributing bars so that the height
of the front fender is approximately
halfway between H1 and H2.

6. Check that the trailer is level. If not level,

adjust the ball height accordingly and
repeat Steps 3–6.

Safety Chains

Note: Never attach safety chains to the
bumper.

Always connect the safety chains to the hook
retainers of your vehicle hitch.

To connect the safety chains, cross them
under the trailer tongue and allow enough
slack for turning tight corners. Do not allow
the chains to drag on the ground.

Trailer Brakes

WARNING

Do not connect a trailer's hydraulic
brake system directly to your vehicle's

brake system. Your vehicle may not have
enough braking power and your chances of
having a collision greatly increase.

Electric brakes and manual, automatic or
surge-type trailer brakes are safe if you install
them properly and adjust them to the
manufacturer's specifications. The trailer
brakes must meet local and federal
regulations.

The rating for the tow vehicle's braking
system operation is at the gross vehicle
weight rating, not the gross combined
weight rating.

Separate functioning brake systems are
required for safe control of towed vehicles
and trailers weighing more than 1500 lb
(680 kg) when loaded.

245

MKT (TP4) , enUSA, Edition date: 201803, First-Printing

Towing

-------------------------------------------------------------------------------------------------------------------------------------------------------------

Trailer Brake Controller Connector

 (If

Equipped)

The connector is located under the
instrument panel above the brake pedal.

E211392

Trailer Lamps

WARNING

Never connect any trailer lamp wiring
to the vehicle's tail lamp wiring; this

may damage the electrical system resulting
in fire. Contact your authorized dealer as
soon as possible for assistance in proper
trailer tow wiring installation. Additional
electrical equipment may be required.

Trailer lamps are required on most towed
vehicles. Make sure all running lights, brake
lights, turn signals and hazard lights are
working.

Before Towing a Trailer

Practice turning, stopping and backing up to
get the feel of your vehicle-trailer
combination before starting on a trip. When
turning, make wider turns so the trailer
wheels clear curbs and other obstacles.

When Towing a Trailer

Do not drive faster than 70 mph
(113 km/h) during the first 500 mi
(800 km).

Do not make full-throttle starts.

Check your hitch, electrical connections
and trailer wheel lug nuts thoroughly after
you have traveled 50 mi (80 km).

When stopped in congested or heavy
traffic during hot weather, place the
gearshift in park (P) to aid engine and
transmission cooling and to help A/C
performance.

Turn off the speed control with heavy
loads or in hilly terrain. The speed control
may turn off automatically when you are
towing on long, steep grades.

Shift to a lower gear when driving down
a long or steep hill. Do not apply the
brakes continuously, as they may
overheat and become less effective.

246

MKT (TP4) , enUSA, Edition date: 201803, First-Printing

Towing

-------------------------------------------------------------------------------------------------------------------------------------------------------------


Content      ..     13      14      15      16     ..