Lincoln Town Car (2011 year). Manual - part 2


  Index      Lincoln     Lincoln Town Car (2011 year) - manual in english


Search            copyright infringement  


Content      ..      1      2      3      ..


Lincoln Town Car (2011 year). Manual - part 2


AUDIO SYSTEMS

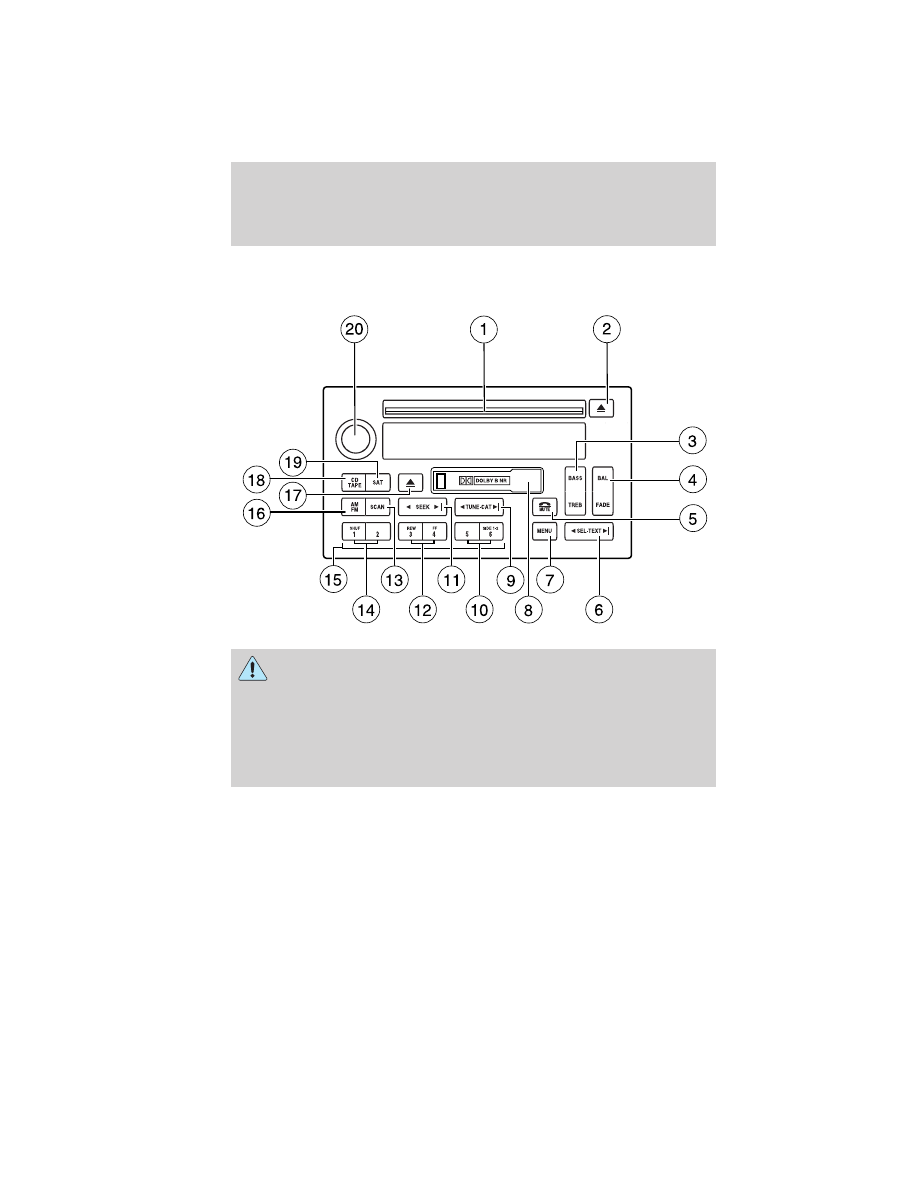
Premium AM/FM Stereo Single CD/Cassette system

WARNING: Driving while distracted can result in loss of vehicle
control, accident and injury. Ford strongly recommends that

drivers use extreme caution when using any device or feature that may
take their focus off the road. Your primary responsibility is the safe
operation of the vehicle. We recommend against the use of any handheld
device while driving, encourage the use of voice-operated systems when
possible and that you become aware of applicable state and local laws
that may affect the use of electronic devices while driving.

Accessory delay: Your vehicle is equipped with accessory delay. With
this feature, the window switches, radio and moon roof (if equipped)
may be used for up to ten minutes after the ignition is turned off or until
any door is opened.

Entertainment Systems

26

2011 Town Car (tow)
Owners Guide, 2nd Printing
USA 
(fus)

-------------------------------------------------------------------------------------------------------------------------------------------------------------

1. CD slot: Insert a CD, label side
up. With the ignition on, the radio
will begin to play a CD once inserted.
If the ignition and audio system are off, press CD prior to inserting a disc.
Do not force a disc into the system as damage could result.

2. CD eject: Press to eject a CD. If
the disc is not removed within the
allotted time, the system will
automatically reload the CD and begin play. Note: The eject function will
work when the ignition and audio systems are turned off.

3. BASS: Press BASS; then
press

SEL-TEXT

to

decrease/increase the level of bass
output.

TREB (Treble): Press TREB; then
press

SEL-TEXT

to

decrease/increase the level of treble
output.

4. BAL (Balance): Press BAL; then
press

SEL-TEXT

to shift

sound to the left/right speakers.

FADE: Press FADE; then press
SEL-TEXT

to shift sound to the

rear/front speakers.

5. Phone/mute: Press to mute the
playing media. Press again to return
to the playing media, or turn the
volume control to adjust the volume.

6. SEL/TEXT: Use with Bass,
Treble, Balance, Fade and other
menu functions.

TEXT: TEXT is only available when equipped with Satellite radio. Your
radio is equipped with Satellite ready capability. The kit to enable
satellite reception is available through your authorized dealer. Detailed
satellite instructions are included with the dealer installed kit. Check
with your authorized dealer for availability.

TREB

BASS

SEL-TEXT

+

TREB

BASS

SEL-TEXT

+

FADE

BAL

SEL-TEXT

+

FADE

BAL

SEL-TEXT

+

Entertainment Systems

27

2011 Town Car (tow)
Owners Guide, 2nd Printing
USA 
(fus)

-------------------------------------------------------------------------------------------------------------------------------------------------------------

7. MENU: Press MENU repeatedly
to access RBDS on/off. Use SEL to
turn RBDS ON or OFF. Press MENU
again to access Program type mode or Show Type/Name mode. (MENU
must be pressed within 10 seconds to proceed to the next RBDS mode.)

The Federal Communications Commission (FCC) and the Canadian Radio
and Telecommunications Commission (CRTC) recommend that FM radio
broadcasters use RBDS technology to transmit information. FM radio
stations are independently operated and individually elect to use RBDS
technology to transmit station ID and program type as desired.

FIND Program type: Allows you to search RBDS-equipped stations for
a certain category of music format: Classic, Country, Info, Jazz, Oldies,
R&B, Religious, Rock, Soft, Top 40.
With RBDS ON, press MENU until the program type menu is displayed.
One of the various program types will appear. Press

SEL-TEXT

to scroll through music types. Press SEEK or SCAN to search for a
station playing the requested music category.

Show TYPE: Selects between displaying the station’s call letters or
music format when RBDS is enabled. Press MENU until SHOW XX
appears in the display. Press

SEL-TEXT

to select NAME or

TYPE.

Compression: Brings soft and loud CD passages together for a more
consistent listening level when in CD mode. Press MENU repeatedly until
COMP (compression) is displayed. Press

SEL-TEXT

to enable

the compression feature when COMPRESS OFF is displayed.
Press

SEL-TEXT

again to disable the feature when COMPRESS

ON is displayed. When activated, the compression icon will appear in the
display.

Occupancy mode: (if equipped): Press MENU repeatedly until
occupancy mode appears in the display. Press

SEL-TEXT

to

select ALL, DRIVER or REAR SEAT occupancy mode.

Autoset: Allows you to set the strongest local radio stations without
losing your original manually set preset stations for AM/FM1/FM2. Press
MENU repeatedly until AUTOSET appears in the display.
Press

SEL-TEXT

to turn ON or OFF. When the six strongest

stations are filled, the station stored in preset 1 will begin playing. If
there are less than six strong stations, the system will store the last one
in the remaining presets.

Entertainment Systems

28

2011 Town Car (tow)
Owners Guide, 2nd Printing
USA 
(fus)

-------------------------------------------------------------------------------------------------------------------------------------------------------------

Speed sensitive volume: Radio volume changes automatically and
slightly with vehicle speed to compensate for road and wind noise.
Recommended level is 1–3. SPEED OFF turns the feature off and level 7
is the maximum setting.

Press MENU to access and

SEL-TEXT

to adjust the volume

setting. The level will appear in the display.

Dolby: Works in tape mode to reduces tape noise and hiss. Press MENU
until DOLBY XX appears in the display. Press SEL/TEXT to turn ON or
OFF.
The Dolby

威 noise reduction system is manufactured under license from

Dolby Laboratories Licensing Corporation. Dolby

威 and the double-D

symbol are registered trademarks of Dolby Laboratories Licensing
Corporation.

Armrest (if equipped): If your vehicle is equipped with Rear Seat
Audio controls, this feature will be listed in Menu mode.
Press

SEL-TEXT

to turn ON or OFF. When the feature is turned

ON, rear seat passengers can adjust the settings of the front audio stem.
For further information, refer to Rear Console Audio Controls (if
equipped) 
later in this chapter.

Note: The menu selections will remain in the display for approximately
10 seconds, at which time the display will return to the previous mode.
You may also exit the menu options by pressing any other audio control.

Setting the clock: Your vehicle is equipped with a separate in-dash
clock. Refer to Clock in the Driver Controls chapter for instructions on
how to set the time.

8. Cassette: Insert a cassette facing to the right.

9. TUNE: Press to manually go up
or down the radio frequency.

CAT: CAT is only available when equipped with Satellite Radio. Your
vehicle may be equipped with Satellite ready capability. The kit to enable
Satellite reception is available through your authorized dealer. Detailed
Satellite instructions are included with the dealer installed kit.
Check with your authorized dealer for availability.

10. Side 1–2: Press to access the
next side of the cassette tape. The
display will indicate whether TAPE
1 or TAPE 2 is playing.

Entertainment Systems

29

2011 Town Car (tow)
Owners Guide, 2nd Printing
USA 
(fus)

-------------------------------------------------------------------------------------------------------------------------------------------------------------

11. SEEK: Press to access the
next/previous radio station, tape
selection or CD track. Press and
hold to advance/reverse in the current CD track.

12. REW (Rewind): Press to
rewind in tape or CD mode.

FF (Fast forward): Press to fast
forward in tape or CD mode.

13. SCAN: Press SCAN to hear a
brief sampling of radio stations,
selections or CD tracks. Press again
to stop.

14. SHUF (Shuffle): Press to play
the tracks on the current CD in
random order. Press again to stop.

15. Memory presets: To set a
station: Select frequency band, tune
to a station, press and hold a preset
button until sound returns.

16. AM/FM: Press to switch
between AM/FM1/FM2 modes.

17. Tape eject: Press to eject the
tape.

18. CD/TAPE: Press to switch
between CD and TAPE mode. In
radio mode, the CD icon will appear
in the display if a CD is loaded into the system.

19. SAT: Your system may be
equipped with Satellite Ready
capability. The kit to enable the
Satellite reception is available through your authorized dealer. Detailed
satellite instructions are included with the dealer installed kit.
Check with your authorized dealer for availability.

REW

FF

3

4

Entertainment Systems

30

2011 Town Car (tow)
Owners Guide, 2nd Printing
USA 
(fus)

-------------------------------------------------------------------------------------------------------------------------------------------------------------

20. On/Off/Volume: Press to turn
on and off; turn to adjust the
volume levels.

Premium plus AM/FM Stereo In-dash Six CD sound system

WARNING: Driving while distracted can result in loss of vehicle
control, accident and injury. Ford strongly recommends that

drivers use extreme caution when using any device or feature that may
take their focus off the road. Your primary responsibility is the safe
operation of the vehicle. We recommend against the use of any
handheld device while driving, encourage the use of voice-operated
systems when possible and that you become aware of applicable state
and local laws that may affect the use of electronic devices while
driving.

Accessory delay: Your vehicle is equipped with accessory delay. With
this feature, the window switches and radio may be used for up to ten
minutes after the ignition is turned off or until any door is opened.

Entertainment Systems

31

2011 Town Car (tow)
Owners Guide, 2nd Printing
USA 
(fus)

-------------------------------------------------------------------------------------------------------------------------------------------------------------

1. CD slot: To insert a CD, press
LOAD. Wait to insert a CD until the
system prompts you. With the
ignition on, the radio will begin to play a CD once inserted. If the ignition
and audio system are off, press CD prior to inserting a disc. Do not force
a disc into the system as damage could result.

2. SEEK: Press to access the
next/previous radio station or CD
track. Press and hold to
advance/reverse in the current CD track.

3. TUNE/CAT: Press to manually go
up or down the radio frequency.

CAT is only available when equipped
with Satellite radio. Your vehicle may be equipped with Satellite ready
capability. The kit to enable Satellite reception is available through your
authorized dealer. Detailed Satellite instructions are included with the
dealer installed kit. Check with your authorized dealer for
availability.

4. MUTE: Press to mute the playing
media. Press again to return to the
playing media or turn the volume
control to adjust the volume.

5. Eject: Press to eject CD(s) when
the ignition is on or off. Numbers
will illuminate in the display
indicating which CD slots are loaded with CDs. To eject a specific CD,
press eject and the corresponding preset number. If no preset is
selected, the system will eject the currently selected CD. Press and hold
to eject all loaded discs.

Note: If the CD is not removed within approximately 15 seconds, the
system will reload the disc and begin play if the system is on.

6. BASS: Press BASS; then
press

SEL-TEXT

to

decrease/increase the level of bass
output.

TREB

BASS

SEL-TEXT

+

Entertainment Systems

32

2011 Town Car (tow)
Owners Guide, 2nd Printing
USA 
(fus)

-------------------------------------------------------------------------------------------------------------------------------------------------------------

TREB (Treble): Press TREB; then
press

SEL-TEXT

to

decrease/increase the level of treble
output.

7. BAL (Balance): Press BAL; then
press

SEL-TEXT

to shift

sound to the left/right speakers.

FADE: Press FADE; then
press

SEL-TEXT

to shift

sound to the rear/front speakers.

8. SEL-TEXT: Use with Bass,
Treble, Balance, Fade and other
menu functions.

TEXT: TEXT is only available when equipped with Satellite radio. Your
vehicle may be equipped with Satellite ready capability. The kit to enable
Satellite reception is available through your authorized dealer. Detailed
Satellite instructions are included with the dealer installed kit. Check
with your authorized dealer for availability.

9. MENU: Press MENU repeatedly
to access RBDS ON or OFF.
Use

SEL-TEXT

to turn

RBDS ON or OFF. Press MENU again to access Program type mode or
Show Type mode. (MENU must be pressed within 10 seconds to proceed
to the next RBDS mode.)

The Federal Communications Commission (FCC) and the Canadian Radio
and Telecommunications Commission (CRTC) recommend that FM radio
broadcasters use RBDS technology to transmit information. FM radio
stations are independently operated and individually elect to use RBDS
technology to transmit station ID and program type as desired.

FIND Program type: Allows you to search RBDS-equipped stations for
a certain category of music format: Classic, Country, Info, Jazz, Oldies,
R&B, Religious, Rock, Soft, Top 40.
In FM mode, with RBDS ON, press MENU until the program type menu
is displayed. One of the various program types will appear.
Press

SEL-TEXT

to scroll through music types. Press SEEK or

SCAN to search for a station playing the requested music category.

TREB

BASS

SEL-TEXT

+

FADE

BAL

SEL-TEXT

+

FADE

BAL

SEL-TEXT

+

Entertainment Systems

33

2011 Town Car (tow)
Owners Guide, 2nd Printing
USA 
(fus)

-------------------------------------------------------------------------------------------------------------------------------------------------------------

Show TYPE: Selects between displaying the station’s call letters or
music format when RBDS is enabled. Press and hold MENU until SHOW
XX appears in the display. Press

SEL-TEXT

to select NAME or

TYPE.

Compression: Brings soft and loud CD passages together for a more
consistent listening level when in CD mode. Press MENU until
compression status is displayed. Press

SEL-TEXT

to enable the

compression feature when COMPRESS OFF is displayed.
Press

SEL-TEXT

again to disable the feature when COMPRESS

ON is displayed. When activated, the compression icon will illuminate in
the display.

Occupancy mode: (Available on Premium plus audios): Press MENU
until occupancy mode appears in the display. Press

SEL-TEXT

to

select ALL, DRIVER or REAR SEAT occupancy mode.

Autoset: Allows you to set the strongest local radio stations without
losing your original manually set preset stations for AM/FM1/FM2. Press
MENU until AUTOSET appears in the display. Press

SEL-TEXT

to turn ON or OFF. When the six strongest stations are filled, the station
stored in preset 1 will begin playing. If there are less than six strong
stations, the system will store the last one in the remaining presets.
When activated, AUTOSET will appear in the display when any of the
preset controls are pressed.

Speed sensitive volume: Radio volume changes automatically and
slightly with vehicle speed to compensate for road and wind noise.
Recommended level is 1–3. Level 0 turns the feature off and level 7 is
the maximum setting.
Press MENU to access and use

SEL-TEXT

to adjust the volume

setting. The level will appear in the display.

Armrest ON/OFF: Press MENU repeatedly until Armrest ON/OFF
appears. Use

SEL-TEXT

to toggle the rear console audio controls

ON or OFF (if equipped).

Setting the clock: Your vehicle is equipped with an in-dash clock. Refer
to Clock in the Driver Controls chapter for instructions on how to set
the time.

10. Memory presets: To set a
station: Select frequency band, tune
to a station, press and hold a preset
button until sound returns.

Entertainment Systems

34

2011 Town Car (tow)
Owners Guide, 2nd Printing
USA 
(fus)

-------------------------------------------------------------------------------------------------------------------------------------------------------------

11. On/Off/Volume: Push to turn
on/off; turn to adjust the volume
levels.

Note: With the ignition and audio
system off, you may press the
volume control to momentarily view the clock.

12. LOAD: Press to load a CD.
When the system prompts you,
select a preset to load a CD in that
particular slot. Load the CD. If you do not pick a slot, the system will
select the next available slot. Available slots are indicated by small
flashing indicators in the display. Press and hold to autoload up to six
discs.

Note: Ensure that the system is ready to accept the CD and do not try
to force the disc into the CD slot as damage could result.

13. AM/FM: Press repeatedly to
switch between AM/FM1/FM2 mode.

14. CD: Press to enter CD mode.
Press CD and a preset to select a
specific CD to play.

15. SAT: SAT is only available when equipped with Satellite radio. Your
vehicle may be equipped with Satellite ready capability. The kit to enable
Satellite reception is available through your authorized dealer. Detailed
Satellite instructions are included with the dealer installed kit. Check
with your authorized dealer for availability.

16. SHUF/SCAN: Press SCAN to hear a brief sampling of radio stations
or CD tracks. Press again to stop.

SHUF (Shuffle): Press and hold to play the CD tracks in random order
for the CD currently being played. Press again to stop.

Entertainment Systems

35

2011 Town Car (tow)
Owners Guide, 2nd Printing
USA 
(fus)

-------------------------------------------------------------------------------------------------------------------------------------------------------------

Rear console audio controls (if equipped)
• NEXT: Press to access the next

radio memory preset, the next
CD track or the next tape
selection.

• VOL: Press the up arrow to

increase the volume or the down
arrow to decrease the volume.

• MODE: Press to cycle through

AM, FM1, FM2, TAPE or CD (if
equipped) modes.

GENERAL AUDIO INFORMATION

Radio frequencies: AM and FM frequencies are established by the
Federal Communications Commission (FCC) and the Canadian Radio and
Telecommunications Commission (CRTC). Those frequencies are:

AM - 530, 540–1700, 1710 kHz

FM- 87.7, 87.9–107.7, 107.9 MHz

Radio reception factors: There are three factors that can affect radio
reception:
• Distance/strength: The further you travel from a station, the weaker

the signal and the weaker the reception.

• Terrain: Hills, mountains, tall buildings, power lines, electric fences,

traffic lights and thunderstorms can interfere with your reception.

• Station overload: When you pass a broadcast tower, a stronger signal

may overtake a weaker one and play while the weak station frequency
is displayed.

Cassette player care:
• Use only cassettes that are 90 minutes long or less.
• Tighten very loose tapes by inserting a finger or pencil into the hole

and turning the hub.

• Remove loose labels before inserting tapes.
• Allow tapes which have been subjected to extreme heat, humidity or

cold to reach a moderate temperature before playing.

• Clean the cassette player head with a cassette cleaning cartridge after

10–12 hours of play to maintain good sound/operation.

Entertainment Systems

36

2011 Town Car (tow)
Owners Guide, 2nd Printing
USA 
(fus)

-------------------------------------------------------------------------------------------------------------------------------------------------------------

Don’t:
• Expose tapes to direct sunlight, extreme humidity, heat or cold.
• Leave tapes in the cassette player for a long time when not being

played.

CD/CD player care:

Do:
• Handle discs by their edges only. Never touch the playing surface.
• Inspect discs before playing. Clean only with an approved CD cleaner

and wipe from the center out.

Don’t:
• Expose discs to direct sunlight or heat sources for extended periods

of time.

• Clean using a circular motion.
CD units are designed to play commercially pressed 4.75 in
(12 cm) audio compact discs only. Due to technical
incompatibility, certain recordable and re-recordable compact
discs may not function correctly when used in Ford CD players.
Dirty, warped or damaged CDs, irregular shaped CDs, CDs with a
scratch protection film attached, and CDs with homemade paper
(adhesive) labels should not be inserted into the CD player. The
label may peel and cause the CD to become jammed. It is
recommended that homemade CDs be identified with permanent
felt tip marker rather than adhesive labels. Ballpoint pens may
damage CDs. Please contact your authorized dealer for further
information.

Audio system warranty and service: Refer to the Warranty
Guide/Customer Information Guide 
for audio system warranty
information. If service is necessary, see your dealer or qualified
technician.

Entertainment Systems

37

2011 Town Car (tow)
Owners Guide, 2nd Printing
USA 
(fus)

-------------------------------------------------------------------------------------------------------------------------------------------------------------

DUAL ELECTRONIC AUTOMATIC TEMPERATURE CONTROL
(DEATC) SYSTEM

1. A/C control: Cools the vehicle
and is used to reduce humidity in
the vehicle. Press to turn on/off.
The A/C control engages automatically in AUTO,

and

modes.

2. Recirculation control: Cools
the vehicle more quickly by
recirculating the cabin air instead of
using outside air and helps prevent unpleasant outside odors or fumes
from entering the vehicle. Press to turn on/off in all modes except

.

Recirculation may turn off automatically to reduce fogging potential.

3. Passenger side temperature
control: 
Controls the temperature
on the passenger side of the vehicle
when in dual zone mode. To enter
dual zone, press the passenger temperature control or DUAL. The
passenger temperature will appear in the display.

4. Rear defroster control:
Removes ice and fog from the rear
window. Press to turn on/off. Refer
to the rear window defrost section
for more information.

A/C

R

Climate Controls

38

2011 Town Car (tow)
Owners Guide, 2nd Printing
USA 
(fus)

-------------------------------------------------------------------------------------------------------------------------------------------------------------

5. DUAL (Single/dual temperature
control): Allows the driver to have
full control of the cabin temperature
settings (single zone) or allows the passenger to have control of their
individual temperature settings (dual zone). Press to turn on dual zone
mode, press again to return to single zone.

6.

Distributes air through the windshield defroster vents and the

side window demisters.

7.

Distributes air through the windshield defroster vents, the side

window demisters and floor vents.

8.

Distributes air through the floor vents.

9.

Distributes air through the instrument panel vents and the floor

vents.

10.

Distributes air through the instrument panel vents.

Manual override controls: Allows
you to manually determine where
airflow is directed. To return to fully
automatic control, press AUTO.

11. OFF: Outside air is shut out and
the fan will not operate.

12. AUTO: Press and select the
desired temperature. The system
will automatically determine the fan
speed, airflow location, A/C on or off, outside or recirculated air to heat
or cool the vehicle to the selected temperature. If unusual conditions
exist, (i.e., window fogging, etc.), manual overrides allow you to select
airflow locations and fan speed.

13. Driver’s side temperature
control: 
Controls the temperature
on the driver side of the vehicle.

14. Fan Speed: Used to manually
enable or disable the fan speed. To
return to automatic fan operation,
press AUTO.

DUAL

OFF

OFF

AUTO 

Climate Controls

39

2011 Town Car (tow)
Owners Guide, 2nd Printing
USA 
(fus)

-------------------------------------------------------------------------------------------------------------------------------------------------------------

15. EXT: Displays the outside air
temperature. It will remain
displayed until the EXT control is
pressed again. The external
temperature will be most accurate when the vehicle has been moving for
a period of time.

16. Temperature conversion:
Press to switch between Fahrenheit
and Celsius temperature on the
DEATC display only. The set point
temperatures in Celsius will be displayed in half-degree increments.

Operating tips
• To reduce fog build-up on the windshield during humid weather, place

the air flow selector in the

position.

• To reduce humidity build-up inside the vehicle: do not drive with the

recirculation control on or the system turned off.

• To improve the A/C cool down, drive with the windows slightly open

for 2–3 minutes after start up or until the vehicle has been “aired out.”

• Do not put objects under the front seats that will interfere with the

airflow to the back seats.

• Remove any snow, ice or leaves from the air intake area at the base of

the windshield.

• A small amount of air may be felt from the floor vent regardless of the

air distribution setting that is selected.

During extreme high ambient temperatures when idling stationary for
extended periods of time in gear, it is recommended to run the A/C
with

selected, reduce blower fan speed from the highest setting

and put the vehicle’s transmission into the P (Park) gear position to
continue to receive cool air from your A/C system.

To aid in side window defogging/demisting in cold weather:

1. Select

.

2. Select A/C.

3. Adjust the temperature control to maintain comfort.

4. Set the fan to the highest speed.

5. Direct the outer instrument panel vents towards the side windows.

To increase airflow to the outer instrument panel vents, close the vents
located in the middle of the instrument panel.

Climate Controls

40

2011 Town Car (tow)
Owners Guide, 2nd Printing
USA 
(fus)

-------------------------------------------------------------------------------------------------------------------------------------------------------------

REAR CONSOLE CLIMATE CONTROLS (IF EQUIPPED)
• TEMP: Press to increase or

decrease airflow temperature.

• FAN: Press to increase or

decrease the fan speed.

REAR WINDOW DEFROSTER

The rear defroster control is located
on the instrument panel.

Press the rear defroster control to
clear the rear window of thin ice
and fog. A small LED will illuminate
when the rear defroster is activated.

The ignition must be in the on position to operate the rear window
defroster.

The defroster turns off automatically after a predetermined amount of
time or when the ignition is turned off. To manually turn off the
defroster, press the control again.

Do not use razor blades or other sharp objects to clean the inside
of the rear window or to remove decals from the inside of the
rear window. This may cause damage to the heated grid lines and
will not be covered by your warranty.

R

Climate Controls

41

2011 Town Car (tow)
Owners Guide, 2nd Printing
USA 
(fus)

-------------------------------------------------------------------------------------------------------------------------------------------------------------


Content      ..      1      2      3      ..