Dodge Grand Caravan (2019 year). Manual - part 5
 

  Index      Dodge     Dodge Grand Caravan (2019 year) - manual in english


Search            copyright infringement  


Content      ..     3      4      5      6     ..


Dodge Grand Caravan (2019 year). Manual - part 5


Icon

Description

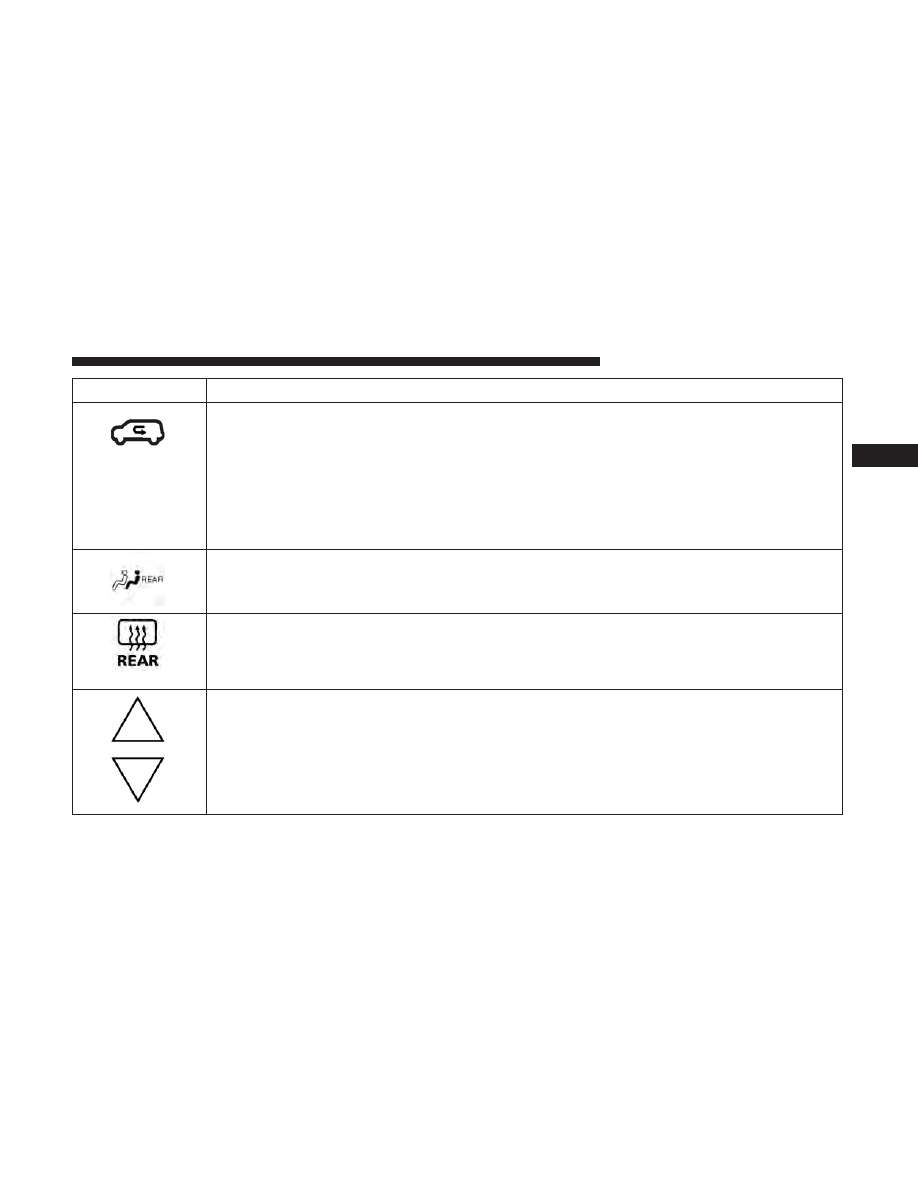
Recirculation Button
Press and release this button to change the system between recirculation mode and outside air
mode. Recirculation can be used when outside conditions such as smoke, odors, or high humid-
ity are present. Recirculation can be used in all modes except for Defrost. Recirculation may be
unavailable (button on the touchscreen greyed out) if conditions exist that could create fogging
on the inside of the windshield. The A/C can be deselected manually without disturbing the
mode control selection. Continuous use of the Recirculation mode may make the inside air
stuffy and window fogging may occur. Extended use of this mode is not recommended.
Rear Climate Control Button
Push Rear Climate Control Button to control rear compartment climate from the Front ATC
Panel. The rear climate modes will be displayed on the Front ATC Panel Rear Control Display.

Rear Defrost Button
Push and release the Rear Defrost Control button to turn on the rear window defroster and the
heated outside mirrors (if equipped). An indicator will illuminate when the rear window de-
froster is on. The rear window defroster automatically turns off after ten minutes.
Driver and Passenger Temperature Up And Down Buttons
Provides the driver and passenger with independent temperature control. Push the up arrow
button for warmer temperature settings. Push the blue arrow button for cooler temperature set-
tings.

3

GETTING TO KNOW YOUR VEHICLE

77

Icon

Description

Blower Control
There are seven blower speeds. Use this control to regulate the amount of air forced through the
system in any mode you select. The blower speed increases as you move the control clockwise
from the off position.

NOTE:

Depending on the configuration, your vehicle may be equipped with four blower

speeds.
Modes Control Button
Toggle the Modes Control Button to adjust airflow distribution. The airflow distribution mode
can be adjusted so air comes from the instrument panel outlets, floor outlets, defrost outlets and
demist outlets. The Mode settings are as follows:

Panel Mode

Panel Mode
Toggle the Modes Control Button until you see Panel Mode Icon on the display. Air comes from
the outlets in the instrument panel. Each of these outlets can be individually adjusted to direct
the flow of air. The air vanes of the center outlets and outboard outlets can be moved up and
down or side to side to regulate airflow direction.

Bi-Level Mode

Bi-Level Mode
Toggle the Modes Control Button until you see Bi-Level Mode Icon on the display. Air comes
from the instrument panel outlets and floor outlets. A slight amount of air is directed through
the defrost and side window demister outlets.

NOTE:

Bi-Level mode is designed under comfort conditions to provide cooler air out of the

panel outlets and warmer air from the floor outlets.

78

GETTING TO KNOW YOUR VEHICLE

Icon

Description

Floor Mode

Floor Mode
Toggle the Modes Control Button until you see Floor Mode Icon on the display. Air comes from
the floor outlets. A slight amount of air is directed through the defrost and side window demis-
ter outlets.

Mix Mode

Mix Mode
Toggle the Modes Control Button until you see Mix Mode Icon on the display. Air is directed
through the floor, defrost, and side window demister outlets. This setting works best in cold or
snowy conditions that require extra heat to the windshield. This setting is good for maintaining
comfort while reducing moisture on the windshield.

Front Defrost

Mode

Front Defrost Mode Button
Push the button to select Front Defrost Mode. The indicator illuminates when this mode is on.
Air comes from the windshield and side window demist outlets. When the defrost mode is se-
lected, the blower level will increase. Use Defrost mode with maximum temperature settings for
best windshield and side window defrosting and defogging.

3

GETTING TO KNOW YOUR VEHICLE

79

Controlling The Rear Climate Controls From The
Front ATC Panel

The rear ATC system has floor air outlets at the rear right
side of the 3rd Row seats and overhead outlets at each
outboard rear seating position. The system provides heated
air through the floor outlets or cool, dehumidified air
through the headliner outlets. The rear system temperature
control buttons are located in the Uconnect system, located
on the instrument panel.

Icon

Description

Rear Lock Button
Press to lock out the rear manual temperature controls from adjusting the rear temperature and
blower settings.

Rear Passenger Temperature Up and Down Buttons
Provides the rear passengers with independent temperature control. Push the up arrow button
to increase the temperature. Push the down arrow button to decrease the temperature. When the
SYNC feature is active, the rear temperature, the passenger’s temperature will move up and
down with the driver’s temperature.

Front ATC Panel Rear Control Display

80

GETTING TO KNOW YOUR VEHICLE

Icon

Description

SYNC Button — If Equipped
Press the SYNC button to toggle the Sync feature on/off. The SYNC indicator is illuminated
when this feature is enabled. SYNC is used to synchronize the front and rear passenger tem-
perature settings with the driver temperature setting. Changing the front or rear passenger tem-
perature setting while in SYNC will automatically exit this feature.
Rear Blower Control
Turn off Blower Control Knob clockwise or counter clockwise to adjust blower speed. There are
seven blower speeds. Use this control to regulate the amount of air forced through the system in
any mode you select in Rear Compartment. The blower speed increases as you move the control
clockwise from the off position.

Panel Mode

Rear Panel Mode
Toggle the Modes Control Button until Rear Panel Mode appears on the display. Air comes from
the outlets in the headliner. Each of these outlets can be individually adjusted to direct the flow
of air. Moving the air vanes of the outlets to one side will shut off the airflow.

Bi-Level Mode

Rear Bi-Level Mode
Toggle the Modes Control Button until the Rear Bi-Level Mode appears on the display. Air
comes from both the headliner outlets and the floor outlets.

NOTE:

In many temperature positions, the Bi-Level mode is designed to provide cooler air out

of the headliner outlets and warmer air from the floor outlets.

3

GETTING TO KNOW YOUR VEHICLE

81

Icon

Description

Floor Mode

Rear Floor Mode
Toggle the Modes Control Button until the Rear Floor Mode appears on the display. Air comes
from the floor vents.

Rear Automatic Temperature Control (ATC) — If
Equipped

The Three-Zone ATC system allows for adjustment of the
rear climate controls from the front ATC panel. To change
the rear system settings:
• Press the ⬙REAR⬙ button to change control to rear control

mode, Rear display (below) will appear. Control func-
tions now operate rear system.

• To return to Front screen, press the ⬙REAR⬙ button again,

or it will revert to the Front screen after six seconds.

1. Adjust the Rear Blower, Rear Temperature and the Rear

Modes to suit your comfort needs.

2. ATC is selected by pushing the AUTO button.

Once the desired temperature is displayed, the ATC System
will automatically achieve and maintain that comfort level.

Rear ATC Control Features

82

GETTING TO KNOW YOUR VEHICLE

When the system is set up for your comfort level, it is not
necessary to change the settings. You will experience the
greatest efficiency by simply allowing the system to func-
tion automatically.

NOTE:
• It is not necessary to move the temperature settings. The

system automatically adjusts the temperature, mode and
fan speed to provide comfort as quickly as possible.

Icon

Description

Rear Mode Control Knob
Rotate knob to change the air distribution mode for the rear passengers to one of the following:

Panel Mode

Rear Panel Mode
Air comes from the outlets in the headliner. Each of these outlets can be individually adjusted to
direct the flow of air. Moving the air vanes of the outlets to one side will shut off the airflow.

Bi-Level Mode

Rear Bi-Level Mode
Air comes from both the headliner outlets and the floor outlets.

NOTE:

In many temperature positions, the Bi-Level mode is designed to provide cooler air out of

the headliner outlets and warmer air from the floor outlets.

Floor Mode

Rear Floor Mode
Air comes from the floor outlets.

3

GETTING TO KNOW YOUR VEHICLE

83

Icon

Description

Rear Temperature Control Knob
To change the temperature in the rear of the vehicle, turn the Temperature Control Knob. Turn it
to the right to raise the temperature, or turn it to the left to lower the temperature. The rear tem-
perature settings are displayed in control head. When rear controls are locked by the front system,
the Rear Temperature Lock symbol on the control head is illuminated and any rear overhead ad-
justments are ignored.
Push the Rear Temperature Lock button on the front ATC panel. This turns off the Rear Tempera-
ture Lock icon in the rear temperature knob.
Rear Blower Control Knob
The rear blower control can be manually set to off, or any fixed blower speed by rotating the
Blower Control Knob in the rear of the vehicle. This allows the rear seat occupants to control the
volume of air circulated in the rear of the vehicle.
Rear AUTO Mode
Rear AUTO is selected by adjusting the rear blower knob counterclockwise to AUTO. The ATC
system will automatically achieve and maintain that comfort level. When the system is set up for
your comfort level, it is not necessary to change the settings. You will experience the greatest effi-
ciency by simply allowing the system to function automatically.

84

GETTING TO KNOW YOUR VEHICLE

Climate Control Functions

A/C (Air Conditioning)

The Air Conditioning (A/C) button allows the operator to
manually activate or deactivate the air conditioning sys-
tem. When the air conditioning system is turned on, cool
dehumidified air will flow through the outlets into the
cabin. For improved fuel economy, press the A/C button to
turn off the air conditioning and manually adjust the
blower and airflow mode settings. Also, make sure to select
only Panel, Bi-Level, or Floor modes.

NOTE:
• For Manual Climate Controls, if the system is in Mix,

Floor or Defrost Mode, the A/C can be turned off, but
the A/C system shall remain active to prevent fogging of
the windows.

• If fog or mist appears on the windshield or side glass,

select Defrost mode, and increase blower speed if
needed.

• If your air conditioning performance seems lower than

expected, check the front of the A/C condenser (located
in front of the radiator), for an accumulation of dirt or
insects. Clean with a gentle water spray from the front of
the radiator and through the condenser.

MAX A/C

MAX A/C sets the control for maximum cooling perfor-
mance.

Press and release to toggle between MAX A/C and the
prior settings. The button illuminates when MAX A/C is
on.

In MAX A/C, the blower level and mode position can be
adjusted to desired user settings. Pressing other settings
will cause the MAX A/C operation to switch to the selected
setting and MAX A/C to exit.

Recirculation

In cold weather, use of Recirculation mode may lead to
excessive window fogging. The Recirculation feature may
be unavailable (button on the touchscreen greyed out) if
conditions exist that could create fogging on the inside of
the windshield.

On systems with Manual Climate Controls, if equipped,
the Recirculation mode is not allowed in Defrost mode to
improve window clearing operation. Recirculation is dis-
abled automatically if this mode is selected. Attempting to
use Recirculation while in this mode causes the LED in the
control button to blink and then turns off.

3

GETTING TO KNOW YOUR VEHICLE

85

Automatic Temperature Control (ATC) — If
Equipped

Automatic Operation

1. Push the AUTO button on the faceplate, or the AUTO

button on the touchscreen on the Automatic Tempera-
ture Control (ATC) Panel.

2. Next, adjust the temperature you would like the system

to maintain by adjusting the driver and passenger
temperature control buttons. Once the desired tempera-
ture is displayed, the system will achieve and automati-
cally maintain that comfort level.

3. When the system is set up for your comfort level, it is

not necessary to change the settings. You will experience
the greatest efficiency by simply allowing the system to
function automatically.

NOTE:
• It is not necessary to move the temperature settings for

cold or hot vehicles. The system automatically adjusts
the temperature, mode, and blower speed to provide
comfort as quickly as possible.

• The temperature can be displayed in U.S. or Metric units

by selecting the US/Metric customer programmable
feature. To provide you with maximum comfort in the
Automatic mode during cold start-ups, the blower fan
will remain on low until the engine warms up. The
blower will increase in speed and transition into Auto
mode.

Manual Operation Override

This system offers a full complement of manual override
features. The AUTO symbol in the front ATC display will
be turned off when the system is being used in the manual
mode.

Operating Tips

NOTE:

Refer to the chart at the end of this section for

suggested control settings for various weather conditions.

86

GETTING TO KNOW YOUR VEHICLE

Summer Operation

The engine cooling system must be protected with a
high-quality antifreeze coolant to provide proper corrosion
protection and to protect against engine overheating. OAT
coolant (conforming to MS.90032) is recommended. Refer
to “Fluids And Lubricants” in “Technical Specifications”
for proper coolant selection.

Winter Operation

To ensure the best possible heater and defroster perfor-
mance, make sure the engine cooling system is functioning
properly and the proper amount, type, and concentration
of coolant is used. Refer to “Fluids And Lubricants” in
“Technical Specifications” for proper coolant selection. Use
of the air Recirculation mode during Winter months is not
recommended, because it may cause window fogging.

Vacation/Storage

Before you store your vehicle, or keep it out of service (i.e.,
vacation) for two weeks or more, run the air conditioning
system at idle for about five minutes, in fresh air with the
blower setting on high. This will ensure adequate system
lubrication to minimize the possibility of compressor dam-
age when the system is started again.

Window Fogging

Vehicle windows tend to fog on the inside in mild, rainy,
and/or humid weather. To clear the windows, select De-
frost or Mix mode and increase the front blower speed. Do
not use the Recirculation mode without A/C for long
periods, as fogging may occur.

CAUTION!

Failure to follow these cautions can cause damage to
the heating elements:
• Use care when washing the inside of the rear win-

dow. Do not use abrasive window cleaners on the
interior surface of the window. Use a soft cloth and a
mild washing solution, wiping parallel to the heat-
ing elements. Labels can be peeled off after soaking
with warm water.

• Do not use scrapers, sharp instruments, or abrasive

window cleaners on the interior surface of the win-
dow.

• Keep all objects a safe distance from the window.

3

GETTING TO KNOW YOUR VEHICLE

87

Outside Air Intake

Make sure the air intake, located directly in front of the
windshield, is free of obstructions such as leaves. Leaves
collected in the air intake may reduce airflow, and if they
enter the plenum, they could plug the water drains. In
winter months, make sure the air intake is clear of ice,
slush, and snow.

A/C Air Filter

The climate control system filters out dust and pollen from
the air. Refer to an authorized dealer for filter replacement
instructions.

Operating Tips Chart

88

GETTING TO KNOW YOUR VEHICLE

WINDOWS

Power Vent Windows — If Equipped

The power vent window switch located on the driver’s
door trim panel allows the driver to operate the two vent
windows from the driver’s seat.

Power Windows

You can control either the front or rear windows using
controls located on the driver’s door trim panel.

The driver may lock out the rear power windows by
pushing the bar control just below the power window
controls.

The controls will operate only when the ignition switch is
in the ON/RUN or ACC position and during power
accessory delay.

Power Vent Window Switch Open/Close

Power Window Lockout Switch

3

GETTING TO KNOW YOUR VEHICLE

89

NOTE:

Power Window controls will also remain active for

up to 10 minutes after the ignition switch has been turned
to OFF, depending upon the accessory delay setting. Open-
ing a front door will cancel this feature.

There is a single control on the front passenger’s door trim
panel which operates the passenger door window and a set
of controls that lock and unlock all doors. The controls will
operate only when the ignition switch is in the ON/RUN
or ACC position and during power accessory delay.

Auto Up Feature With Anti-Pinch Protection — If
Equipped

The front driver and front passenger controls may be
equipped with an Auto Up feature. Lift the window switch
fully upward to the second detent, release, and the window
will go up automatically.

To stop the window from going all the way up during the
Auto Up operation, push down on the control briefly.

To close the window part way, lift the window control to
the first detent and release when you want the window to
stop.

NOTE:
• If the window runs into any obstacle during auto-

closure, it will reverse direction and then go back down.
Remove the obstacle and use the window control again
to close the window.

• Any impact due to rough road conditions may trigger

the auto reverse function unexpectedly during auto-
closure. If this happens, pull the control lightly to the
first detent and hold to close window manually.

Driver Power Window Switches

90

GETTING TO KNOW YOUR VEHICLE

WARNING!

There is no anti-pinch protection when the window is
almost closed. To avoid personal injury be sure to clear
your arms, hands, fingers and all objects from the
window path before closing.

Auto Up Reset — If Equipped

To reactivate the Auto Up feature, perform the following
steps after vehicle power is restored:

1. Pull the window control up to close the window com-

pletely and continue to hold the control up for an
additional two seconds after the window is closed.

2. Push the window control down firmly to the second

detent to open the window completely and continue to
hold the control down for an additional two seconds
after the window is fully open.

Sliding Side Door Power Window Control — If
Equipped

Second row passengers may open and close the sliding
door window by a single control on the door handle
assembly.

The controls will operate only when the ignition switch is
in the ON/RUN or ACC position and during power
accessory delay.

NOTE:
• The controls will not operate if the driver has activated

the Power Window Lockout.

• The sliding door windows do not open fully. They stop

several inches above the window sill.

Sliding Door Power Window Control

3

GETTING TO KNOW YOUR VEHICLE

91

Wind Buffeting

Wind buffeting can be described as the perception of
pressure on the ears or a helicopter-type sound in the ears.
Your vehicle may exhibit wind buffeting with the windows
down, or the sunroof (if equipped) in certain open or
partially open positions. This is a normal occurrence and
can be minimized. If the rear windows are open and
buffeting occurs, open the front and rear windows together
to minimize the buffeting. If the buffeting occurs with the
sunroof open, adjust the sunroof opening to minimize the
buffeting.

HOOD

Opening The Hood

To open the hood, two latches must be released.

1. Pull the hood release lever located on the instrument

panel, below the steering column.

Hood Release Lever

92

GETTING TO KNOW YOUR VEHICLE


Content      ..     3      4      5      6     ..