Dodge Avenger (2014 year). Manual - part 11
 

  Index      Dodge     Dodge Avenger (2014 year) - manual in english


Search            copyright infringement  


Content      ..     9      10      11      12     ..


Dodge Avenger (2014 year). Manual - part 11


WINDSHIELD WIPERS AND WASHERS

The wipers and washers are operated by a switch
on the control lever. The lever is located on the
right side of the steering column.

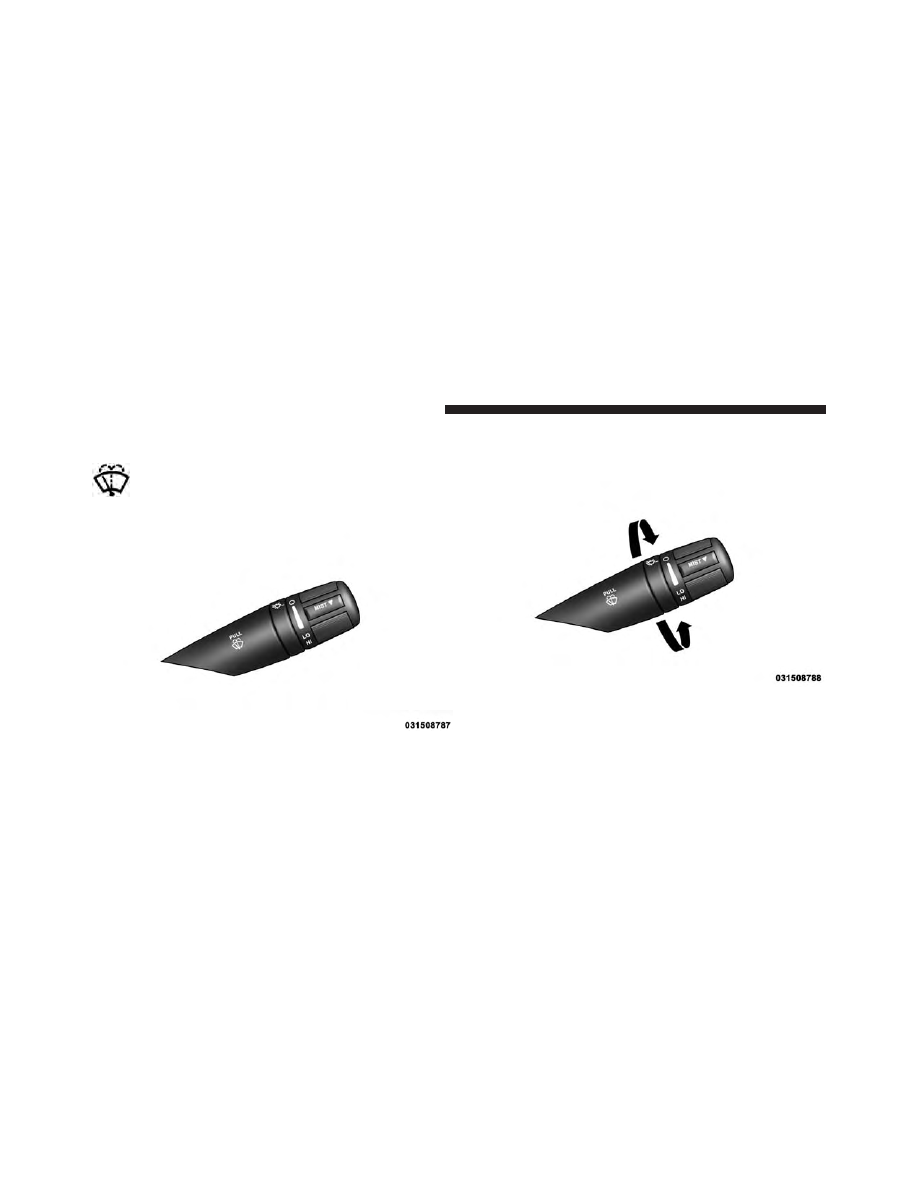
Rotate the end of the lever to the LO position for
low-speed wiper operation, or to the HI position for
high-speed wiper operation.

Windshield Wiper/Washer Lever

Changing Wiper Speeds

172

UNDERSTANDING THE FEATURES OF YOUR VEHICLE

NOTE:

The wipers will automatically return to the park

position if you turn the ignition switch OFF while they
are operating. The wipers will resume operation when
you turn the ignition switch to the ON position again.

CAUTION!

• Turn the windshield wipers off when driving

through an automatic car wash. Damage to the
windshield wipers may result if the wiper control
is left in any position other than off.

• Always remove any buildup of snow that prevents

the windshield wiper blades from returning to the
off position. If the windshield wiper control is
turned off and the blades cannot return to the off
position, damage to the wiper motor may occur.

Intermittent Wiper System

Use the intermittent wiper system when weather condi-
tions make a single wiping cycle with a variable pause
between cycles desirable. Rotate the end of the wind-
shield wiper/washer control lever to the first detent, and
then turn the end of the lever to select the desired delay
interval. There are five delay settings, which allow you to
regulate the wipe interval from a minimum of one cycle
every second to a maximum of approximately 18 seconds
between cycles.

3

UNDERSTANDING THE FEATURES OF YOUR VEHICLE

173

NOTE:

The wiper delay times depend on vehicle speed.

If the vehicle is moving less than 10 mph (16 km/h),
delay times will be doubled.

Windshield Washers

To use the washer, pull the windshield wiper/washer
control lever toward you and hold it for as long as
washer spray is desired.

If you activate the washer while the wiper control is in
the delay range, the wipers will operate in low-speed for
two wipe cycles after releasing the lever and then resume
the intermittent interval previously selected.

If you activate the washer while the wiper control is in
the off position, the wipers will operate for two wipe
cycles and then turn off.

Changing Intermittent Settings

174

UNDERSTANDING THE FEATURES OF YOUR VEHICLE

WARNING!

Sudden loss of visibility through the windshield
could lead to a collision. You might not see other
vehicles or other obstacles. To avoid sudden icing of
the windshield during freezing weather, warm the
windshield with defroster before and during wind-
shield washer use.

Mist Feature

Push down on the wiper control lever to activate a single
wipe to clear the windshield of road mist or spray from
a passing vehicle. As long as the lever is held down, the
wipers will continue to operate.

NOTE:

The mist feature does not activate the washer

pump; therefore, no washer fluid will be sprayed on the
windshield. The wash function must be used in order to
spray the windshield with washer fluid.

Headlights With Wipers Feature (Available With
Automatic Headlights Only)

When this feature is active, the headlights will turn on
approximately 10 seconds after the wipers are turned on
if the multifunction lever (on the left side of the steering

Mist Control

3

UNDERSTANDING THE FEATURES OF YOUR VEHICLE

175

column) is placed in the AUTO position. In addition, the
headlights will turn off when the wipers are turned off if
they were turned on by this feature.

The headlights with wipers feature can be turned on or
off through the Electronic Vehicle Information Center
(EVIC) — if equipped. Refer to “Electronic Vehicle Infor-
mation Center (EVIC)/Personal Settings (Customer-
Programmable Features)” in “Understanding Your In-
strument Panel” for further information.

TILT/TELESCOPING STEERING COLUMN

This feature allows you to tilt the steering column
upward or downward. It also allows you to lengthen or
shorten the steering column. The tilt/telescoping control
handle is located below the steering wheel at the end of
the steering column.

To unlock the steering column, pull the control handle
down. To tilt the steering column, move the steering wheel
upward or downward as desired. To lengthen or shorten
the steering column, pull the steering wheel outward or
push it inward as desired. To lock the steering column in
position, pull the control handle up until fully engaged.

Tilt/Telescoping Steering Wheel

176

UNDERSTANDING THE FEATURES OF YOUR VEHICLE

WARNING!

Do not adjust the steering column while driving.
Adjusting the steering column while driving or driv-
ing with the steering column unlocked, could cause
the driver to lose control of the vehicle. Failure to
follow this warning may result in serious injury or
death.

ELECTRONIC SPEED CONTROL — IF EQUIPPED

When engaged, the Electronic Speed Control takes over
accelerator operations at speeds greater than 25 mph
(40 km/h).

The Electronic Speed Control buttons are located on the
right side of the steering wheel.

Electronic Speed Control Buttons

1 — ON/OFF

3 — SET -

2 — RES +

4 — CANCEL

3

UNDERSTANDING THE FEATURES OF YOUR VEHICLE

177

NOTE:

In order to ensure proper operation, the Elec-

tronic Speed Control System has been designed to shut
down if multiple Speed Control functions are operated at
the same time. If this occurs, the Electronic Speed Control
System can be reactivated by pushing the Electronic
Speed Control ON/OFF button and resetting the desired
vehicle set speed.

To Activate

Push the ON/OFF button. The Cruise Indicator Light in
the instrument cluster will illuminate. To turn the system
off, push the ON/OFF button a second time. The Cruise
Indicator Light will turn off. The system should be
turned off when not in use.

WARNING!

Leaving the Electronic Speed Control system on
when not in use is dangerous. You could accidentally
set the system or cause it to go faster than you want.
You could lose control and have an accident. Always
leave the system OFF when you are not using it.

To Set A Desired Speed

Turn the Electronic Speed Control ON. When the vehicle
has reached the desired speed, press the SET (-) button
and release. Release the accelerator and the vehicle will
operate at the selected speed.

NOTE:

The vehicle should be traveling at a steady speed

and on level ground before pressing the SET (-) button.

178

UNDERSTANDING THE FEATURES OF YOUR VEHICLE

To Deactivate

A soft tap on the brake pedal, pushing the CANCEL
button, or normal brake pressure while slowing the
vehicle will deactivate the Electronic Speed Control with-
out erasing the set speed memory.

Pressing the ON/OFF button or turning the ignition
switch OFF erases the set speed memory.

To Resume Speed

To resume a previously set speed, push the RES (+)
button and release. Resume can be used at any speed
above 20 mph (32 km/h).

To Vary The Speed Setting

To Increase Speed

When the Electronic Speed Control is set, you can in-
crease speed by pushing the RES (+) button.

The speed increment shown is dependant on the speed of
U.S. (mph) or Metric (km/h) units:

U.S. Speed (mph)

• Pressing the RES (+) button once will result in a 1 mph

increase in set speed. Each subsequent tap of the
button results in an increase of 1 mph.

• If the button is continually pressed, the set speed will

continue to increase until the button is released, then
the new set speed will be established.

Metric Speed (km/h)

• Pressing the RES (+) button once will result in a

2 km/h increase in set speed. Each subsequent tap of
the button results in an increase of 2 km/h.

• If the button is continually pressed, the set speed will

continue to increase until the button is released, then
the new set speed will be established.

3

UNDERSTANDING THE FEATURES OF YOUR VEHICLE

179

To Decrease Speed

When the Electronic Speed Control is set, you can de-
crease speed by pushing the SET (-) button.

The speed decrement shown is dependant on the speed
of U.S. (mph) or Metric (km/h) units:

U.S. Speed (mph)

• Pressing the SET (-) button once will result in a 1 mph

decrease in set speed. Each subsequent tap of the
button results in a decrease of 1 mph.

• If the button is continually pressed, the set speed will

continue to decrease until the button is released, then
the new set speed will be established.

Metric Speed (km/h)

• Pressing the SET (-) button once will result in a 2 km/h

decrease in set speed. Each subsequent tap of the
button results in a decrease of 2 km/h.

• If the button is continually pressed, the set speed will

continue to decrease until the button is released, then
the new set speed will be established.

To Accelerate For Passing

Press the accelerator as you would normally. When the
pedal is released, the vehicle will return to the set speed.

Using Electronic Speed Control On Hills

The transmission may downshift on hills to maintain the
vehicle set speed.

NOTE:

The Electronic Speed Control system maintains

speed up and down hills. A slight speed change on
moderate hills is normal.

On steep hills, a greater speed loss or gain may occur so
it may be preferable to drive without Electronic Speed
Control.

180

UNDERSTANDING THE FEATURES OF YOUR VEHICLE

WARNING!

Electronic Speed Control can be dangerous where the
system cannot maintain a constant speed. Your ve-
hicle could go too fast for the conditions, and you
could lose control and have an accident. Do not use
Electronic Speed Control in heavy traffic or on roads
that are winding, icy, snow-covered or slippery.

GARAGE DOOR OPENER — IF EQUIPPED

HomeLink® replaces up to three hand-held transmitters
that operate devices such as garage door openers, motor-
ized gates, lighting or home security systems. The
HomeLink® unit is powered by your vehicles 12 Volt
battery.

The HomeLink® buttons, located on either the overhead
console, headliner or sunvisor, designate the three differ-
ent HomeLink® channels. The HomeLink® indicator is
located above the center button.

HomeLink® Buttons/Overhead Consoles

3

UNDERSTANDING THE FEATURES OF YOUR VEHICLE

181

NOTE:

HomeLink® is disabled when the Vehicle Secu-

rity Alarm is active.

Before You Begin Programming HomeLink®

Be sure that your vehicle is parked outside of the garage
before you begin programming.

For more efficient programming and accurate transmis-
sion of the radio-frequency signal it is recommended that
a new battery be placed in the hand-held transmitter of
the device that is being programmed to the HomeLink®
system.

Erase all channels before you begin programming. To
erase the channels place the ignition in the ON/RUN
position and press and hold the two outside HomeLink®
buttons (I and III) for up 20 seconds or until the red
indicator flashes.

NOTE:

• Erasing all channels should only be performed when

programming HomeLink® for the first time. Do not
erase channels when programming additional buttons.

• If you have any problems, or require assistance, please

call toll-free 1-800-355-3515 or, on the Internet at
www.HomeLink.com for information or assistance.

HomeLink® Buttons/Sunvisor/Headliner

182

UNDERSTANDING THE FEATURES OF YOUR VEHICLE

Programming A Rolling Code

For programming garage door openers that were manu-
factured after 1995. These garage door openers can be
identified by the “LEARN” or “TRAIN” button located
where the hanging antenna is attached to the garage door
opener. It is NOT the button that is normally used to
open and close the door. The name and color of the
button may vary by manufacturer.

1. Cycle the ignition to the ON/RUN position.

Training The Garage Door Opener

1 — Door Opener
2 — Training Button

3

UNDERSTANDING THE FEATURES OF YOUR VEHICLE

183

2. Place the hand-held transmitter 1 to 3 in (3 to 8 cm) away

from the HomeLink® button you wish to program while
keeping the HomeLink® indicator light in view.

3. Simultaneously press and hold both the HomeLink®

button you want to program and the hand-held trans-
mitter button.

4. Continue to hold both buttons and observe the indi-

cator light. The HomeLink® indicator will flash slowly
and then rapidly after HomeLink® has received the
frequency signal from the hand-held transmitter. Re-
lease both buttons after the indicator light changes
from slow to rapid.

5. At the garage door opener motor (in the garage),

locate the “LEARN” or “TRAINING” button. This can
usually be found where the hanging antenna wire is
attached to the garage door opener/device motor.
Firmly press and release the “LEARN” or “TRAIN-
ING” button. On some garage door openers/devices

there may be a light that blinks when the garage door
opener/device is in the LEARN/TRAIN mode.

NOTE:

You have 30 seconds in which to initiate the next

step after the LEARN button has been pressed.

6. Return to the vehicle and press the programmed

HomeLink® button twice (holding the button for two
seconds each time). If the garage door opener/device
activates, programming is complete.

NOTE:

If the garage door opener/device does not acti-

vate, press the button a third time (for two seconds) to
complete the training.

To program the remaining two HomeLink® buttons,
repeat each step for each remaining button. DO NOT
erase the channels.

184

UNDERSTANDING THE FEATURES OF YOUR VEHICLE

Reprogramming A Single HomeLink® Button

To reprogram a channel that has been previously trained,
follow these steps:

1. Cycle the ignition to the ON/RUN position.

2. Press and hold the desired HomeLink® button until

the indicator light begins to flash after 20 seconds. Do
not release the button.

3. Without releasing the button proceed with “Program-

ming A Rolling Code” step 2 and follow all remaining
steps.

Programming A Non-Rolling Code

For programming Garage Door Openers manufactured
before 1995.

1. Cycle the ignition to the ON/RUN position.

2. Place the hand-held transmitter 1 to 3 in (3 to 8 cm)

away from the HomeLink® button you wish to pro-
gram while keeping the HomeLink® indicator light in
view.

3. Simultaneously press and hold both the HomeLink®

button you want to program and the hand-held trans-
mitter button.

4. Continue to hold both buttons and observe the indi-

cator light. HomeLink® indicator will flash slowly
and then rapidly after HomeLink® has received the
frequency signal from the hand-held transmitter. Re-
lease both buttons after the indicator light changes
from slow to rapid.

5. Press and hold the programmed HomeLink® button

and observe the indicator light.

• If the indicator light stays on constantly, program-

ming is complete and the garage door/device should
activate when the HomeLink® button is pressed.

3

UNDERSTANDING THE FEATURES OF YOUR VEHICLE

185

• To program the remaining two HomeLink® buttons,

repeat each step for each remaining button. DO NOT
erase the channels.

Reprogramming A Single HomeLink® Button

To reprogram a channel that has been previously trained,
follow these steps:

1. Cycle the ignition to the ON/RUN position.

2. Press and hold the desired HomeLink® button until

the indicator light begins to flash after 20 seconds. Do
not release the button.

3. Without releasing the button proceed with “Program-

ming A Non-Rolling Code” step 2 and follow all
remaining steps.

Canadian/Gate Operator Programming

For programming transmitters in Canada/United States
that require the transmitter signals to “time-out” after
several seconds of transmission.

Canadian radio frequency laws require transmitter sig-
nals to time-out (or quit) after several seconds of trans-
mission – which may not be long enough for HomeLink®
to pick up the signal during programming. Similar to this
Canadian law, some U.S. gate operators are designed to
time-out in the same manner.

It may be helpful to unplug the device during the cycling
process to prevent possible overheating of the garage
door or gate motor.

1. Cycle the ignition to the ON/RUN position.

186

UNDERSTANDING THE FEATURES OF YOUR VEHICLE

2. Place the hand-held transmitter 1 to 3 in (3 to 8 cm)

away from the HomeLink® button you wish to pro-
gram while keeping the HomeLink® indicator light in
view.

3. Continue to press and hold the HomeLink® button,

while you press and release (“cycle”), your hand-held
transmitter every two seconds until HomeLink® has
successfully accepted the frequency signal. The indi-
cator light will flash slowly and then rapidly when
fully trained.

4. Watch for the HomeLink® indicator to change flash

rates. When it changes, it is programmed. It may take
up to 30 seconds or longer in rare cases. The garage
door may open and close while you are programming.

5. Press and hold the programmed HomeLink® button

and observe the indicator light.

• If the indicator light stays on constantly, program-

ming is complete and the garage door/device should
activate when the HomeLink® button is pressed.

• To program the two remaining HomeLink® buttons,

repeat each step for each remaining button. DO NOT
erase the channels.

If you unplugged the garage door opener/device for
programming, plug it back in at this time.

Reprogramming A Single HomeLink® Button

To reprogram a channel that has been previously trained,
follow these steps:

1. Cycle the ignition to the ON/RUN position.

2. Press and hold the desired HomeLink® button until

the indicator light begins to flash after 20 seconds. Do
not release the button.

3

UNDERSTANDING THE FEATURES OF YOUR VEHICLE

187


Content      ..     9      10      11      12     ..