Dodge Caliber (2012 year). Manual - part 18


  Index      Dodge     Dodge Caliber (2012 year) - manual in english


Search            copyright infringement  


Content      ..     16      17      18      19     ..


Dodge Caliber (2012 year). Manual - part 18


• MAX A/C
For maximum cooling use the A/C and recirculation
buttons at the same time.

• ECONOMY MODE
If economy mode is desired, press the A/C button to turn
OFF the indicator light and the A/C compressor. Then,
move the temperature control to the desired temperature.

Automatic Temperature Control (ATC) — If
Equipped

The Automatic Temperature Control system automati-
cally maintains the climate in the cabin of the vehicle at
the comfort levels desired by the driver and passenger.
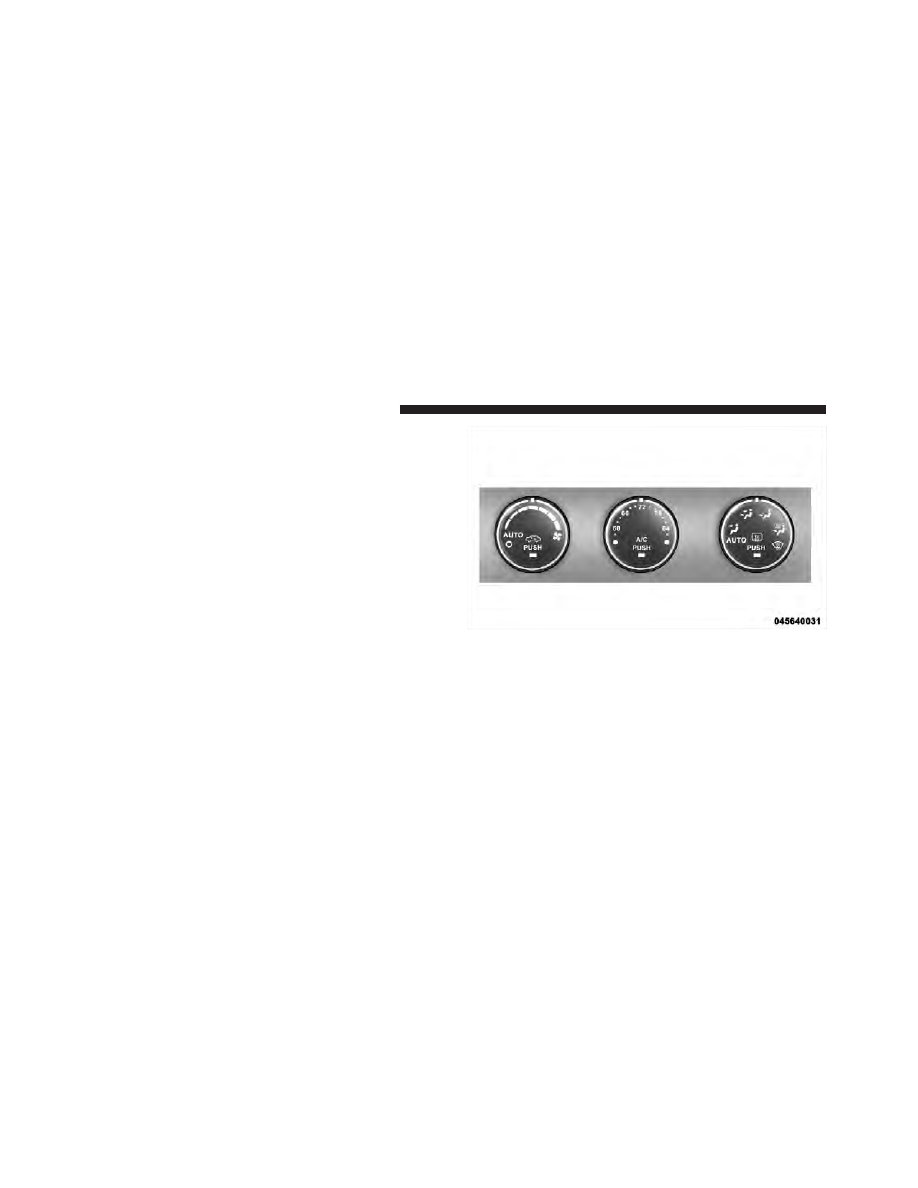
Automatic Operation
Operation of the system is quite simple.

1. Turn the Mode Control knob (on the right) and the
Blower Control knob (on the left) to AUTO.

Automatic Temperature Control

284

UNDERSTANDING YOUR INSTRUMENT PANEL

NOTE:

The AUTO position performs best for front seat

occupants only.

2. Dial in the temperature you would
like the system to maintain by rotating
the Temperature Control knob. Once
the comfort level is selected, the sys-
tem will maintain that level automati-
cally using the heating system. Should
the desired comfort level require air

conditioning, the system will automatically make the
adjustment.

You will experience the greatest efficiency by simply
allowing the system to function automatically. Selecting
the “O” (OFF) position on the blower control stops the
system completely and closes the outside air intake.

The recommended setting for maximum comfort for the
average person is 72°F (22°C); however, this may vary.

NOTE:

• The temperature setting can be adjusted at anytime

without affecting automatic operation.

• Pressing the Air Conditioning Control button while in

AUTO mode will cause the LED in the control button
to flash three times and then turn off. This indicates
that the system is in AUTO mode and requesting the
air conditioning is not necessary.

• If your air conditioning performance seems lower than

expected, check the front of the A/C condenser located
in front of the radiator for an accumulation of dirt or
insects. Clean with a gentle water spray from behind
the radiator and through the condenser. Fabric front
fascia protectors may reduce airflow to the condenser,
reducing air conditioning performance.

4

UNDERSTANDING YOUR INSTRUMENT PANEL

285

Blower Control

For full automatic operation or for
automatic blower operation, turn the
knob to the AUTO position. In manual
mode there are seven blower speeds
that can be individual selected. In off
position the blower will shut off.

Manual Operation
This system offers a full complement of manual override
features, which consist of Blower Preferred Automatic,
Mode Preferred Automatic, or Blower and Mode Pre-
ferred Automatic. This means the operator can override
the blower, the mode, or both. There is a manual blower
range for times when the AUTO setting is not desired.
The blower can be set to any fixed blower speed by
rotating the Blower Control knob (on the left).

NOTE:

Please read the Automatic Temperature Control

Operation Chart that follows for details.

286

UNDERSTANDING YOUR INSTRUMENT PANEL

4

UNDERSTANDING YOUR INSTRUMENT PANEL

287

The operator can override the AUTO mode setting to
change airflow distribution by rotating the Mode Control
knob (on the right) to one of the following positions.

• Panel

Air is directed through the outlets in the instrument
panel. These outlets can be adjusted to direct airflow.

NOTE:

The center instrument panel outlets can be

aimed so that they are directed toward the rear seat
passengers for maximum airflow to the rear.

• Bi-Level

Air is directed through the panel and floor outlets.

NOTE:

For all settings, except full cold or full hot, there

is a difference in temperature between the upper and
lower outlets. The warmer air flows to the floor outlets.
This feature gives improved comfort during sunny but
cool conditions.

• Floor

Air is directed through the floor outlets with a
small amount flowing through the defrost and side

window demist outlets.

• Mix

Air is directed through the floor, defrost, and side
window demist outlets. This setting works best in
cold or snowy conditions that require extra heat to

the windshield. This setting is good for maintaining
comfort while reducing moisture on the windshield.

• Defrost

Air is directed through the windshield and side
window demist outlets. Use this mode with maxi-

mum blower and temperature settings for best wind-
shield and side window defrosting.

288

UNDERSTANDING YOUR INSTRUMENT PANEL

• Air Conditioner Control

Press this button to turn on the air
conditioning during manual operation
only. When the air conditioning is
turned on, cool dehumidified air will
flow through the outlets selected with
the Mode control dial. Press this but-
ton a second time to turn OFF the air

conditioning. An LED in the button illuminates when
manual compressor operation is selected.

• Recirculation Control

The system will automatically control recircu-
lation. However, pressing the Recirculation
Control button will put the system in recircu-
lation mode. This can be used when outside

conditions such as smoke, odors, dust, or high humidity
are present. Activating recirculation will cause the LED in
the control button to illuminate.

NOTE:

• When the ignition switch is turned to the LOCK

position, the recirculation feature will be cancelled.

• In cold weather, use of the Recirculation mode may

lead to excessive window fogging. The Recirculation
mode is not allowed in the floor, defrost, or defrost/
floor mode in order to improve window clearing.
Recirculation will be disabled automatically if these
modes are selected.

• Extended use of recirculation may cause the windows

to fog. If the interior of the windows begins to fog,
press the Recirculation button to return to outside air.
Some temp/humidity conditions will cause captured
interior air to condense on windows and hamper
visibility. For this reason, the system will not allow
Recirculation to be selected while in floor, defrost, or

4

UNDERSTANDING YOUR INSTRUMENT PANEL

289

defrost/floor mode. Attempting to use the recircula-
tion while in these modes will cause the LED in the
control button to blink and then turn off.

• Most of the time, when in Automatic Operation, you

can temporarily put the system into Recirculation
Mode by pressing the Recirculation button. However,
under certain conditions, while in Automatic Mode,
the system is blowing air out the defrost vents. When
these conditions are present, and the Recirculation
button is pressed, the indicator will flash and then turn
off. This tells you that you are unable to go into
Recirculation Mode at this time. If you would like the
system to go into Recirculation Mode, you must first
move the Mode knob to Panel, Bi-Level and then press
the Recirculation button. This feature reduces the
possibility of window fogging.

Operating Tips

NOTE:

Refer to the chart at the end of this section for

suggested control settings for various weather condi-
tions.

Summer Operation
The engine cooling system in air-conditioned vehicles
must be protected with a high-quality antifreeze coolant
to provide proper corrosion protection and to protect
against engine overheating. A solution of 50% ethylene
glycol antifreeze coolant and 50% water is recommended.
Refer to “Maintenance Procedures” in “Maintaining Your
Vehicle” for proper coolant selection.

Winter Operation
Use of the air Recirculation Mode during winter months
is not recommended because it may cause window
fogging.

290

UNDERSTANDING YOUR INSTRUMENT PANEL

Vacation Storage
Anytime you store your vehicle, or keep it out of service
(i.e., vacation) for two weeks or more, run the air
conditioning system at idle for about five minutes in the
fresh air and high blower settings. This will ensure
adequate system lubrication to minimize the possibility
of compressor damage when the system is started again.

Window Fogging
Interior fogging on the windshield can be quickly re-
moved by turning the mode selector to Defrost. The
Defrost/Floor mode can be used to maintain a clear
windshield and provide sufficient heating. If side win-
dow fogging becomes a problem, increase blower speed.
Vehicle windows tend to fog on the inside in mild but
rainy or humid weather.

NOTE:

Recirculate without A/C should not be used for

long periods as fogging may occur.

Side Window Demisters
A side window demister outlet is located at each end of
the instrument panel. These non-adjustable outlets direct
air toward the side windows when the system is in the
FLOOR, MIX, or DEFROST mode. The air is directed at
the area of the windows through which you view the
outside mirrors.

Outside Air Intake
Make sure the air intake, located directly in front of the
windshield, is free of obstructions such as leaves. Leaves
collected in the air intake may reduce airflow, and if they
enter the plenum, they could plug the water drains. In
winter months, make sure the air intake is clear of ice,
slush, and snow.

4

UNDERSTANDING YOUR INSTRUMENT PANEL

291

A/C Air Filter — If Equipped
The A/C Filter prevents most dust and pollen from
entering the cabin. The filter acts on air coming from
outside the vehicle and recirculated air within the pas-
senger compartment. Refer to “Maintenance Procedures”

in “Maintaining Your Vehicle” for A/C Air Filter service
information or see your authorized dealer for service.
Refer to “Maintenance Schedules” for filter service
intervals.

292

UNDERSTANDING YOUR INSTRUMENT PANEL

Control Setting Suggestions for Various Weather Conditions

4

UNDERSTANDING YOUR INSTRUMENT PANEL

293

STARTING AND OPERATING

CONTENTS

䡵 Starting Procedures . . . . . . . . . . . . . . . . . . . . 299

▫ Manual Transmission – If Equipped . . . . . . . 299
▫ Automatic Transmission – If Equipped . . . . . 299
▫ Normal Starting . . . . . . . . . . . . . . . . . . . . . 300
▫ Extreme Cold Weather (Below –20°F Or

⫺29°C) . . . . . . . . . . . . . . . . . . . . . . . . . . . . 301

▫ If Engine Fails To Start . . . . . . . . . . . . . . . . 301
▫ After Starting . . . . . . . . . . . . . . . . . . . . . . . 301

䡵 Engine Block Heater — If Equipped . . . . . . . . 302

䡵 Manual Transmission — If Equipped . . . . . . . . 302

▫ Five–Speed Manual Transmission . . . . . . . . . 302
▫ Recommended Shift Speeds . . . . . . . . . . . . . 303
▫ Downshifting . . . . . . . . . . . . . . . . . . . . . . . 304

䡵 Automatic Transmission — If Equipped . . . . . . 304

▫ Key Ignition Park Interlock . . . . . . . . . . . . . 306
▫ Brake/Transmission Shift Interlock System . . 306
▫ Gear Ranges . . . . . . . . . . . . . . . . . . . . . . . . 307

䡵 AutoStick威 — If Equipped . . . . . . . . . . . . . . . 312

5

▫ Operation . . . . . . . . . . . . . . . . . . . . . . . . . 312
▫ General Information . . . . . . . . . . . . . . . . . . 313

䡵 Driving On Slippery Surfaces . . . . . . . . . . . . . 314

▫ Acceleration . . . . . . . . . . . . . . . . . . . . . . . . 314
▫ Traction . . . . . . . . . . . . . . . . . . . . . . . . . . . 314

䡵 Driving Through Water . . . . . . . . . . . . . . . . . 315

▫ Flowing/Rising Water . . . . . . . . . . . . . . . . . 315
▫ Shallow Standing Water . . . . . . . . . . . . . . . 315

䡵 Power Steering . . . . . . . . . . . . . . . . . . . . . . . 317

▫ Power Steering Fluid Check . . . . . . . . . . . . . 318

䡵 Parking Brake . . . . . . . . . . . . . . . . . . . . . . . . 319
䡵 Brake System . . . . . . . . . . . . . . . . . . . . . . . . 321

▫ Anti-Lock Brake System (ABS) . . . . . . . . . . . 322

䡵 Electronic Brake Control System . . . . . . . . . . . 324

▫ Anti-Lock Brake System (ABS) . . . . . . . . . . . 325
▫ Brake Assist System (BAS) . . . . . . . . . . . . . . 325
▫ Traction Control System (TCS) . . . . . . . . . . . 326
▫ Hill Start Assist (HSA) – Manual

Transmission Only . . . . . . . . . . . . . . . . . . . 326

▫ Electronic Stability Control (ESC) . . . . . . . . . 328
▫ ESC Activation/Malfunction Indicator Light

And ESC Off Indicator Light . . . . . . . . . . . . 330

䡵 Tire Safety Information . . . . . . . . . . . . . . . . . 331

▫ Tire Markings . . . . . . . . . . . . . . . . . . . . . . . 331
▫ Tire Identification Number (TIN) . . . . . . . . . 335
▫ Tire Terminology And Definitions . . . . . . . . . 336
▫ Tire Loading And Tire Pressure . . . . . . . . . . 337

296

STARTING AND OPERATING

䡵 Tires — General Information . . . . . . . . . . . . . 341

▫ Tire Pressure . . . . . . . . . . . . . . . . . . . . . . . 341
▫ Tire Inflation Pressures . . . . . . . . . . . . . . . . 342
▫ Tire Pressures For High Speed Operation . . . 343
▫ Radial Ply Tires . . . . . . . . . . . . . . . . . . . . . 344
▫ Spare Tire Matching Original Equipped Tire

And Wheel – If Equipped . . . . . . . . . . . . . . 344

▫ Compact Spare Tire – If Equipped . . . . . . . . 345
▫ Full Size Spare – If Equipped . . . . . . . . . . . . 346
▫ Limited-Use Spare – If Equipped . . . . . . . . . 346
▫ Tire Spinning . . . . . . . . . . . . . . . . . . . . . . . 347
▫ Tread Wear Indicators . . . . . . . . . . . . . . . . . 348
▫ Life Of Tire . . . . . . . . . . . . . . . . . . . . . . . . 348

▫ Replacement Tires . . . . . . . . . . . . . . . . . . . . 349

䡵 Tire Chains . . . . . . . . . . . . . . . . . . . . . . . . . . 351
䡵 Snow Tires . . . . . . . . . . . . . . . . . . . . . . . . . . 351
䡵 Tire Rotation Recommendations . . . . . . . . . . . 351
䡵 Tire Pressure Monitoring System (TPMS) . . . . . 353

▫ Base System . . . . . . . . . . . . . . . . . . . . . . . . 355
▫ Premium System – If Equipped . . . . . . . . . . 358
▫ General Information . . . . . . . . . . . . . . . . . . 362

䡵 Fuel Requirements . . . . . . . . . . . . . . . . . . . . . 363

▫ 2.0L And 2.4L Engine . . . . . . . . . . . . . . . . . 363
▫ Reformulated Gasoline . . . . . . . . . . . . . . . . 363
▫ Gasoline/Oxygenate Blends . . . . . . . . . . . . . 364
▫ E-85 Usage In Non-Flex Fuel Vehicles . . . . . . 364

5

STARTING AND OPERATING

297

▫ MMT In Gasoline . . . . . . . . . . . . . . . . . . . . 365
▫ Materials Added To Fuel . . . . . . . . . . . . . . . 365
▫ Fuel System Cautions . . . . . . . . . . . . . . . . . 366
▫ Carbon Monoxide Warnings . . . . . . . . . . . . 367

䡵 Adding Fuel . . . . . . . . . . . . . . . . . . . . . . . . . 367

▫ Fuel Filler Cap (Gas Cap) . . . . . . . . . . . . . . 367
▫ Loose Fuel Filler Cap Message . . . . . . . . . . . 369

䡵 Vehicle Loading . . . . . . . . . . . . . . . . . . . . . . 369

▫ Vehicle Certification Label . . . . . . . . . . . . . . 370

䡵 Trailer Towing . . . . . . . . . . . . . . . . . . . . . . . . 372

▫ Common Towing Definitions . . . . . . . . . . . . 372

▫ Installing A Trailer Hitch . . . . . . . . . . . . . . . 374
▫ Trailer Hitch Classification . . . . . . . . . . . . . . 375
▫ Trailer Towing Weights (Maximum Trailer

Weight Ratings) . . . . . . . . . . . . . . . . . . . . . 376

▫ Trailer And Tongue Weight . . . . . . . . . . . . . 377
▫ Towing Requirements . . . . . . . . . . . . . . . . . 378
▫ Towing Tips . . . . . . . . . . . . . . . . . . . . . . . . 383

䡵 Recreational Towing (Behind Motorhome,

Etc.). . . . . . . . . . . . . . . . . . . . . . . . . . . . . . . . 385

▫ Towing This Vehicle Behind Another

Vehicle . . . . . . . . . . . . . . . . . . . . . . . . . . . . 385

298

STARTING AND OPERATING

STARTING PROCEDURES

Before starting your vehicle, adjust your seat, adjust both
inside and outside mirrors, and fasten your seat belts.

WARNING!

• When leaving the vehicle, always remove the key

fob from the ignition and lock your vehicle.

• Never leave children alone in a vehicle, or with

access to an unlocked vehicle.

• Allowing children to be in a vehicle unattended is

dangerous for a number of reasons. A child or
others could be seriously or fatally injured. Chil-
dren should be warned not to touch the parking
brake, brake pedal or the shift lever.

• Do not leave the key fob in or near the vehicle. A

child could operate power windows, other con-
trols, or move the vehicle.

Manual Transmission – If Equipped

Before starting the engine fully apply the parking brake,
press the clutch pedal to the floor, and place the shift
lever in NEUTRAL.

NOTE:

• The engine will not start unless the clutch pedal is

pressed to the floor.

• If the key will not turn and the steering wheel is

locked, rotate the wheel in either direction to relieve
pressure on the locking mechanism and then turn the
key.

Automatic Transmission – If Equipped

The shift lever must be in the PARK or NEUTRAL
position before you can start the engine. Apply the brakes
before shifting to any driving gear.

NOTE:

You must press the brake pedal before shifting

out of PARK.

5

STARTING AND OPERATING

299


Content      ..     16      17      18      19     ..