Dodge Caliber (2012 year). Manual - part 3


  Index      Dodge     Dodge Caliber (2012 year) - manual in english


Search            copyright infringement  


Content      ..     1      2      3      4      ..


Dodge Caliber (2012 year). Manual - part 3


Lap/Shoulder Belt Operating Instructions

1. Enter the vehicle and close the door. Sit back and
adjust the seat.

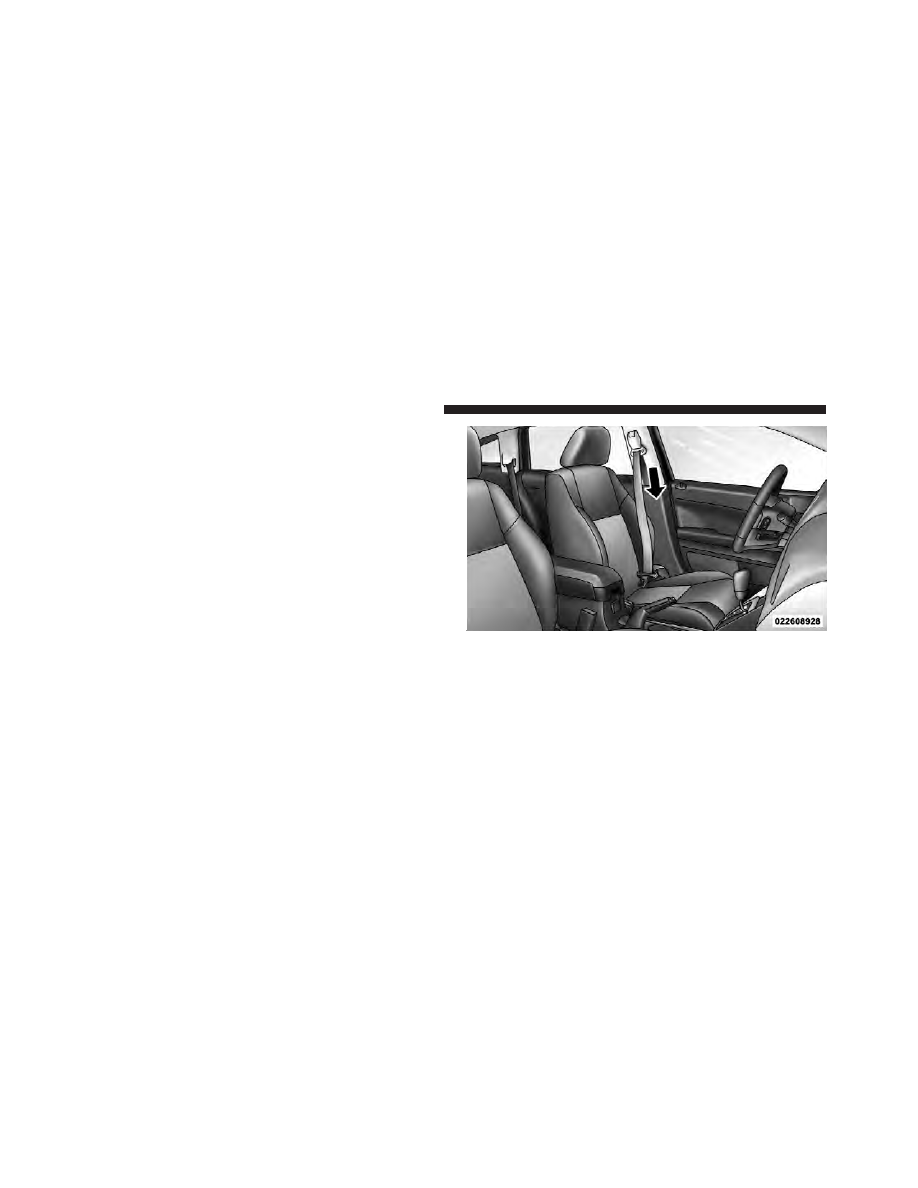
2. The seat belt latch plate is along side the pillar near the
back of your seat. Grasp the latch plate and pull out the
belt. Slide the latch plate up the webbing as far as
necessary to allow the belt to go around your lap.

Pulling Out The Latch Plate

44

THINGS TO KNOW BEFORE STARTING YOUR VEHICLE

3. When the belt is long enough to fit, insert the latch
plate into the buckle until you hear a “click.”

WARNING!

• A belt that is buckled into the wrong buckle will

not protect you properly. The lap portion could
ride too high on your body, possibly causing
internal injuries. Always buckle your belt into the
buckle nearest you.

• A belt that is too loose will not protect you

properly. In a sudden stop you could move too far
forward, increasing the possibility of injury. Wear
your seat belt snugly.

(Continued)

Inserting Latch Plate Into Buckle

2

THINGS TO KNOW BEFORE STARTING YOUR VEHICLE

45

WARNING! (Continued)

• A belt that is worn under your arm is dangerous.

Your body could strike the inside surfaces of the
vehicle in a collision, increasing head and neck
injury. A belt worn under the arm can cause
internal injuries. Ribs aren’t as strong as shoulder
bones. Wear the belt over your shoulder so that
your strongest bones will take the force in a
collision.

• A shoulder belt placed behind you will not protect

you from injury during a collision. You are more
likely to hit your head in a collision if you do not
wear your shoulder belt. The lap and shoulder belt
are meant to be used together.

4. Position the lap belt across your thighs, below your
abdomen. To remove slack in the lap belt portion, pull up
on the shoulder belt. To loosen the lap belt if it is too tight,
tilt the latch plate and pull on the lap belt. A snug belt
reduces the risk of sliding under the belt in a collision.

Positioning Lap Belt

46

THINGS TO KNOW BEFORE STARTING YOUR VEHICLE

WARNING!

• A lap belt worn too high can increase the risk of

internal injury in a collision. The belt forces won’t
be at the strong hip and pelvic bones, but across
your abdomen. Always wear the lap belt as low as
possible and keep it snug.

• A twisted belt may not protect you properly. In a

collision, it could even cut into you. Be sure the
belt is straight. If you can’t straighten a belt in
your vehicle, take it to your authorized dealer
immediately and have it fixed.

5. Position the shoulder belt on your chest so that it is
comfortable and not resting on your neck. The retractor
will withdraw any slack in the belt.

6. To release the belt, push the red button on the buckle.
The belt will automatically retract to its stowed position.
If necessary, slide the latch plate down the webbing to
allow the belt to retract fully.

WARNING!

A frayed or torn belt could rip apart in a collision and
leave you with no protection. Inspect the belt system
periodically, checking for cuts, frays, or loose parts.
Damaged parts must be replaced immediately. Do
not disassemble or modify the system. Seat belt
assemblies must be replaced after a collision if they
have been damaged (bent retractor, torn webbing,
etc.).

2

THINGS TO KNOW BEFORE STARTING YOUR VEHICLE

47

Adjustable Upper Shoulder Belt Anchorage

In the driver and front passenger seat, the shoulder belt
can be adjusted upward or downward to position the belt
away from your neck. Push the anchorage button to
release the anchorage, and move it up or down to the
position that fits you best.

NOTE:

The adjustable upper shoulder belt anchorage is

equipped with an Easy Up feature. This feature allows
the shoulder belt anchorage to be adjusted in the upward
position without pressing the release button. To verify
the shoulder belt anchorage is latched, pull downward
on the shoulder belt anchorage until it is locked into
position.

As a guide, if you are shorter than average, you will
prefer a lower position, and if you are taller than average,
you will prefer a higher position. When you release the
anchorage, try to move it down to make sure that it is

Adjustable Anchorage

48

THINGS TO KNOW BEFORE STARTING YOUR VEHICLE

locked in position. In the rear seat, move toward the
center of the seat to position the belt away from your
neck.

Lap/ Shoulder Belt Operating Instructions With A
Mini-Latch And Buckle

A three point seat belt with a mini-latch and buckle,
allows the shoulder belt to detach from the lower anchor
when the seat is folded. The mini-buckle and shoulder
belt can then be stored out of the way in the right side
trim panel for added convenience.

1. Remove the mini-latch and regular latch from its
stowed position in the right rear side trim panel.

2. Grasp the mini-latch plate and pull the belt over the
seat.

Mini-Latch Stowage

2

THINGS TO KNOW BEFORE STARTING YOUR VEHICLE

49

3. Route the shoulder belt to the inside of the right head
restraint.

4. When the belt is long enough to fit, insert the mini-
latch plate into the mini-buckle until you hear a “click.”

5. Sit back in seat. Slide the regular latch plate up the
webbing as far as necessary to allow the belt to go around
your lap.

6. When the belt is long enough to fit, insert the latch
plate into the buckle until you hear a “click.”

Routing The Rear Center Shoulder Belt

Connecting Mini-Latch To Buckle

50

THINGS TO KNOW BEFORE STARTING YOUR VEHICLE

7. Position the lap belt across your thighs, below your
abdomen. To remove slack in the lap belt portion, pull up
on the shoulder belt. To loosen the lap belt if it is too tight,
pull on the lap belt. A snug belt reduces the risk of sliding
under the belt in a collision.

8. Position the shoulder belt on your chest so that it is
comfortable and not resting on your neck. The retractor
will withdraw any slack in the belt.

9. To release the belt, push the red button on the buckle.

Rear Center Seat Belt Buckled

Detaching Mini-Latch And Buckle

2

THINGS TO KNOW BEFORE STARTING YOUR VEHICLE

51

10. To disengage the mini-latch from the mini-buckle for
storage, insert the regular latch plate into the black
button on the top of the mini-buckle. The belt will
automatically retract to its stowed position. If necessary,
slide the latch plate down the webbing to allow the belt
to retract fully. Insert the mini-latch plate into the slot
provided in the trim panel.

Lap/Shoulder Belt Untwisting Procedure

Use the following procedure to untwist a twisted lap/
shoulder belt.

1. Position the latch plate as close as possible to the
anchor point.

2. At about 6 to 12 in (15 to 30 cm) above the latch plate,
grasp and twist the belt webbing 180 degrees to create a
fold that begins immediately above the latch plate.

3. Slide the latch plate upward over the folded webbing.
The folded webbing must enter the slot at the top of the
latch plate.

4. Continue to slide the latch plate up until it clears the
folded webbing.

Seat Belts In Passenger Seating Positions

The seat belts in the passenger seating positions are
equipped with an Automatic Locking Retractor (ALR)
which are used to secure a child restraint system. For
additional information, refer to “Installing Child Re-
straints Using The Vehicle Seat Belt” under the “Child
Restraints” section. The chart below defines the type of
feature for each seating position.

Driver

Center

Passenger

First Row

N/A

N/A

ALR

Second Row

ALR

ALR

ALR

Third Row

N/A

N/A

N/A

• N/A — Not Applicable
• ALR — Automatic Locking Retractor

52

THINGS TO KNOW BEFORE STARTING YOUR VEHICLE

If the passenger seating position is equipped with an
ALR and is being used for normal usage:

Only pull the belt webbing out far enough to comfortably
wrap around the occupant’s mid-section so as to not
activate the ALR. If the ALR is activated, you will hear a
ratcheting sound as the belt retracts. Allow the webbing
to retract completely in this case and then carefully pull
out only the amount of webbing necessary to comfort-
ably wrap around the occupant’s mid-section. Slide the
latch plate into the buckle until you hear a

⬙click.⬙

Automatic Locking Retractor Mode (ALR) — If
Equipped

In this mode, the shoulder belt is automatically pre-
locked. The belt will still retract to remove any slack in
the shoulder belt. The Automatic Locking Mode is avail-
able on all passenger-seating positions with a combina-
tion lap/shoulder belt. Use the Automatic Locking Mode
anytime a child safety seat is installed in a seating

position that has a belt with this feature. Children
12 years old and under should always be properly
restrained in the rear seat.

How To Engage The Automatic Locking Mode

1. Buckle the combination lap and shoulder belt.

2. Grasp the shoulder portion and pull downward until
the entire belt is extracted.

3. Allow the belt to retract. As the belt retracts, you will
hear a clicking sound. This indicates the safety belt is
now in the Automatic Locking Mode.

How To Disengage The Automatic Locking Mode
Unbuckle the combination lap/shoulder belt and allow it
to retract completely to disengage the Automatic Locking
Mode and activate the vehicle sensitive (emergency)
locking mode.

2

THINGS TO KNOW BEFORE STARTING YOUR VEHICLE

53

WARNING!

• The belt and retractor assembly must be replaced

if the seat belt assembly Automatic Locking Re-
tractor (ALR) feature or any other seat belt func-
tion is not working properly when checked ac-
cording to the procedures in the Service Manual.

• Failure to replace the belt and retractor assembly

could increase the risk of injury in collisions.

Energy Management Feature

This vehicle has a safety belt system with an Energy
Management feature in the front seating positions to help
further reduce the risk of injury in the event of a head-on
collision. This safety belt system has a retractor assembly
that is designed to release webbing in a controlled
manner. This feature is designed to help reduce the belt
force acting on the occupant’s chest.

Seat Belt Pretensioners

The seat belts for both front seating positions are
equipped with pretensioning devices that are designed to
remove slack from the seat belt in the event of a collision.
These devices may improve the performance of the seat
belt by assuring that the belt is tight about the occupant
early in a collision. Pretensioners work for all size occu-
pants, including those in child restraints.

NOTE:

These devices are not a substitute for proper seat

belt placement by the occupant. The seat belt still must be
worn snugly and positioned properly.

The pretensioners are triggered by the Occupant Re-
straint Controller (ORC). Like the air bags, the preten-
sioners are single use items. A deployed pretensioner or
a deployed air bag must be replaced immediately.

54

THINGS TO KNOW BEFORE STARTING YOUR VEHICLE

Supplemental Active Head Restraints (AHR) — If
Equipped

These head restraints are passive, deployable compo-
nents, and vehicles with this equipment cannot be readily
identified by any markings, only through visual inspec-
tion of the head restraint. The head restraint will be split
in two halves, with the front half being soft foam and
trim, the back half being decorative plastic.

How The Active Head Restraints (AHR) Work
The Occupant Restraint Controller (ORC) determines
whether the severity, or type of rear impact will require
the Active Head Restraints (AHR) to deploy. If a rear
impact requires deployment, both the driver and front
passenger seat AHRs will be deployed.

When AHRs deploy during a rear impact, the front half
of the head restraint extends forward to minimize the gap
between the back of the occupant’s head and the AHR.
This system is designed to help prevent or reduce the
extent of injuries to the driver and front passenger in
certain types of rear impacts.

2

THINGS TO KNOW BEFORE STARTING YOUR VEHICLE

55

NOTE:

The Active Head Restraints (AHR) may or may

not deploy in the event of a front or side impact.
However if during a front impact, a secondary rear
impact occurs, the AHR may deploy based on the sever-
ity and type of the impact.

Active Head Restraint (AHR) Components

1 — Head Restraint Front Half

(Soft Foam and Trim)

3 — Head Restraint Back Half

(Decorative Plastic Rear

Cover)

2 — Seatback

4 — Head Restraint Guide

Tubes

56

THINGS TO KNOW BEFORE STARTING YOUR VEHICLE

CAUTION!

All occupants, including the driver, should not oper-
ate a vehicle or sit in a vehicle’s seat until the head
restraints are placed in their proper positions in order
to minimize the risk of neck injury in the event of a
collision.

NOTE:

For more information on properly adjusting and

positioning the head restraint, refer to “Adjusting Active
Head Restraints” in “Understanding The Features Of
Your Vehicle”.

Resetting Active Head Restraints (AHR)
If the Active Head Restraints are triggered in a collision,
you must reset the head restraint on the driver’s and
front passenger seat. You can recognize when the Active
Head Restraint has been triggered by the fact that they
have moved forward (as shown in step three of the
resetting procedure).

1. Grasp the deployed AHR from the rear seat.

2. Position the hands on the top of the deployed AHR at
a comfortable position.

Hand Positioning Points On AHR

2

THINGS TO KNOW BEFORE STARTING YOUR VEHICLE

57

3. Pull down then rearward towards the rear of the
vehicle then down to engage the locking mechanism.

1 — Downward Movement
2 — Rearward Movement

3 — Final Downward Movement To Engage Locking Mecha-

nism

58

THINGS TO KNOW BEFORE STARTING YOUR VEHICLE

4. The AHR front soft foam and trim half should lock
into the back decorative plastic half.

NOTE:

• If you have difficulties or problems resetting the

Active Head Restraints, see an authorized dealer.

• For safety reasons, have the Active Head Restraints

checked by a qualified specialist at an authorized
dealer.

Enhanced Seat Belt Use Reminder System
(BeltAlert

)

BeltAlert

威 is a feature intended to remind the driver and

front passenger (if equipped with front passenger
BeltAlert

威) to fasten their seat belts. The feature is active

whenever the ignition is on. If the driver or front seat
passenger is unbelted, the Seat Belt Reminder Light will
turn on and remain on until both front seat belts are
fastened.

AHR In Reset Position

2

THINGS TO KNOW BEFORE STARTING YOUR VEHICLE

59


Content      ..     1      2      3      4      ..