Dodge Caliber Srt4 (2009 year). Manual - part 9


  Index      Dodge     Dodge Caliber Srt4 (2009 year) - manual in english


Search            copyright infringement  


Content      ..     7      8      9      10     ..


Dodge Caliber Srt4 (2009 year). Manual - part 9


General Information
This device complies with FCC rules Part 15 and Industry
Canada RSS-210. Operation is subject to the following
two conditions:

1. This device may not cause harmful interference

2. This device must accept any interference that may be
received including interference that may cause undesired
operation

NOTE:

The transmitter has been tested and it complies

with FCC and IC rules. Changes or modifications not
expressly approved by the party responsible for compli-
ance could void the user’s authority to operate the
device.

The term IC before the certification/registration number
only signifies that Industry Canada technical specifica-
tions were met.

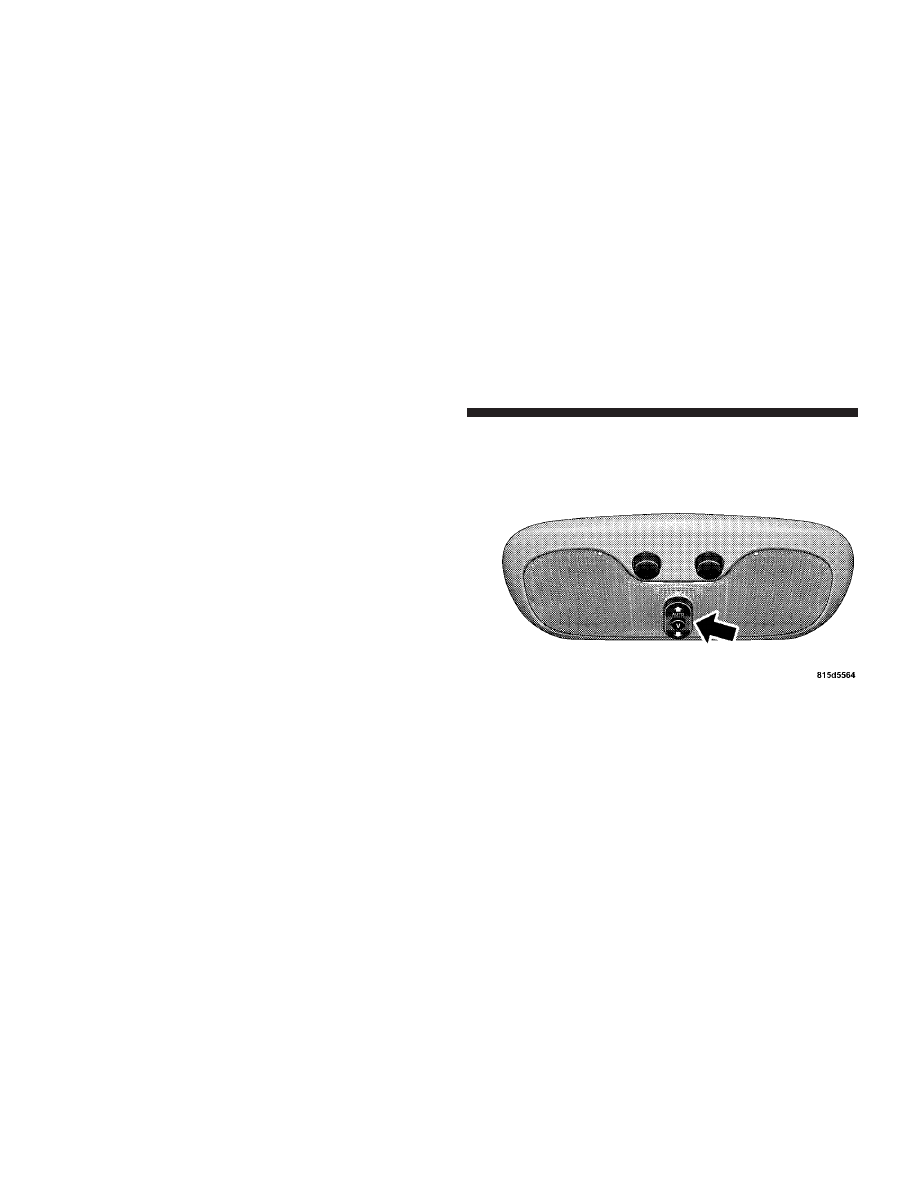
POWER SUNROOF — IF EQUIPPED
The power sunroof switch is located in the reading light.

Power Sunroof Switch

140

UNDERSTANDING THE FEATURES OF YOUR VEHICLE

WARNING!

• Never leave children in a vehicle, with the key in

the ignition switch. Occupants, particularly unat-
tended children, can become entrapped by the
power sunroof while operating the power sunroof
switch. Such entrapment may result in serious
injury or death.

• In an accident, there is a greater risk of being

thrown from a vehicle with an open sunroof. You
could also be seriously injured or killed. Always
fasten your seat belt properly and make sure all
passengers are properly secured too.

• Do not allow small children to operate the sun-

roof. Never allow fingers or other body parts, or
any object to project through the sunroof opening.
Injury may result.

Opening the Sunroof

Manual Mode
To open the sunroof, press and hold the switch rearward
to full open. Any release of the switch will stop the
movement and the sunroof will remain in a partial open
condition until the switch is pushed and held rearward
again.

Express Mode
Press the switch rearward and release, and the sunroof
will open automatically from any position. The sunroof
will open fully, and stop automatically, this is called
“express open”. During express open operation any
movement of the sunroof switch will stop the sunroof.

UNDERSTANDING THE FEATURES OF YOUR VEHICLE

141

3

Closing the Sunroof

Manual Mode
To close the sunroof, press and hold the switch in the
forward position. Again, any release of the switch will
stop the movement and the sunroof will remain in a
partial close condition until the switch is pushed and
held forward again. To ensure sunroof is fully closed,
press and hold switch until sunroof has completely
stopped moving.

Express Mode
Press the switch forward and release, and the sunroof
will close automatically from any position. The sunroof
will close fully, and stop automatically, this is called
“express close”. During express close operation, any
movement of the switch will stop the sunroof.

Pinch Protect Feature
This feature will detect an obstruction in the opening of
the sunroof during express close operation. If an obstruc-
tion in the path of the sunroof is detected, the sunroof
will automatically retract. Remove obstruction and press
the switch forward and release to express close.

Pinch Protect Override
If a known obstruction (ice, debris, etc.) prevents closing,
press the switch forward and hold for two seconds after
the reversal occurs. This allows the sunroof to move
towards the close position.

NOTE:

Pinch protection is disabled while the switch is

pressed.

142

UNDERSTANDING THE FEATURES OF YOUR VEHICLE

Venting Sunroof — Express
Press and hold the “V” button, and the sunroof will open
to the vent position. This is called “express vent”, and
will occur regardless of the sunroof position. During
express vent operation, any movement of the switch will
stop the sunroof.

Sunshade Operation
The sunshade can be opened manually. However, the
sunshade will open automatically as the sunroof opens.

NOTE:

The sunshade cannot be closed if the sunroof is

open.

Wind Buffeting
Wind buffeting can be described as the perception of
pressure on the ears or a helicopter-type sound in the
ears. Your vehicle may exhibit wind buffeting with the

windows down, or the sunroof (if equipped) in certain
open or partially open positions. This is a normal occur-
rence and can be minimized. If the buffeting occurs with
the rear windows open, open the front and rear windows
together to minimize the buffeting. If the buffeting occurs
with the sunroof open, adjust the sunroof opening to
minimize the buffeting or open any window.

Sunroof Maintenance
Use only a non-abrasive cleaner and a soft cloth to clean
the glass panel.

Ignition Off Operation

The sunroof will also operate up to 45 seconds after the
ignition has been turned OFF. The sunroof operation will
be canceled if either of the front doors are opened during
the 45 second time period.

UNDERSTANDING THE FEATURES OF YOUR VEHICLE

143

3

ELECTRICAL POWER OUTLETS
There is a standard 12-Volt power outlet in the instru-
ment panel for added convenience. This outlet can power
cell phones, electronics and other low power devices.

NOTE:

Due to overload protection, the inverter will

shut down if the power rating is exceeded.

WARNING!

To Avoid Serious Injury or Death:
• Do not use a Three-Prong Adaptor.
• Do not insert any objects into the receptacles.

• Do not touch with wet hands.

• Close the lid when not in use, and while driving

the vehicle.

• If this outlet is mishandled it may cause an electric

shock and failure.

12-Volt Power Outlet

144

UNDERSTANDING THE FEATURES OF YOUR VEHICLE

CAUTION!

• Many accessories that can be plugged in draw

power from the vehicle’s battery, even when not in
use (i.e., cellular phones, etc.). Eventually, if
plugged in long enough, the vehicle’s battery will
discharge sufficiently to degrade battery life
and/or prevent engine starting.

• Accessories that draw higher power (i.e., coolers,

vacuum cleaners, lights, etc.); will degrade the
battery even more quickly. Only use these inter-
mittently and with greater caution.

• After the use of high-power draw accessories, or

long periods of the vehicle not being started (with
accessories still plugged in), the vehicle must be
driven a sufficient length of time to allow the
generator to recharge the vehicle’s battery.

CUPHOLDERS
Your vehicle is equipped with four cupholders. There are
two cupholders located in the front.

Front Cupholders

UNDERSTANDING THE FEATURES OF YOUR VEHICLE

145

3

There are also two cupholders located in the back for the
rear passengers.

CONSOLE FEATURES
The floor console’s sliding armrest moves forward 3 in
(7.6 cm) to accommodate shorter drivers. The armrest lid
also includes a unique flip pocket for holding or stowing a
phone or an MP3 player. The bin inside the console can hold
up to 10 CD jewel cases, or other items, securely out of sight.

Rear Cupholders

Floor Console Flip Pocket

146

UNDERSTANDING THE FEATURES OF YOUR VEHICLE

A 115-Volt outlet (if equipped) to power small electronics
is on the console. For more information on this outlet
refer to “Power Inverter – If Equipped” in Section 3.

WARNING!

Do not operate this vehicle with the console compart-
ment lid in the open position. Cell phones, music
players, and other handheld electronic devices
should be stowed while driving. Use of these devices
while driving can cause an accident due to distrac-
tion, resulting in death or injury.

NOTE:

The flip pocket and console lid features are

intended to be used in the upright or open position only
while the vehicle is parked. While driving, all handheld
devices should be properly stowed, and the flip pocket
and the console lid should be closed.

CARGO AREA FEATURES

Cargo Light/Removable Self-Recharging
Flashlight — If Equipped
The dual-function light is mounted in the headliner
above the cargo area to illuminate the cargo area, and
part of it snaps out of the bezel to serve as a flashlight
when needed. The flashlight features two bright LED
light bulbs and is powered by rechargeable lithium
batteries that recharge when snapped back into place for
convenience.

UNDERSTANDING THE FEATURES OF YOUR VEHICLE

147

3

Press in on the flashlight to release it.

To operate the flashlight, press the switch once for high,
twice for low, and a third time to return to off.

Press And Release

Three-Press Switch

148

UNDERSTANDING THE FEATURES OF YOUR VEHICLE

Cargo Cover — If Equipped
The cargo area trim panels include two notches for
mounting the available tonneau cover that accommo-
dates the reclining rear seat.

WARNING!

In an accident a cargo cover loose in the vehicle could
cause injury. It could fly around in a sudden stop and
strike someone in the vehicle. Do not store the cargo
cover on the cargo floor or in the passenger compart-
ment. Remove the cover from the vehicle when taken
from its mounting. Do not store in the vehicle.

Removable Load Floor
The cargo area load floor is removable and can be
washed with mild soap and water.

Rear Cargo Area

UNDERSTANDING THE FEATURES OF YOUR VEHICLE

149

3

Cargo Tie-Down Loops
There are two D-rings installed on the D-pillars for
securing a net across the liftgate opening.

WARNING!

• Cargo tie-down loops are not safe anchors for a

child seat tether strap. In a sudden stop or collision
a loop could pull loose and allow the child seat to
come loose. A child could be badly injured. Use
only the anchors provided for child seat tethers.

• The weight and position of cargo and passengers

can change the vehicle center of gravity and ve-
hicle handling. To avoid loss of control resulting
in personal injury, follow these guidelines for
loading your vehicle:

(Continued)

WARNING! (Continued)

• Always place cargo evenly on the cargo floor. Put

heavier objects as low and as far forward as
possible.

• Place as much cargo as possible in front of the rear

axle. Too much weight or improperly placed
weight over or behind the rear axle can cause the
rear of the vehicle to sway.

• Do not pile luggage or cargo higher than the top of

the seatback. This could impair visibility or be-
come a dangerous projectile in a sudden stop or
collision.

• To help protect against personal injury, passengers

should not be seated in the rear cargo area. The
rear cargo space is intended for load carrying
purposes only, not for passengers, who should sit
in seats and use seat belts.

150

UNDERSTANDING THE FEATURES OF YOUR VEHICLE

Fold Down Speakers — If Equipped
When the liftgate is open, the speakers can swing down
off the trim panel to face rearward, for tailgating and
other activities.

Fold-Down Speakers

UNDERSTANDING THE FEATURES OF YOUR VEHICLE

151

3

REAR WINDOW FEATURES

Rear Window Wiper/Washer
A switch on the right side of the steering column controls
operation of the rear wiper/washer function. Rotating
the center of the switch forward to the on position will
activate the wiper. The rear wiper operates in an inter-
mittent mode only. Rotating the center of the switch all
the way forward will turn on the wash function. The
wash pump will continue to operate as long as the button
is pressed. Upon release, the wipers will cycle two times
before returning to the set position.

If the rear wiper is operating when the ignition is turned
OFF, the wiper will automatically return to the “Park”
position if power accessory delay is active. Power acces-
sory delay can be cancelled by opening the door, if this
happens the rear wiper will stop at its current position
and will not go to park.

Rear Wiper/Washer Control

152

UNDERSTANDING THE FEATURES OF YOUR VEHICLE

Rear Window Defroster

The pushbutton is located on the
bottom right side of the blower
control knob. Press this button to
turn on the rear window defroster.
An amber light illuminates to
show that the defroster is on.

The defroster will automatically turn off after approxi-
mately 10 minutes. For an additional five minutes of
operation, press the switch again. To prevent excessive
battery drain, use the defroster only when the engine is
operating.

CAUTION!

Use care when washing the inside of the rear window
to prevent damage to heating elements. Use a soft
cloth and a mild washing solution, wiping parallel to
the heating elements. Also, keep all objects a safe
distance from the window to prevent damaging the
heating elements.

UNDERSTANDING THE FEATURES OF YOUR VEHICLE

153

3

COOLED BEVERAGE STORAGE BIN/GLOVE
COMPARTMENT — IF EQUIPPED
The upper storage bin door swings upward to present the
contents of the long shallow bin that can store items out
of sight. Beneath this bin is the glove compartment. The
large glove compartment door swings downward and
features two levels of storage. The upper bin functions as
a Cooled Beverage Storage Bin, for vehicles equipped
with air conditioning, for storing up to four 20 oz (1 L)
bottles or cans. When desired, cool air enters the com-
partment to keep the contents cool, depending on ambi-
ent temperature and A/C settings.

NOTE:

The use of the Cooled Beverage Storage Bin is

for nonperishable beverages only.

Glove Compartment And Cooled Beverage Storage

154

UNDERSTANDING THE FEATURES OF YOUR VEHICLE

To operate the beverage cooler, pull the slide control
about 0.5 in (12 mm) toward the passenger compartment.
This will allow cool air to enter the beverage cooler. To
shut off the beverage cooler when not in use, push the
slide control back 0.5 in (12 mm). This will prevent cool
air from entering the passenger compartment when in
heat mode.

Vehicles without air conditioning can use that space for
storage. The lower bin holds the Owner’s Manual and
other important documents. Another storage bin is lo-
cated on the outboard side of the steering wheel and can
hold small items like parking cards for easy access.

Positioning Slide Control

UNDERSTANDING THE FEATURES OF YOUR VEHICLE

155

3


Content      ..     7      8      9      10     ..