Dodge 2500 (2009 year). Manual - part 8


  Index      Dodge     Dodge 2500 (2009 year) - manual in english


Search            copyright infringement  


Content      ..     6      7      8      9     ..


Dodge 2500 (2009 year). Manual - part 8


Power Seats — If Equipped
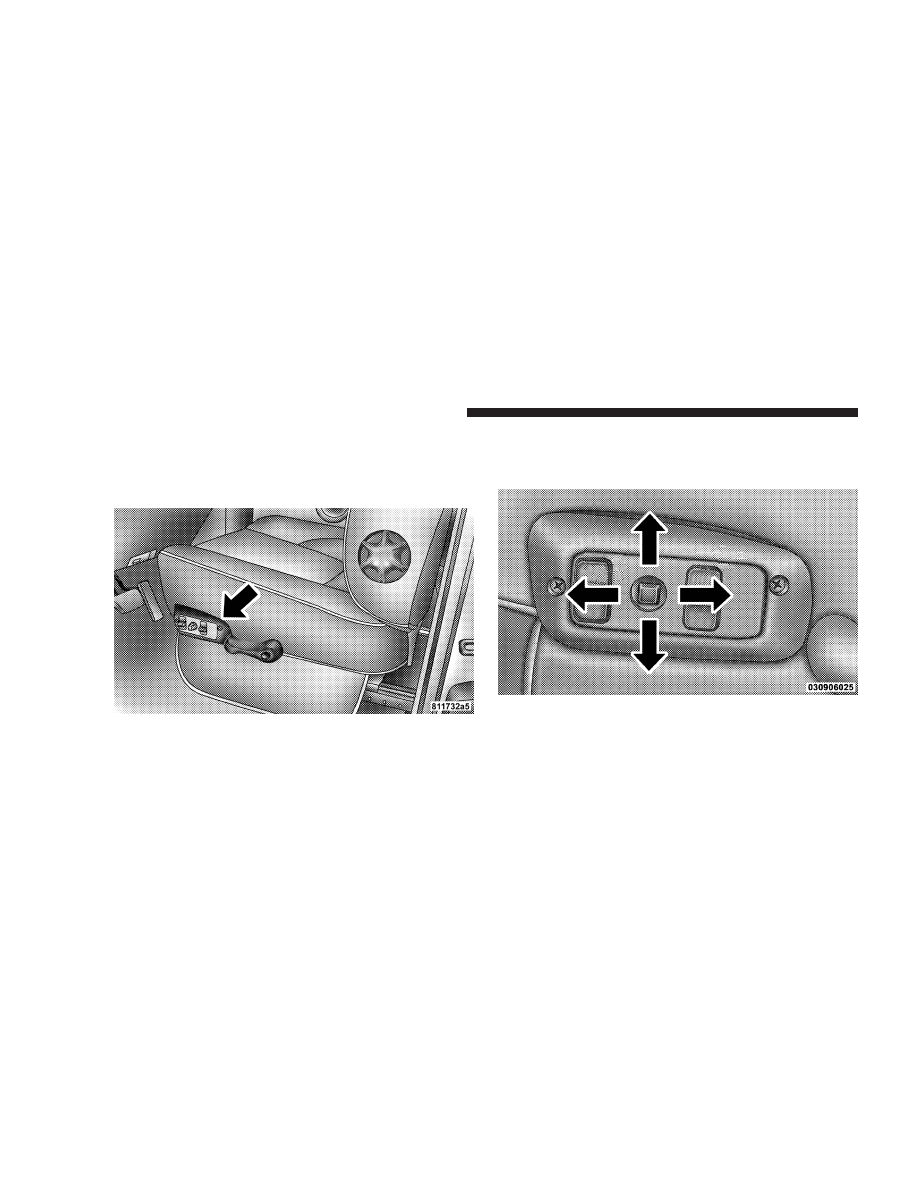
The power seat controls are located on the outboard side
of the front seat cushions. Three switches control the seat
movement.

The four-way switch is used to move the seat cushion
forward or backward, or to adjust the seat height up or
down.

The angle, or tilting, of the seat cushion can be adjusted
using the two toggle switches. Use the forward switch to
raise or lower the front seat cushion. Use the rear switch
to raise or lower the rear of the seat cushion.

Power Seat Switch

Power Seat Movement

124

UNDERSTANDING THE FEATURES OF YOUR VEHICLE

CAUTION!

Do not place anything under a power seat. It may
cause damage to the seat or the seat controls.

Rear Seat Features

Reclining Rear Seats — If Equipped
The recliner handle is located on the outside of the seat
cushion. Pull upward on the handle, to release the
seatback, and lean forward or rearward to the desired
position.

Tilt Adjustment

Rear Seat Recliner Handle

UNDERSTANDING THE FEATURES OF YOUR VEHICLE

125

3

Folding Rear Seat (Table Mode) — If Equipped
Both the left and right rear seatbacks can be folded down
and used as a table.

To fold down either rear seatback:

1. Lift the handle, located next to the head restraint.

2. Fold the seatback forward.

3. Lift the seatback, to return the seat to the upright
position. Be sure the seatback is locked in place.

Table Mode Handle

Table Mode

126

UNDERSTANDING THE FEATURES OF YOUR VEHICLE

Folding Rear Seat (Kneel Mode) — If Equipped
Both the left and right rear seats can be folded flat (kneel
mode) and used for carrying cargo. Each of the rear
seatbacks provide two D-rings and rear storage bin lids
with two slotted cutouts. Use a cargo tie-downs to secure
cargo.

WARNING!

• It is extremely dangerous to ride in a cargo area,

inside or outside of a vehicle. In a collision, people
riding in these areas are more likely to be seri-
ously injured or killed.

• Do not allow people to ride in any area of your

vehicle that is not equipped with seats and seat
belts.

• Be sure everyone in your vehicle is in a seat and

using a seat belt properly.

• Cargo must be securely tied down before driving

your vehicle. Improperly secured cargo can fly
around in a sudden stop and strike someone in the
vehicle, causing serious injury or possible death.
Secure cargo with a cargo tie-down using the
D-rings provided on the back of the seats and the
slotted cutouts in the rear storage bin lid.

Securing Cargo

UNDERSTANDING THE FEATURES OF YOUR VEHICLE

127

3

NOTE:

The rear seat will drop and move forward in

“kneel mode”.

To fold either rear seat flat:

1. Lift the handle, located on the outboard side of the
seat.

2. Fold the seatback down and push the seat forward.

3. Lift the seatback, to return the seat to the upright
position. Be sure the seat is locked in place.

Kneel Mode Handle

Kneel Mode

128

UNDERSTANDING THE FEATURES OF YOUR VEHICLE

WARNING!

Be certain that the seatback is securely locked into
position. If the seatback in not securely locked into
position the seat will not provide the proper stability
for child seats and/or passengers. An improperly
latched seat could cause serious injury.

Heated Seats — If Equipped
This feature heats the front driver and passenger seats.
The controls for front heated seats are located in the
instrument panel under the climate controls.

After turning the ignition ON, you can choose from High,
Low, or Off heat settings. Amber indicator lights in each
switch indicate the level of heat in use. Two indicator
lights will illuminate for High, one for Low, and none for
Off.

Heated Seat Switches

UNDERSTANDING THE FEATURES OF YOUR VEHICLE

129

3

Press the switch once to select High-level heat-
ing. Press the switch a second time to select
Low-level heating. Press the switch a third time
to shut the heating elements Off.

WARNING!

• Persons who are unable to feel pain to the skin

because of advanced age, chronic illness, diabetes,
spinal cord injury, medication, alcohol use, ex-
haustion or other physical condition must exercise
care when using the seat heater. It may cause burns
even at low temperatures, especially if used for
long periods of time.

• Do not place anything on the seat that insulates

against heat, such as a blanket or cushion. This
may cause the seat heater to overheat.

TO OPEN AND CLOSE THE HOOD
To open the hood, two latches must be released.

1. Pull the hood release lever located below the steering
wheel at the base of the instrument panel.

Hood Release Lever

130

UNDERSTANDING THE FEATURES OF YOUR VEHICLE

2. Reach into the opening beneath the center of the grille
and push upward on the safety latch to release it before
raising the hood.

CAUTION!

To prevent possible damage, do not slam the hood to
close it. Use a firm downward push at the front center
of the hood to ensure that both latches engage.

WARNING!

If the hood is not fully latched, it could fly up when
the vehicle is moving and block your forward vision.
Be sure all hood latches are latched fully before
driving.

Safety Latch

UNDERSTANDING THE FEATURES OF YOUR VEHICLE

131

3

LIGHTS
The headlight switch is located on instrument panel to
the left of the steering wheel.

Interior Lights
Courtesy and dome lights are turned on when the front
doors are opened, when the dimmer control (rotating

wheel on the right side of the switch) is rotated to the
upward detent position, or by pressing the UNLOCK
button on the Remote Keyless Entry (RKE) transmitter (if
equipped).

When a door is open and the interior lights are on,
rotating the dimmer control all the way down to the off
detent will cause all the interior lights to go out. This is
also known as the

⬙Party⬙ mode because it allows the

doors to stay open for extended periods of time without
discharging the vehicle’s battery.

The brightness of the instrument panel lighting can be
regulated by rotating the dimmer control up (brighter) or
down (dimmer). When the headlights are on you can
supplement the brightness of the odometer, trip odom-
eter, radio and overhead console by rotating the control
up until you hear a click. This feature is termed the
“Parade” mode and is useful when headlights are re-
quired during the day.

Headlight Switch Location

132

UNDERSTANDING THE FEATURES OF YOUR VEHICLE

Battery Saver
To protect the life of your vehicle’s battery, load shedding
is provided for both the interior and exterior lights.

If the ignition is OFF and any door is left ajar, or if the
dimmer control is rotated upwards for approximately
10 minutes, the interior lights will automatically turn off.

If the headlights are left on, or turned on, when the
ignition is turned OFF, the headlights will automatically
turn off after approximately eight minutes.

NOTE:

Battery saver mode is cancelled if the ignition is

ON.

Headlight Delay
To aid in your exit, your vehicle is equipped with a
headlight delay that will leave the headlights on for
approximately 90 seconds. This delay is initiated when
the ignition is turned OFF while the headlight switch is
on, and then the headlight switch is cycled off. Headlight
delay can be cancelled by either turning the headlight
switch on then off, or by turning the ignition ON.

Dimmer Control

UNDERSTANDING THE FEATURES OF YOUR VEHICLE

133

3

Headlights, Parking Lights and Panel Lights

When the headlight switch is rotated to the first
position, the parking lights, taillights, side marker
lights, license plate light and instrument panel

lights are all turned on. The headlights will turn on when
the switch is rotated to the second position.

Your vehicle is equipped with plastic headlight lenses
that are lighter and less susceptible to stone breakage
than glass. Plastic is not as scratch resistant as glass and
therefore different lens cleaning procedures must be
followed. To minimize the possibility of scratching the
lenses and reducing light output, avoid wiping with a
dry cloth. To remove road dirt, wash the lenses with a
mild soap solution followed by rinsing.
NOTE:

Do not use abrasive cleaning components, sol-

vents, steel wool or other abrasive materials to clean the
lenses.

Daytime Running Lights (Canada Only and Fleet
Vehicles)
The headlights on your vehicle will illuminate when the
engine is started and the transmission is in any gear
except PARK. This provides a constant

⬙Lights On⬙

condition until the ignition is turned OFF or the parking
brake is applied. The lights illuminate at less than 50% of
their normal intensity. If a turn signal is activated, the

Headlight Switch Rotation

134

UNDERSTANDING THE FEATURES OF YOUR VEHICLE

DRL lamp on the same side of the vehicle will turn off for
the duration of the turn signal activation. Once the turn
signal is no longer active, the DRL lamp will illuminate.

Lights-on Reminder
If the headlights, parking lights or cargo lights are left on
after the ignition is turned OFF, a chime will sound when
the driver’s door is opened.

Fog Lights — If Equipped

The fog lights are turned on by placing the head-
light rotary control in the parking light or low
beam headlight position and pushing in the head-

light rotary control. An indicator light, located in the
instrument cluster, will illuminate when the fog lights are
on. The fog lights will turn off when the switch is pushed
a second time, when the headlight switch is rotated to the
off position, or the high beam headlights are activated.

NOTE:

The fog lights will only operate when the

parking lights or low beam headlights are on.

Cargo Light — If Equipped
The cargo lights are turned on by pressing the cargo
button. The interior lights will also turn on when the
cargo lights are on. The cargo lights will also turn ON, for
approximately 30 seconds, as part of the Illuminated
Entry feature when the UNLOCK button is pressed on
the Remote Keyless Entry (RKE) transmitter.

Cargo Light Switch

UNDERSTANDING THE FEATURES OF YOUR VEHICLE

135

3

Multifunction Lever
The multifunction lever, located on the left side of the
steering column, is used to activate the turn signals and
high beams headlights.

Turn Signals
Move the lever up or down to signal a right-hand or
left-hand turn.

The arrow on either side of the instrument cluster flashes
to indicate the direction of the turn and proper operation
of the front and rear turn signal lights. If a defective bulb
or wiring circuit is detected for the turn signal system, the
arrow indicators will flash at a faster rate. If an indicator
fails to light when the lever is moved, see your autho-
rized dealer.

Turn Signal Lever

136

UNDERSTANDING THE FEATURES OF YOUR VEHICLE

Lane Change Assist
Tap the lever up or down once and the turn signal (left or
right) will flash three times then automatically turn off.

Flash-to-Pass
You can signal another vehicle with your headlights by
partially pulling the multifunction lever toward the steer-
ing wheel. This will turn on the high beam headlights
until the lever is released.

High Beam/Low Beam Select Switch
Pull the multifunction lever fully toward the steering
wheel to switch the headlights from high or low beam.

High Beam/Low Beam

UNDERSTANDING THE FEATURES OF YOUR VEHICLE

137

3

WINDSHIELD WIPERS AND WASHERS
The wipers and washers are operated by a switch in the
multifunction lever. Turn the end of the handle to select
the desired wiper speed.

Intermittent Wiper System
The intermittent feature of this system was designed for
use when weather conditions make a single wiping cycle,
with a variable pause between cycles, desirable. For
maximum delay between cycles, rotate the control knob
into the upper end of the delay range.

The delay interval decreases as you rotate the knob until
it enters the low continual speed position. The delay can
be regulated from a maximum of about 15 seconds
between cycles, to a cycle every two seconds. The delay
intervals will double in duration when the vehicle speed
is 10 mph (16 km/h) or less.

Windshield Wiper/Washer Switch

138

UNDERSTANDING THE FEATURES OF YOUR VEHICLE

WARNING!

Sudden loss of visibility through the windshield
could lead to an accident. You might not see other
vehicles or other obstacles. To avoid sudden icing of
the windshield during freezing weather, warm the
windshield with the defroster before and during
windshield washer use.

Windshield Washers
To use the washer, push in on the washer knob on the end
of the multifunction lever and hold while spray is
desired. If the washer knob is depressed while in the
delay range, the wiper will operate for several seconds
after the washer knob is released. It will then resume the
intermittent interval previously selected. If the washer
knob is pushed for a period greater than one second
while in the off position, the wiper will cycle approxi-
mately three times after the wash knob is released.

UNDERSTANDING THE FEATURES OF YOUR VEHICLE

139

3


Content      ..     6      7      8      9     ..