Dodge Stratus Sedan (2005 year). Manual - part 9
 

  Index      Dodge     Dodge Stratus Sedan (2005 year) - manual in english


Search            copyright infringement  


Content      ..     7      8      9      10     ..


Dodge Stratus Sedan (2005 year). Manual - part 9


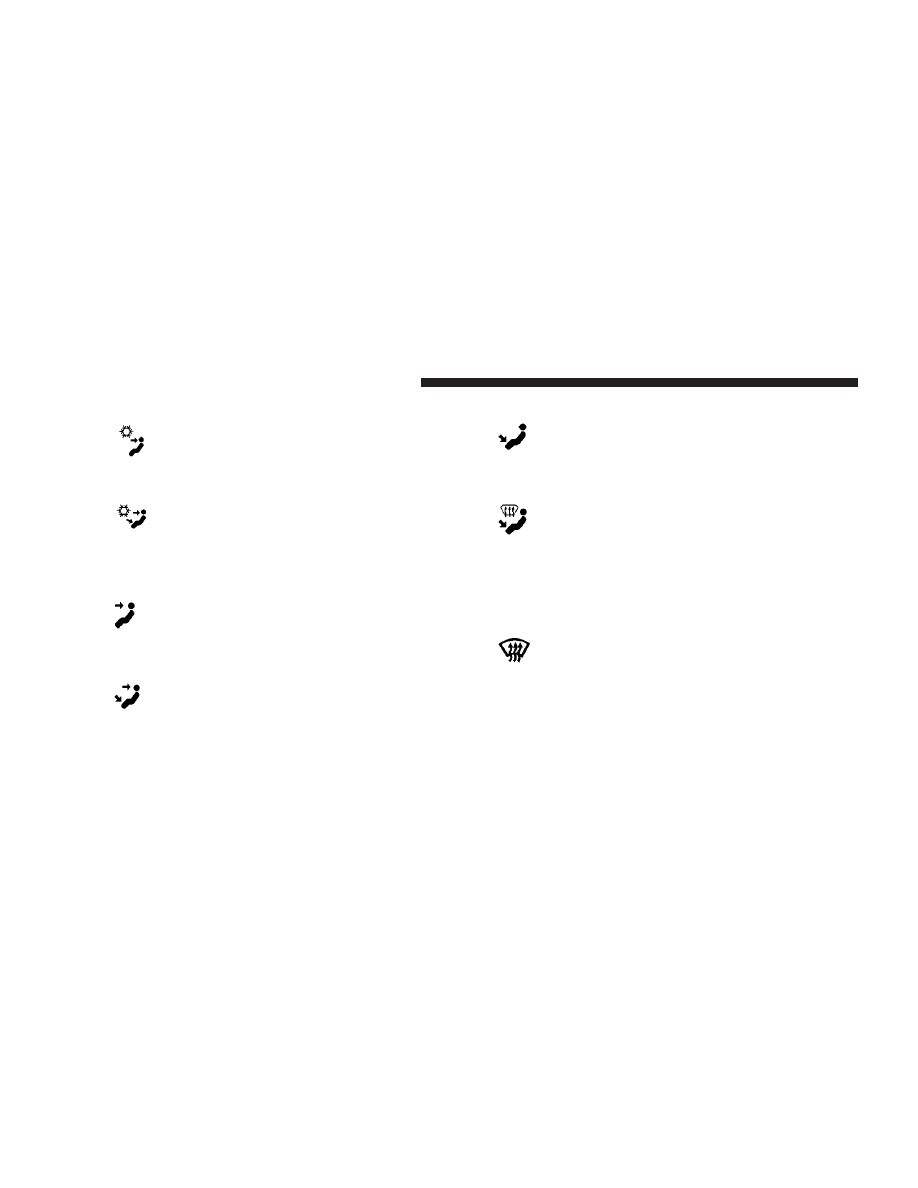
• Panel — Air Conditioning

Outside air flows through the air condition-
ing system and then through the outlets
located in the instrument panel.

• Bi-Level — Air Conditioning

Outside air flows through the air condition-
ing system and then through the outlets

located in both the instrument panel and floor
outlets.

• Panel

Air is directed through the outlets in the instru-
ment panel. These outlets can be adjusted to

direct air flow.

• Bi-Level

Air is directed through the instrument panel
and floor outlets.

NOTE:

There is a difference in temperature between the

upper and lower outlets for added comfort. The warmer
air goes to the floor outlets. This feature gives improved
comfort during sunny but cool conditions.

• Floor

Air is directed through the floor outlets with a
lesser amount through the defrost and side

window demist outlets.

• Mix

Air is directed through the floor, defrost and
side window demist outlets. This setting
works best in cold or snowy conditions that

require extra heat at the windshield. This setting is
good for maintaining comfort while reducing mois-
ture on the windshield.

• Defrost

Air is directed through the windshield and
side window demist outlets. Use this mode

with maximum fan and temperature settings for
best windshield and side window defrosting.

NOTE:

The air conditioning compressor operates in

both Mix and Defrost modes even if the Air Conditioning
is not selected. This dehumidifies the air to help dry the
windshield.

134

UNDERSTANDING YOUR INSTRUMENT PANEL

Rear Seat Outlets
These outlets are located under the front seats and direct
warm air to the rear seat passengers. Air is directed
through these outlets when you select either the Floor,
Bi-Level, or Mix modes.

Rear Window Defroster

The Rear Window Defroster button is located to
the right of the Mode Control. Press this button

once to turn on the Rear Window Defrost and a second
time to turn them off. A light above the button shows that
the defroster is on.

NOTE:

The defroster turns off automatically after 15

minutes of operation. Each later activation will allow 10
minutes of operation.

Side Window Demisters
A side window demister outlet is at each end of the
instrument panel. These non-adjustable outlets direct air
toward the side windows when the system is in either the
FLOOR, MIX, or DEFROST modes. A small amount of air
is directed to the side window demisters in BI-LEVEL
mode as well. The air is directed at the area of the
windows through which you view the outside mirrors.

Windshield and Side Window Fogging

Interior fogging on the windshield can be quickly
removed by using the defrost position on the mode

control.

Your side windows may fog on the inside in mild
rainy or humid weather. To clear the windows,
select the Panel-Air Conditioning mode on the

Mode Control. Point the panel outlets toward the side
windows.

NOTE:

Do not use the recirculation mode as it will not

clear windows under these conditions.

UNDERSTANDING YOUR INSTRUMENT PANEL

135

4

Summer Operation
Air conditioned vehicles must be protected with a high-
quality antifreeze coolant to provide proper corrosion
protection and to raise the boiling point of the coolant for
protection against overheating. A 50 % concentration is
recommended.

Winter Operation
The blower air will heat faster in cold weather if you use
only the low blower speeds for the first 10 minutes of
operation. During engine warm up in cold weather, use
the Defrost mode to direct any cold air away from vehicle
occupants. Use of the Recirculate-Air Conditioning Mode
during winter months is not recommended due to the
possibility of window fogging.

NOTE:

See Operating Tips chart (for Manual A/C

Control) at the end of this section for suggested control
settings in different weather conditions.

136

UNDERSTANDING YOUR INSTRUMENT PANEL

Operating Tips (Manual A/C Control Only)

UNDERSTANDING YOUR INSTRUMENT PANEL

137

4

Outside Air Intake
Make sure the air intake, directly in front of the wind-
shield, is free of ice, slush, snow or other obstructions
such as leaves. Leaves collected in the air-intake plenum
may reduce air flow and plug the plenum water drains.

Air Intake

138

UNDERSTANDING YOUR INSTRUMENT PANEL

STARTING AND OPERATING

CONTENTS

䡵 Starting Procedures . . . . . . . . . . . . . . . . . . . . 142

▫ Automatic Transaxle . . . . . . . . . . . . . . . . . . . 142
▫ Manual Transaxle . . . . . . . . . . . . . . . . . . . . . 142
▫ Normal Starting . . . . . . . . . . . . . . . . . . . . . . 142
▫ Extreme Cold Weather (Below -20°F Or -29°C) . 144
▫ If Engine Fails To Start . . . . . . . . . . . . . . . . . 144
▫ After Starting . . . . . . . . . . . . . . . . . . . . . . . . 145

䡵 Battery And Engine Block Heaters —

If Equipped . . . . . . . . . . . . . . . . . . . . . . . . . . 145

䡵 Automatic Transaxle . . . . . . . . . . . . . . . . . . . . 145

▫ Brake/Transmission Interlock . . . . . . . . . . . . . 145

▫ Automatic Transaxle Ignition Interlock

System . . . . . . . . . . . . . . . . . . . . . . . . . . . . . 147

▫ Four Speed Automatic Transaxle . . . . . . . . . . 147
▫ Reset Mode . . . . . . . . . . . . . . . . . . . . . . . . . 147
▫ Gear Ranges For Four Speed Automatic

Transaxle . . . . . . . . . . . . . . . . . . . . . . . . . . . 148

䡵 Parking Brake . . . . . . . . . . . . . . . . . . . . . . . . . 150
䡵 Brake System . . . . . . . . . . . . . . . . . . . . . . . . . 151

▫ Anti-Lock Brake System (ABS) — If Equipped . 152

䡵 Power Steering . . . . . . . . . . . . . . . . . . . . . . . . 153
䡵 Traction Control — If Equipped . . . . . . . . . . . 153
䡵 Tire Safety Information . . . . . . . . . . . . . . . . . . 154

5

▫ Tire Markings . . . . . . . . . . . . . . . . . . . . . . . . 154
▫ Tire Identification Number (TIN) . . . . . . . . . . 158
▫ Tire Loading And Tire Pressure . . . . . . . . . . . 159

䡵 Tires—General Information . . . . . . . . . . . . . . . 163

▫ Tire Pressure . . . . . . . . . . . . . . . . . . . . . . . . . 163
▫ Tire Inflation Pressures . . . . . . . . . . . . . . . . . 164
▫ Radial-Ply Tires . . . . . . . . . . . . . . . . . . . . . . 166
▫ Compact Spare Tire — If Equipped . . . . . . . . . 166
▫ Limited Use Spare — If Equipped . . . . . . . . . 167
▫ Tire Spinning . . . . . . . . . . . . . . . . . . . . . . . . 167
▫ Tread Wear Indicators . . . . . . . . . . . . . . . . . . 168
▫ Replacement Tires . . . . . . . . . . . . . . . . . . . . . 169
▫ Alignment And Balance . . . . . . . . . . . . . . . . . 170

䡵 Tire Chains . . . . . . . . . . . . . . . . . . . . . . . . . . . 170
䡵 Snow Tires . . . . . . . . . . . . . . . . . . . . . . . . . . . 170
䡵 Tire Rotation Recommendations . . . . . . . . . . . 171

䡵 AutoStick — If Equipped . . . . . . . . . . . . . . . . 172

▫ AutoStick Operation . . . . . . . . . . . . . . . . . . . 172
▫ AutoStick General Information . . . . . . . . . . . . 173

䡵 Fuel Requirements . . . . . . . . . . . . . . . . . . . . . 173

▫ Spark Knock . . . . . . . . . . . . . . . . . . . . . . . . . 173
▫ Reformulated Gasoline . . . . . . . . . . . . . . . . . 174
▫ Gasoline/Oxygenate Blends . . . . . . . . . . . . . . 174
▫ MMT In Gasoline . . . . . . . . . . . . . . . . . . . . . 175
▫ Materials Added To Fuel . . . . . . . . . . . . . . . . 175
▫ Fuel System Cautions . . . . . . . . . . . . . . . . . . 175
▫ Carbon Monoxide Warnings . . . . . . . . . . . . . . 176

䡵 Adding Fuel . . . . . . . . . . . . . . . . . . . . . . . . . . 176

▫ Fuel Filler Cap (Gas Cap) . . . . . . . . . . . . . . . 176

䡵 Vehicle Loading . . . . . . . . . . . . . . . . . . . . . . . 178
䡵 Trailer Towing . . . . . . . . . . . . . . . . . . . . . . . . 178

▫ Towing Requirements . . . . . . . . . . . . . . . . . . 179

140

STARTING AND OPERATING

䡵 Flexible Fuel – (2.7L Engines With Automatic

Transmission Only) . . . . . . . . . . . . . . . . . . . . . 180

▫ E-85 General Information . . . . . . . . . . . . . . . . 180
▫ Ethanol Fuel (E-85) . . . . . . . . . . . . . . . . . . . . 180
▫ Fuel Requirements . . . . . . . . . . . . . . . . . . . . 181
▫ Selection Of Engine Oil . . . . . . . . . . . . . . . . . 181

▫ Starting . . . . . . . . . . . . . . . . . . . . . . . . . . . . 183
▫ Cruising Range . . . . . . . . . . . . . . . . . . . . . . . 183
▫ Replacement Parts . . . . . . . . . . . . . . . . . . . . . 183
▫ Maintenance . . . . . . . . . . . . . . . . . . . . . . . . . 183

STARTING AND OPERATING

141

5

STARTING PROCEDURES
Before starting your vehicle, adjust your seat, adjust both
inside and outside mirrors, and fasten your seat belts.

CAUTION!

Long periods of engine idling, especially at high
engine speeds can cause excessive exhaust tempera-
tures which can damage your vehicle. Do not leave
your vehicle unattended with the engine running.

WARNING!

Do not leave children or animals inside parked
vehicles in hot weather. Interior heat build up may
cause serious injury or death.

Automatic Transaxle
The gear selector must be in the NEUTRAL or PARK
position before you can start the engine. Apply the brakes
before shifting to any driving gear.

Manual Transaxle

Fully apply the parking brake, press the clutch pedal to
the floor and place the gear selector in NEUTRAL before
starting the engine.

Normal Starting
Normal Starting of either a cold or a warm engine does
not require pumping or depressing the accelerator pedal.
Simply turn the key to the “START’” position and release
when the engine starts. If the engine has not started
within 3 seconds, slightly depress the accelerator pedal
while continuing to crank. If the engine fails to start
within 15 seconds, turn the key to the “OFF” position,
wait 10 to 15 seconds, then repeat the normal starting
procedure.

142

STARTING AND OPERATING

WARNING!

Never pour fuel or other flammable liquid into the
throttle body air inlet opening in an attempt to start
the vehicle. This could result in flash fire causing
serious personal injury.

CAUTION!

Do not attempt to push or tow your vehicle to get it
started. Vehicles equipped with an automatic trans-
axle cannot be started this way. Unburned fuel could
enter the catalytic converter and once the engine has
started, ignite and damage the converter and vehicle.
If the vehicle has a discharged battery, booster cables
may be used to obtain a start from another vehicle.
This type of start can be dangerous if done improp-
erly, so follow the procedure carefully. See section 6
of this manual for jump starting instructions.

Ignition Key Positions

STARTING AND OPERATING

143

5

Extreme Cold Weather (below -20°F or -29°C)
To insure reliable starting at these temperatures, use of an
externally powered electric engine block heater and
battery blanket heater package (available from your
dealer) is recommended.

If Engine Fails to Start
If the engine fails to start after you have followed the
“NORMAL

STARTING”

or

“EXTREME

COLD

WEATHER” procedures, it may be flooded. Push the
accelerator pedal all the way to the floor and hold it there
while cranking the engine. This should clear any excess
fuel in case the engine is flooded.

CAUTION!

To prevent damage to the starter, do not crank the
engine for more than 15 seconds at a time. Wait 10 to
15 seconds before trying again.

If the engine has been flooded, it may start to run, but not
have enough power to continue running when the key is
released. If this occurs, continue cranking with the accel-
erator pedal pushed all the way to the floor. Release the
accelerator pedal and the key once the engine is running
smoothly.

If the engine shows no sign of starting after two 15
second periods of cranking with the accelerator pedal
held to the floor, the “NORMAL STARTING” or “EX-
TREME COLD WEATHER” procedure should be re-
peated.

144

STARTING AND OPERATING

After Starting
The idle speed will automatically decrease as the engine
warms up. At cooler ambient temperatures, the idle
speed for the 2.7L engine may increase during extended
idles for improved heater performance.

BATTERY AND ENGINE BLOCK HEATERS — If
EQUIPPED
The engine block heater warms engine coolant and
permits quicker starts in cold weather. Connect the cord
to a standard 110-115 volt AC electrical outlet with a
grounded, three wire extension cord. The engine block
heater cord is found under the hood near the air cleaner
housing.

WARNING!

Remember to disconnect the cord before driving.
Damage to the 110-115 volt AC electrical cord could
cause electrocution.

Use the heater when temperatures below 0°F (-18°C) are
expected to last for several days.

AUTOMATIC TRANSAXLE

Brake/Transmission Interlock
This interlock system prevents you from moving the gear
selector out of the Park position unless the brake pedal is
pressed. The system is active when the ignition switch is
in the RUN position.

STARTING AND OPERATING

145

5

WARNING!

Unintended movement of a vehicle could injure those
in and near the vehicle. As with all vehicles, you
should never exit a vehicle while the engine is run-
ning. Before exiting a vehicle you should shift the
transmission into Park, remove the key from the
ignition, and apply the park brake. Once the key is
removed from the ignition the transmission shift
lever is locked in the Park position, securing the
vehicle against unwanted movement. Furthermore,
you should never leave children unattended inside a
vehicle. The following indicators should be used to
ensure that you have engaged the transmission shift
lever into the “Park” position:
• When shifting into Park, depress the button on the

shift lever and firmly move the lever all the way
forward until it stops.

• Look at the shift indicator window on the console

to ensure it is in the “P” position.

• When engaged in Park you will not be able to

move the shifter rearward without depressing the
shift lever button.

CAUTION!

Damage to the transaxle may occur if the following
precautions are not observed:
• Shift into PARK only after the vehicle has come to

a complete stop.

• Shift into or out of REVERSE only after the

vehicle has come to a complete stop and the
engine is at idle speed.

• Do not shift from REVERSE, PARK, or NEUTRAL

into any forward gear when the engine is above
idle speed.

• Before shifting into any gear, make sure your foot

is firmly on the brake pedal.

146

STARTING AND OPERATING

WARNING!

It is dangerous to shift the selector lever out of “P” or
“N” if the engine speed is higher than idle speed. If
your foot is not firmly on the brake pedal, the
vehicle could accelerate quickly forward or in re-
verse. You could lose control of the vehicle and hit
someone or something. Only shift into gear when
the engine is idling normally and when your right
foot is firmly on the brake pedal.

Automatic Transaxle Ignition Interlock System
This system prevents the key from being removed unless
the shift lever is in PARK and the shift knob push-button
is out. It also prevents shifting out of PARK unless the
key is in the OFF or RUN positions.

NOTE:

If a malfunction occurs, the system may trap the

key in the ignition cylinder to warn you that this safety
feature is inoperable. The engine can be started and
stopped but the key cannot be removed until you obtain
service.

Four Speed Automatic Transaxle
The electronically controlled transaxle provides a precise
shift schedule. The transaxle electronics are self calibrat-
ing; therefore, the first few shifts on a new vehicle may be
somewhat abrupt. This is a normal condition, and preci-
sion shifts will develop within a few shift cycles.

Reset Mode
The transaxle is monitored electronically for abnormal
conditions. If a condition is detected that could cause
damage, the transaxle shifts automatically into second
gear. The transaxle remains in second gear despite the
forward gear selected. Park (P), Reverse (R), and Neutral
(N) will continue to operate. This Reset feature allows the
vehicle to be driven to a dealer for service without
damaging the transaxle.

In the event that the problem has been momentary, the
transaxle can be reset to regain all forward gears.

Stop the vehicle and shift into Park (P).

Turn the Key to LOCK then restart the engine.

Shift into D and resume driving.

STARTING AND OPERATING

147

5

NOTE:

Even if the transaxle can be reset, it is recom-

mended that you visit a dealer at your earliest possible
convenience. Your dealer has diagnostic equipment to
determine if the problem could recur.

If the transaxle cannot be reset, dealer service is required.

Gear Ranges For Four Speed Automatic
Transaxle
DO NOT race the engine when shifting from PARK or
NEUTRAL positions into another gear range.

NOTE:

If the key is in the RUN position, you must

press the brake pedal to shift out of the “P” Park position.

“P” Park
Supplements parking by locking the transaxle. Engine
can be started in this range. Never attempt to use PARK
while vehicle is in motion.

Apply parking brake when leaving the vehicle in this
range.

WARNING!

Your vehicle could move and injure you and others if
it is not completely in P (Park). Check by trying to
move the gearshift lever back and forth without
depressing the shift button after you have set it in P.
Make sure it is in Park before leaving the vehicle.

WARNING!

Never use the Park position as a substitute for the
parking brake. Always apply the parking brake fully
when parked to guard against vehicle movement and
possible injury or damage.

“R” Reverse
Shift into this range only after the vehicle has come to a
complete stop.

“N” Neutral
Engine may be started in this range.

148

STARTING AND OPERATING

“D” Overdrive
This range should be used for most city and highway
driving. It provides smoothest up shifts and down shifts
and best fuel economy.

When frequent transaxle shifting occurs while using the
Overdrive range, such as when operating the vehicle
under heavy loading conditions (in hilly terrain, travel-
ing into strong head winds, or while towing heavy
trailers), use the “3” range.

“3” Drive
This range eliminates shifts into Overdrive. The transaxle
will operate normally in first and second while in this
range.

A delayed shift from second to third will occur at speeds
of about 31 to 38 mph (50 to 60 km/h) and low levels of
accelerator pedal travel. An early down-shift from third
to second will occur at a speed of about 34 to 30 mph (54
to 48 km/h). This is done to provide second gear engine
braking at speeds less than 30 mph (48 km/h).

NOTE:

Using the “3” range while operating the vehicle

under heavy operating conditions will improve perfor-
mance, fuel economy, and extend transaxle life by reduc-
ing excessive shifting and heat build up.

Use the “3” range when descending steep grades to
prevent brake system distress.

“L” Low
This range should be used for maximum engine braking
when descending steep grades. In this range, up shifts
will occur only to prevent engine over speed while down
shifts occur as early as possible.

WARNING!

Never use Park position on an automatic transmis-
sion as a substitute for the parking brake. Always
apply parking brake fully when parked to guard
against vehicle movement and possible injury or
damage.

STARTING AND OPERATING

149

5


Content      ..     7      8      9      10     ..