Dodge Viper SRT-10 (ZB). Manual - part 48


  Index      Dodge     Dodge Viper SRT-10 (ZB) - service repair manual 2005 year


Search            


Content   ..  46  47  48  49   ..


Dodge Viper SRT-10 (ZB). Manual - part 48


INSTALLATION

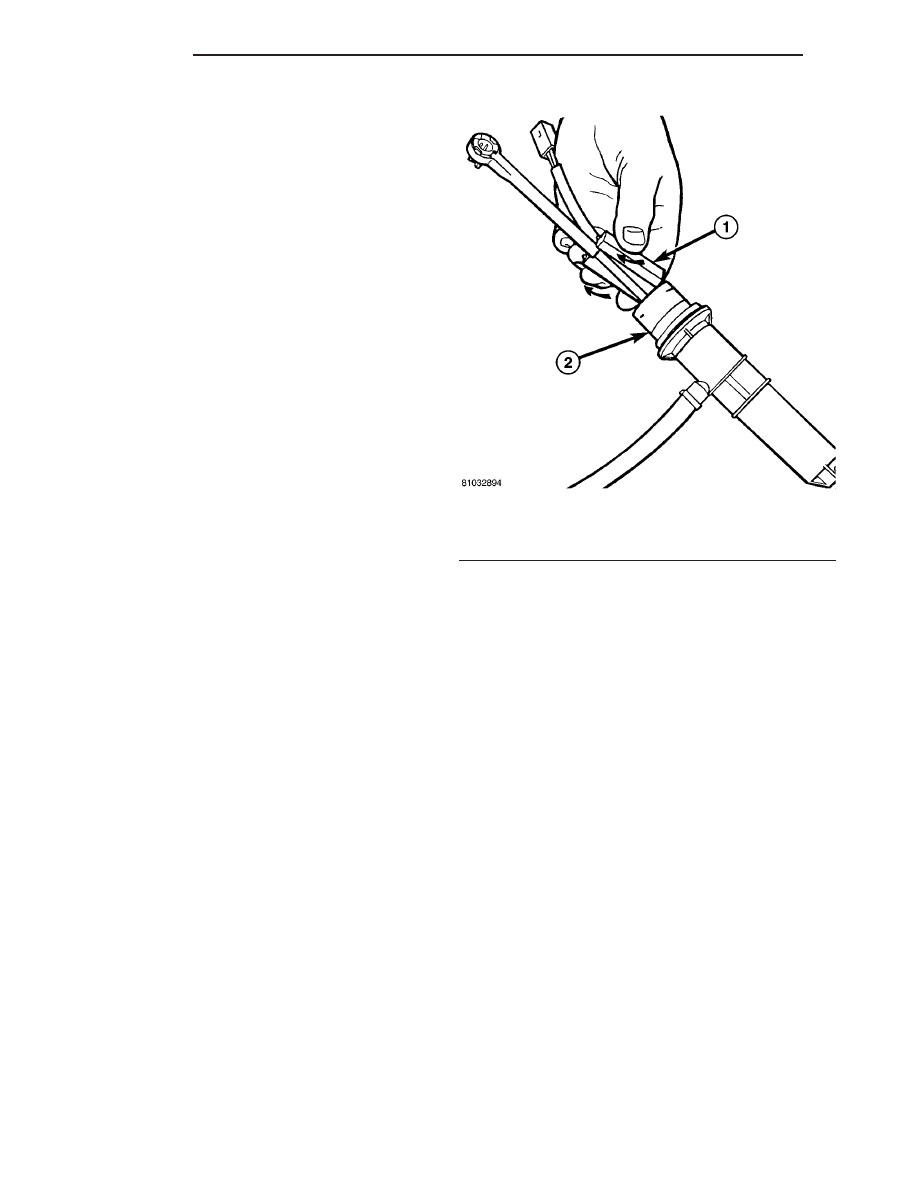
(1) Install new switch as shown in (Fig. 14). Be

sure that the spring loaded plunger inside the switch
is slightly compressed. The plunger inside the switch
must go on the narrow section of the clutch master
cylinder actuation rod. Place the top of the switch
against the rod. Then push the switch up slightly.
This will compress the plunger. Then push the bot-
tom of the switch against the rod. Failure to install
the switch as described or forcing the switch onto the
rod will crack the switch.

(2) Install new white plastic retaining clip.
(3) Install the clutch master cylinder back into the

vehicle.

(4) Reconnect the clutch switch connector.
(5) Check clutch position switch operation.

Fig. 14 SWITCH INSTALLATION

1 - CLUTCH SWITCH
2 - CLUTCH MASTER CYLINDER ASSEMBLY

6 - 12

CLUTCH

ZB

CLUTCH PEDAL POSITION SWITCH (Continued)

COOLING

TABLE OF CONTENTS

page

page

COOLING

WARNING

COOLING SYSTEM WARNINGS

. . . . . . . . . . . 1

SPECIFICATIONS

TORQUE

. . . . . . . . . . . . . . . . . . . . . . . . . . . . . 1

SPECIAL TOOLS

COOLING

. . . . . . . . . . . . . . . . . . . . . . . . . . . . 2

ACCESSORY DRIVE

. . . . . . . . . . . . . . . . . . . . . . . 3

ENGINE

. . . . . . . . . . . . . . . . . . . . . . . . . . . . . . . . 6

COOLING

WARNING

COOLING SYSTEM WARNINGS

WARNING: ANTIFREEZE IS AN ETHYLENE GLYCOL
BASED COOLANT AND IS HARMFUL IF SWAL-
LOWED OR INHALED. IF SWALLOWED, DRINK
TWO GLASSES OF WATER AND INDUCE VOMIT-
ING. IF INHALED, MOVE TO FRESH AIR AREA.
SEEK MEDICAL ATTENTION IMMEDIATELY. DO NOT
STORE IN OPENED OR UNMARKED CONTAINERS.
WASH SKIN AND CLOTHING THOROUGHLY AFTER
COMING IN CONTACT WITH ETHYLENE GLYCOL.
KEEP OUT OF REACH OF CHILDREN AND PETS.
DISPOSE OF GLYCOL BASED COOLANT PROP-
ERLY, CONTACT YOUR DEALER OR GOVERNMENT
AGENCY FOR LOCATION OF COLLECTION CENTER
IN YOUR AREA. DO NOT OPEN A COOLING SYS-
TEM WHEN THE ENGINE IS AT OPERATING TEM-
PERATURE

OR

HOT

UNDER

PRESSURE,

PERSONAL INJURY CAN RESULT. AVOID RADIA-
TOR COOLING FAN WHEN ENGINE COMPARTMENT
RELATED SERVICE IS PERFORMED, PERSONAL
INJURY CAN RESULT.

SPECIFICATIONS

TORQUE

DESCRIPTION

N·m

Ft. Lbs.

In. Lbs.

Nut, Accessory
Drive Belt Ten-
sioner

41

30

-

Bolts, A/C Con-
denser to Radiator

5

-

45

Bolts, Coolant
Pressure Bottle

5

-

40

Bolts, Fan Shroud
to Radiator

5

-

45

Hydraulic Fan
Pressure Inlet Line

47

35

-

Hydraulic Fan
Pressure Outlet
Line

29

21

-

Bolts, Radiator
Mounting

11

-

95

Bolts, Thermostat
Housing

11

-

95

Bolts, Water Pump

11

-

95

ZB

COOLING

7 - 1

SPECIAL TOOLS

COOLING

Hose Clamp Pliers 8495

Pressure Tester Kit 7700

Coolant Refractometer 8286

7 - 2

COOLING

ZB

COOLING (Continued)

ACCESSORY DRIVE

TABLE OF CONTENTS

page

page

ACCESSORY DRIVE BELT AND TENSIONER

DIAGNOSIS AND TESTING - ACCESSORY

DRIVE BELT DIAGNOSIS

. . . . . . . . . . . . . . . . . 3

REMOVAL

. . . . . . . . . . . . . . . . . . . . . . . . . . . . . 4

INSPECTION

. . . . . . . . . . . . . . . . . . . . . . . . . . . 4

INSTALLATION

. . . . . . . . . . . . . . . . . . . . . . . . . . 5

ACCESSORY DRIVE BELT AND
TENSIONER

DIAGNOSIS AND TESTING - ACCESSORY DRIVE BELT DIAGNOSIS

CONDITION

POSSIBLE CAUSE

CORRECTION

BELT SLIPPAGE

1. Belt slipping because of insuffi-
cient tension.

1. Replace the automatic belt ten-
sioner.

2. Belt excessively glazed or hard-
ened from heat and excessive slip-
page.

2. Replace belt.

3. Incorrect belt.

3. Replace belt.

4. Driven component bearing fail-
ure.

4. Replace faulty component.

5. Belt or pulley subjected to sub-
stance (belt dressing, oil, ethylene
glycol) that has reduced friction.

5. Replace belt and clean pulleys.

BELT NOISE (OBJECTIONABLE
SQUEAL, SQUEAK, OR RUMBLE)

1. Belt slippage.

1. Replace belt or automatic belt
tensioner.

2. Foreign material imbedded in
belt.

2. Replace belt.

3. Non-uniform belt.

3. Replace belt.

4. Misaligned pulley(s).

4. Align accessories.

5. Non-uniform groove or eccentric
pulley.

5. Replace pulley(s).

6. Bearing noise.

6. Locate and repair.

BELT ROLLED OVER IN GROOVE
OR BELT JUMPS OFF

1. Broken cord in belt.

1. Replace belt.

2. Belt tension too loose, or too
tight.

2. Replace the automatic belt ten-
sioner.

3. Misaligned pulleys.

3. Align accessories.

4. Non-uniform grooves or eccen-
tric pulley.

4. Replace pulley(s).

5. Foreign object(s) in grooves.

5. Remove foreign objects in
groove.

ZB

ACCESSORY DRIVE

7 - 3


Content   ..  46  47  48  49   ..