Dodge Sprinter. Manual - part 329


  Index      Dodge     Dodge Sprinter / Mercedes-Benz - service repair manual 2006 year


Search            


Content   ..  327  328  329  330   ..


Dodge Sprinter. Manual - part 329


CAUTION: Fabricate a protection guard from 2 mm
sheet plastic or equivalent to protect rubber instru-
ment panel from damage.

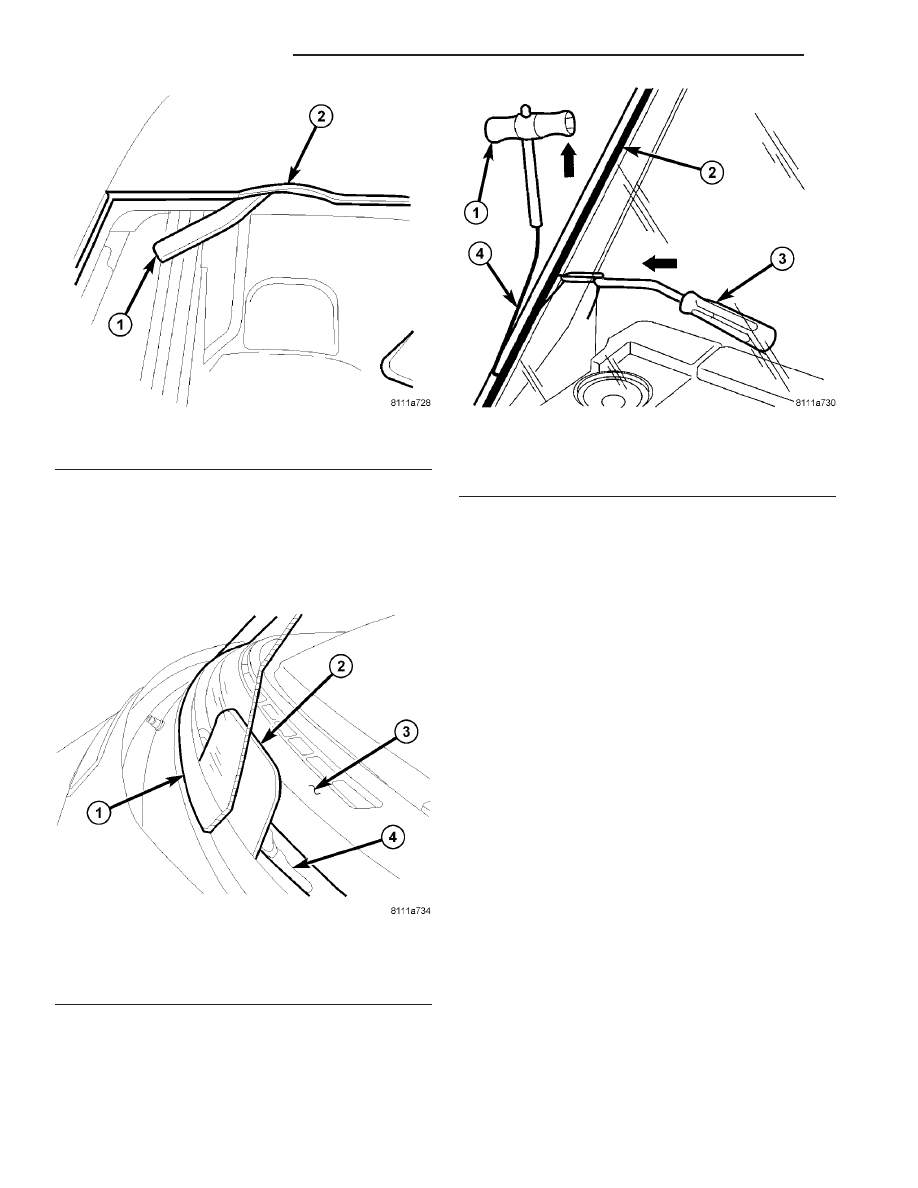
(5) Place protection guard between windshield and

instrument panel seal. (Fig. 4)

(6) Using a windshield cut-out wire separate the

adhesive. (Fig. 5)

(7) Carefully remove windshield.

INSTALLATION

WARNING: Allow the urethane at least 24 hours to
cure before returning the vehicle to use.

CAUTION: Roll down the left and right front door
glass and open the rear glass slider (if available)
before installing windshield to avoid pressurizing
the passenger compartment if a door is slammed
before urethane is cured. Water leaks can result.

The windshield fence should be cleaned of most of

its old urethane bonding material. A small amount of
old urethane, approximately 1 mm in height, should
remain on the fence. Do not grind off or completely
remove all old urethane from the fence, the paint fin-
ish and bonding strength will be adversely affected.

Windshield Preparation - Installing A Previously
Installed Windshield

(1) Level old bead of windshield adhesive to a

thickness of approximately 1 mm (0.04 in.) and
remove loose adhesive. (Fig. 6)

Fig. 3 WINDSHIELD SEAL

1 - WINDSHIELD SEAL
2 - TRIM STICK #4755

Fig. 4 INSTRUMENT PANEL SEAL

1 - WINDSHIELD
2 - SEAL PROTECTOR
3 - INSTRUMENT PANEL
4 - INSTRUMENT PANEL SEAL

Fig. 5 ADHESIVE SEPARATION

1 - T-HANDLE
2 - WINDSHIELD ADHESIVE
3 - COUNTER SUPPORT
4 - CUTTING WIRE

23 - 86

STATIONARY GLASS

VA

(2) Position windshield seal onto windshield start-

ing at one corner and quickly moving up and down.
(Fig. 7)

CAUTION: Never moisten windshield seal with lubri-
cants to facilitate installation.

(3) Position windshield in center of windshield

opening.

(4) Apply adhesive tape to the locations shown to

aid with final installation. (Fig. 8)

(5) Verify windshield gap is parallel to with wind-

shield.

(6) Cut tape with a sharp knife and remove wind-

shield.

(7) Clean and dry area of glass to be re-glued with

a suitable glass preparation solvent and rag.

(8) Using a flash light, verify that glass primer is

without damage.

(9) Re-prime any damaged area. If old adhesive

has been exposed for more than 12 hours, entire
adhesive area needs to be re-primed. (Fig. 9)

(10) Allow primer to air dry for at least 10 min-

utes.

(11) Using a flash light, verify that glass primer is

without damage.

Fig. 6 WINDSHIELD ADHESIVE PREPARATION

1 - WINDSHIELD
2 - SCRAPER
3 - OLD ADHESIVE

Fig. 7 WINDSHIELD SEAL INSTALLATION

1 - WINDSHIELD
2 - WINDSHIELD SEAL

Fig. 8 WINDSHIELD POSITIONING

1 - TAPE
2 - WINDSHIELD FRAME

Fig. 9 WINDSHIELD PRIMER

1 - PRIMER
2 - WINDSHIELD SEAL

VA

STATIONARY GLASS

23 - 87

Windshield Preparation - Installing A New Wind-
shield

(1) Clean and check windshield for damage.
(2) Position windshield seal onto windshield start-

ing at one corner and quickly moving up and down.
(Fig. 7)

CAUTION: Never moisten windshield seal with lubri-
cants to facilitate installation.

(3) Position windshield in center of windshield

opening.

(4) Apply adhesive tape to the locations shown to

aid with final installation. (Fig. 8)

(5) Verify windshield gap is parallel to with wind-

shield.

(6) Cut tape with a sharp knife and remove wind-

shield.

(7) Clean and dry area of glass to be glued with a

suitable glass preparation solvent and rag.

(8) Apply primer to gluing surface at windshield

seal. (Fig. 9)

(9) Allow primer to air dry for at least 10 minutes.
(10) Using a flash light, verify that glass primer is

without damage.

Windshield Opening Preparation

(1) Clean and vacuum windshield opening.
(2) Level old bead of windshield opening adhesive

to a thickness of approximately 1 mm (0.04 in.) and
remove loose adhesive. (Fig. 10)

(3) Clean and dry area of windshield opening to be

re-glued with a suitable glass preparation solvent
and rag.

(4) Re-prime any damaged area. If old adhesive

has been exposed for more than 12 hours, entire
adhesive area needs to be re-primed. (Fig. 11)

(5) Allow primer to air dry for at least 10 minutes.

Windshield Installation

(1) Apply bead of glue with a triangular nozzle

directly to the windshield seal starting at bottom in
center of windshield. (Fig. 12)

CAUTION: Always apply bead of adhesive to the
windshield. Always install the windshield within 5
minutes after applying adhesive.

(2) Allow end of adhesive bead to run out parallel

to the start of the bead and smooth ends flush. (Fig.
13)

Fig. 10 WINDSHIELD OPENING PREPARATION

1 - OLD ADHESIVE
2 - SCRAPER
3 - WINDSHIELD OPENING

Fig. 11 WINDSHIELD OPENING PRIMER

1 - PRIMER
2 - WINDSHIELD OPENING

Fig. 12 WINDSHIELD ADHESIVE APPLICATION

1 - ADHESIVE BEAD
2 - WINDSHIELD SEAL

23 - 88

STATIONARY GLASS

VA

(3) Lift windshield into place in the center of the

windshield opening and use the tape as a guide to
aid installation of the windshield into the center of
the cutout.

(4) Carefully lay down windshield and press on.

CAUTION: It is no longer possible to move the
windshield after installation. The windshield should
never be pressed into place by more than one per-
son, because the windshield can break if pressed
simultaneously on both sides.

CAUTION: Roll down the left and right front door
glass and open the rear glass slider (if available)
before installing windshield to avoid pressurizing
the passenger compartment if a door is slammed
before urethane is cured. Water leaks can result.

(1) Install the rear view mirror. (Refer to 23 -

BODY/INTERIOR/REAR VIEW MIRROR - INSTAL-
LATION)

(2) Install the headliner. (Refer to 23 - BODY/IN-

TERIOR/HEADLINER - INSTALLATION)

(3) Install the wiper arms. (Refer to 8 - ELECTRI-

CAL/WIPERS/WASHERS/WIPER ARMS - INSTAL-
LATION)

Fig. 13 WINDSHIELD ADHESIVE OVERLAP

1 - ADHESIVE BEAD
2 - WINDSHIELD SEAL

VA

STATIONARY GLASS

23 - 89


Content   ..  327  328  329  330   ..