Dodge Ram Truck 1500-2500-3500. Manual - part 359
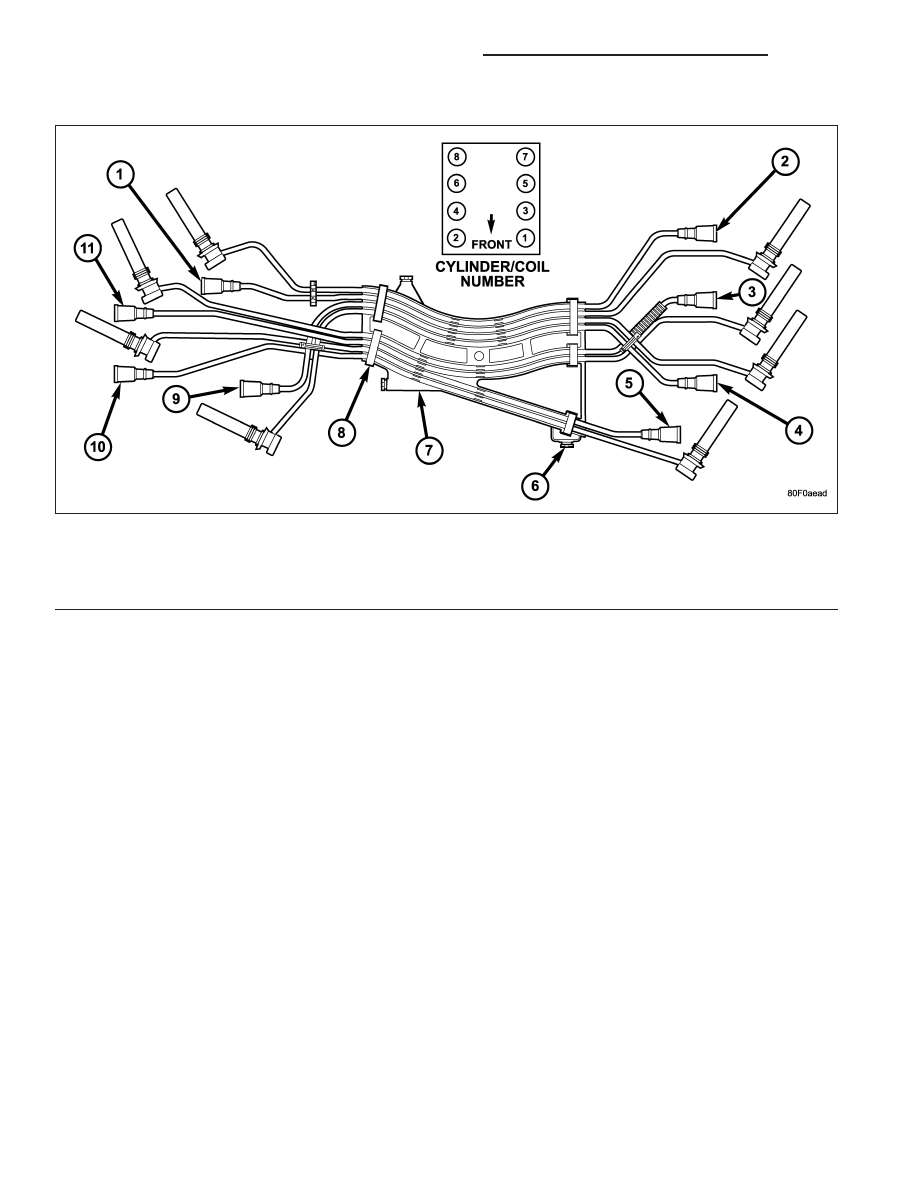
If cable tray removal is necessary, release the 4 tray-to-manifold retention clips.
8.3L - SRT-10
Failure to route the cables properly could cause the radio to reproduce ignition noise, cross ignition of the spark
plugs or short circuit the cables to ground.
1. Release the fuel pressure, refer to the Fuel Pressure Release procedure in the Fuel Delivery section.
2. Disconnect the negative battery cable.
3. Remove the air cleaner assembly, refer to the Engine/Air Intake section for more information.
4. Remove the Intake Manifold, refer to the Engine/Manifolds/Intake Manifold for more information.
5. Use the following procedure when removing the high tension cable from the spark plug. Grasp the terminal as
close as possible to the spark plug. Rotate the cover boot 1/2 turn slightly and pull straight up in a steady
motion.Do not use pliers and do not pull the cable at an angle. Doing so will damage the insulation, cable
terminal or the spark plug insulator. Wipe spark plug insulator clean before reinstalling cable.
6. Remove spark plug cable from coil first.
7. Always remove the spark plug cable by grasping the top of the spark plug insulator, turning the boot 1/2 turn and
pulling straight up in a steady motion.
INSTALLATION
INSTALLATION
Install cables into the proper engine cylinder firing order sequence. Refer to Specifications.
When replacing the spark plug and coil cables, route the cables correctly and secure them in the proper retainers.
Failure to route the cables properly may cause the radio to reproduce ignition noise. It could also cause cross-
ignition of the plugs, or, may short-circuit the cables to ground.
When installing new cables, make sure a positive connection is made. A snap should be felt when a good connec-
tion is made.
1 - #8 COIL-TO- #5 SPARK PLUG (MARKED 5/8)
7 - CABLE TRAY
2 - #5 COIL-TO- #8 SPARK PLUG (MARKED 5/8)
8 - CLIPS (SPARK PLUG CABLE-TO-TRAY- RETENTION)
3 - #7 COIL-TO- #4 SPARK PLUG (MARKED 4/7)
9 - #2 COIL-TO- #3 SPARK PLUG (MARKED 2/3)
4 - #3 COIL-TO- #2 SPARK PLUG (MARKED 2/3)
10 - #6 COIL-TO- #1 SPARK PLUG (MARKED 1/6)
5 - #1 COIL-TO- #6 SPARK PLUG (MARKED 1/6)
11 - #4 COIL-TO- #7 SPARK PLUG (MARKED 4/7)
6 - CLIPS (TRAY-TO-MANIFOLD RETENTION)
8I - 38
IGNITION CONTROL - SERVICE INFORMATION
DR/DH