Dodge Ram Truck 1500-2500-3500. Manual - part 1939


  Index      Dodge     Dodge Ram Truck 1500-2500-3500 - service repair manual 2005 year


Search            


Content   ..  1937  1938  1939  1940   ..


Dodge Ram Truck 1500-2500-3500. Manual - part 1939


5. Install the two screws (3) that secure the body side cladding to the front fender. Tighten the screws to 5 N·m (44

in. lbs.).

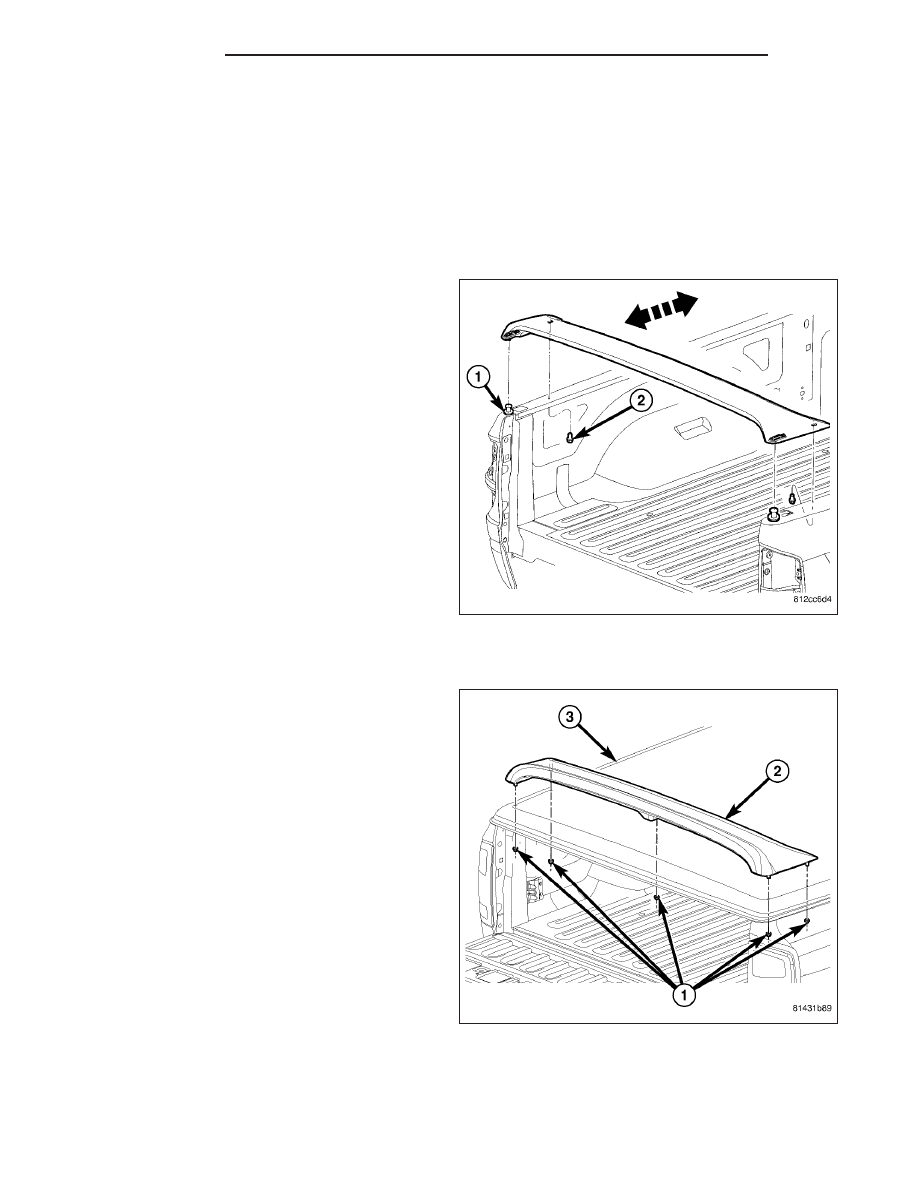
SPOILER - SRT-10

REMOVAL

WITHOUT CARGO BOX COVER

1. Remove the two bolts (2) that secure the spoiler to

the rear of the cargo box.

2. Slide the spoiler rearward to disengage the two

studs (1) and remove the spoiler.

3. If required, remove the two nuts that secure the

two studs to the rear of the cargo box and remove
the studs.

WITH CARGO BOX COVER

1. Remove the five nuts (1) that secure the spoiler (2)

to the cargo box cover (3).

2. Remove the spoiler from the cargo box cover

.

23 - 110

EXTERIOR

DR/DH

INSTALLATION

WITHOUT CARGO BOX COVER

1. If removed, position the two studs (1) onto the rear

of the cargo box and install the retaining nuts.
Tighten the nuts to 9 N·m (80 in. lbs.).

2. Position the spoiler over the two studs and slide

the spoiler forward until the studs fully engage.

3. Install the two bolts (2) that secure the spoiler to

the rear of the cargo box. Tighten the bolts to 6
N·m (50 in. lbs.).

WITH CARGO BOX COVER

1. Position the spoiler (2) onto the rear of the cargo

box cover (3).

2. Install the five nuts (1) that secure the spoiler to

the cargo box cover. Tighten the nuts to 9 N·m (80
in. lbs.).

DR/DH

EXTERIOR

23 - 111

HOOD

TABLE OF CONTENTS

page

page

BEZEL-HOOD SRT-10

REMOVAL

. . . . . . . . . . . . . . . . . . . . . . . . . . . . 112

INSTALLATION

. . . . . . . . . . . . . . . . . . . . . . . . 113

HINGE

REMOVAL

. . . . . . . . . . . . . . . . . . . . . . . . . . . . 114

INSTALLATION

. . . . . . . . . . . . . . . . . . . . . . . . 115

HOOD

REMOVAL

. . . . . . . . . . . . . . . . . . . . . . . . . . . . 116

INSTALLATION

. . . . . . . . . . . . . . . . . . . . . . . . 116

LATCH

REMOVAL

. . . . . . . . . . . . . . . . . . . . . . . . . . . . 117

INSTALLATION

. . . . . . . . . . . . . . . . . . . . . . . . 117

LATCH RELEASE CABLE/HANDLE ASSEMBLY

REMOVAL

REMOVAL . . . . . . . . . . . . . . . . . . . . . . . . . . 118

INSTALLATION

. . . . . . . . . . . . . . . . . . . . . . . . 118

LATCH STRIKER / SECONDARY CATCH

REMOVAL

. . . . . . . . . . . . . . . . . . . . . . . . . . . . 119

INSTALLATION

. . . . . . . . . . . . . . . . . . . . . . . . 119

SUPPORT CYLINDER

REMOVAL

. . . . . . . . . . . . . . . . . . . . . . . . . . . . 120

INSTALLATION

. . . . . . . . . . . . . . . . . . . . . . . . 121

BEZEL-HOOD SRT-10

REMOVAL

NOTE: If the hood scoop bezel is removed for any
reason, it should be replaced.

1. Remove the four nuts that secure the hood scoop

bezel to the hood.

23 - 112

HOOD

DR/DH

2. Using a trim stick C-4755 or equivalent, disengage

the upper retaining clips (2) for the hood scoop
bezel (3) from the hood scoop (1).

3. Rotate the front of the hood scoop bezel upward,

toward the rear of the hood to separate the upper
retaining clips from the hood scoop.

CAUTION: If the upper retaining clips come off of
the bezel during removal, DO NOT open the hood.
This will help prevent the retaining clips from
becoming lost inside the hood.

NOTE: If required, use a magnet to remove any
retaining clips that may have fallen off of the hood
scoop bezel during removal.

4. Remove the hood scoop bezel from the hood.

INSTALLATION

NOTE: If the hood scoop bezel is removed for any
reason, it should be replaced.

1. Position the hood scoop bezel (3) into the hood

scoop (1) and rotate it forward and downward to
engage the upper retaining clips (2) to the hood
scoop as shown.

DR/DH

HOOD

23 - 113


Content   ..  1937  1938  1939  1940   ..