Dodge Nitro. Manual - part 437
 

  Index      Dodge     Dodge Nitro - service repair manual 2007 year


Search            


Content   ..  435  436  437  438   ..


Dodge Nitro. Manual - part 437


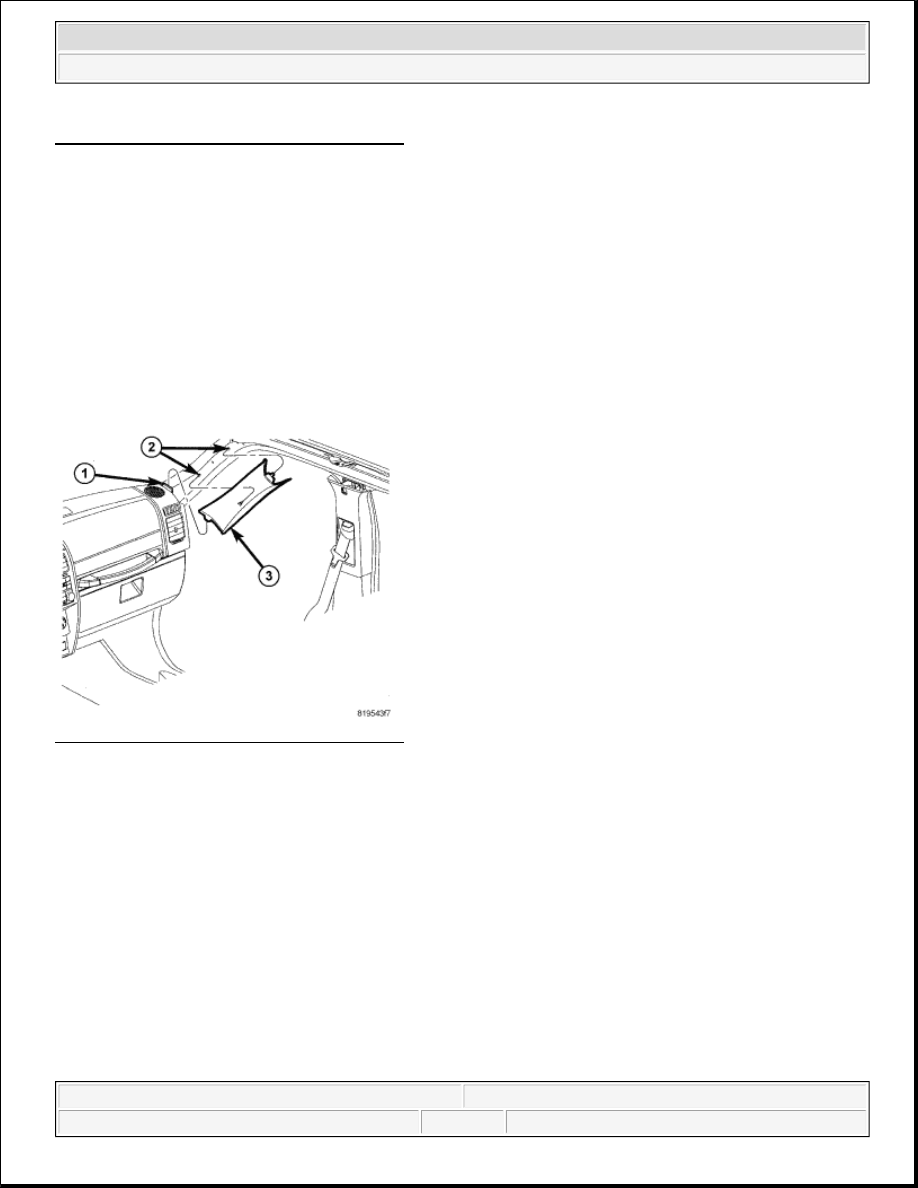
Fig. 389: Instrument Panel, Slots & Moldings
Courtesy of CHRYSLER LLC
 

1. Using a small pry tool or equivalent, lift the A-pillar trim molding (3) from the A-pillar slots (2) releasing 

the clips on the molding. 

2. Remove the top clip from the trim molding.  

INSTALLATION 

MOLDING - A PILLAR 

Fig. 390: Instrument Panel, Slots & Moldings 
Courtesy of CHRYSLER LLC 

1. Align the A-pillar trim tab on the molding (3) to the top cover slot of the instrument panel (1).  

2. Install the top clip on the trim molding.  

3. Align the two clips on the molding to the slots (2) on the A-pillar. Snap the A-pillar trim molding (3) into 

place using hand pressure.  

MOLDING - HEADLINER 

REMOVAL 

MOLDING - HEADLINER 

NOTE:

The top tethered clip has a locking tab that needs to be lifted in order for 
clip to slide out of the trim attachment point.


2007 Dodge Nitro R/T 

2007 ACCESSORIES AND EQUIPMENT Body - Nitro


Fig. 391: Headliner Molding 
Courtesy of CHRYSLER LLC 

1. Open the lift gate. 

2. Pull down at the center of the headliner molding (3) only enough to allow the tab (2) to be released from 

the quarter trim molding.  

3. Carefully pull down to remove the remaining clips (4) attaching the molding to the body then move the 

molding to the left to released the tab from the quarter trim molding.  

INSTALLATION 

MOLDING - HEADLINER 

Fig. 392: Headliner Molding 

NOTE:

Align second clip from Right (Cross Car Locator) to its slot first. This 
helps line up the rest of clips.


2007 Dodge Nitro R/T 

2007 ACCESSORIES AND EQUIPMENT Body - Nitro


Courtesy of CHRYSLER LLC 

1. Install the headliner molding (3) to the body by sliding the tab (1) on the right side into the quarter trim 

molding.  

2. Pull down at the center of the headliner molding (3) only enough to allow the tab (2) to be slide into the 

other side of the quarter trim molding.  

3. Using hand pressure snap the remaining clips (4) into place.  

4. Close the lift gate.  

PANEL - COWL SIDE 

REMOVAL 

PANEL - COWL SIDE 

Fig. 393: Cowl Trim Panel 
Courtesy of CHRYSLER LLC 

1. Using a trim stick C-4755 or equivalent, remove the cowl trim cover (1) by pulling it away from the A-

pillar and releasing the clip (2), continue lifting up the cowl trim panel (1) to release the clips (3) from the 
body.  

INSTALLATION 

PANEL - COWL SIDE 


2007 Dodge Nitro R/T 

2007 ACCESSORIES AND EQUIPMENT Body - Nitro


Fig. 394: Cowl Trim Panel 
Courtesy of CHRYSLER LLC 

1. Align and install the cowl trim cover (1) by sliding the rear tabs of the cowl trim cover under the B-pillar 

trim. 

2. Using hand pressure install the clips (3) into the body and the A-pillar (2).  

PANEL - LOAD FLOOR 

REMOVAL 

PANEL - LOAD FLOOR 

CAUTION: When installing the cowl trim cover make sure not to damage the 

body plugs around the sill area. If damage occurs to the body plugs 
replace with new plugs. Failure to replace a damaged body plug will 
result in a water leak to the floor area of the vehicle.


2007 Dodge Nitro R/T 

2007 ACCESSORIES AND EQUIPMENT Body - Nitro


Content   ..  435  436  437  438   ..