Dodge Durango (HB). Manual - part 1383


  Index      Dodge     Dodge Durango (HB) - service repair manual 2005 year


Search            


Content   ..  1381  1382  1383  1384   ..


Dodge Durango (HB). Manual - part 1383


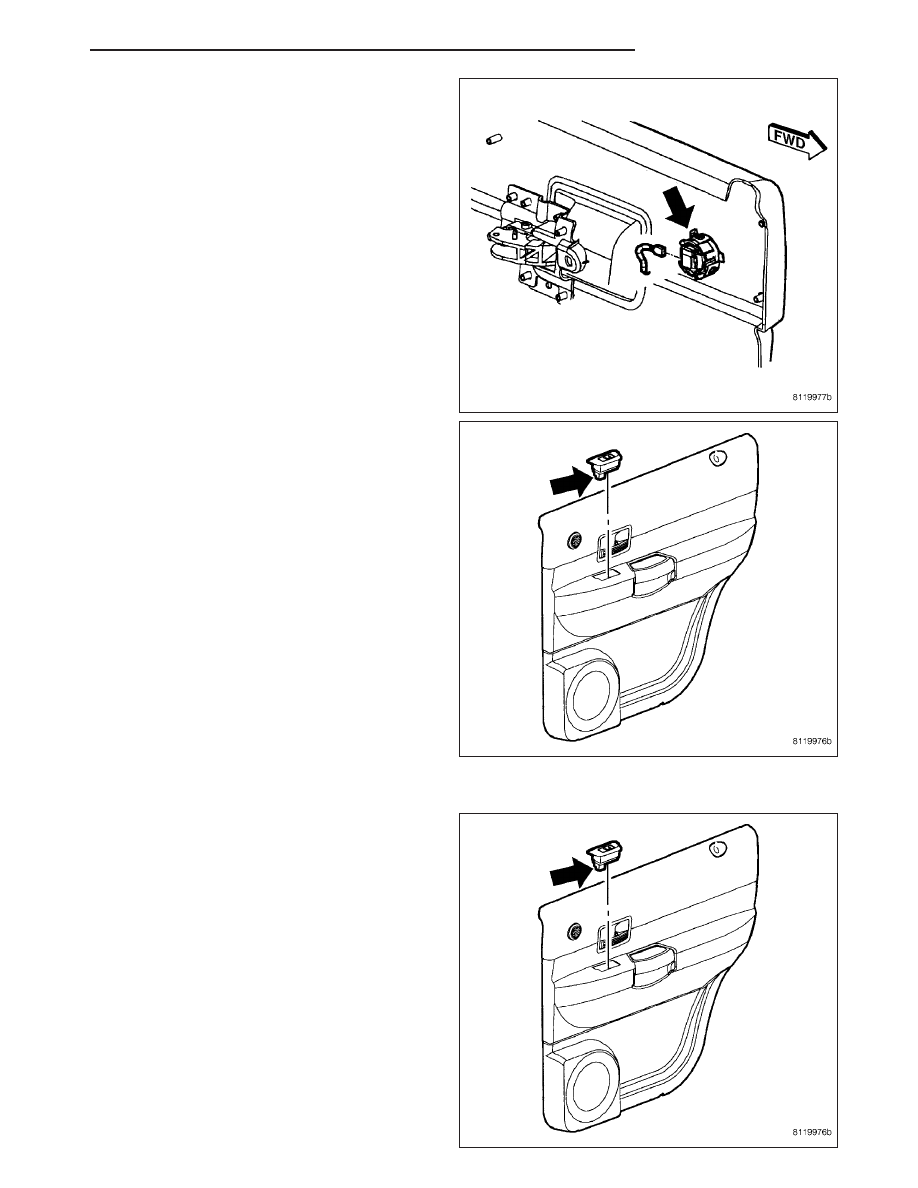
5. Disconnect the electrical connector and remove the

tweeter.

6. Remove the switch panel if necessary.

INSTALLATION

1. Install the switch assembly.

HB

DOORS - REAR

23 - 45

2. Install the tweeter and connect the electrical con-

nector.

3. Position the trim panel (4) and connect the inside

handle actuator rod (1).

4. Connect the electrical connectors (6).

5. Lift the trim panel up and onto the lock rod (2) and

attachment hooks.

6. Install the screws (3 & 5).

23 - 46

DOORS - REAR

HB

WATERSHIELD

REMOVAL

CAUTION: Do not allow the watershield or adhe-
sive to become contaminated with dirt or other
foreign substances.

Do not damage the watershield during removal
and installation.

If the watershield becomes contaminated or dam-
aged, replace the watershield.

1. Remove the speaker. (Refer to 8 - ELECTRICAL/

AUDIO/SPEAKER - REMOVAL)

2. Remove the door trim panel. (Refer to 23 - BODY/

DOORS - REAR/TRIM PANEL - REMOVAL)

3. Separate the watershield from the inner door panel

and off of the latch linkages.

INSTALLATION

CAUTION: Do not allow the watershield or adhe-
sive to become contaminated with dirt or other
foreign substances.

Do not damage the watershield during removal
and installation.

If the watershield becomes contaminated or dam-
aged, replace the watershield.

1. Position

the

wire

harness

and

actuator

rods

through the holes in the watershield.

2. Secure the watershield to the inner door panel.

3. Install the speaker. (Refer to 8 - ELECTRICAL/AU-

DIO/SPEAKER - INSTALLATION)

4. Install the trim panel. (Refer to 23 - BODY/DOORS

- REAR/TRIM PANEL - INSTALLATION)

HB

DOORS - REAR

23 - 47

GLASS

REMOVAL

1. Remove the watershield. (Refer to 23 - BODY/

DOORS - REAR/WATERSHIELD - REMOVAL)

2. Separate the inner belt molding from the mounting

flange from the rear to the front.

3. Insert special tool #9093 (2) between the outer belt

molding (1) and glass at the rear.

4. Push down on outer belt molding (1) and rotate

upper part of tool (2) outward from vehicle then lift
up on molding (1) to disengage from locking tabs
(3) working from back to front.

NOTE: Typical outer belt molding design shown.

5. Slide molding out from under the side view mirror

and remove.

6. Temporarily install the window switch and position

the glass (1) to gain access (2) to the regulator
nuts (4).

7. Remove the nuts (4) and remove the glass (1).

23 - 48

DOORS - REAR

HB


Content   ..  1381  1382  1383  1384   ..