Dodge Durango (DN). Manual - part 266
(3) Install and tighten the two hold down bolts
that secure the hold down strap/battery thermoguard
unit to the U-nuts in the battery tray. Tighten the
bolts to 2.1 N·m (19 in. lbs.).
(4) Reconnect the battery positive cable terminal
clamp to the battery positive terminal post. Tighten
the terminal clamp pinch-bolt hex nut to 7.9 N·m (70
in. lbs.).
(5) Reconnect the battery negative cable terminal
clamp to the battery negative terminal post. Tighten
the terminal clamp pinch-bolt hex nut to 7.9 N·m (70
in. lbs.).
BATTERY
REMOVAL
(1) Turn the ignition switch to the Off position. Be
certain that all electrical accessories are turned off.
(2) Loosen the battery negative cable terminal
clamp pinch-bolt hex nut.
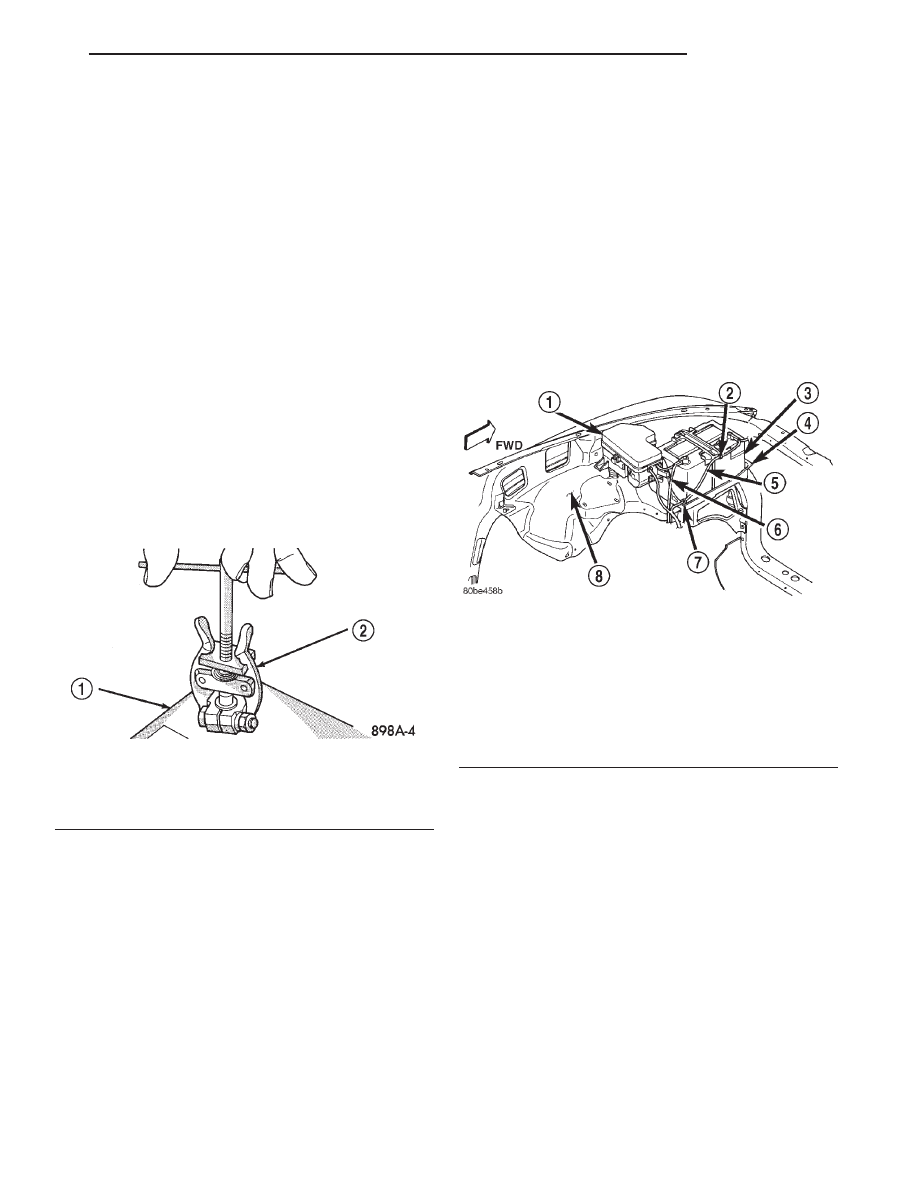
(3) Disconnect the battery negative cable terminal
clamp from the battery negative terminal post. If
necessary, use a battery terminal puller to remove
the terminal clamp from the battery post (Fig. 19).
(4) Loosen the battery positive cable terminal
clamp pinch-bolt hex nut.
(5) Disconnect the battery positive cable terminal
clamp from the battery positive terminal post. If nec-
essary, use a battery terminal puller to remove the
terminal clamp from the battery post.
(6) Remove the battery hold downs from the bat-
tery. Refer to Battery Hold Downs in the index of
this service manual for the location of the proper bat-
tery hold down removal procedures.
WARNING: WEAR A SUITABLE PAIR OF RUBBER
GLOVES (NOT THE HOUSEHOLD TYPE) WHEN
REMOVING
A
BATTERY
BY
HAND.
SAFETY
GLASSES SHOULD ALSO BE WORN. IF THE BAT-
TERY IS CRACKED OR LEAKING, THE ELECTRO-
LYTE CAN BURN THE SKIN AND EYES.
(7) Remove the battery from the battery tray.
INSTALLATION
(1) Clean and inspect the battery. Refer to Bat-
tery in the index of this service manual for the loca-
tion of the proper battery cleaning and inspection
procedures.
(2) Position the battery onto the battery tray.
Ensure that the battery positive and negative termi-
nal posts are correctly positioned. The battery cable
terminal clamps must reach the correct battery ter-
minal post without stretching the cables (Fig. 20).
(3) Reinstall the battery hold downs onto the bat-
tery. Refer to Battery Hold Downs in the index of
this service manual for the location of the proper bat-
tery hold down installation procedures.
CAUTION: Be certain that the battery cable terminal
clamps are connected to the correct battery termi-
nal posts. Reverse battery polarity may damage
electrical components of the vehicle.
(4) Clean the battery cable terminal clamps and
the battery terminal posts. Refer to Battery in the
index of this service manual for the location of the
proper battery cleaning and inspection procedures.
(5) Reconnect the battery positive cable terminal
clamp to the battery positive terminal post. Tighten
the terminal clamp pinch-bolt hex nut to 7.9 N·m (70
in. lbs.).
Fig. 19 Remove Battery Cable Terminal Clamp -
Typical
1 – BATTERY
2 – BATTERY TERMINAL PULLER
Fig. 20 Battery Cables
1 – POWER DISTRIBUTION CENTER
2 – CLIP
3 – BATTERY
4 – TRAY
5 – NEGATIVE CABLE
6 – POSITIVE CABLE
7 – CLIP
8 – WHEELHOUSE INNER PANEL
DN
BATTERY
8A - 19
REMOVAL AND INSTALLATION (Continued)