Dodge Durango (DN). Manual - part 111
(6) Verify positive engagement of transmission
park lock by attempting to rotate propeller shaft.
Shaft will not rotate when park lock is engaged.
(7) Slide cable eyelet onto transmission shift lever.
(8) Lower
vehicle
and
check
engine
starting.
Engine should start only in Park and Neutral.
(9) Lock shift cable by pressing cable adjuster
clamp down until it snaps into place.
FRONT BAND ADJUSTMENT
The front (kickdown) band adjusting screw is
located on the left side of the transmission case
above the manual valve and throttle valve levers.
(1) Raise vehicle.
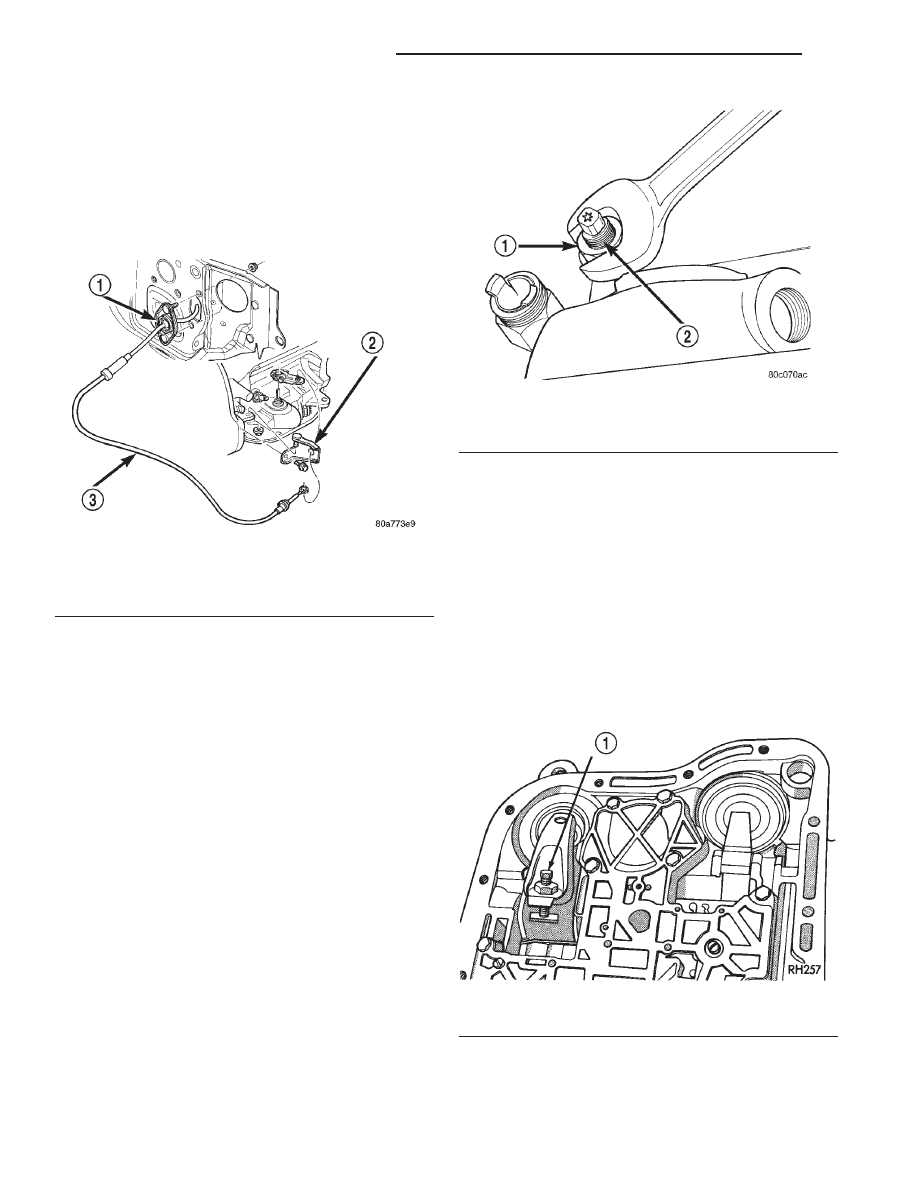
(2) Loosen band adjusting screw locknut (Fig. 313).
Then back locknut off 3-5 turns. Be sure adjusting
screw turns freely in case. Apply lubricant to screw
threads if necessary.
(3) Tighten band adjusting screw to 8 N·m (72 in.
lbs.)
torque
with
Inch
Pound
Torque
Wrench
C-3380-A, a 3-in. extension and an appropriate
Torx
y socket.
CAUTION: If Adapter C-3705 is needed to reach the
adjusting screw, tighten the screw to only 5 N·m
(47-50 in. lbs.) torque.
(4) Back off front band adjusting screw 2-7/8
turns.
(5) Hold adjuster screw in position and tighten
locknut to 41 N·m (30 ft. lbs.) torque.
(6) Lower vehicle.
REAR BAND ADJUSTMENT
The transmission oil pan must be removed for
access to the rear band adjusting screw.
(1) Raise vehicle.
(2) Remove transmission oil pan and drain fluid.
(3) Loosen band adjusting screw locknut 5-6 turns.
Be sure adjusting screw turns freely in lever.
(4) Tighten adjusting screw to 8 N·m (72 in. lbs.)
torque (Fig. 314).
(5) Back off adjusting screw 2 turns.
(6) Hold adjusting screw in place and tighten lock-
nut to 34 N·m (25 ft. lbs.) torque.
(7) Position new gasket on oil pan and install pan
on transmission. Tighten pan bolts to 17 N·m (13 ft.
lbs.) torque.
(8) Lower vehicle and refill transmission with
Mopar
t ATF Plus, Type 7176 fluid.
Fig. 312 Gearshift Cable Routing
1 – CABLE MOUNTING
2 – CABLE BRACKET AT TRANS.
3 – GEARSHIFT CABLE
Fig. 313 Front Band Adjustment Screw Location
1 – LOCK-NUT
2 – FRONT BAND ADJUSTER
Fig. 314 Rear Band Adjustment Screw Location
1 – LOW-REVERSE BAND ADJUSTMENT
21 - 310
46RE AUTOMATIC TRANSMISSION
DN
ADJUSTMENTS (Continued)