Dodge Durango (DN). Manual - part 99
ASSEMBLY
Do not allow dirt, grease, or foreign material to
enter the case or transmission components during
assembly. Keep the transmission case and compo-
nents clean. Also make sure the tools and workbench
area used for reassembly operations are equally
clean.
Shop towels used for wiping off tools and your
hands must be made from lint free materials. Lint
will stick to transmission parts and could interfere
with valve operation or even restrict fluid passages.
Lubricate transmission clutch and gear compo-
nents with Mopar
t ATF Plus 3, type 7176, during
reassembly. Soak clutch discs in transmission fluid
before installation.
Use Mopar
t Door Ease, or Ru-Glyde on piston
seals and O-rings to ease installation. Petroleum jelly
can also be used to lubricate and hold thrust washers
and plates in position during assembly.
Do not use chassis grease, bearing grease,
white grease, or similar lubricants on any part.
These types of lubricants can eventually block or
restrict fluid passages and valve operation. Use
petroleum jelly only.
Do not force parts into place. The transmission
components and sub-assemblies are easily installed
by hand when properly aligned. If a part seems dif-
ficult to install, it is either misaligned or incorrectly
assembled. Verify that thrust washers, thrust plates
and seal rings are correctly positioned.
The planetary geartrain, front/rear clutch assem-
blies and oil pump are all much easier to install
when the transmission case is upright. Either tilt the
case upward with wood blocks, or cut a hole in the
bench large enough for the intermediate shaft and
rear support. Then lower the shaft and support into
the hole and support the rear of the case directly on
the bench.
FRONT/REAR SERVO
(1) Lubricate rear servo piston seal with Mopar
t
Door Ease or ATF Plus 3. Lubricate servo bore in
case with ATF Plus 3.
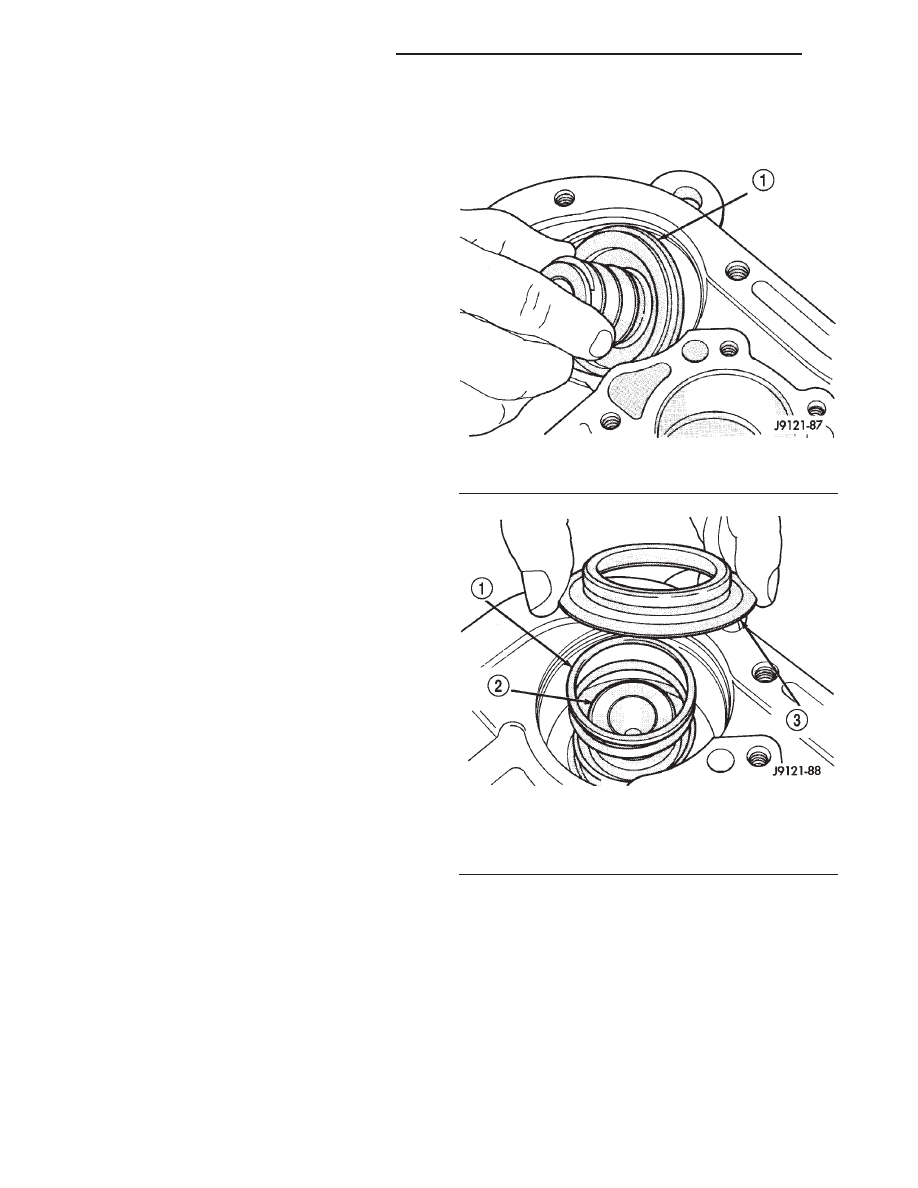
(2) Install rear servo piston in case. Position piston
at slight angle to bore and insert piston with twisting
motion (Fig. 172).
(3) Install rear servo spring and retainer in case
bore (Fig. 173). Be sure spring is seated on piston.
(4) Compress rear servo piston with C-clamp or
Valve Spring Compressor C-3422-B and install servo
piston snap ring (Fig. 174).
(5) Lubricate front servo piston components and
servo bore in case with transmission fluid.
(6) Install front servo piston in bore. Carefully
“run” small, suitable tool around piston ring to press
it back into groove and ease installation (Fig. 175).
Rotate piston into bore at same time. Rock piston
slightly to ease piston ring past snap ring groove and
into bore.
(7) Bottom front servo piston in bore and install
servo spring.
(8) Install front servo piston rod guide as follows:
(a) Place Tool SP-5560 (or similar size tool) on
guide and position C-clamp on tool and case (Fig.
176).
(b) Slowly compress rod guide while simulta-
neously easing seal ring into bore with suitable
tool.
(9) Install rod guide snap ring (Fig. 176).
Fig. 172 Rear Servo Piston
1 – REAR SERVO PISTON
Fig. 173 Rear Servo Piston Spring And Retainer
1 – PISTON SPRING
2 – REAR SERVO PISTON
3 – SPRING RETAINER
21 - 262
46RE AUTOMATIC TRANSMISSION
DN
DISASSEMBLY AND ASSEMBLY (Continued)