Dodge Dakota (ND). Manual - part 72


  Index      Dodge     Dodge Dakota (ND) 2005 - service repair manual 2005 year


Search            


Content   ..  70  71  72  73   ..


Dodge Dakota (ND). Manual - part 72


INSTALLATION

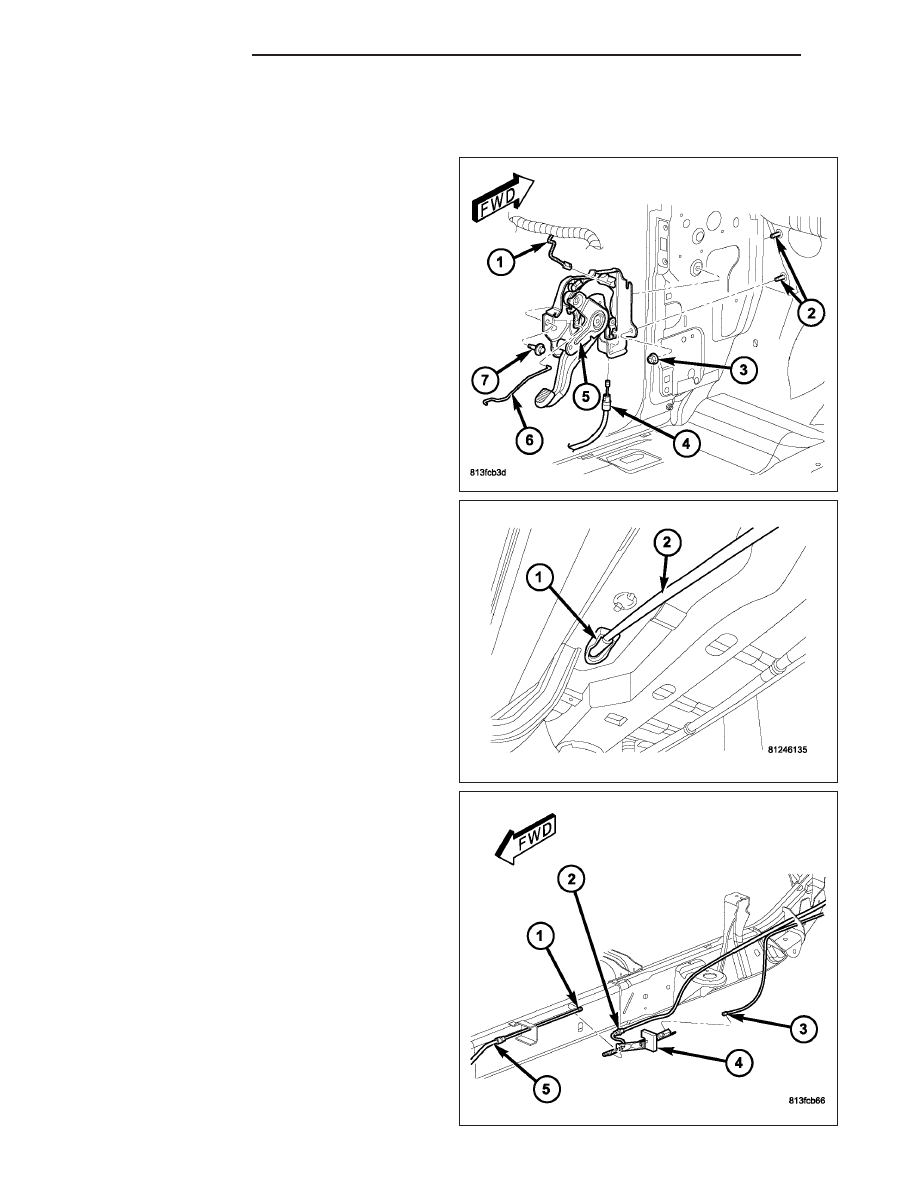
FRONT PARKING BRAKE CABLE

1. From inside the vehicle, insert the cable end fitting

(4) into the hole in the pedal assembly (5).

2. Seat the cable retainer in the pedal assembly (4).

3. Engage the cable ball end in clevis on the pedal

assembly.

4. Route the cable (2) through the floorpan and install

the body grommet (1).

5. Place the carpet down and install the left cowl trim

and sill plate.

6. Raise and support the vehicle.

7. Route the cable (5) through the underbody bracket

and seat the cable end fitting in the bracket.

8. Connect the cable (1) to the cable adjuster (4).

5 - 58

BRAKES - BASE

ND

9. Perform the park brake adjustment procedure,

(Refer to 5 - BRAKES/PARKING BRAKE/CABLE
TENSIONER - ADJUSTMENTS).

10. Lower the vehicle.

REAR PARK BRAKE CABLE

1. Push each cable end through the brake cable sup-

port plate hole (2) until the cable end fitting tabs
lock into place.

NOTE: Pull on the cable to ensure it is locked into
place.

2. Install the rear cables (1) into the park brake lever

behind the rear of the brake assembly (3).

ND

BRAKES - BASE

5 - 59

3. Install the hold down brackets for the park brake

cable (2&3).

4. Install the cable (3) to the intermediate cable con-

nector (4).

5. Release and remove the lock out device.

6. Perform the park brake adjustment procedure,

(Refer to 5 - BRAKES/PARKING BRAKE/CABLE
TENSIONER - ADJUSTMENTS).

7. Remove the supports and lower the vehicle.

5 - 60

BRAKES - BASE

ND

ADJUSTMENTS - PARK BRAKE CABLE TENSIONER

NOTE: Tensioner adjustment is only necessary when the tensioner, or a cable has been replaced or dis-
connected for service. When adjustment is necessary, perform adjustment only as described in the follow-
ing procedure. This is necessary to avoid faulty park brake operation.

1. Raise vehicle.

2. Back off cable tensioner adjusting nut at equalizer to create slack in cables.

3. Remove rear wheel/tire assemblies. Then remove brake drums.

4. Verify brakes are in good condition and operating properly.

5. Verify park brake cables operate freely and are not binding, or seized.

6. Check rear brake shoe adjustment with standard brake gauge.

7. Install drums and verify that drums rotate freely without drag.

8. Reinstall wheel/tire assemblies after brake shoe adjustment is complete.

9. Lower vehicle enough for access to park brake foot pedal. Then fully apply park brakes.

NOTE: Leave park brakes applied until adjustment is complete.

10. Raise vehicle again.

11. Mark tensioner rod 6.35 mm (1/4 in.) from edge of tensioner bracket.

12. Tighten adjusting nut at equalizer until mark on tensioner rod moves into alignment with tensioner bracket.

CAUTION: Do not loosen, or tighten the tensioner adjusting nut for any reason after completing adjustment.

13. Lower vehicle until rear wheels are 15-20 cm (6-8 in.) off shop floor.

14. Release park brake foot pedal and verify that rear wheels rotate freely without drag. Then lower vehicle.

ND

BRAKES - BASE

5 - 61


Content   ..  70  71  72  73   ..