Chrysler Le Baron, Dodge Dynasty, Plymouth Acclaim. Manual - part 180
INSTALLATION
Reverse the preceding operation.
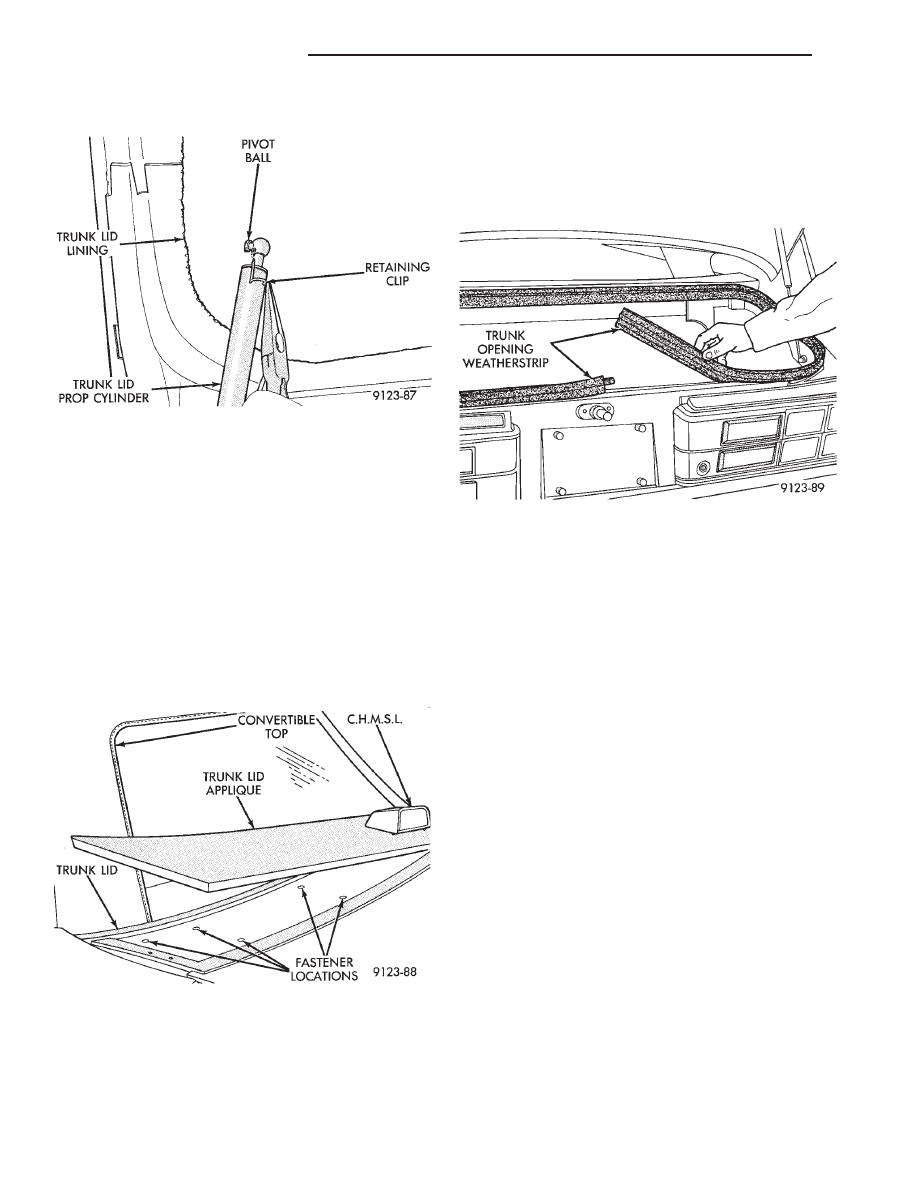
TRUNK LID APPLIQUE
REMOVAL (FIG. 35)
(1) Remove trunk lid lining as necessary to gain
access to applique attaching nuts.
(2) Remove nuts holding applique to trunk lid.
(3) Separate applique from trunk lid.
(4) Disconnect center high mounted stop lamp wire
connector.
(5) Remove applique from vehicle.
INSTALLATION
Apply sealing putty around mounting studs on
back of applique and reverse the removal operation.
TRUNK OPENING WEATHERSTRIP
REMOVAL (FIG. 36)
(1) Raise trunk lid.
(2) Pull trunk lid opening weatherstrip from pinch
flange around opening.
(3) Separate weatherstrip from vehicle.
INSTALLATION
Position weatherstrip at center of rearward pinch
flange. Push weatherstrip onto pinch flange around
trunk opening and join the ends of the weatherstrip
when they meet.
TRUNK LID
REMOVAL (FIG. 37)
(1) Raise trunk lid to full up position.
(2) Disconnect the trunk lamp wire connector, if
equipped.
(3) Mark all bolt and hinge attachment locations
with a grease pencil to provide reference marks for
installation. When installing trunk lid, align all
marks and secure bolts. The trunk lid should be
aligned to 4 mm (0.160 in.) gap to the quarter panels
and flush across the top surfaces along quarter pan-
els.
(4) Support trunk lid and remove prop-rod cylin-
ders.
(5) Remove the top trunk lid to hinge attaching
bolts and loosen the bottom bolts until they can be
removed by hand.
(6) With assistance of a helper at the opposite side
of the vehicle, remove the remaining bolts. Separate
the trunk lid from the vehicle.
INSTALLATION
Reverse the preceding operation.
TRUNK HINGE LID
REMOVAL (FIG. 38)
(1) Raise and support trunk lid in the full up posi-
tion.
(2) Remove pivot bolts holding trunk lid hinge to
trunk opening side panel.
Fig. 34 Trunk Lid Lining and Prop Cylinder
Fig. 35 Trunk Lid Applique
Fig. 36 Trunk Opening Weatherstrip
23 - 130
AP/27 CONVERTIBLE
Ä