Chrysler Le Baron, Dodge Dynasty, Plymouth Acclaim. Manual - part 79
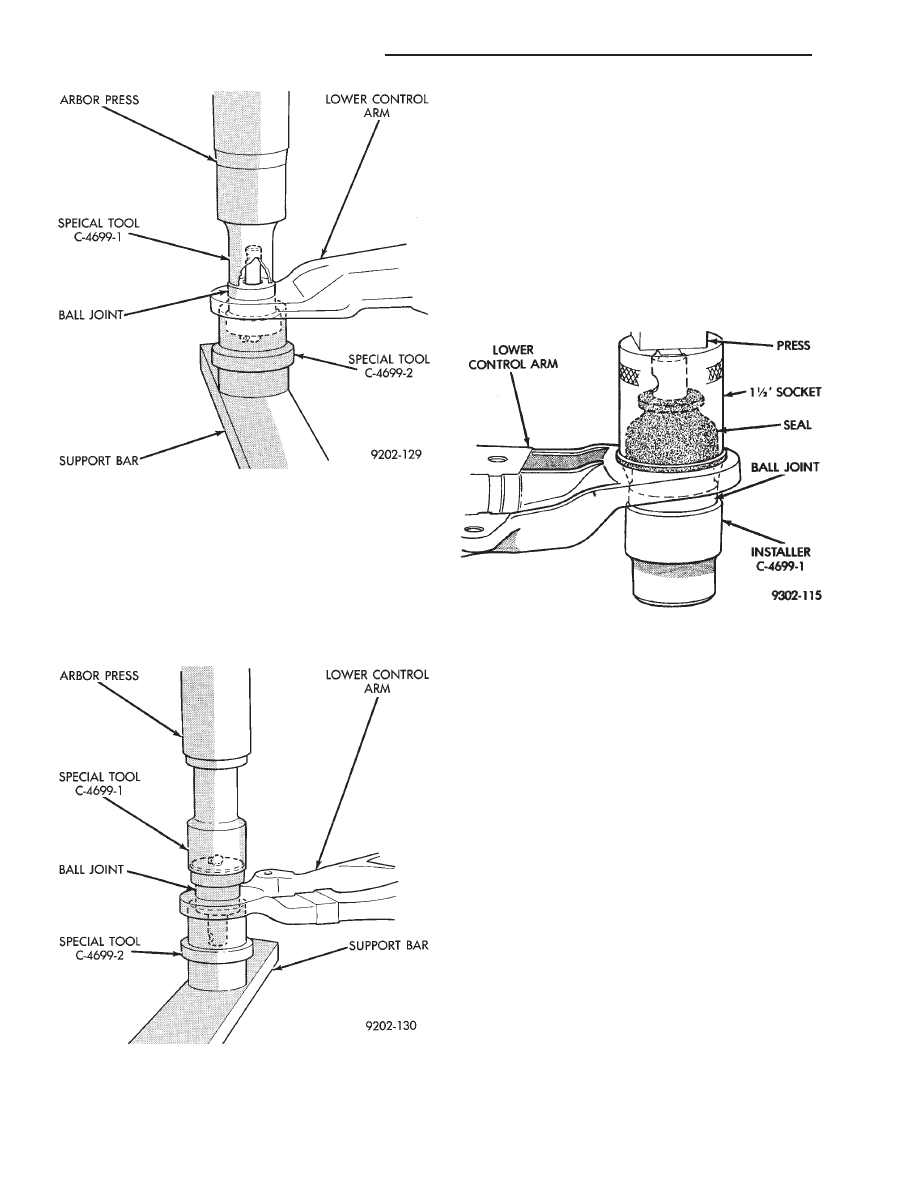
BALL JOINT INSTALLATION
(1) By hand, position ball joint assembly into the
ball joint bore of the lower control arm. Be sure the
ball joint assembly is not cocked in the bore of the
control arm, this will cause binding of the ball joint
assembly.
(2) Position assembly in press with Installer Tool
C-4699-2 supporting control arm (Fig. 14).
(3) Install
the
Remover/Installer,
Special
Tool
C-4699-1 over the ball joint stud and down on the
lower body of the ball joint assembly (Fig. 14).
(4) Carefully align all pieces. Using an arbor press
apply pressure against the ball joint assembly, until
ball joint is fully seated against bottom surface of
control arm. Do not apply excessive pressure against
the control arm.
BALL JOINT SEAL INSTALLATION
(1) Support ball joint housing with Installer, Spe-
cial Tool C-4699-1 (Fig. 15). Position new seal over
ball joint stud and against ball joint housing.
(2) With 1-1/2 inch socket, press seal onto ball
joint housing until it is squarely seated against top
surface of control arm as shown in (Fig. 15).
SWAY BAR
The sway bar interconnects the front lower control
arms of the vehicle and attaches to the crossmember
(Fig. 1).
Jounce and rebound movements affecting one
wheel are partially transmitted to the opposite wheel
to stabilize body roll.
Attachment to the crossmember, and front lower
control arms is through rubber-isolated bushings. All
parts are serviceable, and the sway bar to crossmem-
ber bushings are split for easy removal and installa-
tion. The split in the sway bar to crossmember
bushing should be positioned toward the front of the
vehicle.
LOWER CONTROL ARM SWAY BAR RETAINER
ATTACHMENT HOLE THREAD REPAIR
If threaded holes in lower control arm, for attach-
ment of sway bar retainers (Fig. 1) become damaged.
The threaded holes are repairable and do not require
replacement of lower control arm.
If threads are damaged or stripped on the lower
control arm. An initial repair attempt should be
Fig. 13 Removing Ball Joint
Fig. 14 Installing Ball Joint
Fig. 15 Installing Ball Joint Seal
2 - 14
SUSPENSION AND DRIVESHAFTS
Ä