Daewoo Matiz (2003 year). Manual - part 260
 

  Index      Daewoo     Daewoo Matiz - service repair manual 2003 year


Search            


Content   ..  258  259  260  261   ..


Daewoo Matiz (2003 year). Manual - part 260


WATERLEAKS  9I – 5

REPAIR INSTRUCTIONS

ON–VEHICLE SERVICE

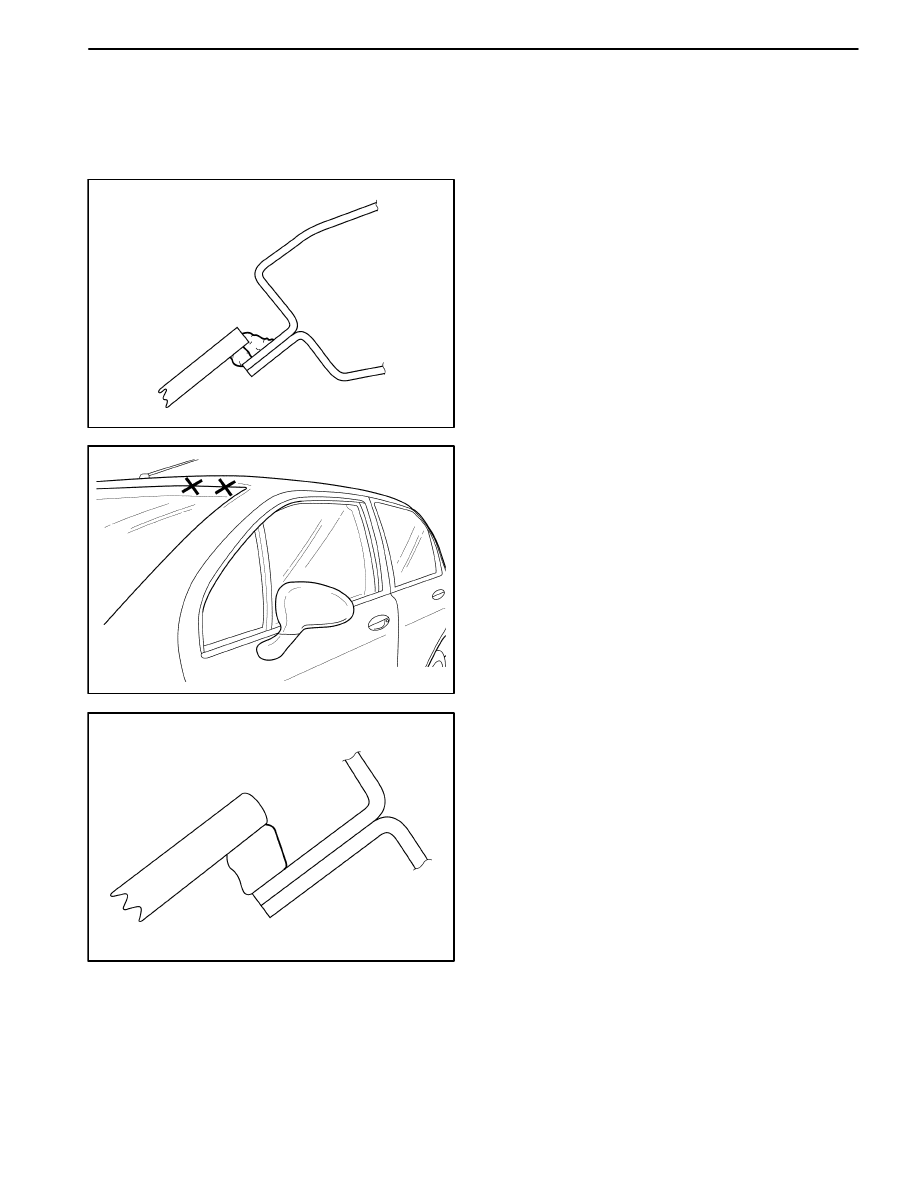
D109A501

D109A502

WATERLEAK REPAIR

Some waterleaks around the glass can be repaired with-
out removing the glass.

Important: This type of repair may be used only for ure-
thane–installed glass.

1 Remove the reveal molding in the area of the leak. It

may be necessary to remove the garnish molding or
the trim strip lace in order to locate the leak.

2. While spraying water over leak area, carefully push

the glass outward in order to determine the size of the
leak.

3. Mark the location of the leak.

4. Use water to clean any dirt frame the area. Dry the

area with an air hose.

D109A503

5. Using a sharp knife, trim off the uneven edges of the

adhesive caulking material around the leak for a dis-
tance of 75 to 100 mm (3 to 4 inches) on both side of
the leak.

9I – 6  WATERLEAKS

D109A504

6. Prime the trimmed area with the primer.

7. Using a sharp knife, trim off the uneven edges of the

adhesive material around the leak 75 to 100 mm (3 to
4 inches) on both sides of the leak.

D109A505

8.

Allow the primer to dry for 5 minutes.

9.

Apply the adhesive over the leak and for a distance
of 75 to 100 mm (3 to 4 inches) on both sides of the
leak.

D109A506

10. Immediately after applying the adhesive, use a flat

stick or a similar tool to work the adhesive into the
leak area and into the joint between the original ma-
terial and the vehicle body in order to ensure a wa-
tertight seal.

11. Spray warm or hot water over the repaired area in

order to determine if the leak was repaired. Do not
run a heavy stream of water directly on the freshly
applied adhesive.

12. Install the trim strip lace if it was removed.

13. Install the garnish molding if it was removed.

14. Install the reveal molding.

D109A304

Important: After the completion of any waterleak repair,
re–test the area using the watertest stands. Do not use
localized testing procedures on the newly–repaired
areas, as the repair material may dislodge under abnor-
mal pressure.

WATERLEAKS  9I – 7

SPECIFICATIONS

RECOMMENDED MATERIALS FOR WATERLEAK REPAIRS

ÁÁÁÁÁÁÁÁÁÁÁÁÁÁÁÁÁÁ

ÁÁÁÁÁÁÁÁÁÁÁÁÁÁÁÁÁÁ

Leak Areas

ÁÁÁÁÁÁÁÁÁÁÁÁÁÁÁÁÁÁ

ÁÁÁÁÁÁÁÁÁÁÁÁÁÁÁÁÁÁ

Repair Materials

ÁÁÁÁÁÁÁÁÁÁÁÁÁÁÁÁÁÁ

ÁÁÁÁÁÁÁÁÁÁÁÁÁÁÁÁÁÁ

Windshield, back window

ÁÁÁÁÁÁÁÁÁÁÁÁÁÁÁÁÁÁ

ÁÁÁÁÁÁÁÁÁÁÁÁÁÁÁÁÁÁ

Urethane adhesive, caulking kit, or the equivalent

ÁÁÁÁÁÁÁÁÁÁÁÁÁÁÁÁÁÁ

ÁÁÁÁÁÁÁÁÁÁÁÁÁÁÁÁÁÁ

Metal joints

ÁÁÁÁÁÁÁÁÁÁÁÁÁÁÁÁÁÁ

ÁÁÁÁÁÁÁÁÁÁÁÁÁÁÁÁÁÁ

Brushable seam sealer which can be painted

ÁÁÁÁÁÁÁÁÁÁÁÁÁÁÁÁÁÁ

ÁÁÁÁÁÁÁÁÁÁÁÁÁÁÁÁÁÁ

ÁÁÁÁÁÁÁÁÁÁÁÁÁÁÁÁÁÁ

Ventilation ducts

ÁÁÁÁÁÁÁÁÁÁÁÁÁÁÁÁÁÁ

ÁÁÁÁÁÁÁÁÁÁÁÁÁÁÁÁÁÁ

ÁÁÁÁÁÁÁÁÁÁÁÁÁÁÁÁÁÁ

3M

TM

 Auto Bedding and Glazing Compound or the

equivalent

ÁÁÁÁÁÁÁÁÁÁÁÁÁÁÁÁÁÁ

ÁÁÁÁÁÁÁÁÁÁÁÁÁÁÁÁÁÁ

Small cracks and pin holes

ÁÁÁÁÁÁÁÁÁÁÁÁÁÁÁÁÁÁ

ÁÁÁÁÁÁÁÁÁÁÁÁÁÁÁÁÁÁ

3M

TM

 Drip-Check Sealer or the equivalent

ÁÁÁÁÁÁÁÁÁÁÁÁÁÁÁÁÁÁ

ÁÁÁÁÁÁÁÁÁÁÁÁÁÁÁÁÁÁ

Large holes

ÁÁÁÁÁÁÁÁÁÁÁÁÁÁÁÁÁÁ

ÁÁÁÁÁÁÁÁÁÁÁÁÁÁÁÁÁÁ

3M

TM

 Automotive Joint and Seam Sealer

ÁÁÁÁÁÁÁÁÁÁÁÁÁÁÁÁÁÁ

ÁÁÁÁÁÁÁÁÁÁÁÁÁÁÁÁÁÁ

Weatherstrips

ÁÁÁÁÁÁÁÁÁÁÁÁÁÁÁÁÁÁ

ÁÁÁÁÁÁÁÁÁÁÁÁÁÁÁÁÁÁ

3M

TM

 08011 Weatherstrip Adhesive or the equivalent

ÁÁÁÁÁÁÁÁÁÁÁÁÁÁÁÁÁÁ

ÁÁÁÁÁÁÁÁÁÁÁÁÁÁÁÁÁÁ

Bolts, studs, and screws

ÁÁÁÁÁÁÁÁÁÁÁÁÁÁÁÁÁÁ

ÁÁÁÁÁÁÁÁÁÁÁÁÁÁÁÁÁÁ

Strip caulk

WATERTEST STAND SPECIFICATIONS

ÁÁÁÁÁÁÁÁÁÁÁÁÁÁÁÁÁÁ

ÁÁÁÁÁÁÁÁÁÁÁÁÁÁÁÁÁÁ

Application

ÁÁÁÁÁÁÁÁÁÁÁÁÁÁÁÁÁÁ

ÁÁÁÁÁÁÁÁÁÁÁÁÁÁÁÁÁÁ

Description

ÁÁÁÁÁÁÁÁÁÁÁÁÁÁÁÁÁÁ

ÁÁÁÁÁÁÁÁÁÁÁÁÁÁÁÁÁÁ

ÁÁÁÁÁÁÁÁÁÁÁÁÁÁÁÁÁÁ

Nozzle Type

ÁÁÁÁÁÁÁÁÁÁÁÁÁÁÁÁÁÁ

ÁÁÁÁÁÁÁÁÁÁÁÁÁÁÁÁÁÁ

ÁÁÁÁÁÁÁÁÁÁÁÁÁÁÁÁÁÁ

Full jet spray nozzle #1/2 GG-25 or equivalent with a
60

°

 included angle

ÁÁÁÁÁÁÁÁÁÁÁÁÁÁÁÁÁÁ

ÁÁÁÁÁÁÁÁÁÁÁÁÁÁÁÁÁÁ

Nozzle Height

ÁÁÁÁÁÁÁÁÁÁÁÁÁÁÁÁÁÁ

ÁÁÁÁÁÁÁÁÁÁÁÁÁÁÁÁÁÁ

Approximately 1,600 mm (63.0 in.) from the floor

ÁÁÁÁÁÁÁÁÁÁÁÁÁÁÁÁÁÁ

ÁÁÁÁÁÁÁÁÁÁÁÁÁÁÁÁÁÁ

Volume of Flow

ÁÁÁÁÁÁÁÁÁÁÁÁÁÁÁÁÁÁ

ÁÁÁÁÁÁÁÁÁÁÁÁÁÁÁÁÁÁ

14L (3.7 gal) per minute

ÁÁÁÁÁÁÁÁÁÁÁÁÁÁÁÁÁÁ

ÁÁÁÁÁÁÁÁÁÁÁÁÁÁÁÁÁÁ

Pressure

ÁÁÁÁÁÁÁÁÁÁÁÁÁÁÁÁÁÁ

ÁÁÁÁÁÁÁÁÁÁÁÁÁÁÁÁÁÁ

155 kPa (22.5 psi) measured at the nozzle

ÁÁÁÁÁÁÁÁÁÁÁÁÁÁÁÁÁÁ

ÁÁÁÁÁÁÁÁÁÁÁÁÁÁÁÁÁÁ

ÁÁÁÁÁÁÁÁÁÁÁÁÁÁÁÁÁÁ

Windshield and A-Pillar Test Stand Position

ÁÁÁÁÁÁÁÁÁÁÁÁÁÁÁÁÁÁ

ÁÁÁÁÁÁÁÁÁÁÁÁÁÁÁÁÁÁ

ÁÁÁÁÁÁÁÁÁÁÁÁÁÁÁÁÁÁ

Approximately 30

°

 down, 45

°

 toward the rear, and

aimed at the corner of the windshield

ÁÁÁÁÁÁÁÁÁÁÁÁÁÁÁÁÁÁ

ÁÁÁÁÁÁÁÁÁÁÁÁÁÁÁÁÁÁ

B-Pillar Test Stand Position

ÁÁÁÁÁÁÁÁÁÁÁÁÁÁÁÁÁÁ

ÁÁÁÁÁÁÁÁÁÁÁÁÁÁÁÁÁÁ

Approximately 30

°

 down, 45

°

 toward the rear, and

aimed at the center of the rear door

ÁÁÁÁÁÁÁÁÁÁÁÁÁÁÁÁÁÁ

ÁÁÁÁÁÁÁÁÁÁÁÁÁÁÁÁÁÁ

ÁÁÁÁÁÁÁÁÁÁÁÁÁÁÁÁÁÁ

ÁÁÁÁÁÁÁÁÁÁÁÁÁÁÁÁÁÁ

Back Window and tailgate Test Stand Position

ÁÁÁÁÁÁÁÁÁÁÁÁÁÁÁÁÁÁ

ÁÁÁÁÁÁÁÁÁÁÁÁÁÁÁÁÁÁ

ÁÁÁÁÁÁÁÁÁÁÁÁÁÁÁÁÁÁ

ÁÁÁÁÁÁÁÁÁÁÁÁÁÁÁÁÁÁ

Approximately 30

°

 down, 45

°

 toward the front and

aimed approximately 610 mm (24.0 in.) from the
corner of the back window

SECTION 9J

WINDNOISE

TABLE OF CONTENTS

Diagnostic Information and Procedures

9J-1

. . . . . 

Windnoise Diagnosis

9J-1

. . . . . . . . . . . . . . . . . . . . . . . 

Repair Instructions

9J-2

. . . . . . . . . . . . . . . . . . . . . . . . . 

On-Vehicle Service

9J-2

. . . . . . . . . . . . . . . . . . . . . . . . . . 

Windnoise Repair

9J-2

. . . . . . . . . . . . . . . . . . . . . . . . . 

DIAGNOSTIC INFORMATION AND PROCEDURES

WINDNOISE DIAGNOSIS

Caution: An assistant should drive the vehicle while
the technician checks for the location of the wind-
noise, in order to prevent personal injury or vehicle
damage.

A test drive in the vehicle is necessary to accurately de-
termine the location of the windnoise.  Often there is a
primary leak and secondary leaks. Failure to repair all
leaks will only reduce the windnoise, not eliminate it.

During the test drive the technician should bring the fol-
lowing items to aid in determining the location of the
windnoise.

D

A mechanics stethoscope or vacuum hose

D

Masking tape

D

Strip caulk

D

A china marking pencil

D

A screwdriver

Perform the following steps in order to conduct the road
test:

1. Choose a route that includes smooth straight streets

that run in all four directions (north, south, east, and
west).

2. Choose streets with little traffic or noise that would in-

terfere with the test.

3. Drive the vehicle at the speeds at which the noise

was noticed by the customer or until the noise is pro-
duced. Do not exceed legal speed limits.

4. The windnoise is external if any of the following condi-

tions occur:

D

The windnoise is caused by the wind.

D

The windnoise can be heard with the door glass
lowered and while the vehicle is being driven.

D

The windnoise is eliminated when tape is placed
over various moldings and gaps.

5. Internal windnoise is air leaving the vehicle and

should be repaired in the following manner.

D

In order to locate the leak, tape off the body lock
pillar pressure relief valves. This will cause air
pressure to build up inside the vehicle and en-
hance the windnoise.

D

Use a stethoscope or a vacuum hose to locate the
leak.

D

Temporarily repair the leak with masking tape.

D109A307

D

Continue testing in order to determine if the noise
has been eliminated or if other leaks exist.

D

When all leaks have been found, return to the shop
and make permanent repairs with the proper align-
ment techniques and sealing materials.


Content   ..  258  259  260  261   ..