Daewoo Matiz (2003 year). Manual - part 164


  Index      Daewoo     Daewoo Matiz - service repair manual 2003 year


Search            


Content   ..  162  163  164  165   ..


Daewoo Matiz (2003 year). Manual - part 164


FIVE-SPEED MANUAL TRANSAXLE  5B – 39

D103B755

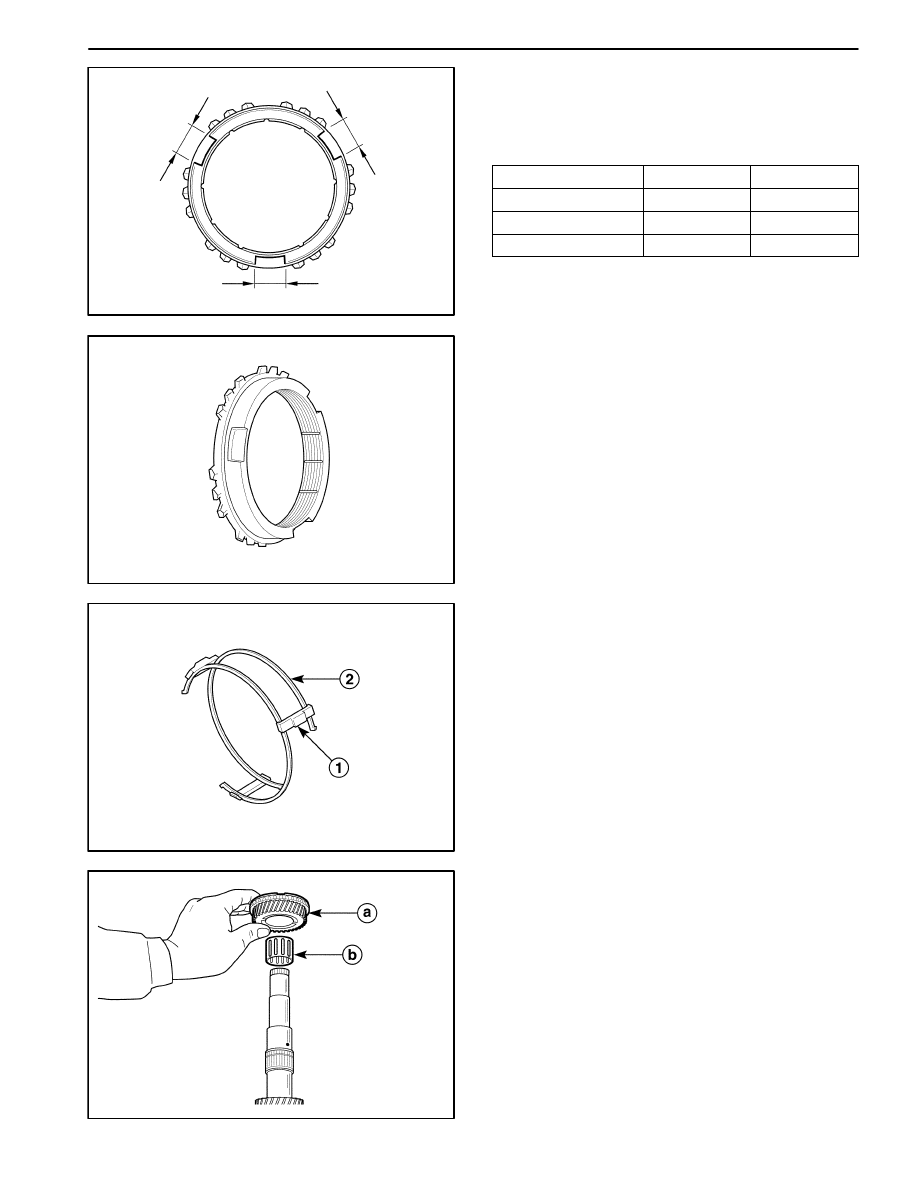
3. Inspecting key slot width of synchronizer ring.

D

Measure key slot width of synchronizer ring. Re-
place if it exceeds limit.

ÁÁÁÁÁÁÁÁÁÁÁÁÁÁÁÁÁ

Unit : mm (in.)

ÁÁÁÁÁÁÁ

ÁÁÁÁÁÁÁ

Key Slot Width

ÁÁÁÁÁÁ

ÁÁÁÁÁÁ

Standard

ÁÁÁÁÁÁ

ÁÁÁÁÁÁ

Limit

ÁÁÁÁÁÁÁ

ÁÁÁÁÁÁÁ

1st gear

8.2 (0.323)

8.6 (0.339)

ÁÁÁÁÁÁÁ

ÁÁÁÁÁÁÁ

2nd, 3rd, 4th gear

9.6 (0.378)

10.0 (0.394)

ÁÁÁÁÁÁÁ

ÁÁÁÁÁÁÁ

5th gear

9.4 (0.370)

9.8 (0.386)

D103B756

4. Inspecting wear of synchronizer ring.

D

Check for worn or damaged synchronizer ring
teeth. Replace it if necessary.

D103B757

5. Inspecting synchronizer key and spring.

D

Check for worn synchronizer key (1).

D

Check for weak, damaged or broken spring (2).

D103B758

Assembly Procedure

1. Install the third gear bearing, the third gear / synchro-

nizer ring.

a. Third gear / synchronizer ring.

b. Third gear bearing.

Important: Coat the inner parts; gear, bearing, oil seal
etc. with gear fluid.

5B – 40  FIVE-SPEED MANUAL TRANSAXLE

D103B759

2. Assemble the third–fourth synchronizer hub assem-

bly.

D

Install the synchronizer springs to the hub.

D

Install the synchronizer key to the hub.

Important: In case of assembling the synchronizer
sleeve and the hub, let A=B.

D

Install the hub to the sleeve.

a. Sleeve.

b. Hub.

D103B760

3. Install the third–fourth synchronizer hub assembly.

D

Insert the hub assembly into the input shaft (1).

Important: Position the longer flange of hub toward the
third gear and match the key and the ring groove.

D

Install the hub assembly using a hammer and the
gear, bearing installer DW09940–53111.

D13B761A

Notice: When installing gear, bearing and hub assem-
bly, install them slowly using the gear, bearing installer
DW09940–53111 and a hammer. If overpressed, the
gear teeth may be damaged.

D103B749

4. Install the third–fourth synchronizer circlip.

5. Install the fourth synchronizer ring and wave spring.

Important: Match the ring groove to the key of hub.

FIVE-SPEED MANUAL TRANSAXLE  5B – 41

D103B762

6. Install the input shaft fourth gear bearing and the

fourth gear.

a. Fourth gear.

b. Fourth gear bearing.

D103B763

7. Install the input shaft left side bearing and the fifth

gear spacer.

D

Install the following parts using the gear, bearing
installer DW09925–98221 and a hammer.

a. Fifth gear spacer.

b. Input shaft left side bearing.

D103B764

8. Install the input shaft right side bearing.

D

Install the bearing to the input shaft using the gear,
bearing installer DW09925–98221 and a hammer
(1).

9. Install the gear unit. Refer to “Gear Unit” in this sec-

tion.

D103B765

COUNTER SHAFT

Tools Required

09913–76010

Bushing, Seal Installer

DW09913–80112 Gear, Bearing Installer

DW09921–57810 Gear, Bearing Remover

DW09925–98221 Gear, Bearing Installer

DW09940–53111 Gear,Bearing Installer

DW220–020–01

Differential Bearing Puller

DW220–020–02

Differential Bearing Plate Adapter

DW220–020–03

Differential Bearing Plate Adapter

KM466–A

Gear, Bearing Remover/Installer

5B – 42  FIVE-SPEED MANUAL TRANSAXLE

Disassembly Procedure

1. Remove the gear unit. Refer to “Gear Unit” in this

section.

2. Remove the counter shaft right side bearing.

D103B766

3. Remove the counter shaft left side bearing and the

fourth gear.

D

Position the fourth gear to the gear, bearing remov-
er DW09921–57810.

D

Remove the following parts by pressing.

a. Counter shaft left side bearing.

b. Fourth gear.

D103B767

4. Remove the counter shaft third–fourth gear spacer.

5. Remove the counter shaft third gear and second gear.

D

Position the second gear to the gear, bearing re-
mover DW09921–57810.

D

Remove the following parts by pressing

a. Third gear.

b. Second gear.

D103B768

6. Remove the counter shaft second gear bearing.

7. Remove the second gear synchronizer ring.

8. Remove the first–second gear synchronizer circlip.


Content   ..  162  163  164  165   ..