DAF 95XF. Manual - part 860


  Index      DAF     DAF 95XF Series - service repair manual


Search            


Content   ..  858  859  860  861   ..


DAF 95XF. Manual - part 860


1

ACCESSORIES

Removal and installation

3-2

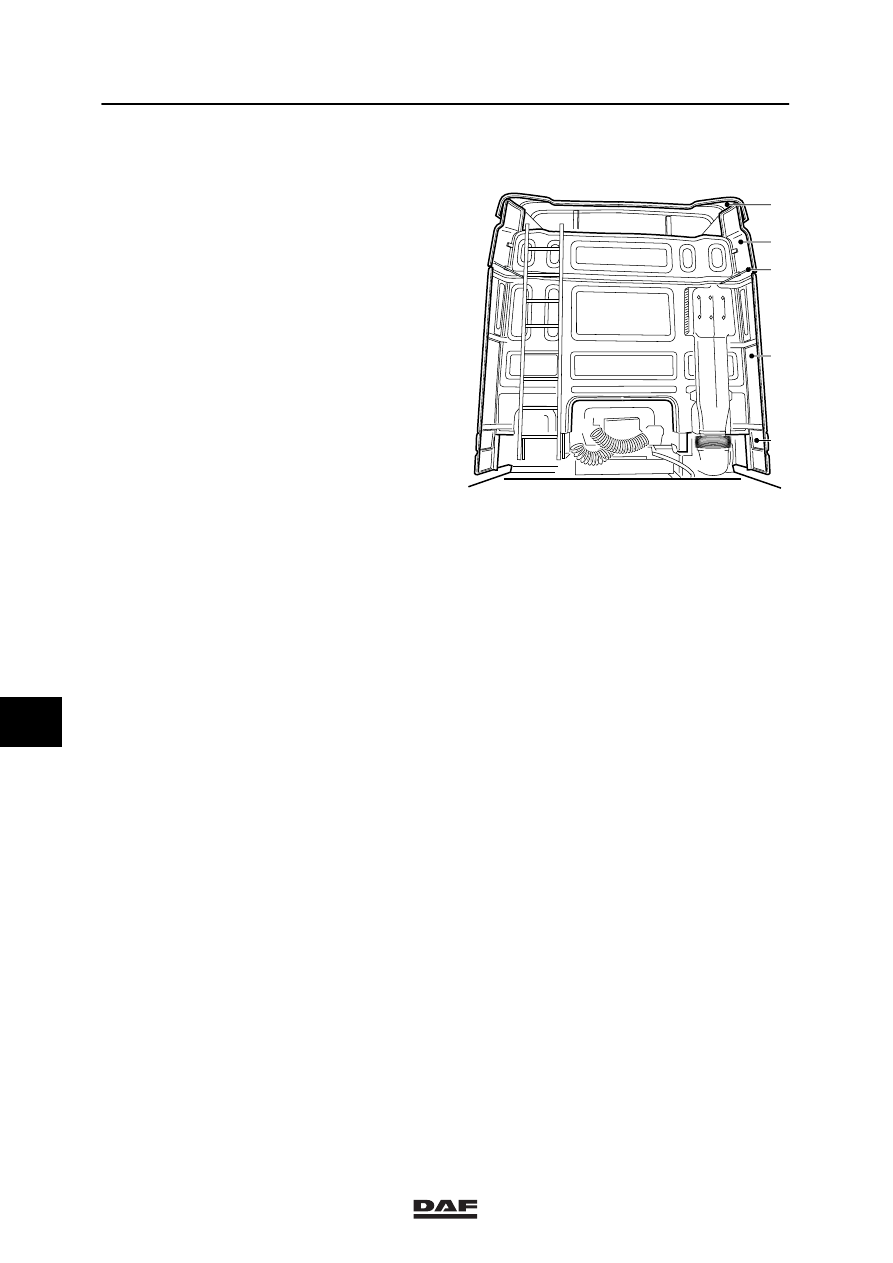
3.2 REMOVAL AND INSTALLATION, REAR AIR FOILS

Removing rear air foils
1.

Remove the attachment bolt and nut of the
reinforcement (3) from the rear air foil
extension (2) to the upper rear air foil
bracket.

2.

Remove the attachment bolts of the rear air
foils (4) and the lower extension pieces (5)
from the tapped holes at the cab rear.

3.

Remove the rear air foils (4) together with
the lower extension pieces (5).

4.

If necessary, remove the rear air foil
extension (2) by removing the clamping
brackets at the cab rear and any
attachment bolts on the roof spoiler.

5.

If necessary, remove the roof spoiler
extension (1) of the ’aerodynamic’ roof
spoiler by removing the attachment bolts
and nuts.

Installing rear air foils
1.

Using the attachment bolts, fit the rear air
foils (4) and the lower extension pieces (5)
to the cab rear and tighten the attachment
bolts to the specified tightening torque, see
“Technical data”.

2.

If necessary, fit the rear air foil extension (2)
with the clamping brackets to the cab rear,
fit any attachment bolts and nuts to the roof
spoiler and tighten the attachment bolts and
nuts to the specified tightening torque, see
“Technical data”.

3.

If necessary, fit the roof spoiler extension
(1) to the ’aerodynamic’ roof spoiler using
the attachment bolts and nuts and tighten
the attachment bolts and nuts to the
specified tightening torque, see “Technical
data”.

1

2

4

3

5

K1 01 479

8

ᓻ 0209

1

Removal and installation

ACCESSORIES

3-3

3.3 REMOVAL AND INSTALLATION, SIDE SKIRTS AND CATWALK

Removing side skirts and catwalk
1.

Unhook the attachment brackets at the side
skirt top and open the side skirt.

2.

Unplug the connectors of the side marker
lighting.

3.

Unhook the check straps at the side skirt
top.

4.

Tilt the side skirt completely open and
unhook the side skirt from the lower
attachment.

5.

Unhook the catwalk plates lengthwise from
their attachment points.

6.

Remove the attachment bolts of the front
catwalk plate and the remaining catwalk
plates widthwise.

7.

Remove the front catwalk plate.

8.

Unhook the remaining catwalk plates from
the chassis members.

Installing side skirts and catwalk
1.

Fit the front catwalk plate to the chassis.

2.

Hook the catwalk plates widthwise
completely in the chassis members.

3.

Fix the elements together, using the
attachment bolts.

4.

Hook the catwalk plates lengthwise in
position.

5.

Fit the side skirts on the lower attachment.

6.

Hook the check straps firmly to the
attachment brackets.

7.

Fit the connectors of the side marker
lighting.

8.

Close the side skirts.

9.

Adjust the attachment brackets.

K1 01 478

8

ᓻ 0209

1

ACCESSORIES

Removal and installation

3-4

3.4 REMOVAL AND INSTALLATION, CORNER SPOILER

Removing corner spoiler
1.

Open the grille and door and remove the
attachment bolts of the corner piece (1).

2.

Remove the corner piece (1) completely.

3.

Remove the attachment bolts (2) and
remove the corner spoiler (3) from the
corner piece (1).

Installing corner spoiler
1.

Fit the corner spoiler (3) to the corner
piece (1)

2.

Fit the corner piece (1) completely and
close the grille and door.

2

3

1

K1 01 477

3.5 REMOVAL AND INSTALLATION, WINDSCREEN SUN VISOR

Removing windscreen sun visor
1.

Remove the attachment bolts of the
mounting brackets from the tapped holes in
the cab.

2.

Remove the sun visor from the cab.

Installing windscreen sun visor
1.

To fit the sun visor stress-free, loosen the
attachment bolts fastening the plastic hood
to the brackets a few strokes.

2.

Using the attachment bolts, fit the sun visor
complete with the attachment brackets to
the cab.

3.

Tighten the attachment bolts fastening the
plastic hood to the brackets.

8

ᓻ 0209

1

Removal and installation

ACCESSORIES

3-5

3.6 REMOVAL AND INSTALLATION, AIR DAM

Removing air dam
1.

Unplug the connectors of the combi-light in
the air dam.

2.

Remove the attachment nuts and bolts
fastening the suspension brackets to the
chassis.

3.

Remove the attachment nuts and bolts of
the air dam at the cab bottom and remove
the air dam.

Installing air dam
1.

Fit the air dam to the cab bottom, using the
suspension brackets and the attachment
bolts and nuts.

2.

Fit the connectors of the combi-light in the
air dam.

3.7 REMOVAL AND INSTALLATION, COMBI-LIGHT

Removing combi-light
1.

Remove the combi-light connector.

2.

Remove the attachment screw (1) and take
the combi-light out of the bumper.

Installing combi-light
1.

Fit the combi-light with attachment screw
(1) into the bumper.

2.

Fit the combi-light connector.

1

K1 01 520

8

ᓻ 0209


Content   ..  858  859  860  861   ..