DAF 95XF. Manual - part 141


  Index      DAF     DAF 95XF Series - service repair manual


Search            


Content   ..  139  140  141  142   ..


DAF 95XF. Manual - part 141


6

Removal and installation

BRAKE COMPONENTS

2-3

Removing the line from a coupling
1.

Cut the line just in front of the hose adapter.

2.

Remove the remainder of the line using
heat or the “cutting point” of an soldering
iron.

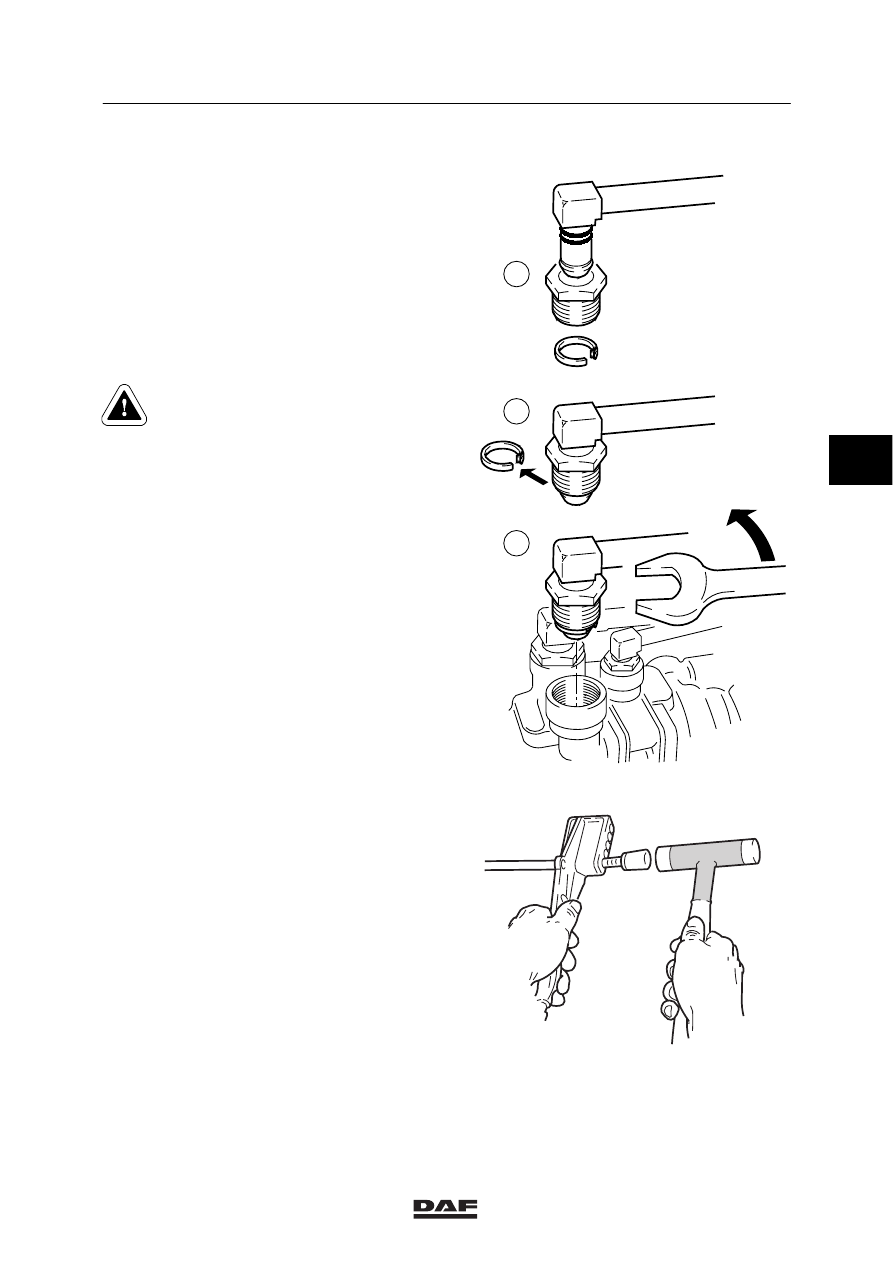
Removing a complete quick-release
coupling from a valve
1.

First of all ensure that the port concerned is
pressureless.

2.

Loosen the socket using an open-end
spanner.

Always replace the plastic circlip
after removing a VOSS 230
coupling from the braking system.

Installing the plastic line to the hose adapter
-

The plastic line must not be heated.

-

The hose adapter must be absolutely free
of damage. Damaged pipe connectors are
likely to leak.

-

The hose adapter must be clean and free
from grease.

When installing a quick-release coupling, use a
gripping device and a plastic mallet.
Hold the line with the gripping device. The
coupling can now easily be fitted in the line by
tapping it with a plastic mallet.

Note:
All plugs (males) are supplied with a protective
plastic cover. This cover prevents them from
getting damaged when the pipe is being
connected.

W602008

1

2

3

W602009

4

ǹ 0006

6

BRAKE COMPONENTS

Removal and installation

2-4

Installing a VOSS 230 coupling

Note:
Before the O-rings are fitted they must be
greased with brake grease (DAF no. 1250185).

1.

Now attach the sleeve nut, the locking clip
and the circlip at the end of the correct tool
(DAF no. 1310404).

2.

Now tighten the assembly by hand and
remove the tool.

3.

Tighten the socket to the specified
tightening torque, see main group
“Technical data”.

4.

Remove the protective cover from the plug
(male).

5.

Push the plug into the socket until the circlip
engages in the groove of the plug.
When pushing in the plug it should be kept
parallel to the socket to prevent the circlip
from being damaged.

Note:
Never tapping the plug home using a tool, e.g.
when the line is (too) short.
Having inserted the plug, the red dust ring on
the plug should no longer be visible.

Protect the assembled plug against powerful
bumps.

6.

Put the special tool (DAF no. 1240101)
between the plug and the sleeve nut. Apply
a little force (approx. 30 N), to check the
locking of the connection.

Note:
If the connection has not been properly locked
by the locking clip, it could come loose if
pressure is applied. This could cause unsafe
situations in traffic.

W602001

;;

;;;

;

;;

;;;

;

W602002

;

;

;;

W602003

;;

;;

;

;;

;;

;

;

;

;

;

;;

;;

W602006

4

ǹ 0006

6

Removal and installation

BRAKE COMPONENTS

2-5

VOSS 232 version

The VOSS 232 quick-release coupling consists
of two parts, i.e.:
-

plug with hose adapter

-

socket

The plug is fitted with two O-rings The upper
O-ring ensures pre-loading and prevents dirt
from entering. Like the O-ring, the lower O-ring
provides sealing between the socket and the
valve.

The socket is fitted with a retaining ring with two
circlips This retaining ring with circlips is held in
place by a sleeve.

1.

Plug

2.

Socket

3.

O-ring (Pre-load and dirt protection)

4.

O-ring (seal valve-socket)

5.

O-ring (seal plug-socket)

6.

Sleeve

7.

Retaining ring

8.

Circlip

9.

Circlip

10. Valve

R600365

2

1

3

5

6

10

4

8

7

9

4

ǹ 0006

6

BRAKE COMPONENTS

Removal and installation

2-6

Removing the line from a coupling

Be sure to depressurise the
relevant port before removing any
lines and/or quick-release
couplings.

1.

Cut the line just in front of the hose adapter.

2.

Note:
Do not use any sharp objects to remove the
remainder of the line This in order to avoid
damaging the hose adapter. Damaged hose
adapters are likely to leak.

Remove the remainder of the line using
heat or the “cutting point” of a soldering
iron.

Connecting a line to a coupling
-

The line must not be heated.

-

The line must be cut at a right angle and
must not show any burrs.

-

The hose adapter must be absolutely free
of damage. If the hose adapter is damaged,
the hose adapter and socket must be
replaced.

-

The hose adapter must be clean and free
from grease.

Note:
All plugs (males) are supplied with a protective
plastic cover. This cover prevents them from
getting damaged when the pipe is being
connected.

Use the special tool (DAF no. 0694829) and a
plastic mallet to fit the line to the hose adapter.

W602009

4

ǹ 0006


Content   ..  139  140  141  142   ..