RAM Cargo Van (2015 year). Manual - part 22


  Index      RAM     RAM Cargo Van (2015 year) - manual in english


Search            copyright infringement  


Content      ..     20      21      22      23     ..


RAM Cargo Van (2015 year). Manual - part 22


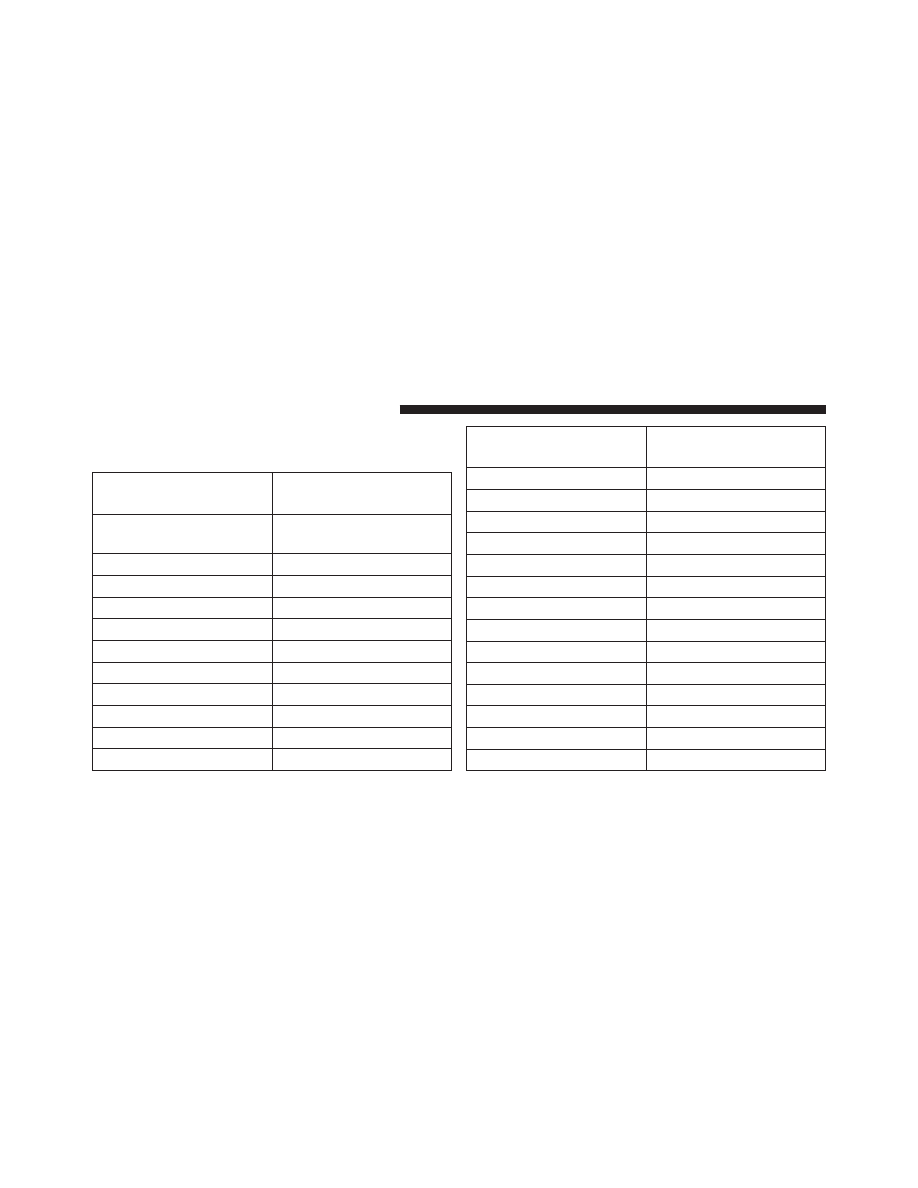
Toggle the MUSIC TYPE button to select the following
format types:

Program Type

16-Digit Character

Display

No program type or un-

defined

None

Adult Hits

Adlt Hit

Classical

Classicl

Classic Rock

Cls Rock

College

College

Country

Country

Foreign Language

Language

Information

Inform

Jazz

Jazz

News

News

Nostalgia

Nostalga

Program Type

16-Digit Character

Display

Oldies

Oldies

Personality

Persnlty

Public

Public

Rhythm and Blues

R & B

Religious Music

Rel Musc

Religious Talk

Rel Talk

Rock

Rock

Soft

Soft

Soft Rock

Soft Rck

Soft Rhythm and Blues

Soft R&B

Sports

Sports

Talk

Talk

Top 40

Top 40

Weather

Weather

342

UNDERSTANDING YOUR INSTRUMENT PANEL

-------------------------------------------------------------------------------------------------------------------------------------------------------------

By pushing the SEEK button when the Music Type icon is
displayed, the radio will be tuned to the next frequency
station with the same selected Music Type name. The
Music Type function only operates when in the FM
mode.

If a preset button is activated while in the Music Type
(Program Type) mode, the Music Type mode will be
exited and the radio will tune to the preset station.

SETUP Button

Pushing the SETUP button allows you to select between
the following items:

• Set Clock — Pushing the SELECT button will allow

you to set the clock. Adjust the hours by turning the
TUNE/SCROLL control knob. After adjusting the
hours, push the TUNE/SCROLL control knob to set
the minutes. The minutes will begin to blink. Adjust

the minutes using the right side TUNE/SCROLL con-
trol knob. Push the TUNE/SCROLL control knob to
save time change.

AM/FM Button

Push the button to select either AM or FM mode.

SET/RND Button — To Set The Pushbutton
Memory

When you are receiving a station that you wish to
commit to pushbutton memory, push the SET/RND
button. The symbol SET 1 will now show in the display
window. Select the button (1–6) you wish to lock onto this
station and push and release that button. If a button is not
selected within five seconds after pushing the SET/RND
button, the station will continue to play but will not be
stored into pushbutton memory.

4

UNDERSTANDING YOUR INSTRUMENT PANEL

343

-------------------------------------------------------------------------------------------------------------------------------------------------------------

You may add a second station to each pushbutton by
repeating the above procedure with this exception: Push
the SET/RND button twice and SET 2 will show in the
display window. Each button can be set for SET 1 and
SET 2 in both AM and FM. This allows a total of 12 AM
and 12 FM stations to be stored into pushbutton memory.
The stations stored in SET 2 memory can be selected by
pushing the pushbutton twice.

Every time a preset button is used, a corresponding
button number will display.

Buttons 1 - 6

These buttons tune the radio to the stations that you
commit to pushbutton memory (12 AM and 12 FM
stations).

DISC/AUX Button

Pushing the DISC/AUX button will allow you to switch
from AM/FM modes to DISC/AUX mode.

Operation Instructions — CD MODE For CD And
MP3 Audio Play

NOTE:

• The ignition switch must be in the ON/RUN or ACC

position to operate the radio.

• This radio is capable of playing compact discs (CD),

recordable compact discs (CD-R), rewritable compact
discs (CD-RW), compact discs with MP3 tracks and
multisession compact discs with CD and MP3 tracks.

Inserting Compact Disc(s)

Gently insert one CD into the CD player with the CD
label facing up. The CD will automatically be pulled into
the CD player and the CD icon will illuminate on the
radio display. If a CD does not go into the slot more than
1.0 inch (2.5 cm), a disc may already be loaded and must
be ejected before a new disc can be loaded.

344

UNDERSTANDING YOUR INSTRUMENT PANEL

-------------------------------------------------------------------------------------------------------------------------------------------------------------

If you insert a disc with the ignition ON/RUN and the
radio ON, the unit will switch from radio to CD mode
and begin to play when you insert the disc. The display
will show the track number, and index time in minutes
and seconds. Play will begin at the start of track 1.

CAUTION!

• This CD player will accept 4–3/4 inch (12 cm) discs

only. The use of other sized discs may damage the
CD player mechanism.

• Do not use adhesive labels. These labels can peel

away and jam the player mechanism.

• The Uconnect® 130 is a single CD player. Do not

attempt to insert a second CD if one is already
loaded.

(Continued)

CAUTION! (Continued)

• Dual-media disc types (one side is a DVD, the

other side is a CD) should not be used, and they can
cause damage to the player.

EJECT Button — Ejecting A CD

Push the EJECT button to eject the CD.

If you have ejected a disc and have not removed it within
10 seconds, it will be reloaded. If the CD is not removed,
the radio will reinsert the CD but will not play it.

A disc can be ejected with the radio and ignition OFF.

NOTE:

Ejecting with the ignition OFF is not allowed on

convertible or soft-top models (if equipped.)

4

UNDERSTANDING YOUR INSTRUMENT PANEL

345

-------------------------------------------------------------------------------------------------------------------------------------------------------------

SEEK Button

Push the right SEEK button for the next selection on the
CD. Push the left SEEK button to return to the beginning
of the current selection, or return to the beginning of the
previous selection if the CD is within the first second of
the current selection. Pushing and holding the SEEK
button will allow faster scrolling through the tracks in
CD and MP3 modes.

TIME Button

Push this button to change the display from a large CD
playing time display to a small CD playing time display.

RW/FF

Push and hold FF (Fast Forward) and the CD player will
begin to fast forward until FF is released or RW or
another CD button is pushed. The RW (Reverse) button
works in a similar manner.

AM/FM Button

Push the button to select either AM or FM mode.

SET/RND Button (Random Play Button)

Push this button while the CD is playing to activate
Random Play. This feature plays the selections on the
compact disc in random order to provide an interesting
change of pace.

Push the right SEEK button to move to the next randomly
selected track.

Push the SET/RND button a second time to stop Random
Play.

Notes On Playing MP3 Files

The radio can play MP3 files; however, acceptable MP3 file
recording media and formats are limited. When writing
MP3 files, pay attention to the following restrictions.

346

UNDERSTANDING YOUR INSTRUMENT PANEL

-------------------------------------------------------------------------------------------------------------------------------------------------------------

Supported Media (Disc Types)

The MP3 file recording media supported by the radio are
CDDA, CD-R, CD-RW, MP3, and CDDA+MP3.

Supported Medium Formats (File Systems)

The medium formats supported by the radio are ISO 9660
Level 1 and Level 2 and includes the Joliet extension.
When reading discs recorded using formats other than
ISO 9660 Level 1 and Level 2, the radio may fail to read
files properly and may be unable to play the file nor-
mally. UDF and Apple HFS formats are not supported.

The radio uses the following limits for file systems:

• Maximum number of folder levels: 8
• Maximum number of files: 255
• Maximum number of folders. (The radio display of file

names and folder names is limited. For large numbers
of files and/or folders, the radio may be unable to

display the file name and folder name, and will assign
a number instead. With a maximum number of files,
exceeding 20 folders will result in this display. With
200 files, exceeding 50 folders will result in this dis-
play.)

Maximum number of characters in file/folder names:

• Level 1: 12 (including a separator ⬙.⬙ and a three-

character extension)

• Level 2: 31 (including a separator ⬙.⬙ and a three-

character extension)

Multi-session disc formats are supported by the radio.
Multi-session discs may contain combinations of normal
CD audio tracks and computer files (including MP3 files).
Discs created with an option such as

⬙keep disc open after

writing

⬙ are most likely multi-session discs. The use of

multi-session for CD audio or MP3 playback may result
in longer disc loading times.

4

UNDERSTANDING YOUR INSTRUMENT PANEL

347

-------------------------------------------------------------------------------------------------------------------------------------------------------------

Supported MP3 File Formats

The radio will recognize only files with the *.MP3 exten-
sion as MP3 files. Non-MP3 files named with the *.MP3
extension may cause playback problems. The radio is
designed to recognize the file as an invalid MP3 and will
not play the file.

When using the MP3 encoder to compress audio data to
an MP3 file, the bit rate and sampling frequencies in the
following table are supported. In addition, variable bit
rates (VBR) are also supported. The majority of MP3 files
use a 44.1 kHz sampling rate and a 192, 160, 128, 96 or
VBR bit rates.

MPEG Specifi-

cation

Sampling Fre-

quency (kHz)

Bit Rate (kbps)

MPEG-1 Audio

Layer 3

48, 44.1, 32

320, 256, 224,
192, 160, 128,

112, 96, 80, 64,

56, 48, 40, 32

MPEG-2 Audio

Layer 3

24, 22.05, 16

160, 128, 144,

112, 96, 80, 64,

56, 48, 40, 32,

24, 16, 8

ID3 Tag information for artist, song title, and album title
are supported for version 1 ID3 tags. ID3 version 2 is not
supported by the radios.

Playlist files are not supported. MP3 Pro files are not
supported.

348

UNDERSTANDING YOUR INSTRUMENT PANEL

-------------------------------------------------------------------------------------------------------------------------------------------------------------

Playback Of MP3 Files

When a medium containing MP3 data is loaded, the
radio checks all files on the medium. If the medium
contains a lot of folders or files, the radio will take more
time to start playing the MP3 files.

Loading times for playback of MP3 files may be affected
by the following:

• Media - CD-RW media may take longer to load than

CD-R media

• Medium formats - Multisession discs may take longer

to load than non-multisession discs

• Number of files and folders - Loading times will

increase with more files and folders

To increase the speed of disc loading, it is recommended
to use CD-R media and single-session discs. To create a
single-session disc, enable the “Disc at Once” option
before writing to the disc.

LIST Button — CD Mode For MP3 Play

Pushing the LIST button will bring up a list of all folders
on the disc. Scrolling up or down the list is done by
turning the TUNE/SCROLL control knob. Selecting a
folder by pushing the TUNE/SCROLL control knob will
begin playing the files contained in that folder (or the
next folder in sequence if the selection does not contain
playable files).

The folder list will time out after five seconds.

4

UNDERSTANDING YOUR INSTRUMENT PANEL

349

-------------------------------------------------------------------------------------------------------------------------------------------------------------

INFO Button — CD Mode For MP3 Play

Pushing the INFO button repeatedly will scroll through
the following TAG information: Song Title, Artist, File
Name, and Folder Name (if available).

Push the INFO button once more to return to

⬙elapsed

time

⬙ priority mode.

Push and hold the INFO button for three seconds or more
and the radio will display song titles for each file.

Push and hold the INFO button again for three seconds
to return to

⬙elapsed time⬙ display.

Operation Instructions — Auxiliary Mode

The auxiliary (AUX) jack is an audio input jack which
allows the user to plug in a portable device such as an
MP3 player or iPod® and utilize the vehicle’s audio
system to amplify the source and play through the
vehicle speakers.

Pushing the AUX button will change the mode to auxil-
iary device if the AUX jack is connected.

NOTE:

The AUX device must be turned on and the

device’s volume set to the proper level. If the AUX audio
is not loud enough, turn the device’s volume up. If the
AUX audio sounds distorted, turn the device’s volume
down.

TIME Button (Auxiliary Mode)

Push this button to change the display to time of day. The
time of day will display for five seconds (when the
ignition is OFF).

Uconnect® (Satellite Radio) — If Equipped

Satellite radio uses direct satellite-to-receiver broadcast-
ing technology to provide clear digital sound, coast to
coast. The subscription service provider is Sirius Satellite
Radio. This service offers over 130 channels of music,

350

UNDERSTANDING YOUR INSTRUMENT PANEL

-------------------------------------------------------------------------------------------------------------------------------------------------------------

sports, news, entertainment, and programming for chil-
dren, directly from its satellites and broadcasting studios.

NOTE:

Sirius service is not available in Hawaii and has

limited coverage in Alaska.

System Activation

Sirius Satellite Radio service is pre-activated, and you
may begin listening immediately to the one year of audio
service that is included with the factory-installed satellite
radio system in your vehicle. Sirius will supply a wel-
come kit that contains general information, including
how to setup your on-line listening account. For further
information, call the toll-free number 888-539-7474, or
visit the Sirius web site at www.siriusxm.com, or at
www.siriusxm.ca for Canadian residents.

Electronic Serial Number/Sirius Identification
Number (ESN/SID)

Please have the following information available when
calling:

1. The Electronic Serial Number/Sirius Identification

Number (ESN/SID).

2. Your Vehicle Identification Number.

To access the ESN/SID, refer to the following steps:

ESN/SID Access

With the ignition switch in the ON/RUN or ACC posi-
tion and the radio on, push the SETUP button and scroll
using the TUNE/SCROLL control knob until Sirius ID is
selected. Push the TUNE/SCROLL control knob and the
Sirius ID number will display. The Sirius ID number
display will time out in two minutes. Push any button on
the radio to exit this screen.

4

UNDERSTANDING YOUR INSTRUMENT PANEL

351

-------------------------------------------------------------------------------------------------------------------------------------------------------------

Selecting Uconnect® (Satellite) Mode

Push the SAT button until

⬙SAT⬙ appears in the display. A

CD may remain in the radio while in the Satellite radio
mode.

Satellite Antenna

To ensure optimum reception, do not place items on the
roof around the rooftop antenna location. Metal objects
placed within the line of sight of the antenna will cause
decreased performance. Larger luggage items such as
bikes should be placed as far rearward as possible, within
the loading design of the rack. Do not place items directly
on or above the antenna.

Reception Quality

Satellite reception may be interrupted due to one of the
following reasons:

• The vehicle is parked in an underground parking

structure or under a physical obstacle.

• Dense tree coverage may interrupt reception in the

form of short audio mutes.

• Driving under wide bridges or along tall buildings can

cause intermittent reception.

• Placing objects over or too close to the antenna can

cause signal blockage.

Operating Instructions — Uconnect® (Satellite)
Mode

NOTE:

The ignition switch must be in the ON/RUN or

ACC position to operate the radio.

SEEK Buttons

Push and release the SEEK buttons to search for the next
listenable station in AM/FM mode. Push the right switch
to seek up and the left switch to seek down. The radio
will remain tuned to the new station until you make
another selection. Holding either button will bypass
stations without stopping, until you release it.

352

UNDERSTANDING YOUR INSTRUMENT PANEL

-------------------------------------------------------------------------------------------------------------------------------------------------------------

SCAN Button

Pushing the SCAN button causes the tuner to search for
the next channel, pausing for eight seconds before con-
tinuing to the next. To stop the search, push the SCAN
button a second time.

INFO Button

Pushing the INFO button will cycle the display informa-
tion between Artist, Song Title, and Composer (if avail-
able). Also, pushing and holding the INFO button for an
additional three seconds will make the radio display the
Song Title all of the time (push and hold again to return
to normal display).

RW/FF

Pushing the RW (Rewind) or FF (Fast Forward) buttons
causes the tuner to search for the next channel in the
direction of the arrows.

TUNE Control (Rotary)

Turn the rotary TUNE/SCROLL control knob clockwise
to increase or counterclockwise to decrease the channel.

MUSIC TYPE Button

Pushing this button once will turn on the Music Type mode
for five seconds. Pushing the MUSIC TYPE button or
turning the TUNE/SCROLL control knob within five sec-
onds will allow the program format type to be selected.

Toggle the MUSIC TYPE button again to select the music
type.

By pushing the SEEK button when the Music Type
function is active, the radio will be tuned to the next
channel with the same selected Music Type name.

If a preset button is activated while in the Music Type
(Program Type) mode, the Music Type mode will be
exited and the radio will tune to the preset channel.

4

UNDERSTANDING YOUR INSTRUMENT PANEL

353

-------------------------------------------------------------------------------------------------------------------------------------------------------------

SETUP Button

Pushing the SETUP button allows you to select the
following items:

• Display Sirius ID number — Push the AUDIO/

SELECT button to display the Sirius ID number. This
number is used to activate, deactivate, or change the
Sirius subscription.

SET Button — To Set The Pushbutton Memory

When you are receiving a channel that you wish to
commit to pushbutton memory, push the SET button. The
symbol SET 1 will now show in the display window.
Select the button (1-6) you wish to lock onto this channel
and push and release that button. If a button is not
selected within five seconds after pushing the SET but-
ton, the channel will continue to play but will not be
stored into pushbutton memory.

You may add a second channel to each pushbutton by
repeating the above procedure with this exception: Push
the SET button twice and SET 2 will show in the display
window. Each button can be set for SET 1 and SET 2. This
allows a total of 12 Satellite channels to be stored into
pushbutton memory. The channels stored in SET 2
memory can be selected by pushing the pushbutton
twice.

Every time a preset button is used, a corresponding
button number will display.

Buttons 1 - 6

These buttons tune the radio to the channels that you
commit to pushbutton memory (12 Satellite stations).

354

UNDERSTANDING YOUR INSTRUMENT PANEL

-------------------------------------------------------------------------------------------------------------------------------------------------------------

Operating Instructions (Uconnect® Phone) —
If Equipped

Refer to “Uconnect® Phone” for further details.

iPod®/USB/MP3 CONTROL — IF EQUIPPED

NOTE:

This section is for Uconnect® 130/230 radios

only. For Uconnect® 430/430N, 730N, 731N, 735N or 431
touchscreen radio iPod®/USB/MP3 control feature, refer
to the separate Supplement Manual. iPod®/USB/MP3
control is available only if equipped as an option with
these radios.

This feature allows an iPod® or external USB device to be
plugged into the USB port, located in the glove compart-
ment.

iPod® control supports Mini, 4G, Photo, Nano, 5G iPod®
and iPhone® devices. Some iPod® software versions
may not fully support the iPod® control features. Please
visit Apple’s website for software updates.

NOTE:

• If the radio has a USB port, refer to the appropriate

Uconnect® Multimedia radio User’s Manual for
iPod® or external USB device support capability.

• Connecting an iPod® or consumer electronic audio

device to the AUX port located in the radio faceplate,
plays media, but does not use the iPod® / MP3 control
feature to control the connected device.

4

UNDERSTANDING YOUR INSTRUMENT PANEL

355

-------------------------------------------------------------------------------------------------------------------------------------------------------------

Connecting The iPod® Or External USB Device

Use the connection cable to connect an iPod® or external
USB device to the vehicle’s USB connector port which is
located in the glove compartment.

NOTE:

The glove compartment will have a position

where the iPod® or consumer electronic audio device
cable can be routed through without damaging the cable
when closing the lid. This allows routing of the cable
without damaging it while closing the lid. If a cut out is
not available in the glove compartment, route the cable
away from the lid latch and in a place that will allow the
lid to close without damaging the cable.

Once the audio device is connected and synchronized to
the vehicle’s iPod®/USB/MP3 control system (iPod® or
external USB device may take a few minutes to connect),
the audio device starts charging and is ready for use by
pressing radio switches, as described below.

NOTE:

If the audio device battery is completely dis-

charged, it may not communicate with the iPod®/USB/
MP3 control system until a minimum charge is attained.
Leaving the audio device connected to the iPod®/USB/
MP3 control system may charge it to the required level.

USB Port

356

UNDERSTANDING YOUR INSTRUMENT PANEL

-------------------------------------------------------------------------------------------------------------------------------------------------------------

Using This Feature

By using an iPod® cable, or an external USB device to
connect to the USB port:

• The audio device can be played on the vehicle’s sound

system, providing metadata (artist, track title, album,
etc.) information on the radio display.

• The audio device can be controlled using the radio

buttons to Play, Browse, and List the iPod® contents.

• The audio device battery charges when plugged into

the USB/AUX connector (if supported by the specific
audio device).

Controlling The iPod® Or External USB Device
Using Radio Buttons

To enter the iPod®/USB/MP3 control mode and access a
connected audio device, either push the “AUX” button
on the radio faceplate or push the VR button and say

⬙USB⬙ or ⬙Switch to USB.⬙ Once in the iPod®/USB/MP3

control mode, audio tracks (if available from audio
device) start playing over the vehicle’s audio system.

Play Mode

When switched to iPod®/USB/MP3 control mode, the
iPod® or external USB device automatically starts Play
mode. In Play mode, the following buttons on the radio
faceplate may be used to control the iPod® or external
USB device and display data:

• Use the TUNE control knob to select the next or

previous track.

• Turning it clockwise (forward) by one click, while

playing a track, skips to the next track or push the VR
button and say

⬙Next Track.⬙

• Turning it counterclockwise (backward) by one click,

will jump to the previous track in the list or push the
VR button and say

⬙Previous Track.⬙

4

UNDERSTANDING YOUR INSTRUMENT PANEL

357

-------------------------------------------------------------------------------------------------------------------------------------------------------------


Content      ..     20      21      22      23     ..