Chrysler 200 Convertible (2013 year). Manual - part 5


  Index      Chrysler     Chrysler 200 Convertible (2013 year) - manual in english


Search            copyright infringement  


Content      ..     3      4      5      6     ..


Chrysler 200 Convertible (2013 year). Manual - part 5


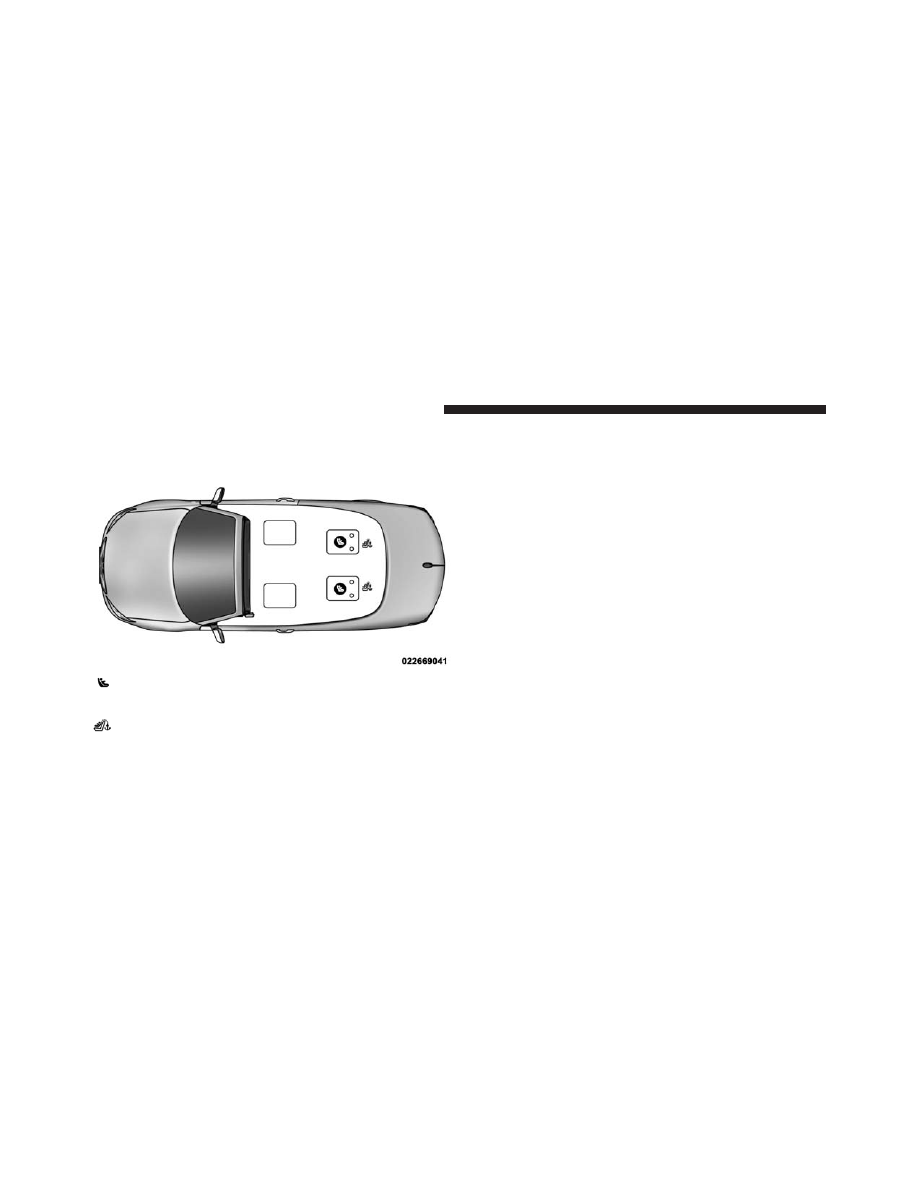
LATCH Positions For Installing Child Restraints In This Vehicle

Lower Anchorage Symbol 2 anchorages per seating

position

Top Tether Anchorage Symbol

76

THINGS TO KNOW BEFORE STARTING YOUR VEHICLE

-------------------------------------------------------------------------------------------------------------------------------------------------------------

What is the weight limit (child’s weight +
weight of the child restraint) for using the
LATCH anchorage system to attach the child
restraint?

65 lbs (29.5 kg)

Use the LATCH anchorage system until

the combined weight of the child and the

child restraint is 65 lbs (29.5 kg). Use the

seat belt alone instead of the LATCH an-

chorage system once the combined weight

is more than 65 lbs (29.5 kg).

Can the LATCH anchorages and the seat

belt be used together to attach a rear-

facing or forward-facing child restraint?

No

Do not use the seat belt when you use the

LATCH anchorage system to attach a rear-

facing or forward-facing child restraint.

Can two child restraints be attached using

a common lower LATCH anchorage?

No

Never “share” a LATCH anchorage with

two or more child restraints. If the center

position does not have dedicated LATCH

lower anchorages, use the seat belt to in-

stall a child seat in the center position next

to a child seat using the LATCH anchor-

ages in an outboard position.

2

THINGS TO KNOW BEFORE STARTING YOUR VEHICLE

77

-------------------------------------------------------------------------------------------------------------------------------------------------------------

Can the rear-facing child restraint touch

the back of the front passenger seat?

Yes

The child seat may touch the back of the

front passenger seat if the child restraint

manufacturer also allows contact. See your

child restraint owner’s manual for more

information.

Can the head restraints be removed?

No

Locating The LATCH Anchorages

The lower anchorages are round bars that are
found at the rear of the seat cushion where it
meets the seatback, below the anchorage sym-
bols on the seatback. They are just visible when

you lean into the rear seat to install the child restraint.
You will easily feel them if you run your finger along gap
between the seatback and seat cushion.

Rear Seat LATCH Anchorages

78

THINGS TO KNOW BEFORE STARTING YOUR VEHICLE

-------------------------------------------------------------------------------------------------------------------------------------------------------------

Locating The LATCH Anchorages

In addition, there are tether strap anchorages
behind each rear seating position. Access ports
to the tether anchors are located in the panel
between the rear seat and the rear window. The

tether anchors are underneath access covers in the carpet
covering the back of the seat where you see the tether
anchorage symbol.

Child Tether Access Port Cover

A — Cover

B — Tether Strap Hook

2

THINGS TO KNOW BEFORE STARTING YOUR VEHICLE

79

-------------------------------------------------------------------------------------------------------------------------------------------------------------

LATCH-compatible child restraint systems will be
equipped with a rigid bar or a flexible strap on each side.
Each will have a hook or connector to attach to the lower

anchorage and a way to tighten the connection to the
anchorage. Forward-facing child restraints and some
rear-facing infant restraints will also be equipped with a
tether strap. The tether strap will have a hook at the end
to attach to the top tether anchorage and a way to tighten
the strap after it is attached to the anchorage.

Center Seat LATCH

WARNING!

This vehicle does not have a center seating position.
Do not use the center lower LATCH anchorages to
install a child seat in the center of the back seat.

Always follow the directions of the child restraint manu-
facturer when installing your child restraint. Not all child
restraint systems will be installed as described here.

Child Tether Anchor

C — Attaching Strap

D — Tether Anchor

80

THINGS TO KNOW BEFORE STARTING YOUR VEHICLE

-------------------------------------------------------------------------------------------------------------------------------------------------------------

To Install A LATCH-compatible Child Restraint:

1. If the selected seating position has a Switchable Auto-

matic Locking Retractor (ALR) seat belt, stow the seat
belt, following the instructions below. See the section
“Installing Child Restraints Using the Vehicle Seat
Belt” to check what type of seat belt each seating
position has.

2. Loosen the adjusters on the lower straps and on the

tether strap of the child seat so that you can more
easily attach the hooks or connectors to the vehicle
anchorages.

3. Place the child seat between the lower anchorages for

that seating position. For some second row seats, you
may need to recline the seat and / or raise the head
restraint to get a better fit.

4. Attach the lower hooks or connectors of the child

restraint to the lower anchorages in the selected seat-
ing position.

5. If the child restraint has a tether strap, connect it to the

top tether anchorage. See the section “Installing Child
Restraints Using the Top Tether Anchorage” for direc-
tions to attach a tether anchor.

6. Tighten all of the straps as you push the child restraint

rearward and downward into the seat. Remove slack
in the straps according to the child restraint manufac-
turer’s instructions.

7. Test that the child restraint is installed tightly by

pulling back and forth on the child seat at the belt
path. It should not move more than 1 inch (25.4 mm)
in any direction.

2

THINGS TO KNOW BEFORE STARTING YOUR VEHICLE

81

-------------------------------------------------------------------------------------------------------------------------------------------------------------

How To Stow An Unused ALR Seatbelt

When using the LATCH attaching system to install a
child restraint, stow all ALR seat belts that are not being
used by other occupants or being used to secure child
restraints. An unused belt could injure a child if they play
with it and accidentally lock the seatbelt retractor. Before
installing a child restraint using the LATCH system,
buckle the seat belt behind the child restraint and out of
the child’s reach. If the buckled seat belt interferes with
the child restraint installation, instead of buckling it
behind the child restraint, route the seat belt through the
child restraint belt path and then buckle it. Do not lock
the seatbelt. Remind all children in the vehicle that the
seat belts are not toys and that they should not play with
them.

WARNING!

Improper installation of a child restraint to the
LATCH anchorages can lead to failure of the re-
straint. The child could be badly injured or killed.
Follow the child restraint manufacturer’s directions
exactly when installing an infant or child restraint.

82

THINGS TO KNOW BEFORE STARTING YOUR VEHICLE

-------------------------------------------------------------------------------------------------------------------------------------------------------------

Installing Child Restraints Using The Vehicle Seat
Belt

The seat belts in the passenger seating positions are
equipped with either a Switchable Automatic Locking
Retractor (ALR) or a cinching latch plate or both. Both
types of seat belts are designed to keep the lap portion of
the seat belt tight around the child restraint so that it is
not necessary to use a locking clip. The ALR retractor can
be “switched” into a locked mode by pulling all of the
webbing out of the retractor and then letting the webbing

retract back into the retractor. If it is locked, the ALR will
make a clicking noise while the webbing is pulled back
into the retractor. For additional information on ALR,
refer to the “Automatic Locking Mode” description un-
der “Occupant Restraints.” The cinching latch plate is
designed to hold the lap portion of the seatbelt tight
when webbing is pulled tight and straight through a
child restraint’s belt path. Please see the table below and
the following sections for more information about both
types of seat belts.

2

THINGS TO KNOW BEFORE STARTING YOUR VEHICLE

83

-------------------------------------------------------------------------------------------------------------------------------------------------------------

Lap/Shoulder Belt Systems for Installing Child Restraints in this Vehicle

84

THINGS TO KNOW BEFORE STARTING YOUR VEHICLE

-------------------------------------------------------------------------------------------------------------------------------------------------------------

What is the weight limit (child’s weight +
weight of the child restraint) for using the
Tether Anchor with the seat belt to attach a
forward facing child restraint?

65 lbs (29.5 kg)

The Tether Anchor can be used with the seat
belt until the combined weight of the child
and the child restraint is 65 lbs (29.5 kg). Use
the seat belt without the Tether Anchor once
the combined weight is more than 65 lbs
(29.5 kg).

Can the rear-facing child restraint touch the
back of the front passenger seat?

Yes

Contact between the front passenger seat and
the child restraint is allowed, if the child
restraint manufacturer also allows contact.

Can the head restraints be removed?

No

Can the buckle stalk be twisted to tighten the
seat belt against the belt path of the child
restraint?

Yes

In positions with cinching latch plates
(CINCH), the buckle stalk may be twisted up
to 3 full turns. Do not twist the buckle stalk in
a seating position with an ALR retractor.

2

THINGS TO KNOW BEFORE STARTING YOUR VEHICLE

85

-------------------------------------------------------------------------------------------------------------------------------------------------------------

Installing A Child Restraint with a Switchable
Automatic Locking Retractor (ALR):

1. Place the child seat in the center of the seating

position. For some second row seats, you may need to
recline the seat and/or raise the head restraint to get a
better fit.

2. Pull enough of the seat belt webbing from the retractor

to pass it through the belt path of the child restraint.
Do not twist the belt webbing in the belt path.

3. Slide the latch plate into the buckle until you hear a

“click.”

4. Pull on the webbing to make the lap portion tight

against the child seat.

5. To lock the seat belt, pull down on the shoulder part of

the belt until you have pulled all the seat belt webbing
out of the retractor. Then, allow the webbing to retract
back into the retractor. As the webbing retracts, you
will hear a clicking sound. This means the seat belt is
now in the Automatic Locking mode.

6. Try to pull the webbing out of the retractor. If it is

locked, you should not be able to pull out any web-
bing. If the retractor is not locked, repeat step 5.

7. Finally, pull up on any excess webbing to tighten the

lap portion around the child restraint while you push
the child restraint rearward and downward into the
vehicle seat.

86

THINGS TO KNOW BEFORE STARTING YOUR VEHICLE

-------------------------------------------------------------------------------------------------------------------------------------------------------------

8. If the child restraint has a top tether strap and the

seating position has a top tether anchorage, connect
the tether strap to the anchorage and tighten the tether
strap. Refer to “Lower Anchors and Tethers for Chil-
dren (LATCH) Restraint System” for directions to
attach a tether anchor.

9. Test that the child restraint is installed tightly by

pulling back and forth on the child seat at the belt
path. It should not move more than 1 inch (25.4 mm)
in any direction.

Any seat belt system will loosen with time, so check the
belt occasionally, and pull it tight if necessary.

Installing A Child Restraint With A Cinching
Latch Plate (CINCH) — If Equipped

1. Place the child seat in the center of the seating

position. For some second row seats, you may need to
recline the seat and / or raise the head restraint to get
a better fit.

2. Next, pull enough of the seat belt webbing from the

retractor to pass it through the belt path of the child
restraint. Do not twist the belt webbing in the belt
path.

3. Slide the latch plate into the buckle until you hear a

“click.”

4. Finally, pull up on any excess webbing to tighten the

lap portion around the child restraint while you push
the child restraint rearward and downward into the
vehicle seat.

2

THINGS TO KNOW BEFORE STARTING YOUR VEHICLE

87

-------------------------------------------------------------------------------------------------------------------------------------------------------------

5. If the child restraint has a top tether strap and the

seating position has a top tether anchorage, connect
the tether strap to the anchorage and tighten the tether
strap. Refer to “Lower Anchors and Tethers for Chil-
dren (LATCH) Restraint System” for directions to
attach a tether anchor.

6. Test that the child restraint is installed tightly by

pulling back and forth on the child seat at the belt
path. It should not move more than 1 inch (25.4 mm)
in any direction.

Any seat belt system will loosen with time, so check the
belt occasionally, and pull it tight if necessary.

If the buckle or the cinching latch plate is too close to the
belt path opening of the child restraint, you may have
trouble tightening the seat belt. If this happens, discon-
nect the latch plate from the buckle and twist the short
buckle-end belt up to three full turns to shorten it. Insert
the latch plate into the buckle with the release button

facing out, away from the child restraint. Repeat steps 4
to 6, above, to complete the installation of the child
restraint.

If the belt still cannot be tightened after you shorten the
buckle, disconnect the latch plate from the buckle, turn
the buckle around one half turn, and insert the latch plate
into the buckle again. If you still cannot make the child
restraint installation tight, try a different seating position.

Installing Child Restraints Using The Top Tether
Anchorage

1. If lowered, raise the convertible top. The convertible

top must be in the UP position to access the tether
anchor.

2. Open the access port cover (A) behind the seat where

you are placing the child restraint.

88

THINGS TO KNOW BEFORE STARTING YOUR VEHICLE

-------------------------------------------------------------------------------------------------------------------------------------------------------------

3. Push the tether strap and hook (B) through the access

port and down into the trunk. Route the tether strap to
provide the most direct path from the child seat to the
anchor.

4. Open the access cover (C) on the carpet covering the

back of the seat and attach the tether strap hook (D) to
the anchor.

5. Remove slack in the tether strap according to the child

restraint manufacturer’s instructions.

Child Tether Access Port Cover

Child Tether Anchor

2

THINGS TO KNOW BEFORE STARTING YOUR VEHICLE

89

-------------------------------------------------------------------------------------------------------------------------------------------------------------

Transporting Pets

Air Bags deploying in the front seat could harm your pet.
An unrestrained pet will be thrown about and possibly
injured, or injure a passenger during panic braking or in
a collision.

Pets should be restrained in the rear seat in pet harnesses
or pet carriers that are secured by seat belts.

ENGINE BREAK-IN RECOMMENDATIONS

A long break-in period is not required for the engine and
drivetrain (transmission and axle) in your vehicle.

Drive moderately during the first 300 miles (500 km).
After the initial 60 miles (100 km), speeds up to 50 or
55 mph (80 or 90 km/h) are desirable.

While cruising, brief full-throttle acceleration within the
limits of local traffic laws contributes to a good break-in.
Wide-open throttle acceleration in low gear can be detri-
mental and should be avoided.

The engine oil installed in the engine at the factory is a
high-quality energy conserving type lubricant. Oil
changes should be consistent with anticipated climate
conditions under which vehicle operations will occur. For
the recommended viscosity and quality grades, refer to
“Maintenance Procedures” in “Maintaining Your Ve-
hicle”.

CAUTION!

Never use Non-Detergent Oil or Straight Mineral Oil
in the engine or damage may result.

90

THINGS TO KNOW BEFORE STARTING YOUR VEHICLE

-------------------------------------------------------------------------------------------------------------------------------------------------------------

NOTE:

A new engine may consume some oil during its

first few thousand miles (kilometers) of operation. This
should be considered a normal part of the break-in and
not interpreted as an indication of difficulty.

SAFETY TIPS

Transporting Passengers

NEVER TRANSPORT PASSENGERS IN THE CARGO
AREA.

WARNING!

• Do not leave children or animals inside parked

vehicles in hot weather. Interior heat build-up may
cause serious injury or death.

(Continued)

WARNING! (Continued)

• It is extremely dangerous to ride in a cargo area,

inside or outside of a vehicle. In a collision, people
riding in these areas are more likely to be seriously
injured or killed.

• Do not allow people to ride in any area of your

vehicle that is not equipped with seats and seat
belts.

• Be sure everyone in your vehicle is in a seat and

using a seat belt properly.

Exhaust Gas

WARNING!

Exhaust gases can injure or kill. They contain carbon
monoxide (CO), which is colorless and odorless.
Breathing it can make you unconscious and can

(Continued)

2

THINGS TO KNOW BEFORE STARTING YOUR VEHICLE

91

-------------------------------------------------------------------------------------------------------------------------------------------------------------


Content      ..     3      4      5      6     ..