Chrysler Sebring, Stratus sedan, Sebring Convertible. Manual - part 680


  Index      Chrysler     Chrysler Sebring, Stratus sedan, Sebring Convertible - service repair manual 2001-2007 year


Search            


Content   ..  678  679  680  681   ..


Chrysler Sebring, Stratus sedan, Sebring Convertible. Manual - part 680


REAR SEAT

DESCRIPTION

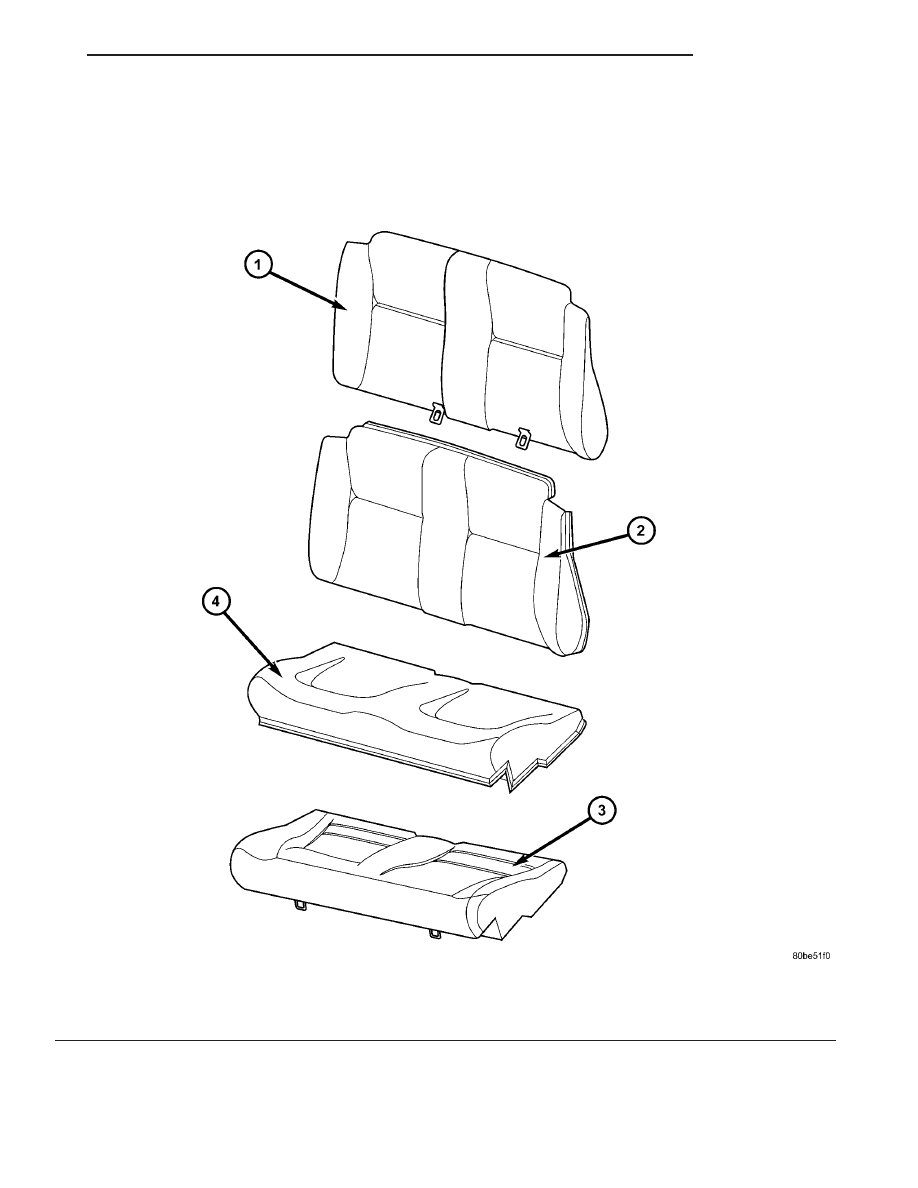
Refer to (Fig. 26) for more information while ser-

vicing the rear seat.

Fig. 26 Rear Seat Exploded View

1 - SEAT BACK FOAM AND FRAME
2 - SEAT BACK COVER

3 - SEAT CUSHION COVER
4 - SEAT CUSHION FOAM AND FRAME

JR

SEATS

23 - 117

REAR SEAT CUSHION

REMOVAL

REMOVAL - REAR

NOTE: Fabric covered cushions are serviced as an
assembly.

(1) Pull upward at forward edge of cushion each

retainer loop of the rear seat cushion to disengage
retainer loops from cups in floor (Fig. 27).

(2) Guild seat belts through loops.
(3) Remove rear seat cushion from vehicle.

REMOVAL - JR-27 ONLY

NOTE: Special care should be taken when removing
rear seat cushion to prevent damage to the cushion
frame. Remove cushion at attachment areas, not at
wing area.

(1) Push firmly rearward and upward at one

attachment point and disengage wire loops from
retainers in floor pan (Fig. 28).

(2) Repeat for other attachment point.
(3) Separate rear seat cushion from vehicle.

INSTALLATION

INSTALLATION - REAR

NOTE: Fabric covered cushions are serviced as an
assembly.

NOTE: Verify visibility of “Latch” bars in the seat
bite area.

(1) Place rear seat cushion in position.
(2) Guild seat belts through loops.
(3) Engage retainer loops into cup on floor kick-up.
(4) Push downward at forward edge at each

retainer loop of the rear seat cushion to engage
retainers.

INSTALLATION - JR-27 ONLY

NOTE: Special care should be taken when removing
rear seat cushion to prevent damage to the cushion
frame. Remove cushion at attachment areas, not at
wing area.

(1) Position rear seat cushion in vehicle.
(2) Place inner seat belts on top of seat cushion.
(3) Push seat cushion rearward and align wire

loops to retainers in floor pan.

(4) Push rear seat cushion firmly downward and

engage wire loops to retainers in floor pan.

Fig. 27 Rear Seat Cushion

1 - RETAINER LOOP
2 - REAR SEAT BACK
3 - REAR SEAT CUSHION
4 - CUPS

Fig. 28 Rear Seat Cushion

1 - REAR SEAT BACK
2 - REAR SEAT CUSHION
3 - INNER SEAT BELTS

23 - 118

SEATS

JR

REAR SEAT CUSHION COVER

REMOVAL

REMOVAL - REAR SEAT CUSHION COVER

(1) Remove rear seat cushion.
(2) Disengage the J-strap retainers (Fig. 29).
(3) Cut hog rings to free cover (Fig. 30).
(4) Remove seat cushion cover from seat cushion.

REMOVAL - JR-27 ONLY

(1) Remove rear seat cushion from vehicle (Refer

to 23 - BODY/SEATS/SEAT CUSHION - REMOVAL).

(2) Place seat cushion on a suitable work surface

in inverted position.

(3) Remove hog rings around perimeter of seat

cushion attaching seat cushion cover to seat cushion
frame.

(4) Pull seat cover from seat cushion frame and

seat cushion foam.

(5) Remove hog rings attaching seat cover seam

wires to seat foam wires.

(6) Remove seat cover from seat frame and seat

cushion foam.

INSTALLATION

INSTALLATION - REAR SEAT CUSHION COVER

(1) Position seat cushion cover on cushion.
(2) Install hog rings to seat cover.
(3) Engage the J-strap retainers.
(4) Steam wrinkles from seat cushion, if necessary.
(5) Install seat cushion.

INSTALLATION - JR-27 ONLY

(1) Position seat cushion cover to seat cushion

frame and seat cushion foam.

(2) Install a hog ring at each hog ring location to

attach seat cushion cover seam wires to wires in seat
cushion foam. Begin at center location and work out-
ward.

(3) Repeat above steps for opposite inboard vertical

seam, both outboard vertical seams, and for the hor-
izontal seams.

(4) Pull seat cover over seat cushion frame and

seat cushion foam.

(5) Install hog rings at hog ring locators around

perimeter of seat cushion foam attaching seat cush-
ion cover to seat cushion frame.

(6) Install rear seat cushion to vehicle (Refer to 23

- BODY/SEATS/SEAT CUSHION - INSTALLATION).

REAR SEAT BACK

REMOVAL

REMOVAL - FOLDING BACK

NOTE: Fabric covered cushions are serviced as an
assembly.

(1) Remove rear seat cushion. (Refer to 23 - BODY/

SEATS/SEAT CUSHION - REMOVAL)

(2) Remove the rear seat buckles and belt anchors.

(Refer

to

8

-

ELECTRICAL/RESTRAINTS/SEAT

BELT - REAR INBOARD - REMOVAL)

(3) Remove the outer seat back bracket nuts (Fig.

31).

(4) Release folding rear seat back latches.
(5) Remove seat back from vehicle.

REMOVAL - JR-27 ONLY

(1) Remove rear seat cushion (Refer to 23 - BODY/

SEATS/SEAT CUSHION - REMOVAL).

Fig. 29 Rear Seat Cushion Cover J-Straps

1 - J-STRAPS

Fig. 30 Rear Seat Cushion Cover Hog Rings

1 - HOG RINGS

JR

SEATS

23 - 119

(2) Pull bottom of rear seat back forward until seat

back brackets clear studs on floor pan (Fig. 32).

(3) Push upward on rear seat back and disengage

hooks attaching seat back to rear seat back support.

(4) Remove rear seat back from vehicle.

INSTALLATION

INSTALLATION - FOLDING BACK

NOTE: Fabric covered cushions are serviced as an
assembly.

(1) Place the four seat back brackets over the body

mounted weld studs and position seat back in vehi-
cle.

(2) Engage folding rear seat back latch.
(3) Install the outer seat back bracket nuts and

tighten to 61 Nm (45 ft. lbs.).

(4) Install the rear seat buckles and belt anchors.

(Refer

to

8

-

ELECTRICAL/RESTRAINTS/SEAT

BELT - REAR INBOARD - INSTALLATION)

(5) Install rear seat cushion. (Refer to 23 - BODY/

SEATS/SEAT CUSHION - INSTALLATION)

INSTALLATION - JR-27 ONLY

(1) Position rear seat back in vehicle.
(2) Tilt rear seat back rearward and raise seat

back above retaining brackets on rear seat back sup-
port.

(3) Lower rear seat back until center loop begins

to engage.

(4) Lower rear seat back and push rearward on

outboard corners of seat back to engage outboard
hooks to brackets on rear seat back support.

(5) Push downward on rear seat back until all

hooks are fully engaged into retaining brackets.

(6) Install rear seat cushion.

REAR SEAT BACK COVER

REMOVAL - JR-27 ONLY

(1) Remove rear seat back from vehicle (Refer to

23 - BODY/SEATS/REAR SEAT BACK - REMOVAL).

(2) Place seat back on a suitable work surface in

inverted position.

(3) Remove hog rings around perimeter of seat

back holding seat back cover to seat back frame.

(4) Pull seat cover from seat back frame and seat

back foam.

(5) Remove any hog rings holding seat cover seam

wires to seat foam wires.

(6) Remove seat cover from seat frame and seat

back foam.

INSTALLATION - JR-27 ONLY

(1) Position seat cover to seat back frame and seat

back foam.

(2) Align notch in center of seat back cover vertical

seam to center hog ring locator.

(3) Install a hog ring at each hog ring location,

center first, attaching seat back cover seam to wires
in seat back foam.

(4) Repeat the above steps for the opposite inboard

vertical seam, both outboard vertical seams, and the
lower horizontal seam.

(5) Install hog rings at each hog ring locator, cen-

ter first, to attach ends of vertical portions of
U-shaped wires to vertical foam wires.

(6) Align notch in center of upper horizontal seat

cover seam to center hog ring location.

Fig. 31 REAR SEAT BACK

1 - SEAT BACK
2 - NUTS
3 - BRACKETS

Fig. 32 Rear Seat Back

1 - REAR SEAT BACK SUPPORT
2 - FLOOR PAN
3 - REAR SEAT BACK
4 - RETAINING BRACKET

23 - 120

SEATS

JR

REAR SEAT BACK (Continued)


Content   ..  678  679  680  681   ..