Chrysler RG Voyager. Manual - part 950
pressure. If the blue is transferred to the center of
valve face, contact is satisfactory. If the blue is trans-
ferred to top edge of valve face, lower valve seat with
a 15 degree stone. If the blue is transferred to the
bottom edge of valve face raise valve seat with a 65
degrees stone.
NOTE: Valve seats which are worn or burned can
be reworked, provided that correct angle and seat
width are maintained. Otherwise cylinder head must
be replaced.
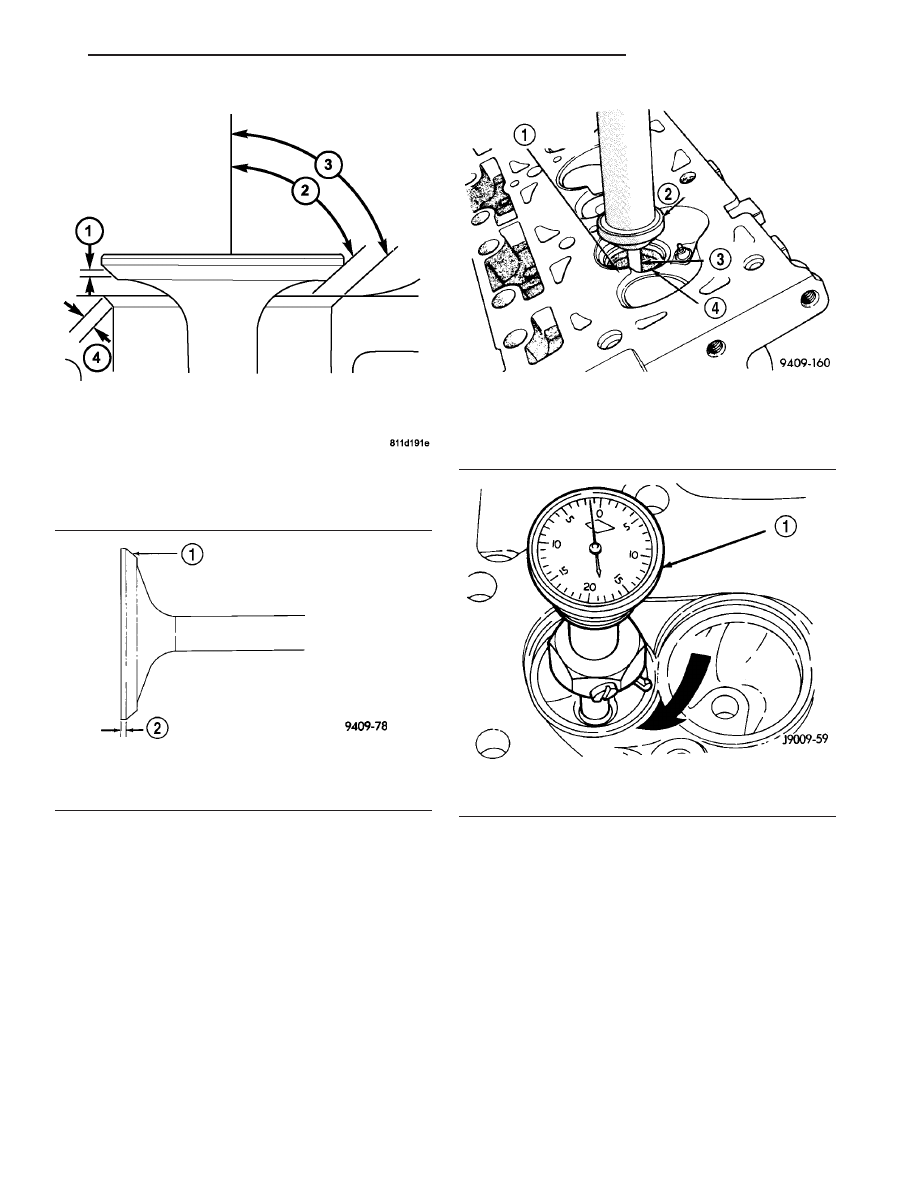
(4) When seat is properly positioned the width of
intake and exhaust seats should be 1.50–2.00 mm
(0.059–0.078 in.) (Fig. 28).
(5) After grinding the valve seats or faces, install
the valve in cylinder head and check valve installed
height by measuring from valve tip to spring seat
(Fig. 32). Remove valve from cylinder head and grind
valve tip until within specifications. Check valve tip
for scoring. The tip chamfer should be reground (if
necessary) to prevent seal damage when the valve is
installed.
(6) Check the valve spring installed height after
refacing the valve and seat (Fig. 32).
If valves and/or seats are reground, measure
the installed height of springs (Fig. 32), make
sure measurements are taken from top of
spring seat to the bottom surface of spring
retainer. If height is greater than specifica-
tions, install a 0.794 mm (0.0312 in.) spacer in
head counterbore to bring spring height back
within specifications.
Fig. 28 VALVE FACE AND SEAT
1 - VALVE FACE WIDTH
2 - VALVE FACE ANGLE
3 - SEAT ANGLE
4 - SEAT CONTACT AREA
Fig. 29 Valve Margin
1 - VALVE FACE
2 - VALVE MARGIN
Fig. 30 Refacing Valve Seats
1 - REFACING STONE MUST NOT CUT INTO CYLINDER HEAD
2 - STONE
3 - PILOT
4 - SEAT
Fig. 31 Measurement of Valve Seat Runout
1 - DIAL INDICATOR
RS
ENGINE 3.3/3.8L
9 - 109
INTAKE/EXHAUST VALVES & SEATS (Continued)