Chrysler RG Voyager. Manual - part 463
WARNING:
DO
NOT
REMOVE
THE
CYLINDER
BLOCK PLUG OR THE RADIATOR DRAINCOCK
WITH THE SYSTEM HOT AND UNDER PRESSURE
BECAUSE SERIOUS BURNS FROM COOLANT CAN
OCCUR.
(3) Drain the cooling system (Refer to 7 - COOL-
ING/ENGINE/COOLANT
-
STANDARD
PROCE-
DURE).
(4) Remove the radiator fans. (Refer to 7 - COOL-
ING/ENGINE/RADIATOR FAN - REMOVAL)
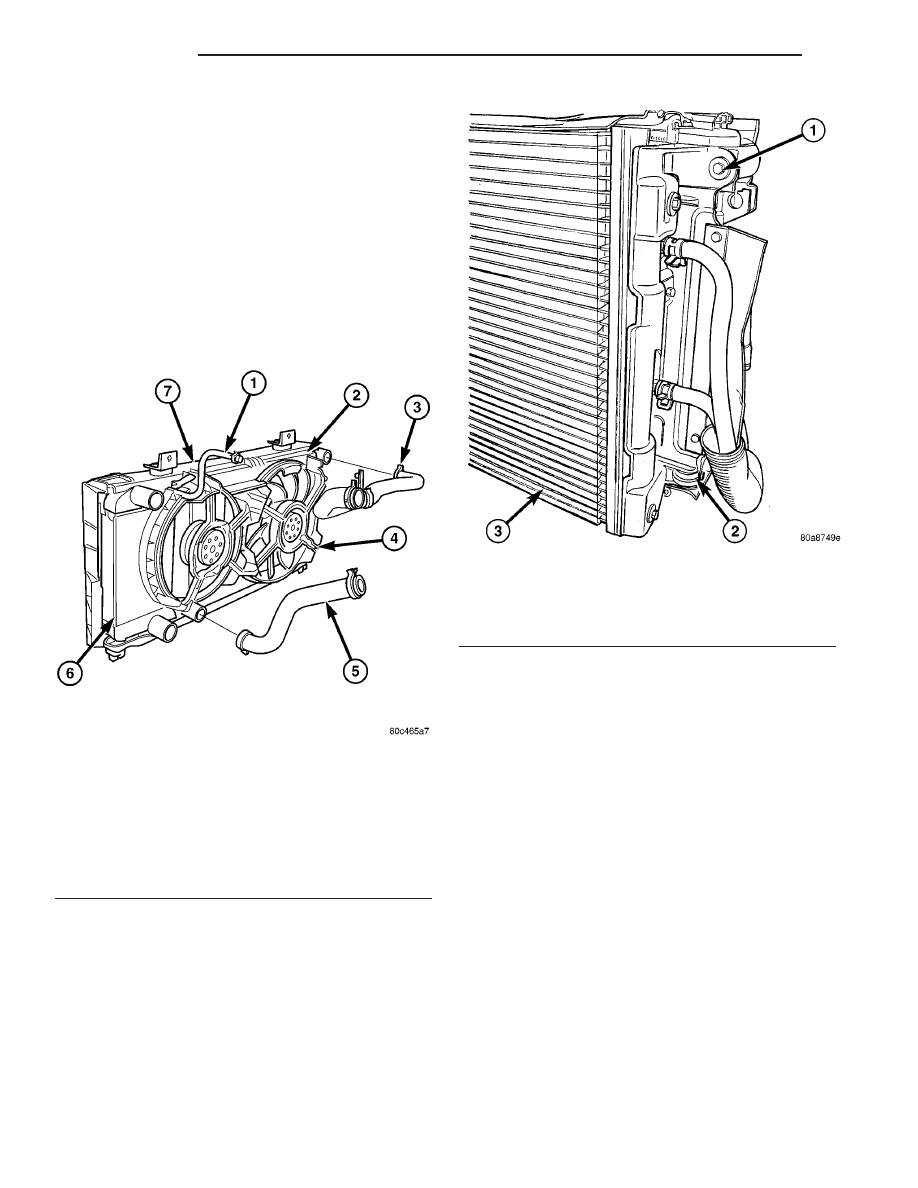
(5) Disconnect coolant bypass hose (Fig. 11).
(6) Disconnect upper and lower hoses from the
radiator (Fig. 11).
(7) Remove the A/C condenser side brackets to
radiator attaching screws (Fig. 12). Separate the con-
denser from the radiator by lifting upward to disen-
gage
from
lower
mounts
(Fig.
12).
Allow
the
condenser to rest in front of radiator.
(8) Radiator can now be lifted free from engine
compartment. Care should be taken not to dam-
age radiator cooling fins or water tubes during
removal.
INSTALLATION
(1)
Be sure the air seal is in position before
radiator is installed. Slide radiator down into posi-
tion. Seat the radiator with the rubber isolators into
the mounting holes provided, with a 10 lbs. force.
(2) Position air conditioning condenser onto the
radiator lower mounts and install upper screws (Fig.
12). Tighten fasteners to 5 N·m (45 in. lbs.).
(3) Install the radiator upper and lower hoses (Fig.
11).
(4) Connect the coolant bypass hose.
(5) Install the radiator fans. (Refer to 7 - COOL-
ING/ENGINE/RADIATOR FAN - INSTALLATION)
(6) Install the radiator upper crossmember sup-
port.
(Refer
to
23
-
BODY/EXTERIOR/GRILLE
OPENING REINFORCEMENT - INSTALLATION)
(7) Fill the cooling system (Refer to 7 - COOLING/
ENGINE/COOLANT - STANDARD PROCEDURE).
(8) Connect negative cable to battery.
Fig. 11 UPPER AND LOWER RADIATOR HOSES -
2.5L DIESEL SHOWN
1 - COOLANT BYPASS HOSE
2 - RADIATOR ASSEMBLY
3 - UPPER RADIATOR HOSE
4 - COOLING FAN
5 - LOWER RADIATOR HOSE
6 - CHARGE AIR COOLER
7 - RADIATOR BRACKET
Fig. 12 Radiator to A/C Condenser Mounting (left
mount shown, right similar)
1 - SCREW - A/C CONDENSER SIDE BRACKET TO RADIATOR
2 - LOWER MOUNT
3 - A/C CONDENSER
7a - 20
ENGINE
RG
RADIATOR (Continued)